

 TL;DR:
The quickest way to fix Windows 11/10 HDMI audio issues is to press Win + R, execute mmsys.cpl, and manually set your connected TV or monitor as the "Default Device" to override local laptop speaker priorities.
● If connecting to a 4K or 8K display, hardware prerequisites require an HDMI 2.0 or 2.1 cable, and any USB-C or DisplayPort to HDMI adapters must explicitly support "Audio Pass-through" to prevent video-only transmission.
● For displays completely missing from the playback list, right-click the empty space to check "Show Disabled Devices" and "Show disconnected devices" before you can successfully enable the HDMI output.
● Address controller conflicts by opening the Device Manager (devmgmt.msc), revealing hidden files under System Devices, and specifically updating or enabling Intel, AMD, or NVIDIA High Definition Audio controllers rather than generic sound drivers.
Ask AI for a summary
 ChatGPT
 Perplexity
 Gemini
 Claude
 Grok
Grok
In today's digitally connected world, we depend on a seamless flow of audio and video content to keep us entertained and informed. One of the most common ways to transmit high-quality audio and video is through HDMI (high-definition media interface) connections. However, it's not uncommon to encounter the frustrating issue of HDMI audio not working on Windows 11/10. Imagine settling down for a movie night, only to find that the sound on your TV is not working with HDMI.
To help you overcome this challenge, we've compiled a comprehensive guide outlining 7 effective solutions to fix Windows 11/10 HDMI audio not working. Read on to discover how you can restore your audio and enjoy an uninterrupted entertainment experience.
Why Is Sound on TV Not Working with HDMI?
This issue can be caused by several factors. The problem could be with the computer, the HDMI cable itself, or the monitor or TV you are connecting to. Therefore the best way to test for all three is to first connect the HDMI cable to another computer. If there is no sound, then the problem could be the cable itself or the monitor/TV. You can also try to use a different HDMI cable. If the sound is still not working, then the PC or the TV/monitor could be the problem.
Other reasons could be malfunctioning, missing or outdated graphics drives, and a software issue with the PC. All these issues can be fixed using one or more of the solutions we'll see in the next part of this post.
HDMI Audio Troubleshooting Matrix
Use this table to identify which solution to prioritize based on your symptoms:
| Symptom | Probable Cause | Recommended Action |
| No HDMI option in Playback list | Disabled/Hidden Device | Method 3 (Enable Hidden Devices) |
| Video works, but No Sound | Wrong Default Output | Method 3 (Set Default) |
| "Peripheral Not Plugged In" error | Damaged Cable/Port | Method 2 (Hardware Check) |
| Audio stutters or cuts out | Driver Conflict | Method 4 & 6 (Update Drivers) |
| HDMI works on other PCs | Local Windows Service | Method 1 & 5 (Restart/Enable Controllers) |
How to Fix Windows 11/10 HDMI Audio Not Working
The following are the most effective ways to fix Windows 11/10 HDMI not working issue:
Method 1: Restart Your Computer
Since this problem can be caused by a settings or software issue, the first thing you should do is restart the computer. Restarting the computer can eliminate some of the conflicting settings and the system bugs that could be causing the issue.
To restart the computer, simply click on the start menu and then select the "Power" button to click on "Restart" from the power options presented. Wait for the computer to restart and then check if the problem has been fixed.
Method 2: Check Your Hardware Connections
Loose or improperly connected HDMI cables, damaged ports, or debris in the ports can cause audio issues. Ensuring that the hardware connections are secure and clean can help resolve the problem. Here are the steps:
- Turn off your computer and TV or monitor.
- Disconnect the HDMI cable from both devices.
- Check the HDMI ports for any damage or debris. Clean the ports if necessary.
- Reconnect the HDMI cable, ensuring it's firmly and securely connected.
- Turn on your computer and TV or monitor, and check if the HDMI audio is working.
Method 3: Set HDMI As the Default Playback Device
In many cases, Windows 10/11 defaults to your laptop speakers even when an HDMI cable is plugged in. Use these shortcuts to fix it:
| Task | Command / Action |
| Open Sound Settings | Press Win + R > type mmsys.cpl > Enter |
| View Hidden Devices | Right-click in the list > Check "Show Disabled Devices" |
| Activate Audio | Right-click the HDMI device > Enable |
| Primary Output | Select HDMI device > Click Set Default |
- Use the Windows Key + R on your keyboard to open the run dialogue box. Type in "mmsys.CPL" and then click "OK"
- In the window that appears, click on the "Playback" tab and then plug in the HDMI cable. It should appear in the list of devices usually as the name of the TV or monitor you are using. If it doesn't appear, right-click anywhere on the list and check "Show disabled devices" and "Show disconnected devices"
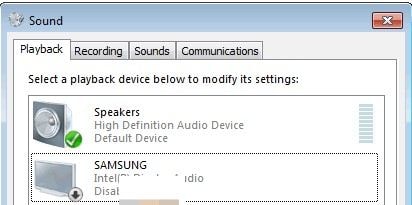
- When you see the HDMI audio device listed here, right-click on it and select "Enable". Now click on it again to select it and then click on "Set as Default". Click "OK".
Method 4: Update your Sound Drivers
Outdated sound drivers can cause this issue and many others. You may therefore want to check if the sound drivers on your computer are up to date and if not, update them. To do that, follow these simple steps:
- Open the run dialogue box again as we did in the first method above. Type in "devmgmt.msc" and then hit enter.
- Expand the "Sound, Video, and Game Controller" option and then right-click on the audio service driver. Select "Update driver Software".

- Select "Search Automatically for Updated Driver Software" and the computer will search for the driver updates online to install them.
Method 5: Enable Audio Controllers
Audio controllers determine how the audio system on your computer behaves. Disabling them can cause the audio system to malfunction. The following is how to re-enable them.
- Open the run dialogue box and once again, type in "devmgmt.msc". Click "OK" to continue.
- Click on "View" in the top menu and then check "Show hidden files".
- Click on the "System Devices" section to expand it and then look for audio controllers such as the "High Definition Audio Controller".
- Right-click on it and select "Properties". Click on the "Driver Tab" and then select "Enable".

- Repeat this process for all other audio controllers and then restart the PC when prompted.
Quick Summary for Audio Controllers:
- Path: Device Manager > System Devices.
- Target: Intel(R) Smart Sound Technology or High Definition Audio Controller.
- Action: If a yellow exclamation mark ⚠️ is present, right-click and select "Update."
Method 6: Update Graphics Card Drivers
You should also consider updating the graphics card drivers. Here's how to do that:
- Type in "Device Manager" in the search icon and then select the first result that appears.
- Select the graphics card drivers to expand then and then right-click on the ones you would like to update. Click on "Update Driver".

- Select "Search Automatically for Updated Driver Software" and Windows will find the latest driver update online and install it.
Method 7. Uninstall Graphic and Audio Drivers
If updating the drivers doesn't work, the best thing to do may be to uninstall the graphics and audio drivers. Follow these simple steps to do it:
- Type in "Uninstall a Program" in the search box and click on the first result.
- Locate the device or drivers on the list. Double-click on the driver to begin the process.
When the driver has been uninstalled, restart your PC.
By the way, if you're using a Dell computer, check how to fix the Dell audio not working issue.
How to Recover Lost Data from Windows with Recoverit
Very often, malfunctions with the Windows system can cause data loss on the PC. In such a situation, you must look for a good data recovery tool that can help you recover the data you've lost from the crashed Windows system easily and quickly. One of the most reliable data recovery programs in the market is Recoverit Data Recovery. It can help you recover the missing data on your device very easily since it has one of the highest recovery rates in the business.
Some of its other most notable features include the following:
Follow these simple steps to recover data from your device's hard drive using Recoverit:
Step 1: Choose the Drive Location
Download and install Recoverit on your computer and then double-click on the program's icon on your computer to run it. In the main window, select the drive that contains the missing data, in this case, the hard drive, and click "Start".

Step 2: Scan the Selected Location
Recoverit will immediately begin scanning the selected drive for the missing data. The process may take some time depending on the amount of data on the drive and the type of data on the drive.
If you see the files that you are looking for during the scan, you can press the "Pause" or the "Stop" to end the process.

Step 3: Preview and Recover the files
The program will then display all the recovered files on that drive. You can preview a file by clicking on the file. A thumbnail of the file will appear on the right panel.
You can also click on the "Preview" button to open the popup window with the file.
You can then click on "Recover" to save the recovered file.

Whenever you are having sound issues, particularly HDMI sound issues, the solutions outlined above should be able to help you. If you have any questions about the processes described above or any other issue, let us know in the comments section below and we'll be happy to help in any way we can.
FAQ
-
Why is there no sound through my HDMI TV?
No sound through HDMI TV can be caused by loose connections, incorrect audio settings, outdated drivers, or issues with the Windows Audio service. Check hardware connections, set HDMI as the default audio device, update drivers, and restart the Windows Audio service to resolve the issue. -
How do I get audio output on my Samsung TV?
To get audio output on your Samsung TV, ensure the HDMI cable is securely connected, select the appropriate HDMI input using your remote, and check the audio settings on the TV to ensure the correct output device is selected. -
How do I check the audio settings on my TV?
To check audio settings on your TV, use the remote to access the TV's menu or settings. Navigate to the audio or sound settings, and verify that the correct output device is selected, and the audio format is compatible with your sound system.


