

A Preparing Automatic Repair black screen means Windows detected a startup problem, tried to load its repair environment, and then failed to show the normal repair screen or desktop. It can happen after a Windows update, power loss, bad driver, corrupted boot files, disk errors, or hardware trouble.
The key is to avoid random resets. Start with low-risk checks, then move into Windows Recovery Environment, system file repair, and boot repair only when needed. If the PC contains important files, recover or back them up before CHKDSK, Reset this PC, clean install, or drive replacement.
This guide explains how to fix Preparing Automatic Repair then black screen in Windows 10 and similar Windows 11 startup cases. It also shows how Recoverit Windows Data Recovery can help recover local files from a PC that cannot boot normally. Recoverit cannot repair Windows, bypass passwords, decrypt BitLocker without a key, or guarantee recovery from failing hardware.
In this article
Part 1. What Does "Preparing Automatic Repair Then Black Screen" Mean?
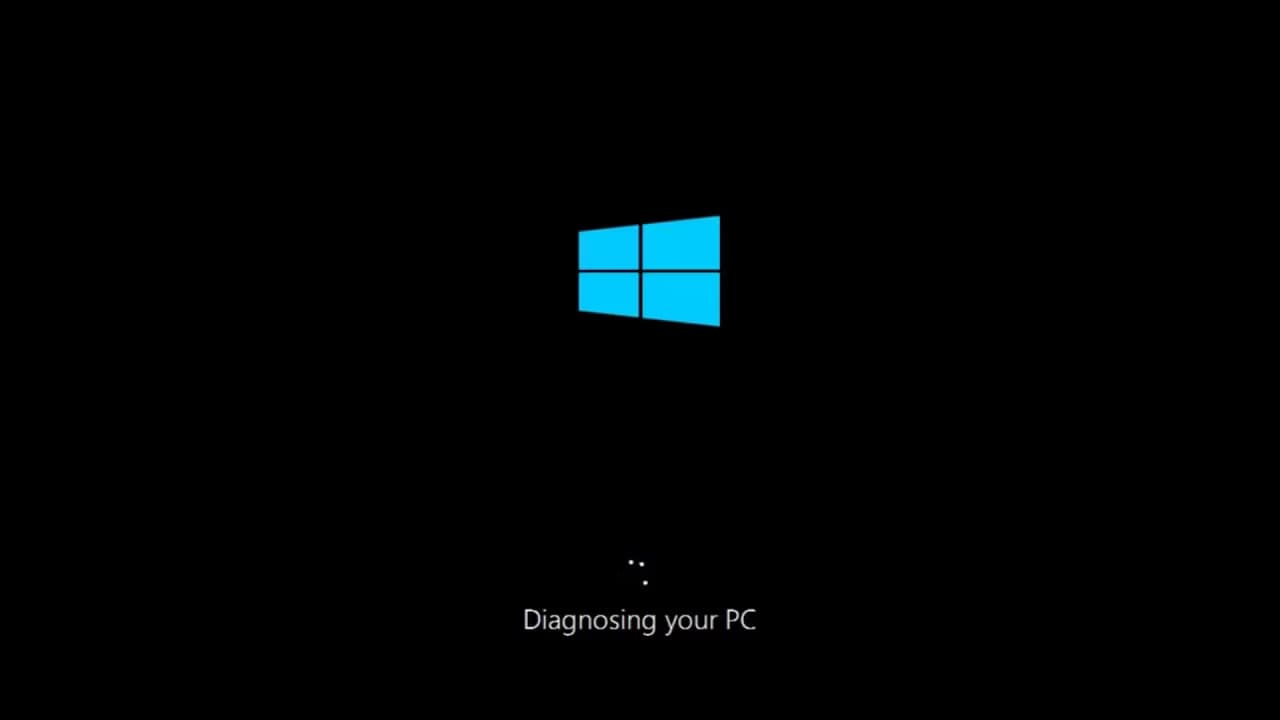
Automatic Repair is part of the Windows recovery process. When Windows fails to start correctly, it may show Preparing Automatic Repair, diagnose the PC, and open recovery options. If that process ends in a black screen, Windows may be stuck before loading the repair interface, before showing the sign-in screen, or before loading the desktop.
The black screen can appear in several ways:
- Plain black screen: The display is on, but no cursor or text appears.
- Black screen with cursor: Windows graphics may be loading, but Explorer, sign-in, or display services are stuck.
- No signal black screen: The monitor receives no video signal. This may involve display cable, monitor input, GPU, or hardware.
- Repair loop: The PC repeatedly shows Preparing Automatic Repair and returns to a black screen.
Common causes include failed Windows updates, corrupted boot files, damaged system files, bad display drivers, disk errors, BitLocker recovery issues, or failing hardware. Windows 10 reached end of support on October 14, 2025, but many Windows 10 PCs still encounter this startup problem, and the same recovery logic also applies to many Windows 11 cases.
Part 2. What to Do Before Trying Fixes
Before deeper repair, take these precautions to protect the system and your files.
| Precaution | What to Do | Why It Matters |
| Wait briefly | Give Windows several minutes if disk activity or repair messages continue | Windows may still be diagnosing or finishing update rollback |
| Avoid repeated hard shutdowns | Force restart once only if the PC is clearly frozen | Repeated interruptions can worsen file-system or update corruption |
| Unplug extra devices | Disconnect USB drives, external disks, printers, docks, hubs, and memory cards | A faulty peripheral or driver can block startup |
| Test display output | Try another monitor, cable, input source, or external display on laptops | No-signal black screens may be display or GPU related |
| Protect important files | Recover or back up files before reset, CHKDSK, clean install, or drive replacement | Some repairs can change, erase, or overwrite data |
Part 3. Basic Fixes for Preparing Automatic Repair Black Screen
Start with these low-risk fixes before using advanced repair commands.
Fix 1. Force Restart Once and Let Windows Try Again
A single force restart can clear a temporary repair hang.
Step 1. Hold the Power button for 10 to 20 seconds until the PC shuts down.
Step 2. Wait a few seconds.
Step 3. Press the power button again and check whether Windows loads normally or reaches recovery options.
Fix 2. Remove External Devices and Reboot
Shut down the PC and disconnect nonessential devices, including USB drives, external hard drives, printers, card readers, docks, hubs, and external accessories. Restart with only the power, keyboard, mouse, and monitor connected. If Windows starts, reconnect devices one by one to find the conflict.
Fix 3. Restart the Graphics Driver If a Cursor Appears
If you see a black screen with a mouse cursor, the display driver or Windows shell may be stuck. Press Windows + Ctrl + Shift + B. Windows may beep and refresh the graphics driver.
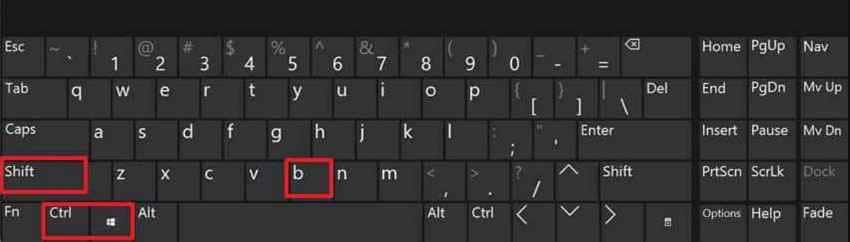
If the desktop appears, update or roll back the display driver afterward. If nothing changes, continue to Safe Mode.
Fix 4. Boot Into Safe Mode From Windows Recovery Environment
Safe Mode starts Windows with limited drivers and services, making driver and startup conflicts easier to isolate.
Step 1. Turn on the PC. When the Windows logo appears, hold the power button to shut it down. Repeat this two or three times until Windows opens Automatic Repair or WinRE.
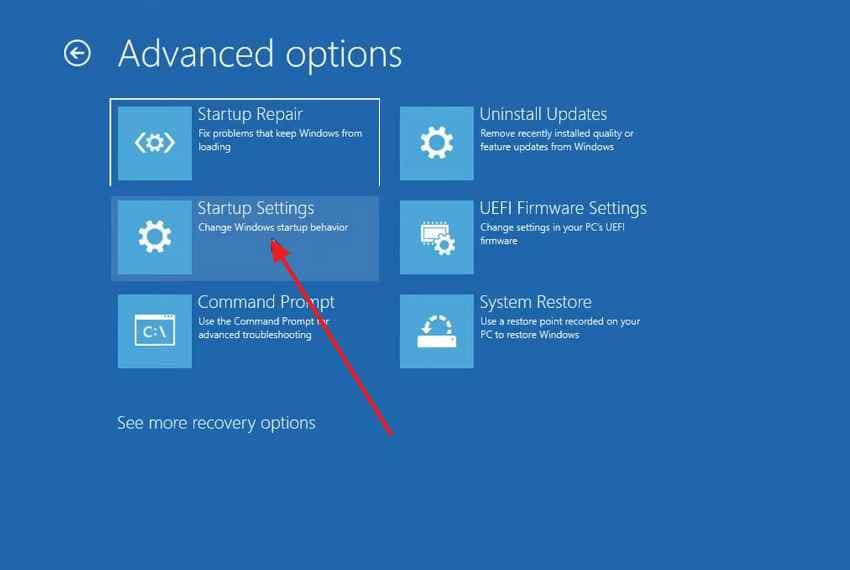
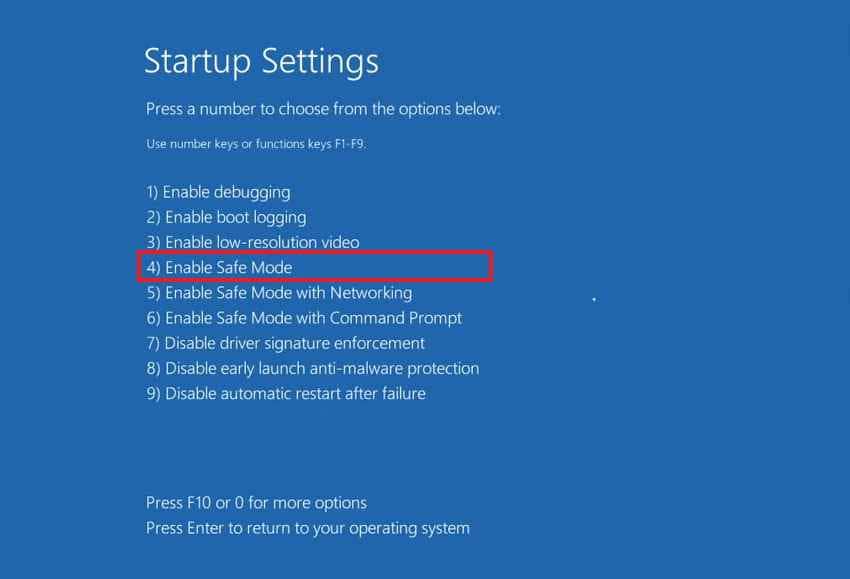
Step 2. Choose Troubleshoot > Advanced options > Startup Settings.
Step 3. Click Restart, then press 4 or F4 to enable Safe Mode. Use 5 or F5 if you need networking.
Fix 5. Disable Startup Apps and Problem Services in Safe Mode
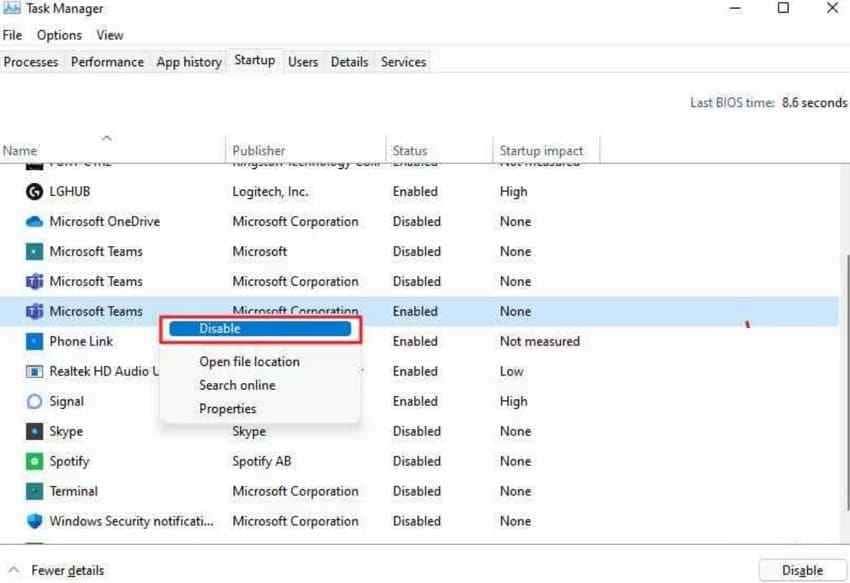
If Safe Mode loads, a startup app or third-party service may be causing the black screen.
Step 1. Press Ctrl + Shift + Esc to open Task Manager.
Step 2. Open the Startup or Startup apps tab.
Step 3. Disable recently installed or unnecessary startup items, then restart normally.
For a deeper clean boot, use msconfig, hide all Microsoft services, and disable non-Microsoft services before testing. Do not disable Microsoft services directly.
Part 4. Perform Windows Recovery Options
If basic fixes do not work, use the official recovery tools in Windows Recovery Environment.
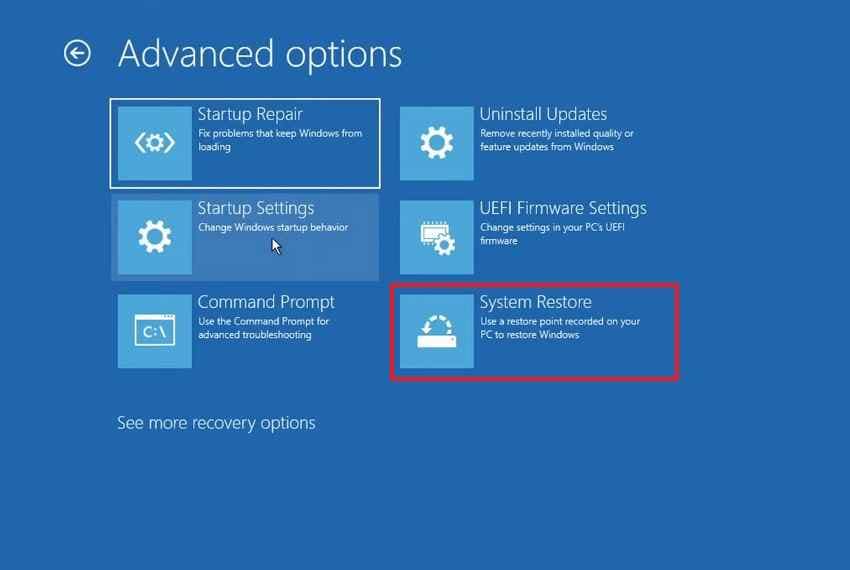
Fix 6. Access Advanced Startup Options
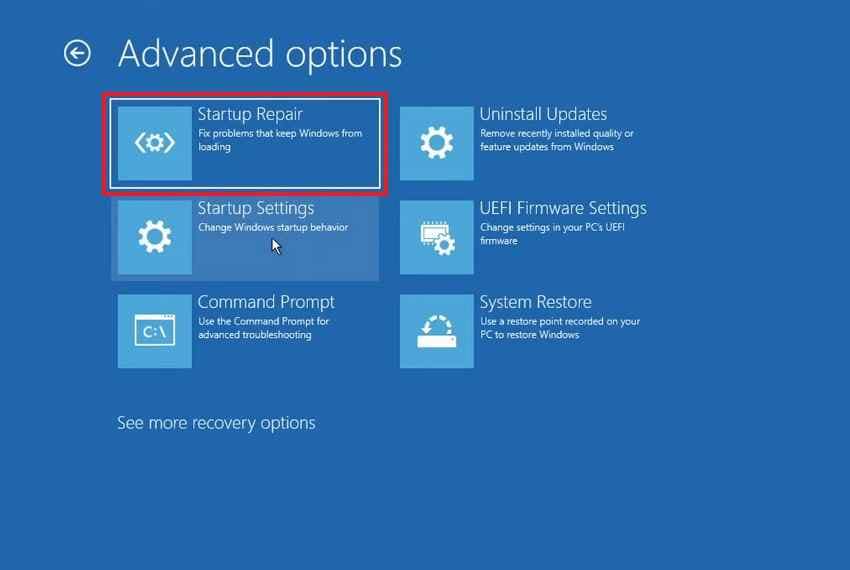
Advanced Startup Options gives access to Startup Repair, System Restore, Safe Mode, Command Prompt, Uninstall Updates, and Reset this PC.
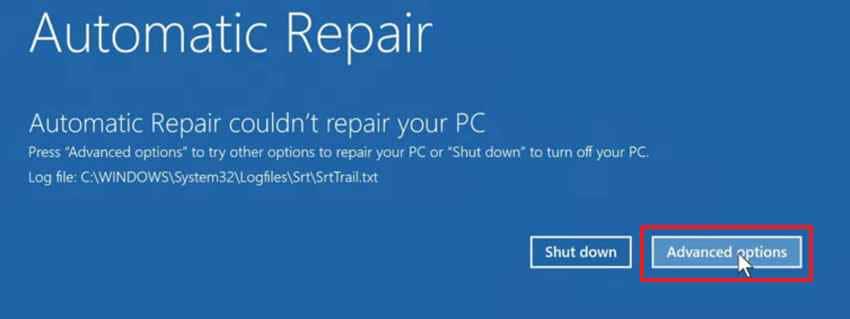
Step 1. Power on the PC. When the Windows logo appears, hold the power button to interrupt startup.
Step 2. Repeat the interruption until the Automatic Repair screen appears.
Step 3. Click Advanced options.
Fix 7. Run Startup Repair Manually
Startup Repair checks common startup settings and files. It is safer than reset because it normally does not remove personal files.
In WinRE, go to Troubleshoot > Advanced options > Startup Repair. Choose your Windows account if prompted and let Windows finish the scan.
Fix 8. Use System Restore to Return to a Working Point
System Restore can roll back system files, registry settings, drivers, and installed programs to an earlier restore point. It does not recover personal files and requires an existing restore point.
In WinRE, choose Troubleshoot > Advanced options > System Restore. Pick a restore point from before the Automatic Repair black screen started.
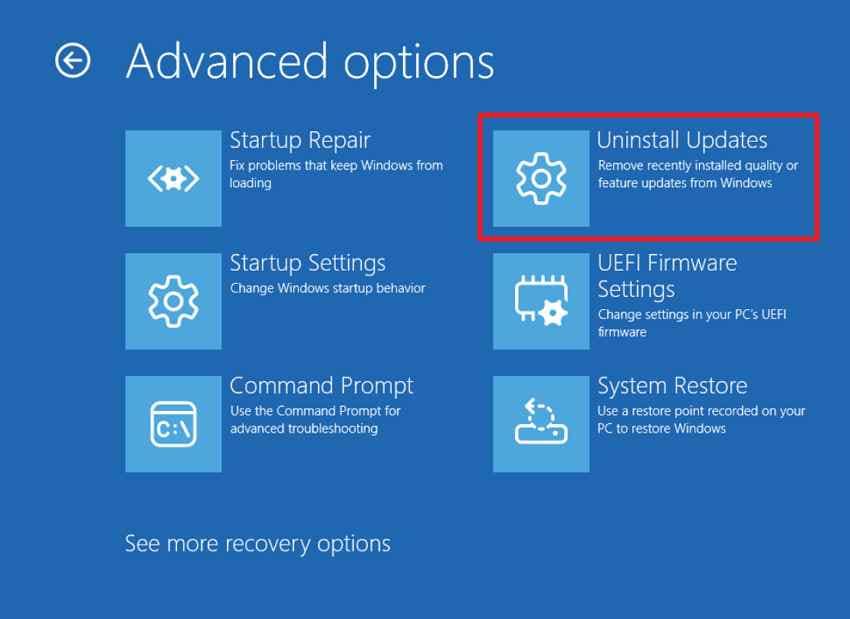
Fix 9. Uninstall the Latest Quality or Feature Update
If the black screen started after a Windows update, remove the latest quality update first. Feature updates are larger and should be removed only if the timing clearly matches the failure.
In WinRE, choose Troubleshoot > Advanced options > Uninstall Updates, then select Uninstall latest quality update or Uninstall latest feature update.
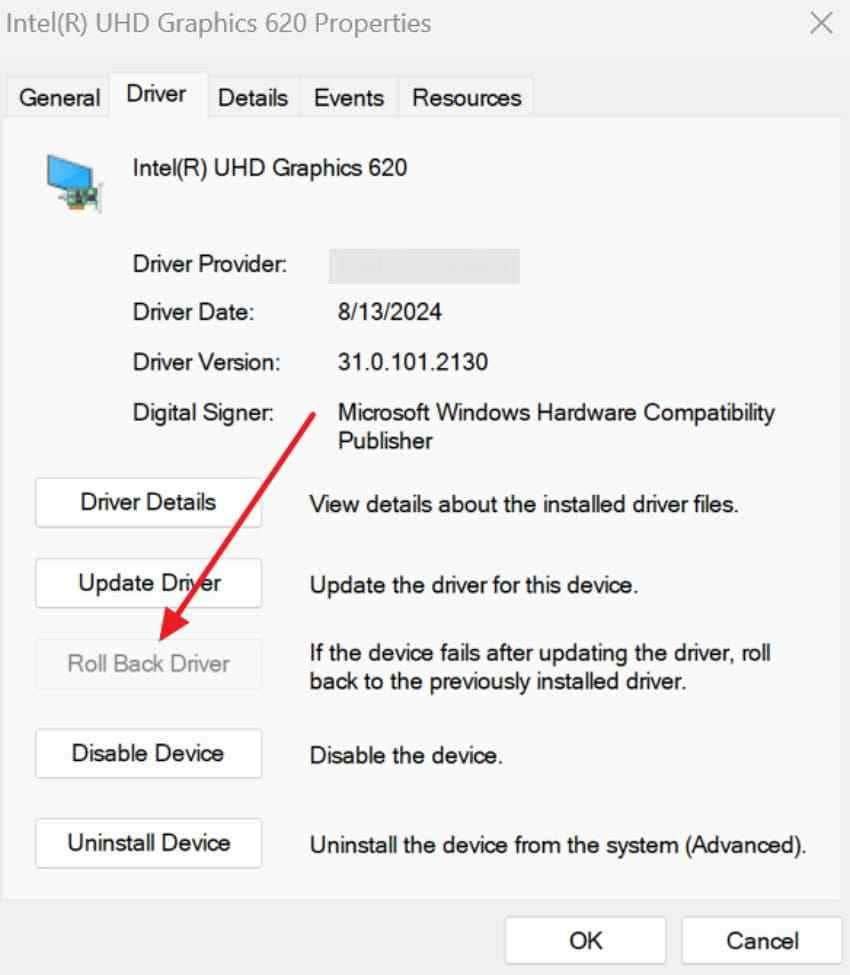
Fix 10. Roll Back or Reinstall Display Drivers
A failed graphics driver can cause Automatic Repair to end in a black screen. Use Safe Mode when normal startup does not work.
Step 1. Boot into Safe Mode. Press Windows + X, open Device Manager, expand Display adapters, right-click your graphics device, and choose Properties.
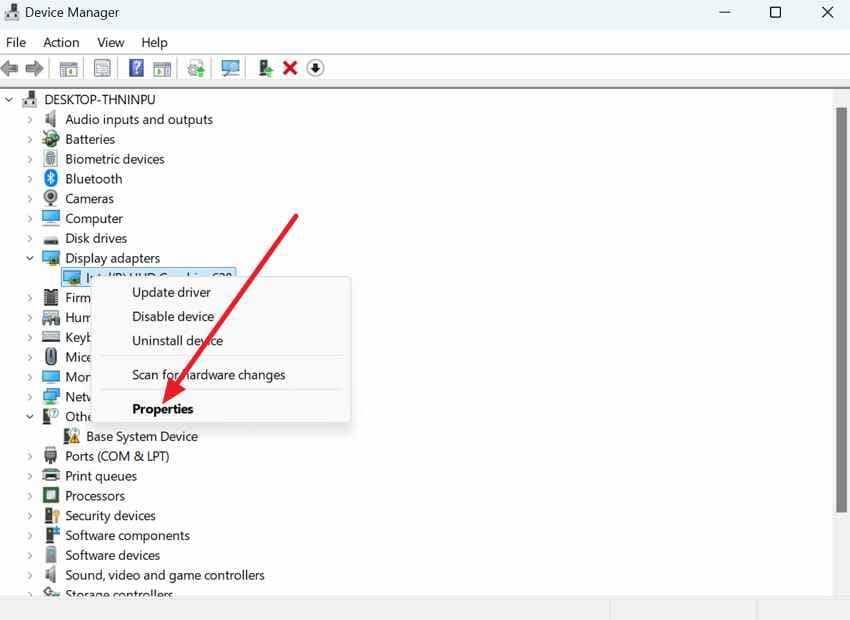
Step 2. Open the Driver tab and choose Roll Back Driver if available. If not, uninstall the device and restart, or install the correct driver from the PC manufacturer's official website.
Part 5. Repair System Files and Boot Configuration
Use these commands carefully. If the drive may be failing or the files are critical, recover data first.
Fix 11. Run SFC From WinRE or Safe Mode
System File Checker can repair protected Windows system files. If Windows can start in Safe Mode, open Command Prompt as administrator and run:
sfc /scannow

If you run SFC from WinRE against an offline Windows installation, the command may require offline directory switches. Use the correct Windows drive letter shown in WinRE.
Fix 12. Run DISM When Windows Can Load Enough to Support It
DISM repairs the Windows image used by SFC. It works best when Windows can load enough to run the online repair command from Safe Mode or normal Windows with networking.
Open Command Prompt as administrator and run:
DISM /Online /Cleanup-Image /RestoreHealth
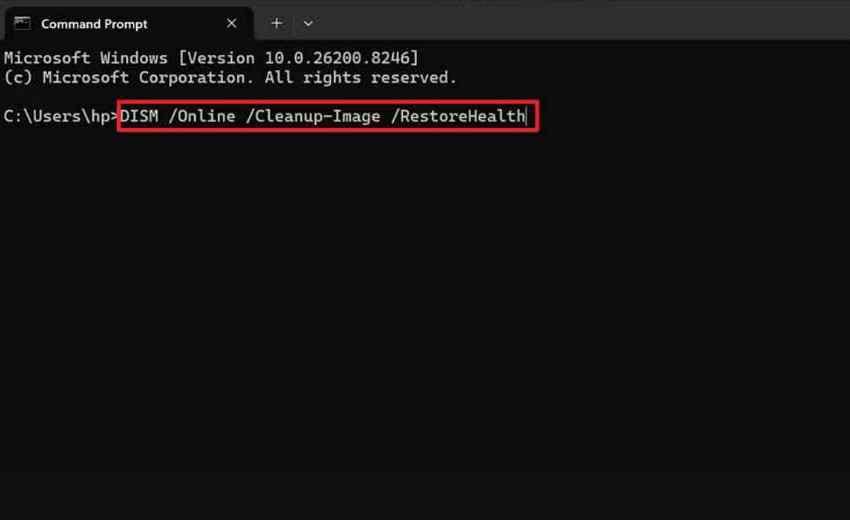
After DISM finishes, run sfc /scannow again.
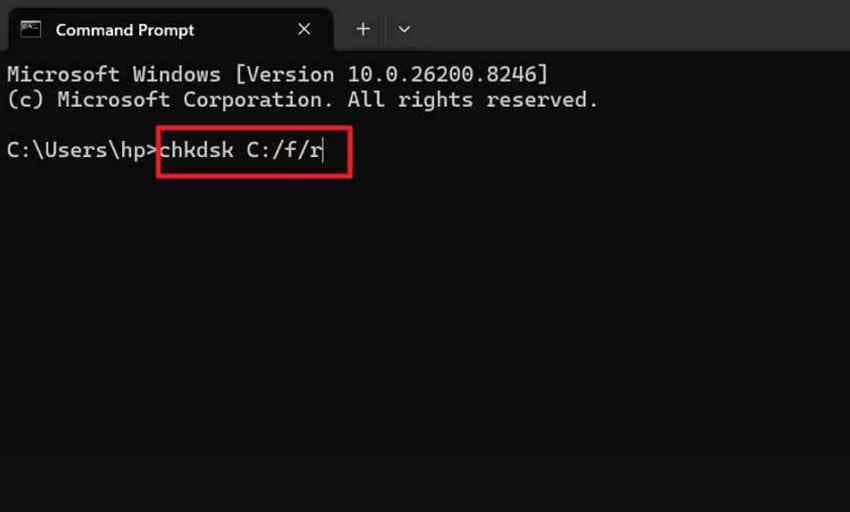
Fix 13. Check the Disk After Protecting Files
CHKDSK can repair file-system errors, but it can also stress a failing drive and modify disk structures. Recover important files first if the drive is noisy, very slow, repeatedly disconnects, or contains critical unbacked-up files.
After files are protected, open Command Prompt as administrator and run:
chkdsk C: /f /r
Fix 14. Repair Boot Configuration With Bootrec Commands
Bootrec commands can repair boot records and rebuild the boot configuration database. Use them when Windows cannot complete startup and Startup Repair does not solve the issue.
Open Command Prompt in WinRE and run these commands one at a time:
bootrec /fixmbr
bootrec /fixboot
bootrec /scanos
bootrec /rebuildbcd
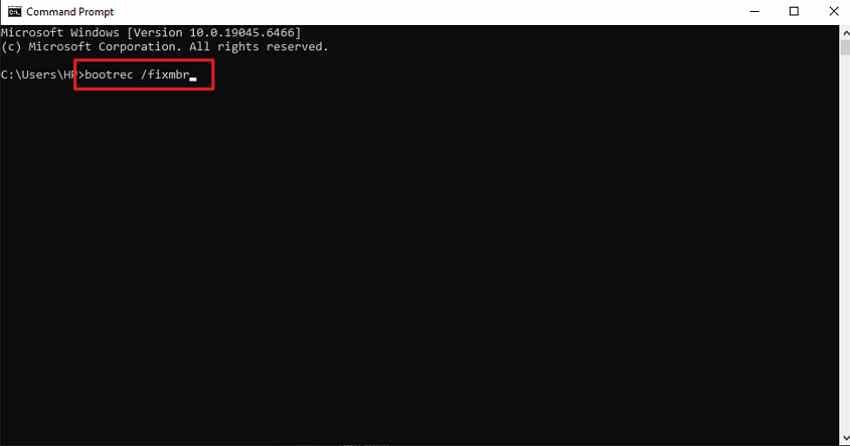
If bootrec /fixboot returns Access is denied, stop and verify the boot mode, EFI partition, and Windows version before running more commands.
Fix 15. Turn Off Automatic Repair Temporarily for Diagnosis
Use this only as a diagnostic step. Disabling Automatic Repair can reveal the underlying startup error, but it does not fix the cause.
In WinRE Command Prompt, run:
bcdedit /set {default} recoveryenabled No
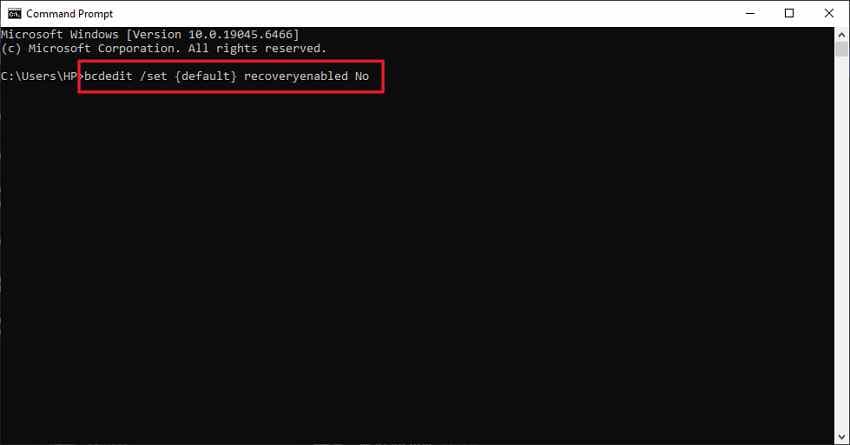
After checking the error, turn Automatic Repair back on:
bcdedit /set {default} recoveryenabled Yes
Part 6. Recover Files Before Reset or Reinstall
If the PC remains stuck after repair attempts, your next steps may include Reset this PC, clean installation, or drive replacement. Recover files first if the data matters.
When Recoverit Can Help
Recoverit Windows Data Recovery can help recover local files from an accessible internal drive when Windows cannot start, shows a black screen, enters a boot loop, or stays stuck in Automatic Repair. Its crashed computer recovery workflow can create a bootable USB drive on another working computer and use it to access recoverable files.
It can help with documents, photos, videos, emails, archives, project files, and files from accessible internal drives, external drives, formatted partitions, lost partitions, and supported storage devices.
When Recoverit Cannot Help
Recoverit cannot repair Windows startup, fix bad drivers, bypass a Windows password, decrypt BitLocker without the recovery key, repair physically damaged hardware, or guarantee recovery from a failing SSD or HDD. If the drive clicks, is not detected, or freezes during scans, consider a professional data recovery service.
Guide to Recover Files Before Windows Reset Using Recoverit
Use another working Windows computer and an empty USB drive. The USB drive will be formatted during bootable media creation, so do not use one that contains important data.
Step 1. Choose System Crashed Computer
Launch Recoverit on a working computer, connect an empty USB flash drive, choose System Crashed Computer, and click Start.

Step 2. Create Bootable Recovery Media
Select the USB drive and click Create. Confirm the formatting prompt and wait for Recoverit to create the bootable USB.

Step 3. Recover Data From the Crashed PC
Boot the affected PC from the USB drive. Choose Data Recovery or Hard Disk Copy, scan the internal drive, select the files you need, and save them to a separate external storage device.

Part 7. Advanced Fixes When Other Solutions Fail
Use these only after safer fixes and data recovery steps have been tried.
1. Reset This PC With Keep My Files
Reset this PC can reinstall Windows while keeping personal files, but it removes installed apps and many settings. Back up or recover important files first.
Step 1. In WinRE, choose Troubleshoot > Reset this PC.
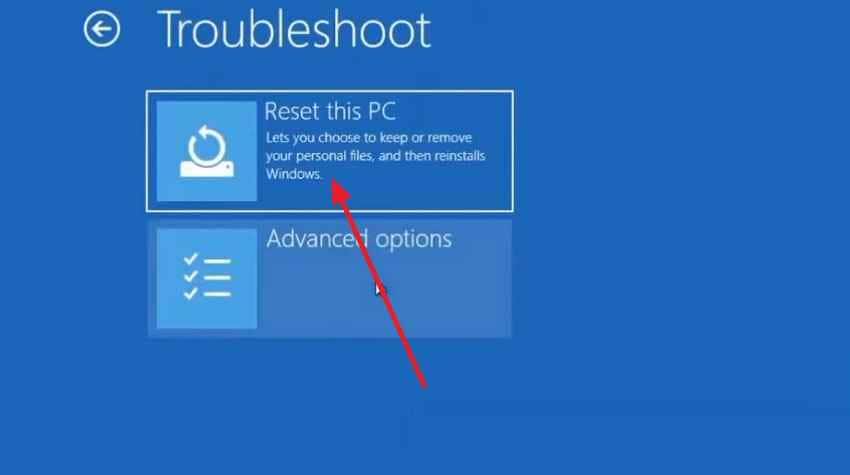
Step 2. Choose Keep my files and follow the prompts.

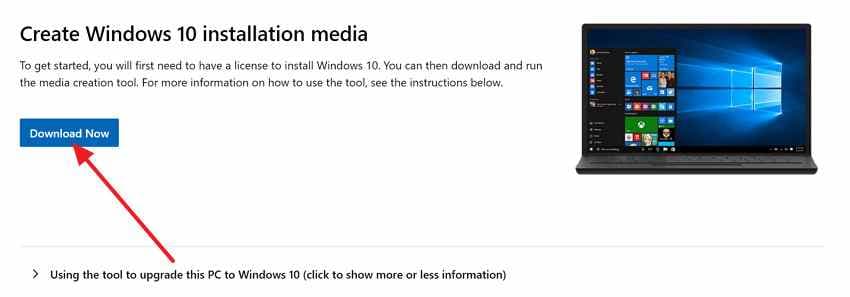
2. Reinstall Windows From Installation Media
If reset fails, create Windows installation media on another computer, boot the affected PC from the USB installer, and reinstall Windows. A clean installation can erase apps, settings, and files on the selected partition, so recover data first.
3. Replace the Startup Drive
If disk tests show bad sectors, repeated read errors, SMART warnings, or frequent boot failures, replace the SSD or HDD. If the old drive remains readable, recover or clone important data before it fails completely.
4. Check RAM, GPU, and Motherboard Hardware
Suspect hardware when the PC freezes randomly, restarts during repair, shows no display on any monitor, or fails even after a clean Windows installation. Test memory with Windows Memory Diagnostic or vendor diagnostics, and contact a technician for GPU, motherboard, or power issues.
Part 8. How to Prevent Automatic Repair Black Screen Issues
| Measure | What It Helps Prevent |
| Avoid interrupting updates | Reduces incomplete update and system file corruption risk |
| Update drivers from official sources | Reduces display, storage, chipset, and boot driver conflicts |
| Keep disk space free | Gives Windows enough room for updates, repair logs, and temporary files |
| Monitor disk health | Helps detect failing drives before startup loops begin |
| Create recovery media and backups | Protects files and gives recovery options when Windows cannot boot |
| Use reliable power during updates | Prevents sudden shutdowns during boot and repair operations |
Conclusion
A Preparing Automatic Repair black screen does not always mean the PC is beyond repair or that your files are gone. Start with safe fixes: wait briefly, force restart once, remove peripherals, test display output, enter Safe Mode, and use Windows Recovery options such as Startup Repair, System Restore, and update removal.
Before CHKDSK, boot repair commands, Reset this PC, clean installation, or drive replacement, protect important files. Recoverit Windows Data Recovery can help recover local files from an accessible drive when Windows will not boot, but it cannot repair Windows, bypass passwords, decrypt BitLocker without a key, or guarantee recovery from failing hardware.
FAQ
-
Why does Preparing Automatic Repair turn into a black screen?
Windows may fail while loading recovery options, startup files, display drivers, or the desktop. Common causes include failed updates, corrupted boot files, bad drivers, disk errors, or hardware problems. -
How do I fix Windows 10 Preparing Automatic Repair black screen?
Start with a single restart, remove external devices, test the display, enter Safe Mode, run Startup Repair, uninstall recent updates, and repair system or boot files. Recover important files before high-risk fixes. -
Will Startup Repair delete my files?
Startup Repair is designed to fix startup problems without deleting personal files. However, backing up or recovering important data is still recommended before deeper repairs. -
Should I reset Windows if Automatic Repair keeps failing?
Reset should be a later option after Safe Mode, Startup Repair, System Restore, update removal, driver rollback, and file recovery have been considered. Choose Keep my files if you want to preserve personal files, but still back them up first. -
Can Recoverit fix the Automatic Repair black screen?
No. Recoverit does not repair Windows startup or hardware. It can help recover local files before you reset, reinstall, replace a drive, or send the PC for repair.


