Are some of your files suddenly showing zero bytes, preventing you from viewing their contents? You know they contain data, so why are they acting up? Several reasons could be the culprits.
Let's see what 0-byte files are and why they become such before exploring the nine tried-and-tested methods to recover 0 byte files.
In this article
What Are 0-Byte Files?

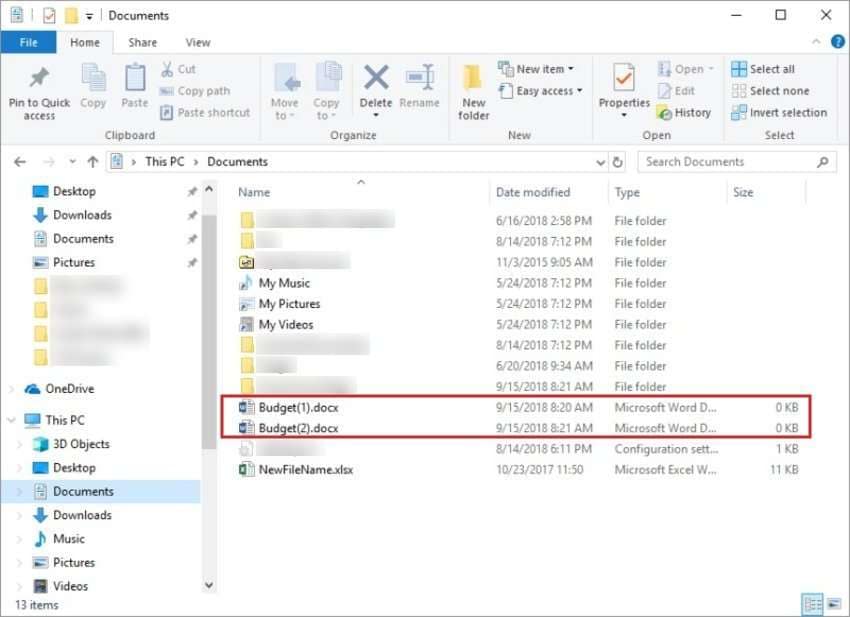
By definition, zero-byte files contain no data. However, even empty documents occupy several kilobytes in your storage, so what does the length of 0 bytes mean? It means damage or corruption.
Your computer won't open a corrupted file with zero bytes. It displays an error, stating it can't find the file, preventing you from viewing and updating it. It only lets you delete it.
What if you know the problematic file isn't empty? You can recover it with the methods below.
Reasons Files Show 0 Bytes
The following issues cause files to show zero bytes:
- Unexpected computer shutdown – A system crash or sudden power loss while writing data to a file can damage it, making it unreadable.
- Incomplete transfer – Interrupting a download can cause a file to show zero bytes.
- Malware – A computer virus or other malicious software can damage files, sometimes turning them into 0-byte items.
- File system errors – Damaged file allocation tables, incorrect formatting, and bad sectors are the most prevalent causes of file system errors, corrupting files, partitions, and entire disks.
- External drive disconnection while in use – Removing a USB or another device while it writes data (e.g., saving or transferring) can turn affected items into zero-byte files.
- Unsupported file attributes – Incompatible file types or unusually long names are another cause of 0-byte files.
Recover 0-Byte Files With Professional Data Recovery Software
Professional data recovery software is the go-to solution for restoring zero-byte files. Wondershare Recoverit is your best bet because it can retrieve lost data in 500+ scenarios, including a system crash, disk corruption, malware infection, formatting, and interrupted transfer.
Wondershare Recoverit can seamlessly handle zero-byte file recovery across 1,000+ file formats and 2,000+ storage devices, making it ideal for everyone. Its 98% success rate, 35+ patented tech innovations, and 5+ million global users speak volumes about its reliability. Try it for free to see why it has been the leader since 2003.
Here's how to recover 0-byte files with Wondershare Recoverit:
- Download and install the software on your computer and log into your Wondershare account (or create a new one).

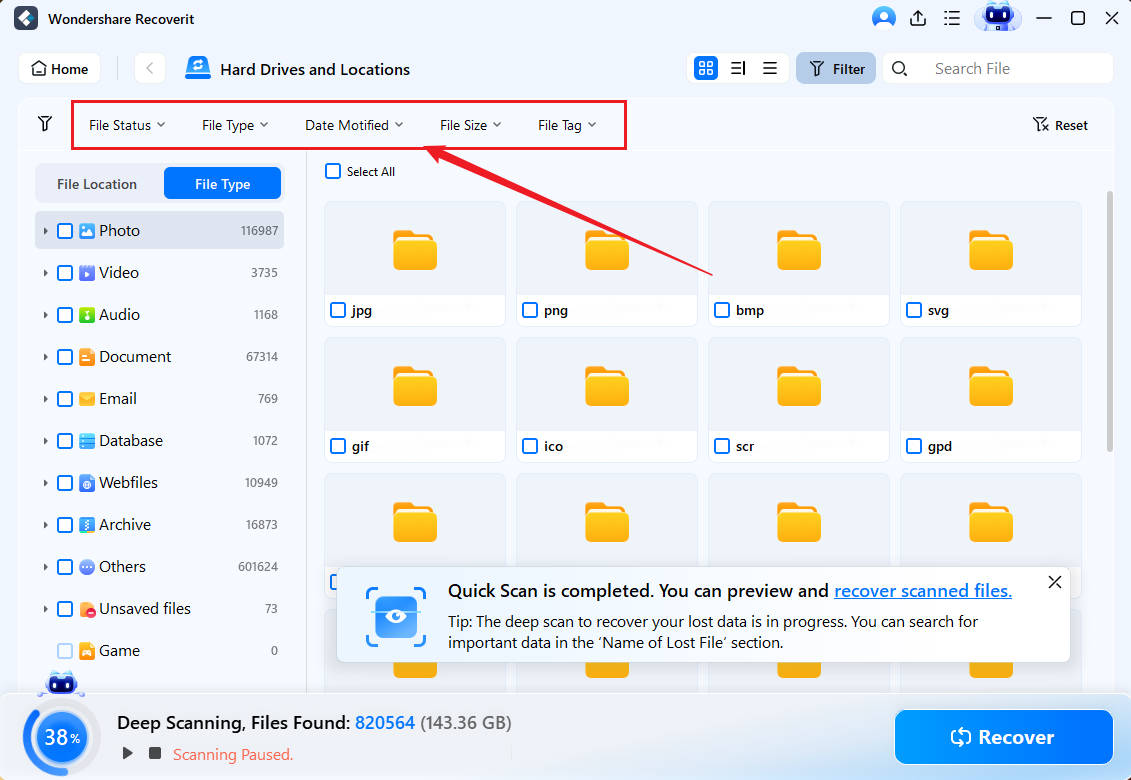
- Go to Hard Drives and Locations and choose the storage unit containing your zero-byte files to initiate an automatic scan.

- Use search filters like file size, type, and time to accelerate the process.

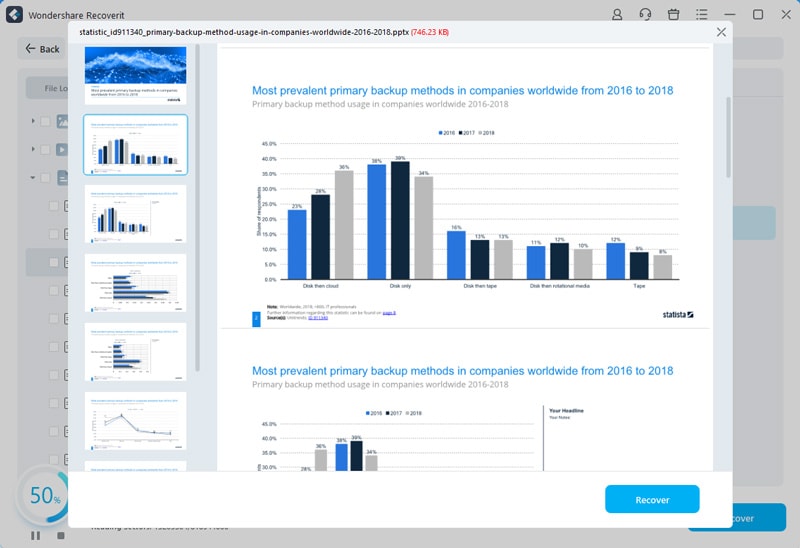
- Once the software completes Quick and Deep Scans and displays recoverable data, preview your files to ensure everything is in order. Then, select what to retrieve and click Recover.

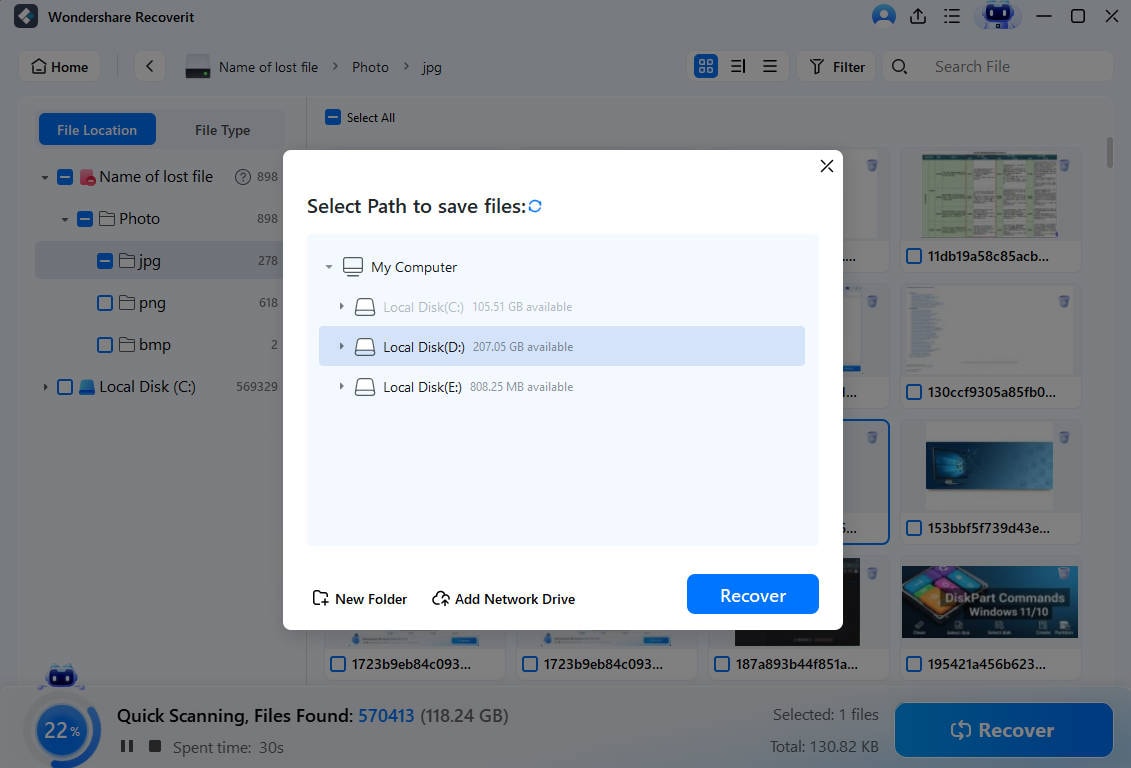
- Choose a secure file path and hit Recover. Please don't save the files in their original location because that would corrupt them.

Restore 0-Byte Files Without Professional Data Recovery Software
If you don't want to download software, try the methods below to retrieve your zero-byte files.
| Method | When to Use It |
| Method 1: Downloading the files again | Resolving an incomplete transfer, corruption, or malware |
| Method 2: Downloading the correct ZIP tool | Extracting files with unsupported attributes |
| Method 3: Show hidden files | Revealing the contents of hidden files |
| Method 4: Use the System File Checker | Checking for corrupted system files after a sudden computer shutdown or malware infection |
| Method 5: Delete SysWin files | Uncovering and removing the SysWin virus |
| Method 6: Run an antivirus scan | Detecting and eliminating potential viruses |
| Method 7: Change file extensions | Repairing file system errors with the Error Checking Tool |
| Method 8: Use CHKDSK | Quickly fixing file system errors in the CMD |
Method 1: Download the Files Again
If your downloaded files show 0 bytes, the logical solution is to download them again. Redownloading them will resolve the issue, whether something interrupted the transfer or the problem occurred later (e.g., due to corruption or malware).
Here's how to recover zero-byte files online in case of an incomplete download:
- Visit the website or online service from which you wish to download the file(s).
- Hover over the attachment and click the Download button. Here's an example of downloading email attachments:

Method 2: Download the Correct ZIP Tool
WinZip, WinRAR, and 7-Zip are the best-known file archiver utilities compatible with most zipped files.
However, if someone sent you a RAR archive they compressed using an unfamiliar ZIP utility, you may need that exact tool to extract and view the items. Otherwise, you'll see them as zero-byte files because of unsupported attributes. Here's what to do:
- Download the correct ZIP tool.
- Right-click your zero-byte file and choose the desired extraction option. Regardless of your ZIP utility, you can extract all files to the current directory, select another path, or unzip the archive as a folder.

- Alternatively, choose Open With [ZIP tool] when right-clicking the file to view all items using your downloaded utility. You can then manage and extract them to the desired location. The following is a WinRAR example, but all ZIP utilities have the same interface.

Method 3: Show Hidden Files
Hidden files sometimes leave leftovers in the form of zero-byte items. That means you only need to unhide them to reveal their contents.
Here's how to restore 0-byte files if you've accidentally hidden them:
- Open File Explorer and click View > Options.

- Switch to the View tab, click Show hidden files, folders, and drives, and hit Apply > OK.

Method 4: Use the System File Checker
The System File Checker (SFC) is a built-in Windows utility for scanning and repairing corrupted system files. It can help you restore zero-byte files if malware or a sudden computer shutdown has made them inaccessible.
Here's how to recover 0-byte files with the SFC:
- Search for the Command Prompt and select Run as administrator.

- Run this command:
sfc/ scannow. Scanning all system files may take time, but don't interrupt the process because it will fix potential problems and restore cached copies of your corrupted files.
- If you see the "Windows Resource Protection did not find any integrity violations" message, corrupted system files may not be the cause of your zero-byte problem. However, the CMD may notify you of a successful repair. Either way, restart your PC.

- If the SFC informs you that it couldn't perform the requested operation or fix the corrupted files, try the DISM (Deployment Image Servicing and Management) command-line tool (unavailable on Windows 7). Relaunch the CMD as an administrator and run this command:
DISM.exe /Online /Cleanup-image /Restorehealth
- Once you see 100% progress, restart your PC and scan it with the SFC again. The problem should be gone if the cause was file system corruption.

Method 5: Delete SysWin Files
The notorious SysWin virus corrupts executables, turning them into zero-byte files and creating multiple copies. If it has infected your computer, it has likely replicated across directories, launching on startup and compromising your system.
Don't worry; you can quickly remove the SysWin virus by deleting its folder, hidden directory, and registry entries. That should restore your 0-byte files. Here's what to do:
- Use the Ctrl + Alt + Delete shortcut to launch Task Manager. Right-click the SysWin process in the Startup tab and click Disable. If it isn't there, your PC doesn't have this virus, so relax and try other methods.

- Right-click SysWin in the Processes tab and select End Task.

- Right-click it again and click Open file location.

- File Explorer will launch, showing the SysWin folder. Right-click it, choose Delete, and empty the Recycle Bin. You can bypass the Recycle Bin with Shift + Delete.

- Click View, tick the Hidden items checkbox to reveal SysWin's hidden Boots directory, and remove it from your PC with Shift + Delete.

- Since the SysWin virus has created multiple entries on your PC, launch the Registry Editor to delete them and prevent reactivation. Then, run the Find dialog box with Ctrl + F, type "syswin" into the search field, and hit Enter.

- Once the program finds all SysWin files, select them with Ctrl + A and eliminate them with Shift + Delete.

Method 6: Run an Antivirus Scan
If your PC doesn't have the SysWin virus, it doesn't necessarily mean it's virus-free. Other malware may have infected it, causing your files to show zero bytes. Therefore, run an antivirus scan and remove potential threats.
We'll use AVG as an example, but scanning your PC and deleting quarantined files is identical in every antivirus software. Here's how it works:
- Launch AVG and click Run Smart Scan.

- If it informs you of a suspicious file, click More Options or Close to let it finish scanning.

- If you choose More Options, click Move to Quarantine.

- Once you see the "Threat detected and secured" message, go to Menu > Quarantine, select the infected files, click Delete All, and confirm your choice.

- You can click More (the three horizontal dots) to restore the files, but we don't recommend it. You can also send them to AVG Threat Labs for analysis but don't expect a response or data recovery.

Unfortunately, your antivirus software may delete your zero-byte files if a virus has infected them. We don't recommend recovering them because you'll be back to square one with infection.
Method 7: Change File Extensions
Let's move on from all the virus talk. Hopefully, malware hasn't infected your PC. What if the problem lies in file system errors? That's often a quickly fixable issue.
Your PC's Error Checking Tool can scan for and repair file system errors. You can then change file extensions and return your 0-byte documents, images, or other items to their former glory.
Here's how to restore zero-byte files using the Error Checking Tool:
- Right-click the drive with 0-byte files in File Explorer and select Properties.

- If you use Windows 8 or newer, click Check in the Tools tab.

- If you use Windows 7, click Check now > Automatically fix file system errors > Start.

- If the tool doesn't find errors, click Scan Drive for a double-check.

- Whether the initial or second scan reveals errors, click Repair Drive to eliminate them.

- Once it fixes errors, the tool will save the repaired zero-byte files to a hidden FOUND.000 folder, giving them the .chk (Check Disk) extension. Click View to show Hidden items and Image name extensions.

- Search your drive for the FOUND.000 folder.

- Rename all the recovered files in the folder, changing their .chk extension to the original one (e.g., jpg, doc, or ppt).

Method 8: Use CHKDSK
CHKDSK is the command-line counterpart of the Error Checking Tool. However, it's faster than its GUI variant because it only requires a single command to scan for and repair file system errors.
Here's how to use it to get a 0-bytes-free NTFS drive:
- Run the Command Prompt as an administrator.

- Run this command:
CHKDSK H: /f /r /x. However, replaceHwith the corresponding drive letter, and don't worry about capitalization because the CMD isn't case-sensitive. The/fparameter will rewrite the file system directory, the/rwill instruct the CMD to fix errors, and the/xwill tell it to disconnect the drive for scanning and repair.
- Once the CMD finishes the process, close the program and rename the recovered .chk files in the FOUND.000 folder.
Conclusion
As you can see, recovering zero-byte files is a breeze. You can quickly restore them with several built-in Windows tools, antivirus software, the correct ZIP utility, or professional data recovery software like Wondershare Recoverit (the most reliable option). Of course, you can also download the files again in case of interrupted transfer.
Try Wondershare Recoverit to Perform Zero-byte File Recovery


 ChatGPT
 Perplexity
 Google AI Mode
 Grok
Grok


