How to Format a Windows XP Hard Drive With And Without its Boot CD?
If you have a Windows system and are finding it hard to format its hard drive, then you have come to the right place. From troubleshooting a hard drive issue to simply getting rid of your data – there could be numerous reasons for formatting the disk. Though, A lot of people find it hard to format the Windows XP hard drive without a CD. To make your job easier, I’m going to help you do a Windows XP format hard drive without its CD in this guide. Besides, I will also guide you to erase Windows XP hard drive with a bootable CD. Let's begin right now!
What’s the Use of a Bootable CD in Windows?
Mostly, the system manufacturers would include a bootable CD with the unit or would ask users to create one. Ideally, it is a read-only disc that can boot your system into a Windows environment.
- A bootable media can reinstall a fresh copy of Windows on the system.
- It can repair the operating system in case of different scenarios (like a corrupt firmware, crashed computer system, blue screen, etc)
- It can also help you perform a system restore or launch the command prompt to perform any task.
Mostly, any bootable media is used to troubleshoot an issue on Windows or boot it when the firmware has been corrupted. Since it will reinstall a fresh copy of Windows on the system by performing a factory reset, a lot of people avoid it. Also, it takes a lot of time and effort to format a hard drive by using the bootable media as there are other ways to do it.

How to Format a Windows XP Hard Drive Without its Boot CD?
Chances are that your Windows XP drive would have different partitions as well. While formatting a non-system partition is extremely easy, a lot of people struggle to format the Windows drive. Let’s learn how to format a Windows XP hard drive without CD for both cases.
Case 1 Formatting a Non-System Drive on Windows XP
Any drive that is not the Windows partition can easily be formatted. You can do it via the Explorer, Command Prompt, or the Disk Management tool. Let’s consider the example of Disk Management to do Windows XP format hard drive without a CD.
Step 1: Launch the Disk Management tool
At first, just click on the Start button from the taskbar and select the “Run” prompt. Once the Run prompt is launched, enter the “diskmmgmt. msc” command to load the Disk Management tool.

Step 2: Select the disk to format
This will open the Disk Management application with a list of all the partitions on your system and their details. You can simply select any non-system partition from here, right-click, and choose to format it.

Step 3: Complete the formatting operation
Once you click on the Format button, a dedicated wizard would launch on your Windows XP system. Here, you can select the type of file format or partitioning style to format the Windows XP hard drive without its CD.

Case 2 Formatting the System Drive on Windows XP
A lot of people don’t know this, but Windows XP has an inbuilt executable file that can load the installation setup. This means you can format Windows XP hard drive without its CD if you have the firmware installed and the setup files present on the system.
Step 1: Backup the disk in advance
Since this will delete all the saved data on your system, it is recommended to back up your files. You can copy them to an external storage unit or simply upload them to the cloud.
Step 2: Locate the winnt32.exe file
Now, you can just launch My Computer on your system and browse to the Windows drive, which is C: in most cases. Afterward, go to the Windows > i386 folder and open the winnt32.exe file.

Step 3: Format the Windows drive
This will launch the Windows XP setup wizard on the screen that you can easily follow. Here, you can choose to reinstall a fresh copy of Windows to do Windows XP format hard drive without CD. Please note that you would have to enter the product key for your Windows XP to complete the reinstallation.

How to Format the Hard Drive with Boot CD on Windows XP?
Now when you know how to format Windows XP hard drive without its CD, let’s consider the other option. If you already have a Windows disc, then you can simply take its assistance to repair, reinstall, or restore the system. In case you don’t have a bootable disc, then you can create one as well.
Step 1 Create a Windows XP Bootable CD
If you don’t have a bootable CD for your Windows XP, then you can create one instead. For this, just insert a blank CD/DVD to the system and go to its Control Panel > System and Maintenance > Backup & Restore. From here, choose to create a system disc and simply follow a click-through wizard.

Step 2 Boot your system from the CD
Once the bootable CD is created, restart your system, and make sure that the CD is inserted. When your system restarts, press and hold the BIOS key, which could be F2, F8, F10, DEL, ESC, or any other option.

As the BIOS settings would open, you can go to the Boot menu and set the inserted disc as a priority for booting.
Step 3 Load the Bootable Media and open Command Prompt
Afterward, you can just restart your system and simply let the bootable media load the respective wizard. From here, you can choose to reinstall the firmware, repair it, or restore a previous image. To format the system, you can launch the Command Prompt instead.

Step 4 Format the system and its disk
Great! After launching the command prompt, you can enter the “vol” command followed by the drive letter (like vol C:) to select the C: drive.
Once the Windows drive is selected, you can enter the “format” command followed by the file system. For instance, to format the C: drive to the NTFS system, you can type and enter the “Format c: /fs: NTFS” command.

Wait for a while as this would format the Windows drive. If you want, you can replace the drive letter with any other partition to format it as well.
More Related:
How to Format Hard Drive on Windows 10/11?
How to Format a Partition for Free
How to Retrieve Formatted Hard Drive Data on Windows XP?
By now, you can see how easy it is to format a Windows XP hard drive without its CD. Though, at times, we end up formatting the drive by mistake or while troubleshooting an issue. In this case, you can use Wondershare Recoverit data recovery software to get back your lost, deleted, or inaccessible files.
Recoverit Data Recovery is 100% compatible with all the Windows and Mac versions and is extremely easy to use. It has one of the highest recovery rates in the industry and can help you get back your lost photos, videos, music, documents, and more. Here’s how you can use Recoverit Data Recovery to restore data from a formatted drive in Windows XP.
Step 1 Select a partition/drive/folder to scan
To begin with, just launch Recoverit Data Recovery on your Windows and select a location to scan. You can choose the entire drive, a partition, or browse to any specific folder of your choice.

Step 2 Let the application scan the source
After selecting a source location, just wait for a while and let Recoverit scan your data. You can view the progress here and even stop or halt the process.

Step 3 Preview and recover your files
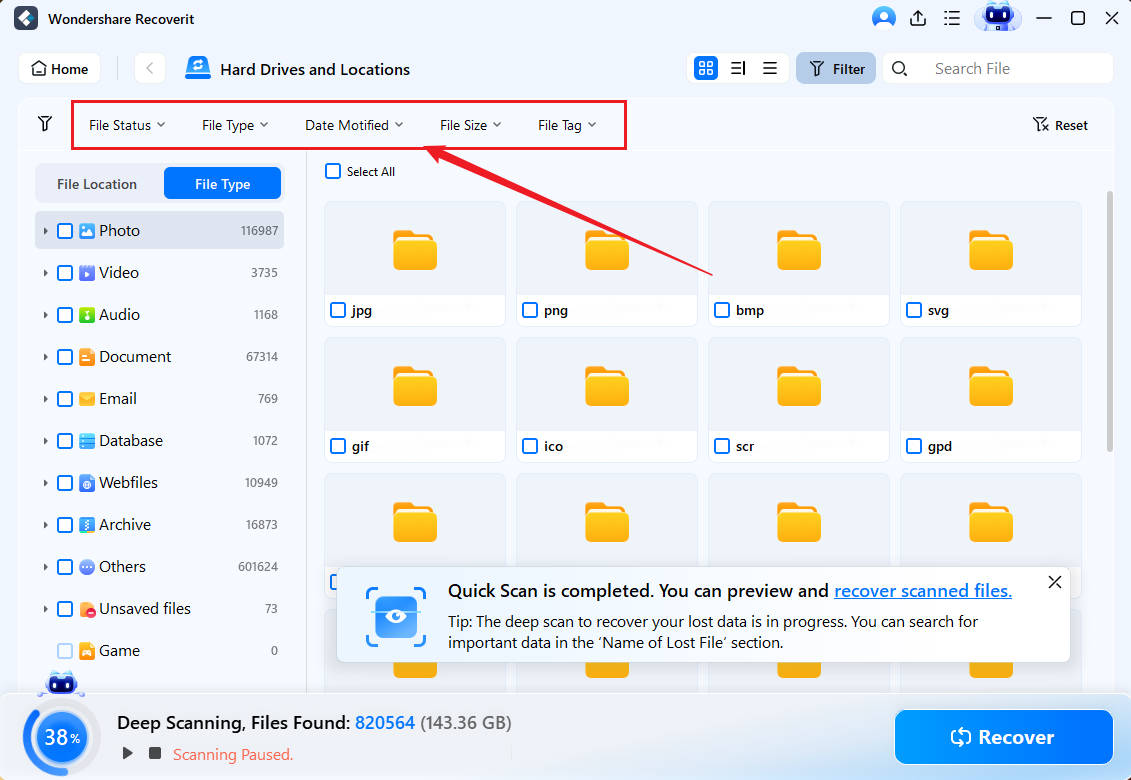
Once the scanning is completed, you can use the inbuilt filters on the sidebar to handpick any file of your choice. You can filter data based on the file type, size, last modified, and so on.

In the end, you can just preview your data that would be listed under different sections. You can preview your photos, videos, documents, etc., and chose to recover them to any desired location on your system.

This brings us to the end of this extensive guide on how to format a Windows XP hard drive without a CD. As you can see, you can easily format the system or the non-system disk on Windows with or without a bootable CD. Besides that, if you have formatted the drive by mistake and have lost your data, then consider using Recoverit Data Recovery to get your files back.
What's Wrong with Drive
- Recover Your Drive
- Fix Your Drive
- Format/Wipe Drive
- Know Your Drive


 ChatGPT
 Perplexity
 Google AI Mode
 Grok
Grok


Theo Lucia
chief Editor