

 TL;DR:
Formatting an internal or external hard drive on Windows 10 permanently erases its data and requires selecting the appropriate file system and format type using built-in tools like File Explorer, Disk Management, Diskpart, PowerShell, or Settings.
● Choose NTFS for the Windows 10 installation drive, exFAT for cross-platform storage between Windows, macOS, and Linux, or FAT32 for universal compatibility, keeping in mind that FAT32 restricts individual files to a 4GB maximum and partitions to 2TB.
● A Quick Format finishes in seconds and leaves deleted files recoverable via data recovery software, whereas a Full Format takes hours to scan for bad sectors and permanently overwrites previous data with zeros and ones for privacy during device resale.
● The active C system drive cannot be formatted directly within Windows 10; this action strictly requires booting from a Windows installation DVD or USB drive to perform a clean install.
Ask AI for a summary
 ChatGPT
 Perplexity
 Gemini
 Claude
 Grok
Grok
Although formatting is standard among Windows users, only a few know what the process does. And since people are unsure about the word's meaning, picking a suitable format can also be frightening as no one wants to put their vital files at risk.
Therefore, today, we'll dive deeper into formats, what they are, and how they work and teach you how to choose the best one for your needs. We'll also show you how to format a hard drive on Windows 10.
Table of Content
Things to Know Before Formatting a Hard Drive on Windows 10
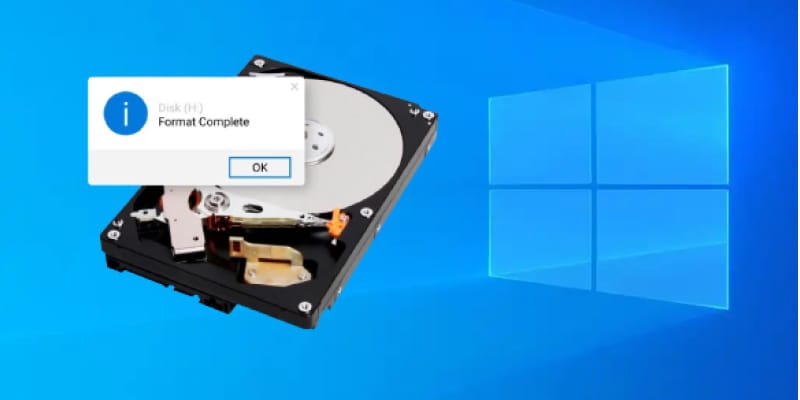
Before you dive deeper into formatting or reformatting your internal or external hard drives on Windows 10, it's vital to remember that these actions wipe data off the device. When you begin such an operation, you'll lose all your essential files, so tread carefully and don't mess with these operations unless you know what you're doing.
Why Format a Hard Drive on Windows 10
When you purchase a new hard drive, it comes empty with absolutely nothing on the hard drive. Thus, all new drives must be formatted to make them readable by the operating system. The goal is to put a file system on them to organize your data, remember file types on the disk, and mark where each file begins and ends.
Similarly, reformatting a hard drive on Windows 10 refers to wiping data from an older, previously used HDD. People do it for various reasons, including the following:
- Making the hard drive more compatible with other operating systems, as some formats, like FAT32, have limitations;
- Switching from Windows to Mac or Linux or vice versa, as different operating systems use different file systems;
- Refreshing the drive and improving its read and write speeds;
- Fixing disk errors and bad hard drive sectors or removing corrupt data;
- Preparing the hard drive for resale and ensuring the privacy of the previously stored data.
Depending on your reasons for formatting the hard drive, there are two formatting options to choose from – Quick and Full Format, so let's dive straight into those.
Understanding the Difference Between Quick and Full Format
Although the process doesn't differ much between internal and external hard drives, when formatting new drives or reformatting old ones, Windows users can choose one of two formatting options: Quick and Full Format.
| Format Type | Explanation |
| Quick Format | This option skips the scanning process and quickly formats the drive in seconds, making it preferred for everything except disk errors, bad sectors, and hard drive resales. |
| Full Format | It's recommended when you're fixing the drive's corruption or intend to resell the HDD and want to protect your privacy, as it can take up to a few hours, depending on the size of your hard drive. It involves scanning the drive's bad sectors before formatting it and writing zeros and ones over the previous data. |
The difference between these two formatting options is vital, as data recovery is only possible with Quick Format.
Can You Recover Data From a Formatted Hard Drive on Windows 10?
Your chosen formatting option significantly impacts the recoverability of your data. Namely, data can be recovered only from hard drives formatted with the Quick Format box checked beforehand.
There's nothing to worry about in those cases, as third-party hard drive recovery tools from reputable vendors, like Wondershare Recoverit, can get your files back.
The app in question supports over 2,000 storage devices and over 1,000 file types. It also has a 95% data recovery success rate for more than 500 situations. These include conditions where you've formatted the drive without a backup, accidentally deleted files, experienced a system crash, exposed files to malware, etc.
Moreover, data recovery only takes a few minutes and a few steps. Here's how you can do it:
- Download, install, and open Wondershare Recoverit on your Windows 10 PC.
- Select Hard Drives and Locations on the left and click on your formatted hard drive.

- The app will automatically begin scanning for lost files.

- If you're after specific files, you can speed up the search by adding keywords or adjusting the app's filters.
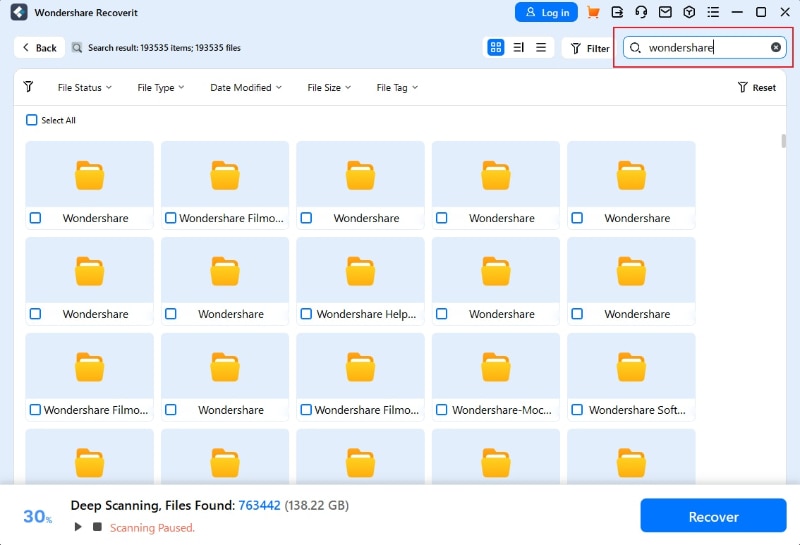
- When ready, select the files you want to retrieve, hit the Recover button, and save them to a specific location.

That's it. The entire process is only a few minutes long, and you can stop or pause it at any moment if you've found the files you're looking for.
Available File System Formats for Windows 10 Hard Drives
Out of the box and without any additional drivers or applications, Windows 10 supports only a handful of hard drive formats. Among the few, the three most notable formats are the following ones:
- NTFS - NTFS should be your go-to if you're looking for a format to install Windows 10. The Windows-focused structure is excellent for encrypting data and compressing files. Although it's readable by Mac and Linux systems, writing data on such a hard drive will require additional drivers or applications, making it less than ideal for external HDDs.
- exFAT - It's one of the newest file systems and is a generational jump from the older, highly-compatible FAT32 system with no disadvantages of its predecessor. ExFAT, also known as FAT64, is excellent for internal and external drives on which you store data. It'll work on all operating systems, making it perfect for disk drives you use on Windows, macOS, and Linux. However, it's not ideal for the installation drive.
- FAT32 - As a highly universal file format, FAT32 works on all operating systems, making it ideal for external drives that often change hands, like USB sticks or HDDs. However, because of its file and partition-size limitations, it's not recommended for disk drives larger than 2TB or those on which you store large individual files.
Your chosen format depends on whether you're formatting an internal or external drive and whether you'll use the disk drive for Windows PCs only or transfer data between different operating systems.
Here's a quick table comparison of these file systems:
| File Systems | NTFS | exFAT | FAT32 |
| Max File Size | 16 EB | 16 EB | 4 GB |
| Max Partition Size | 16 TB | 512 PB | 2 TB |
| Encryption | Yes | Yes | No |
| Compression | Yes | Yes | No |
| Compatibility | Windows (7, 8, 10, 11); Mac (Read-only). |
Windows (7, 8, 10, 11); Mac (10.6.5 and later); |
Windows (7, 8, 10, 11); Mac (all versions); |
Different Ways You Can Format a Hard Drive on Windows 10 (Internal & External)
Before we dive into each method separately, it's worth mentioning that the procedures for formatting also work for reformatting the drive on Windows 10, and you can use any technique for both operations and external and internal hard drives.
Way 1. Format a Drive on Windows 10 Using File Explorer
- Go into This PC, right-click the hard drive you wish to format, and select the Format option.
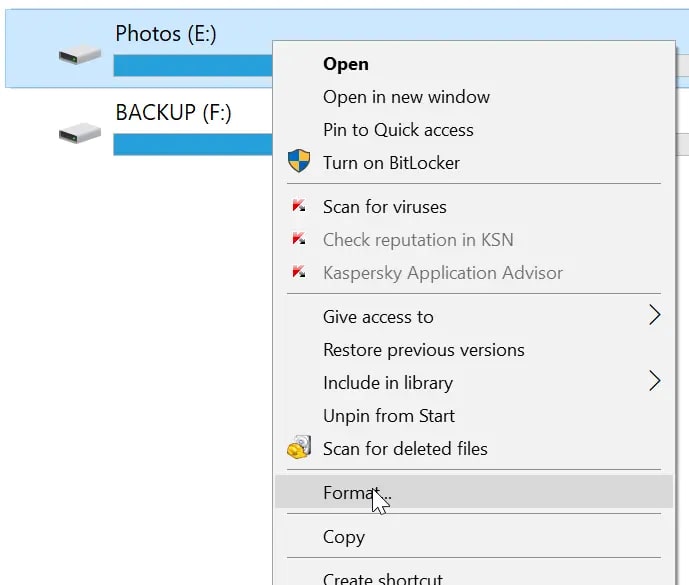
- Choose between NTFS, FAT32, and exFAT under the File system, and name the drive under the Volume label.
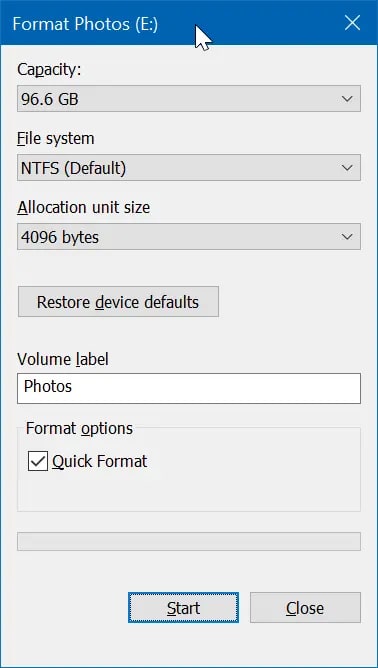
- Check the box next to "Quick Format" and click on Start.
And that's it. It's likely the most beginner-friendly method on the list.
Way 2. Format a Drive on Windows 10 Using Disk Management
- Hit the Windows key on your keyboard and search for Disk Management to open the app.
- If it's a new unformatted hard drive, right-click on its Unallocated space and select New Simple Volume.

- Choose volume size, assign the hard drive a letter, and click Next.
- Select the format under the File system, name the drive under the Volume label, and check the box next to "Perform a quick format."

- Hit Next, and then Finish.
- If it's an older hard drive, right-click it and select Format.

- Name the drive, choose the format, check the quick format option, and hit OK.

Way 3. Format a Drive on Windows 10 Using Diskpart
To access Diskpart, you'll need to use the Command Prompt. Here's how:
- Press Windows key, type cmd, and Launch Command Prompt on your Windows 10 PC as Administrator.
- Type in the following command:
diskpart - Then, use this command and note the number of the disk drive you want to format:
list disk
- Select the hard drive with this command, but ensure the number matches your drive:
select disk 2
- Clean the drive, create a partition on the disk, and format it with these three commands:
cleancreate partition primaryformat fs=ntfs
Changing "ntfs" to "exfat" or "fat32" will format the drive to the corresponding file systems.
- Finally, assign the drive a letter and exit Diskpart with these two commands:
assignexit
Command Prompt might seem overwhelming, but if you follow our step-by-step guide, you should be done within a few minutes and without any issues.
Way 4. Format a Drive on Windows 10 Using Powershell
PowerShell is a newer version of the Command Prompt and uses commands that only a few users are comfortable with. Nevertheless, we've also included a guide on PowerShell.
- Hit the Windows key, search for PowerShell, and open it as Administrator.
- Use the following command and hit Enter:
Get-disk
- Select the disk you wish to format and clear the drive's data with this command:
clear-disk -number X -removedata. Replace X with the number of your drive.
- Format the drive with the following:
new-partition -disknumber X -usemaximumsize | format-volume -filesystem NTFS -newfilesystemlabel newdrive. Again, replace the X with the number of the drive you want to format.
- Finally, assign the drive a letter with this:
get-partition -disknumber X | set-partition -newdriveletter X. The first X must also be replaced with your drive's number, while the last X in the command is your letter of choice.
The PowerShell formatting method is likely the least beginner-friendly of the five. However, if you follow the commands, you shouldn't have a problem.
Way 5. Format a Drive on Windows 10 Using Settings
- Open the Settings app on your Windows 10 computer.

- Go to System > Storage > Advanced storage settings > Disks & volumes.
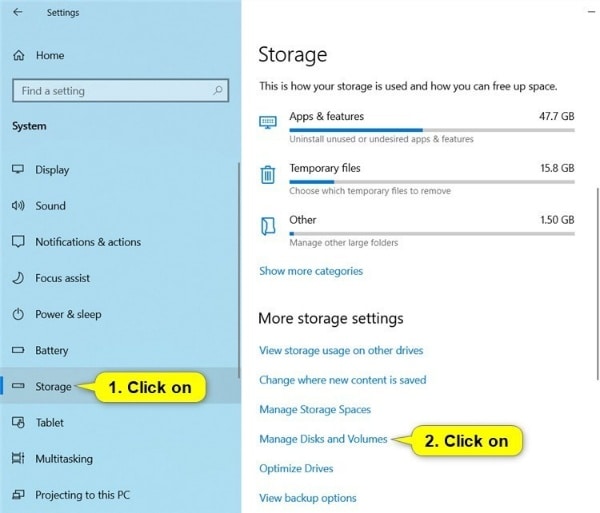
- Select Properties next to the hard drive you want to format.

- Click on Format.

- Add a drive name under Label, choose its format under File System, check Perform a quick format, and click on Format.

Although they seem complicated, all the methods above are relatively straightforward, and you should have zero issues if you follow our step-by-step instructions. Therefore, you can choose the one you're most comfortable with.
Conclusion
Whether you've purchased a new hard drive or want to refresh and reuse an older one and whether it's an internal or an external disk, picking the right drive format matters, as it'll affect your drive's capabilities.
When it comes to formatting, Windows users have it easy, as Microsoft offers five different ways to format a hard drive, which we've covered in detail. However, users often forget that formatting a drive deletes all data and don't create backups beforehand.
Fortunately, not all is lost in such cases, as data recovery apps such as Wondershare Recoverit can still save the day.
FAQs About Formatting a Hard Drive on Windows 10
-
How do I format a hard drive on Windows 10?
follow these steps to format a hard drive on Windows 10 quickly:- Press Windows key + X and select Disk Management.
- In the Disk Management window, locate the hard drive you want to format.
- Right-click on the partition you want to format and select Format.
- Choose the desired file system (NTFS, FAT32, or exFAT), allocation unit size, and volume label.
- Check the box for Perform a quick format if you want a faster process.
- Click OK to start the formatting process.
-
Can I format my C drive (system drive) on Windows 10?
You cannot format the C drive (system drive) directly from within Windows 10, as it contains the operating system files. To format the C drive, you will need to boot from a Windows installation media (DVD or USB drive) and perform a clean install of Windows 10, which will format the drive during the installation process. -
How long does it take to format a hard drive on Windows 10?
The time taken to format a hard drive depends on its capacity, the selected file system, and whether you choose a quick or full format. A quick format is usually completed within a few minutes, while a full format may take several hours for larger drives. -
Can I format an external hard drive or USB drive on Windows 10?
Yes, you can format an external hard drive or USB drive on Windows 10. To do this, connect the external drive to your Windows 10 computer, open Disk Management, locate the drive, right-click on the partition you want to format, and follow the same steps mentioned above to format the drive. -
What file system should I choose when formatting a hard drive on Windows 10?
For Windows 10, the recommended file system is NTFS, as it supports larger file sizes, better security features, and improved performance. However, if you need your drive to be compatible with older systems or Mac/Linux devices, you may choose FAT32 or exFAT as the file system.


