How to Recover Files from Iomega Hard Disks?
To recover deleted or inaccessible files from an Iomega external hard drive on Windows or Mac, scan the connected device using Wondershare Recoverit and extract the data to a separate secure location.
● The computer must physically detect the Iomega drive via a functioning USB or FireWire connection before the recovery software can locate it under the External Drives menu.
● You must save the restored files to a completely different storage device rather than the original Iomega hard disk to prevent permanent data overwriting.
● To avoid future file system corruption or data loss, safely eject the device before unplugging the cable and refrain from repeatedly alternating its use across different operating systems.
Ask AI for a summary
Q: how to recover files from Iomega hard disk
"hello there, I mistakenly deleted some files on my Iomega hard disk. They are very important; please how do I recover my files?"
Iomega external hard disks are quite popular among a lot of users these days. The reason is due to its advanced features and high reliability. And they are available in different sizes and models. They are often used for backing up important data and they can store huge amounts of data. They are also highly accessible and portable. Not only can these external hard disks store huge amounts of data, but they can also be used on any computer system regardless of the operating system running on it.
In spite of all of these, users are still susceptible to data loss. Because of such a case, different data recovery tools have been developed to help recover files from Iomega hard disks. However, there are a lot of unreliable tools in the market today.
This article is meant to show a reliable data recovery tool and help through the simple steps to carry in other to get your files back in case you lost them on an Iomega hard disk.
Part 1: Reasons for Data Loss from Iomega Hard Drive
Various reasons can lead to data loss from Iomega hard drive. Some of these are:
- Unintentional deletion: you might want to delete unwanted files and mistakenly delete important ones. Don't beat yourself if that happens, it can occur even to the best of us.
- Accident formatting: an Iomega hard drive and other drives may be connected to a system. In the bid to format one of those drives, the Iomega hard drive was formatted. This is another reason that can lead to loss of data.
- Scanning with antivirus: some antiviruses can delete some files when you scan your Iomega hard drive with them. This happens, especially, if the antivirus sees the files are threats.
- Physical damage: the Iomega hard drive can also be damaged if it falls accidentally. This can lead to loss of data.
- System shut down: in the event of sudden system shut down or unexpected power failure while the Iomega hard drive is in use. When this happens, especially frequently, it is almost certain that some data will be lost.
- Forceful pulling: data can also be lost on an Iomega hard drive if it is pulled out unexpectedly when it is in use.
- Corrupt file system: if for any reason the hard drive file system gets corrupted, then the data saved there becomes inaccessible.
- Using different operating systems: if you repeatedly use different operating systems to access your Iomega hard drive, then you are inviting loss of data sooner or later.
Part 2: Iomega Hard Drive Recovery on Mac
If your computer system runs on a Mac and you want to recover data from Iomega hard drive, you have got to thread gently. Nothing to worry about though, there is a lot of data recovery tools out there that can help you. However, not a lot of them are reliable. And when they promise to get your data from your Iomega hard drive, you have to also ask if they will work on your mac operating system powered system.
Thankfully, Recoverit works perfectly on an iOS operating system. In other to get your data recovered on an Iomega hard drive, follow the following steps.
Step 1. Download Recoverit
The very first thing is to have the software on your computer if you don't have it already. In other to download, go to recoverit.wondershare.com and click on the "Download for Mac" button. The executable file will be downloaded, go to the folder is get downloaded to. Click on the file and follow the instructions followed.
Step 2. Connect the Iomega hard disk
Before you launch the software, ensure that you properly plug the hard drive into your computer. Make sure the computer can detect it.
Step 3. Launch Recoverit
To launch Recoverit, double click on the software icon and you will open a data recovery environment for you.
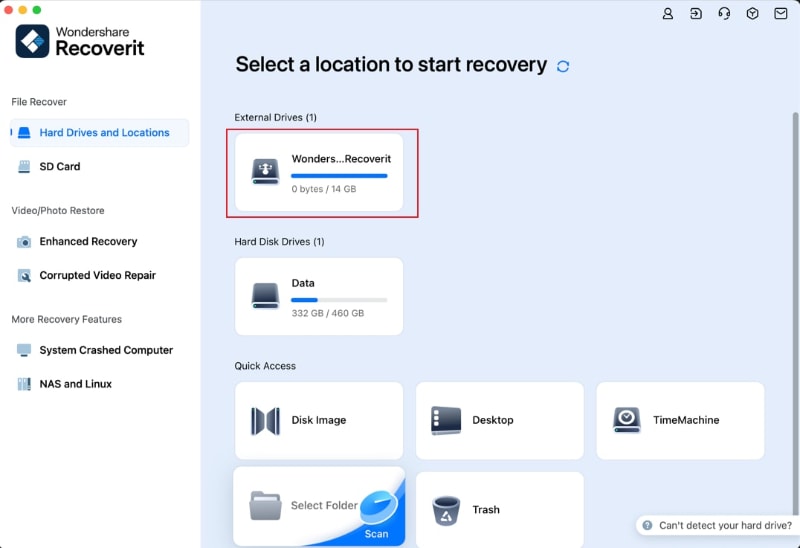
Step 4. Select Iomega Hard Drive
Go to Hard Drives and Locations. Since we want to get files from an external disk, select the Iomega hard drive under the External Drives section to start scanning the disk.
Step 6. Scan the hard drive
Once you click the Iomega hard disk, an all-around scan starts. Note that the process can take a few minutes depending on the files on the drive. The beauty of Recoverit, however, is that you get to filter and locate the files you want while it is scanning.

Step 7. Preview files
Once you find the files you are looking for on the Iomega hard drive, Recoverit allows you to preview them before recovering them. Whether they are images, documents, videos, or audio, you can preview any type of file.
Step 8. Recover your files
Having previewed, the next thing is to recover your files. Simply highlight the files you want and click the "Recover" button. It is advisable, however, not to recover and download the files into the same Iomega hard drive where you lost them before.

Part 3: Iomega hard drive recovery on windows
Step 1. Download Recoverit
The step to download the software on windows is quite similar to working on a mac system. Download Recoverit for Windows and install the program first.
Step 2. Connect the Iomega hard disk
Using a good USB cord, connect the Iomega hard disk to the windows computer system. Before you launch Recoverit, ensure that your computer can recognize the hard drive.
Step 3. Launch Recoverit
Once the Recoverit is downloaded on your computer system, double click on the icon and you will have a window that has a few options you can pick from depending on the task you want to perform with the software.
Step 4. Select Deleted Files Recovery
From the list of menus on the Recoverit software, select the "Hard Drives and Locations" menu. That will open a new window showing all the drives that are connected to the computer.
Step 5. Select the Iomega hard disk
From the list of drives, select the Iomega hard disk that you have trapped data under the External Drives section. Once you click the drive, scanning starts automatically.
It does not matter if a partition on the hard drive has been deleted, Recoverit will scan the whole Iomega hard disk.

Step 6. Scan the Iomega hard drive
During the scanning, you can locate targeted files and even pause or stop the scanning.

Step 7. Preview files
Once you have located the files you wanted on the Iomega hard disk, you can preview them to be sure. All kinds of files can be previewed on the Recoverit software.

Step 8. Recover files
Having reviewed the files, you can then go ahead to recover your files. In other to do that, highlight the files you wanted and then click the "Recover" button.
For safety sake, however, select a different drive from the old Iomega hard drive to save the recovered files.

Part 4: How to Prevent Data Loss on Iomega Hard Drive
1. Take proper care of the Iomega HDD
You must have heard the saying that little things matter. This cannot be truer for any other thing as it is for Iomega hard drives. In other prevent data loss on your Iomega hard drive and ultimately extend the lifespan, then you must care for it.
It is advisable to treat the hard drive the same way you will treat your computer. Get a case for it, if you haven't already, keep it away from moisture and condensation. You must know already but you must be reminded that your Iomega external hard drive does not appreciate a low or high temperature. You also ensure no physical damage occur to the drive.
2. Monitor the health of Iomega hard drive
Being aware of the health of your hard drive will go a long way to help you prevent losing important data. One thing that has been discovered is that Iomega hard drives do not suddenly stop working, it must have been giving symptoms.
The issue is you are most likely not to have discovered these symptoms, however, a hard drive monitoring tool will help you know its condition before it goes out of hand.
3. Reduce the load on the drive
Like any other products we use, the Iomega hard drive can also break down from excessive overloading. As much as possible, don't overload the drive. Keep it under its capacity.
Overloading your Iomega hard drive will increase wear and tear and ultimately lead to damage to the hard drive and you most likely lose important data.
4. Always eject the hard drive
It is common practice to not "eject" the drive before removing from a computer system. In other to eject an Iomega hard drive from a computer system, select the "remove device" or "eject" option pulling the drive's USB from the computer.
Closing Words
An Iomega hard disk is a powerful tool. Not only can it help you backup important data, but it can also let you carry around a huge amount of data easily due to its portability. The rather sad thing is this powerful to can cause data loss due to several factors – some of which we have discovered in this article.
While it is important to safeguard the hard drive from harm, sometimes this is inevitable. Then, the reason for this piece. Data can be recovered from damaged or corrupted Iomega hard disks and Recoverit is the solution.
People Also Ask
-
How do I fix my Iomega external hard drive?
Check the power on the Iomega external hard drive if the drive isn’t working correctly. Examine the USB data cord that connects the Iomega drive to the PC. The computer will not read and send saved data to the disc if the USB cable is not fully plugged into both ports. Using the driver installation CD, install the drivers on your computer.
-
Is Iomega still in business?
The company that EMC purchased is changing its network-attached storage arrays after 33 years of using the Iomega brand name. Iomega announced that the Lenovo Ltd. logo will now appear on its entry-level consumer NAS devices.
-
How do I connect my Iomega hard drive?
1. Turn your PC on.
2. If your hard disc has an AC adaptor, plug it in.
3. Use the FireWire or USB cable that came with the hard disc to connect it to your computer.
4. Drag and drop files into the window to copy them to the hard drive.
5. When you’ve finished using the drive, disconnect it.
-
Why won’t an external hard drive be recognized?
The following scenarios can result in a hard drive not identified error or issue: The USB driver has become corrupted, obsolete, or unstable. USB ports can become defective, damaged, or even broken over time—problems with partitioning on your external USB device.
-
Why can’t Windows 10 see my external drive?
Try to attach the external hard drive to a different USB port and see what happens. By hitting Windows key + R and typing diskmgmt. msc into the start prompt, you may start Disk Manager, which will display a list of all the discs attached to the computer. Check to see if the USB drive is visible.
What's Wrong with Drive
- Recover Your Drive
- Fix Your Drive
- Format/Wipe Drive
- Know Your Drive


 ChatGPT
 Perplexity
 Gemini
 Claude
 Grok
Grok


Amy Dennis
staff Editor