

As a Mac user, it's crucial to check the health of hard drive or Solid-State Drive (SSD). Isn’t it? Whether you're using a traditional hard disk drive (HDD) or the faster, more reliable SSD, monitoring its condition can help you avoid data loss and ensure your computer's overall performance remains top-notch.
In this comprehensive guide, we'll explore the signs and symptoms of a failing Mac hard drive, explain how to perform Mac SSD health checks, and discuss various methods to assess the condition of your storage device. We'll also cover what to do if you've lost data due to a failing hard disk, and provide tips to maintain the long-term health of your Mac's storage. So, let's dive in and learn how to perform an SSD Health Check on Mac.
Part 1: Hard Disk Failing on Mac: Signs and Symptoms
When your Mac's hard drive or SSD starts to fail, there are several telltale signs you should watch out for:
- Slow performance: If your Mac is taking longer than usual to boot up, launch apps, or access files, it could be a sign of a failing hard drive.
- Frequent freezes or crashes: If your Mac is suddenly freezing or crashing more often, it may be an indication of a problem with the storage device.
- Unusual noises: If you hear unusual whirring, clicking, or grinding noises coming from your Mac, it could be a sign of a failing HDD.
- File corruption: If you're encountering corrupted files or unable to open certain documents, it may be a sign of a failing hard drive.
- Disappearing files: If you're finding that files are randomly disappearing or you're unable to access certain folders, it could be a sign of a failing storage device.
- Startup issues: If your Mac is having trouble booting up or getting stuck on the startup screen, it could be an issue with the hard drive or SSD.
It's important to pay attention to these signs and symptoms, as they can help you identify a potential hard drive or SSD failure before it's too late.
Part 2: Can I Perform SSD Health Check on Mac?
Yes, you can absolutely check the health of your Mac's SSD. Unlike traditional hard disk drives (HDDs), which rely on moving parts, SSDs use flash memory to store data. This makes them more resilient and less prone to physical failures.
However, SSDs can still experience wear and tear over time, and it's essential to monitor their condition to ensure optimal performance and prevent data loss.
Fortunately, there are several methods you can use to perform hard disk health check on Mac, which we'll cover in the next section.
Part 3: How to Check Hard Drive Health on Mac
When it comes to checking the health of your Mac's hard drive or SSD, there are a few different methods you can use. Let's explore each one in detail:
Method 1. Use Disk Utility to Check SSD Health
The Disk Utility app, which comes pre-installed on your Mac, is an excellent tool for maintaining your storage device. This app lets you not only format SD cards but also check the overall health of your storage device. You can use it to verify the integrity of your disk, repair errors, and even manage partitions. It's a handy feature to ensure your devices run smoothly and efficiently.
Here's how to use it:
- Open the Disk Utility app, which you can find in the Utilities folder of your Applications. Select your Mac's internal storage device (either the HDD or SSD) from the left-hand menu.
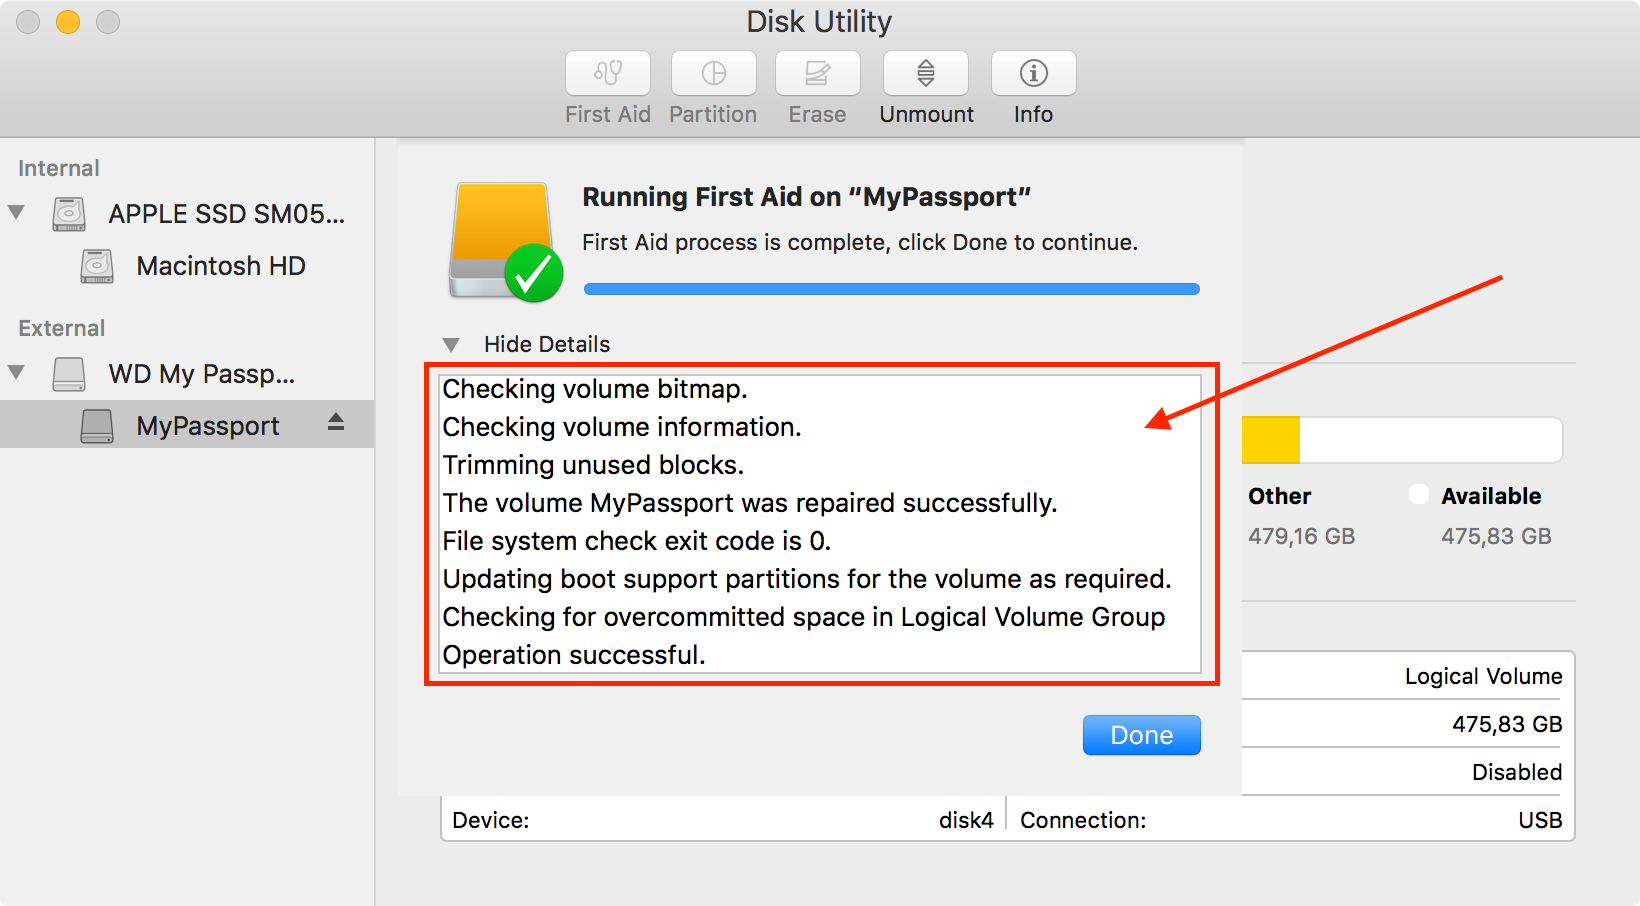
- Click on the "First Aid" tab, then click "Run" to initiate a health check on your storage device. The Disk Utility will now scan your drive and report any issues or irregularities it finds.
Using Disk Utility is a quick and easy way to get a general overview of your Mac's storage health. It can detect issues like bad sectors, file system problems, and other potential problems that could be causing performance issues or data loss.
Method 2. Use Terminal to Check Health of SSD Drive
For a more detailed analysis of your Mac's SSD health, you can take advantage of the Terminal app. By running a few specific commands, you can gain deeper insights into the performance and status of your SSD, helping you maintain its health and longevity. This method provides comprehensive information beyond what the Disk Utility app offers, ensuring your storage device stays in optimal condition.
Here's how to perform a Mac HDD health check using Terminal:
- Open the Terminal app, which you can find in the Utilities folder of your Applications. In the Terminal window, run this command. sudo smartctl -a /dev/disk0
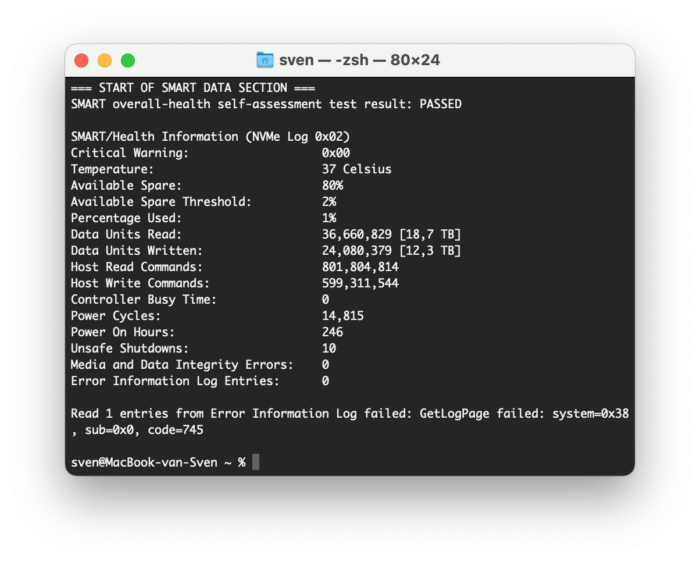
- This command will display a detailed report on the health of your SSD, including its overall condition, wear level, and other critical metrics.
The Terminal-based method provides more granular information about your SSD's health, including factors like its wear level, which can help you anticipate when you might need to replace the drive.
Method 3. Use Apple Diagnostics
Apple Diagnostics is a built-in tool designed to help you identify and diagnose hardware issues on your Mac, including problems with the storage device. This feature runs a series of tests to pinpoint any hardware-related issues, providing you with detailed information on potential problems.
Using Apple Diagnostics, you can ensure your Mac's components are functioning correctly, allowing you to address any issues promptly and maintain your device's performance.
Here's how to use it:
- To begin, shut down your Mac, unplug external devices, and then restart while holding the "D" key.
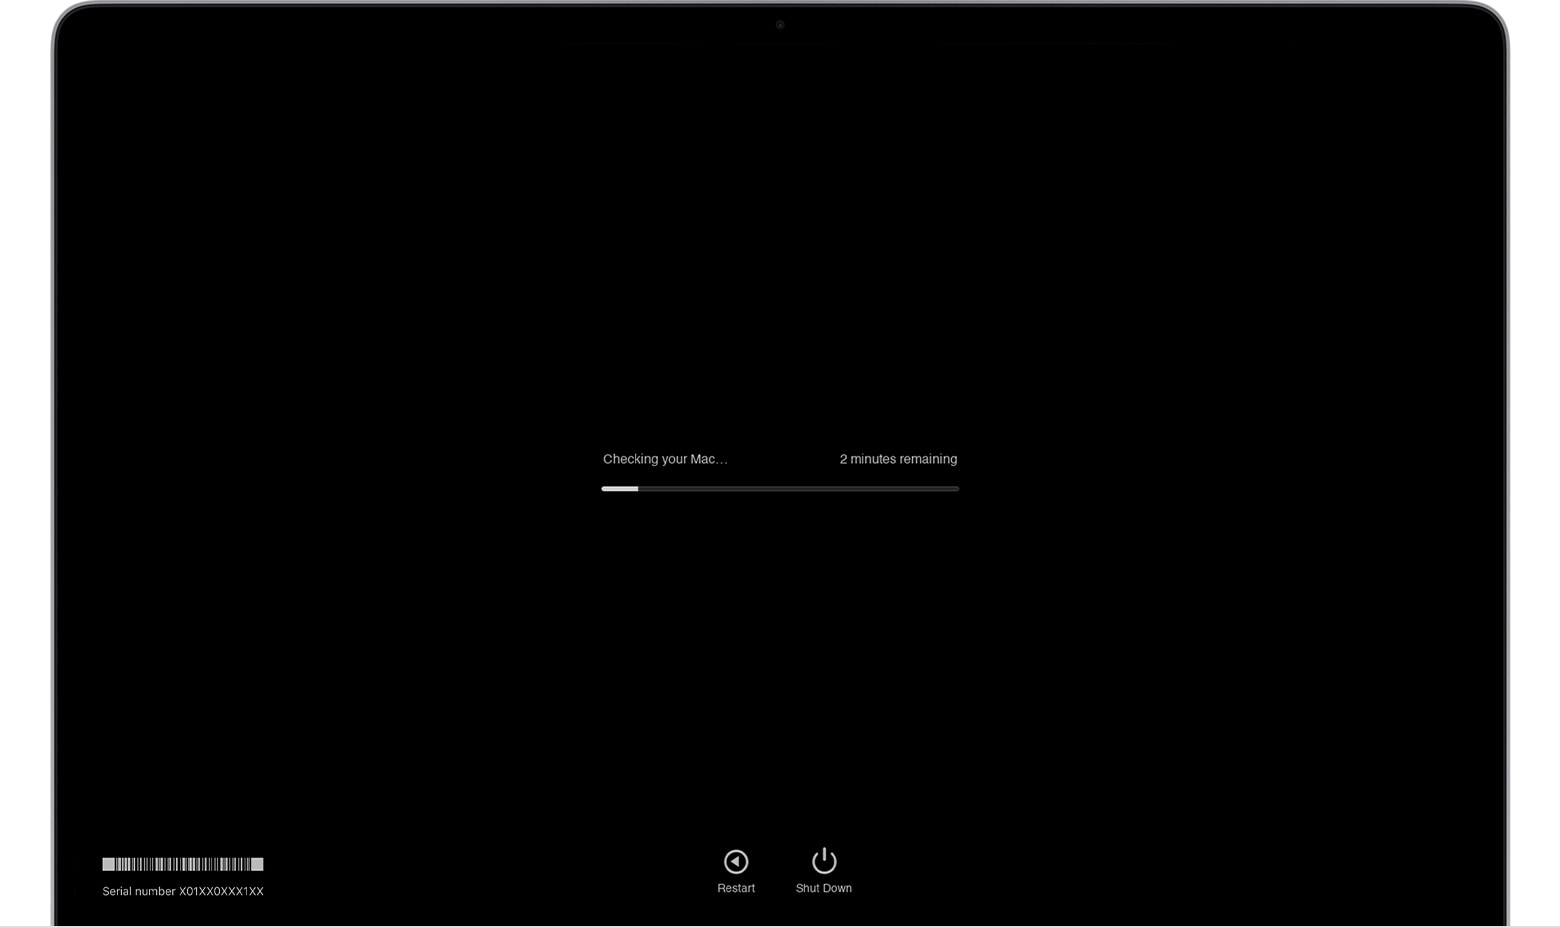
- The Apple Diagnostics tool will start running and scan your Mac for any hardware-related issues. Once the scan is complete, it will display a report with any detected problems, including issues with your storage device.
Using Apple Diagnostics is a great way to get a comprehensive overview of your Mac's hardware health, including the condition of your hard drive or SSD.
Part 4: Lost Data on MacOS Due to Failing Hard Disk?
If you've already experienced data loss due to a failing hard disk or SSD on your Mac, don't worry – there are tools available to help you recover your important files. One such tool is Recoverit, a powerful data recovery software specifically designed for macOS.
Recoverit can help you recover a wide range of file types, including documents, photos, videos, and more, even if your storage device is severely damaged or corrupted. The software uses advanced scanning algorithms to search for and retrieve your lost data, making it an invaluable tool in the event of a hard drive or SSD failure.
To use Recoverit, simply download and install the software on your Mac, then follow the on-screen instructions to scan your storage device and recover your lost files. The process is straightforward and user-friendly, even for those who are not tech-savvy.
To use Recoverit, follow these simple steps:
- Install Recoverit on your Mac. Select the location where you lost your data, such as the failed hard drive or SSD. Click "Start".

- The scanning process can vary in duration depending on the size of your storage device.

- Once the scan is complete, preview the recoverable files and select the ones you want to restore. Click "Recover" to save them to a safe location.

Using Recoverit is a straightforward and user-friendly process, even for those who are not tech-savvy. The software's intuitive interface and advanced recovery algorithms make it a valuable tool for anyone facing data loss due to a failing hard drive or SSD on their Mac.
Guide: How do I recover permanently deleted pictures?
Part 5: Tips to Check hard drive health on Mac
In addition to the methods we've covered, here are a few additional tips to help you monitor and maintain the health of your Mac's hard drive or SSD:
- Regularly backup your data: One of the best ways to protect your data is to create regular backups, either to an external hard drive or a cloud storage service. This will ensure that even if your primary storage device fails, you'll still have access to your important files.
- Monitor your storage usage: Keep an eye on how much storage space your Mac is using, as excessive usage can put strain on your hard drive or SSD and potentially lead to performance issues or data loss.
- Avoid fragmentation: For traditional hard disk drives (HDDs), it's important to avoid excessive file fragmentation, which can slow down your Mac's performance. You can use the built-in Disk Defragmenter tool to help optimize your HDD.
- Keep your Mac's software up-to-date: Regularly updating your Mac's operating system and other software can help ensure that your storage device is running at optimal performance and that any known issues are addressed.
- Consider upgrading to an SSD: If your Mac is equipped with a traditional hard disk drive, consider upgrading to a solid-state drive (SSD). SSDs are generally more reliable, faster, and less prone to physical failures than HDDs.
By following these tips and regularly checking the health of your Mac's hard drive or SSD, you can help ensure that your data remains safe and your computer continues to perform at its best.
Conclusion
Monitoring the health of your Mac's hard drive or SSD is a crucial aspect of maintaining the overall performance and longevity of your computer. By being aware of the signs and symptoms of a failing storage device, and by utilizing the various tools and methods available to check its condition, you can take proactive steps to prevent data loss and ensure your Mac continues to run smoothly.
Remember, regular backups, storage usage monitoring, and software updates are all key to maintaining the long-term health of your Mac's storage. And if you do experience data loss due to a failing hard drive or SSD, tools like Recoverit can help you recover your important files.
By following the guidance provided in this comprehensive guide, you'll be well on your way to keeping your Mac's hard drive or SSD in top-notch condition for years to come.
FAQ
-
1. Can I use third-party software to check the health of my Mac's SSD?
Yes, there are several third-party utilities available that can provide more detailed information about the health of your Mac's SSD. Some popular options include the free app CrystalDiskInfo or the paid app DriveDx. -
2. How often should I check the health of my Mac's hard drive or SSD?
It's a good idea to check the health of your storage device at least once a month, or whenever you notice any performance issues or unusual behavior. This will help you catch any potential problems early and take action to prevent data loss. -
3. What should I do if Disk Utility or Terminal show that my Mac's storage device is failing?
If the health check tools indicate that your hard drive or SSD is failing, the first step is to back up your data as soon as possible. Then, you can consider replacing the failing storage device to restore your Mac's performance and protect your files.
 ChatGPT
 Perplexity
 Google AI Mode
 Grok
Grok


