How to Remove Hard Drive from Laptop
There could be any number of reasons why you would want to remove a hard drive from your laptop, and chief among them is the need for an upgrade, isn't it? And since hard drives aren't indestructible, they can get damaged and will need to be replaced. The steps you'll have to take to remove your drive will be written out for you in detail in the subsequent pages.
- Part 1: Is it Safe to Remove Hard Drive from Laptop?
- Part 2: How to Remove Hard Drive from Laptop
- Part 3: How to Recover Lost Data from Hard Drive Removal?
- Part 4: Overview of Laptop Hard Drive Parts
Part 1: Is It Safe to Remove Hard Drive from Laptop?
Yes, yes, it's very safe. There may be some risk involved but it's very minimal (if you follow the appropriate steps). Removing your laptop's hard drive, as you would expect, has very little to do with software. You will be handling hardware throughout the process. It entails doing a lot of screwing and unscrewing, so prepare to channel into your inner handyman.
Removing a hard drive simply means opening up your laptop and taking out the drive or drives it runs on, regardless of how many of them the laptop is compatible with. But the process of removing the drive itself should be handled with care.
For one, NEVER remove it while the system is still on and the drive is functioning. If, for some illogical reason, you do decide to remove it with the power still on, be aware that you expose the drive static electricity, which could electrocute your drive's contents to death (no joke!). Your body can easily transmit static electricity to the drive's fragile electronic components. In essence, you could fry the sectors on the drive and lose valuable information without even realizing it! Does it seem too surreal? Well, it's not; just fact.
The aim is not to scare you here; it's just a warning because there are times when removing your drive becomes a necessity:
- You're running out of space and need more, and installing a drive with larger capacity is the only solution.
- The drive is damaged and needs to be replaced.
- Your system has several hard drive slots and you want to install more i.e. most modern laptops come with both SSD and HDD slots.
- You want to use the drive in your system as a backup drive, so you remove it and replace it with another drive.
- You simply want to upgrade to a newer and more advanced drive.
Part 2: How to Remove Hard Drive from Laptop
Alright, it's finally time. As the old saying goes, "nothing ventured, nothing gained". You can read up as much as you want about removing a hard drive but until you put all that theory into practice, the knowledge will be of very little value.
Even though different laptop models place their hard drives at different positions, the drives are generally accessible through the access panel below the laptop. All you need to get to work are your hands and a screwdriver (get a set of Jeweler's screwdriver because they are compatible with screws in any kind of laptop).
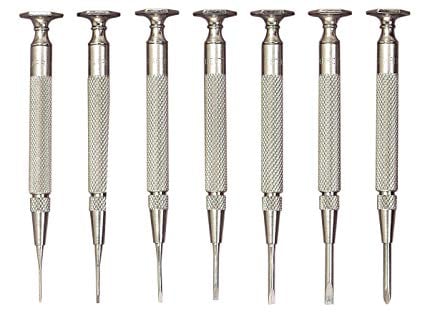
Step 1: Take Out the Battery
Since you have neither the efficiency nor precision of a machine, you have to be extra cautious for manual work like this.
Take out the laptop's battery if it's not inbuilt. The simple reason you should do this is that even if your system is turned off while you're working on its inner components, as long as it's still connected to a power source (battery), the power might come back on due to a short or mechanical jolt.
Oh, and disconnect all the cables attached to the laptop too. Press and hold down on the power button for about 15 seconds to drain any remaining electricity the laptop may be harboring. The majority of batteries have two release latches that you either pull or press to take the battery out of the bay.
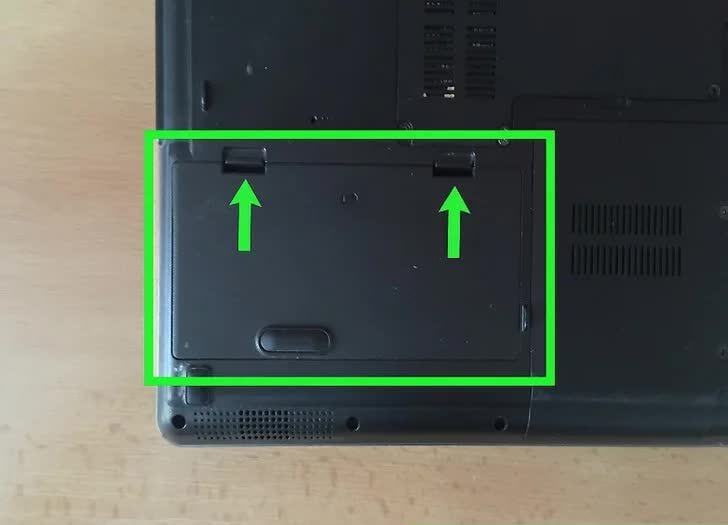
Step 2: Remove the Screws of the Main Access Panel
Look below the laptop to locate the access panel. Sometimes, it's at the side of the laptop. On rare occasions, you could find out that the hard drive is located under the motherboard of your laptop. Removing that kind of drive is considerably more difficult, so you are advised to consult someone with a bigger brain (an expert) in such a case.
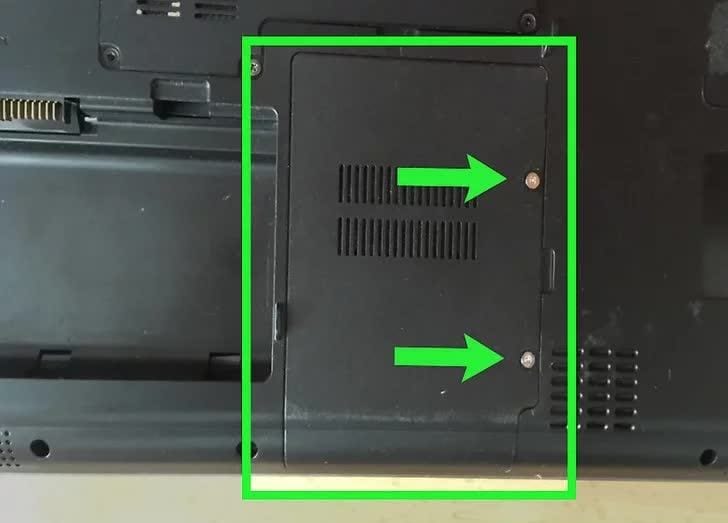
Step 3: Remove the Drive Mount
In all likelihood, your drive has a hard drive amount which further helps to keep it in place. There will be screws holding the mount down so you have to unscrew them too; on certain laptops, it's a button you press to release the drive.
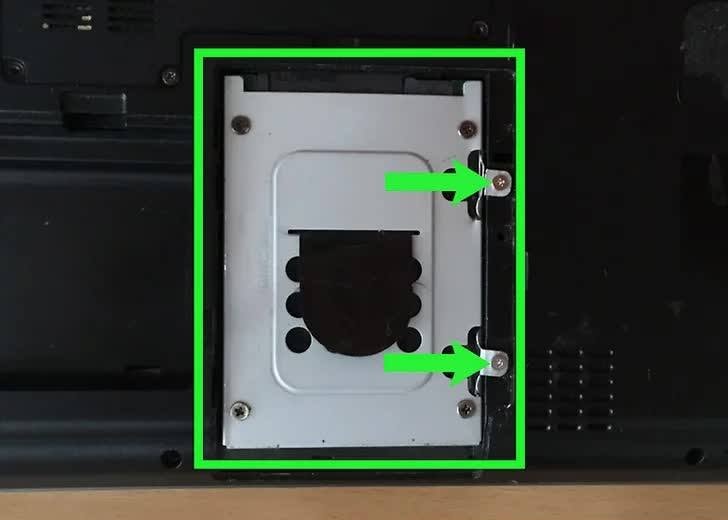
Step 4: Pull Out the Drive from the Connectors
Gently pull the drive away from its connectors and out of its bay (a flat-bladed tool can come in handy here). Be careful and try not to damage the connectors. Without them, there's no other way to insert an internal drive into your laptop.
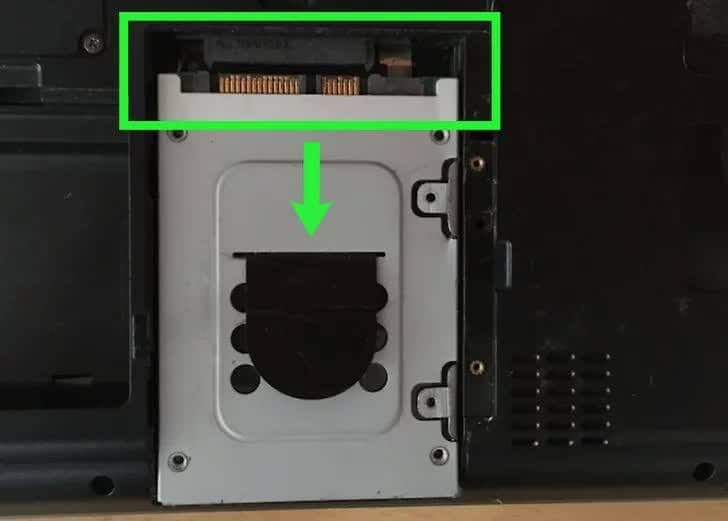
Step 5: Take it out from the Bracket
Even after pulling it out, the drive may still be fastened to the bracket. There are normally two screws on either side of the bracket holding the hard drive to it. Unscrew them and your hard drive is finally free.
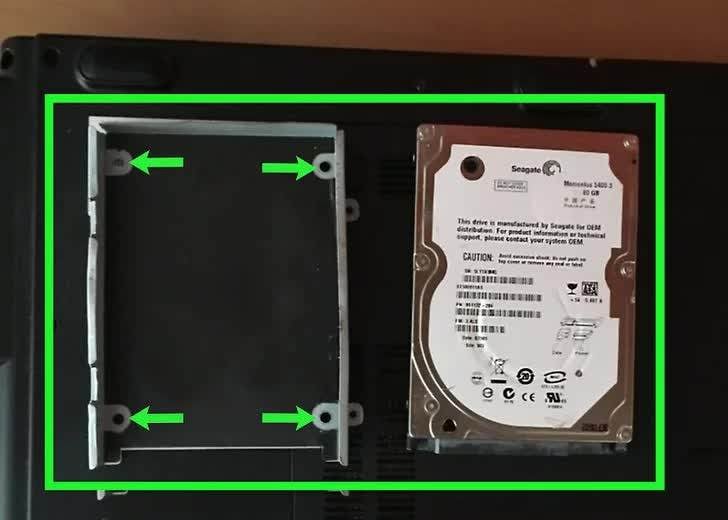
See how easy it is to remove the drive? Now read the tips below to make the process even safer and smoother.
- Backup your data because though a hard drive is replaceable, many of your files are not. You can't buy your files in a shop like you can do a drive.
- Put the hard drive back into your laptop by reversing the steps you took to remove it.
- If you're putting in a new drive into your laptop, the first step is to format the drive once you install it.
- Never try to remove the battery while the laptop's power is on.
Part 3. How to Recover Lost Data from Hard Drive Removal?
There is a slight chance that you may lose your files after you remove your hard disk. How? Maybe after removing and replacing your drive with a newer one, you format the old one and decide to use it as an external, but before backing up the files in it.
Recoverit Data Recovery is a premium data recovery software specifically meant to tackle issues like this. The software's sole purpose is to recover files you lose in several ways. Best of all, anyone can use it. You don't need to be a whiz or geek to get it to work for you.
Step 1: Choose a Location
- If the drive you want to recover data from is an external, connect it to your PC and launch Recoverit. On the other hand, if the drive is the default one your PC is running on, just start Recoverit and choose it from the software's first window.
- Naturally, any external drive will be under the "External Devices" category while "Hard Disk Drives" will show you the internal drives. Select the right drive and click "Start."

Step 2: Scan the Location
- The scan for lost data will commence. To make the recovery process more convenient for you, Recoverit offers features that allow you to select file filters. For example, if you wish to only recover "jpg" and "doc" files, you can just tick the checkboxes corresponding to the said file types.

Step 3: Preview and Recover Data
- Tick all the checkboxes of the files you want Recoverit to recover. There's a "select all" button but you only need to do this if you want to recover EVERYTHING you lost and not just particular stiff.
- Click the "Recover" button and the files you selected will be taken out of your drive and dumped wherever you want. Be wary of where you save the files; don't recover them back to the drive they were lost from.

The only thing you need to worry about when it comes to data loss is to ascertain whether the fault stems from hardware damage or not. If it's not the latter, Recoverit is your one-stop solution to not just recovering lost data, but also formatted and deleted files.
The software was built to drill through hard drives and drag out lost data from each sector of the drives it's hiding in. Recoverit is user-friendly and so effective you can almost say it's adept at data recovery.
Part 4: Overview of Laptop Hard Drive Parts
This is the part where things get a little more technical and confusing, so brace yourself. A hard drive, also known as a hard disk and abbreviated as HDD, is a non-volatile memory device that stores and retrieves data on a system. Before you ask, "non-volatile" means memory which is saved even if your computer is powered off.
Are you clear on all that? Good. A hard drive is made up of several components, but explaining them all here would be pointless. Honestly, unless you're a hard drive manufacturer, don't bother yourself with knowing every part and how they function; there's too many of them, so only the four main ones will be highlighted here.
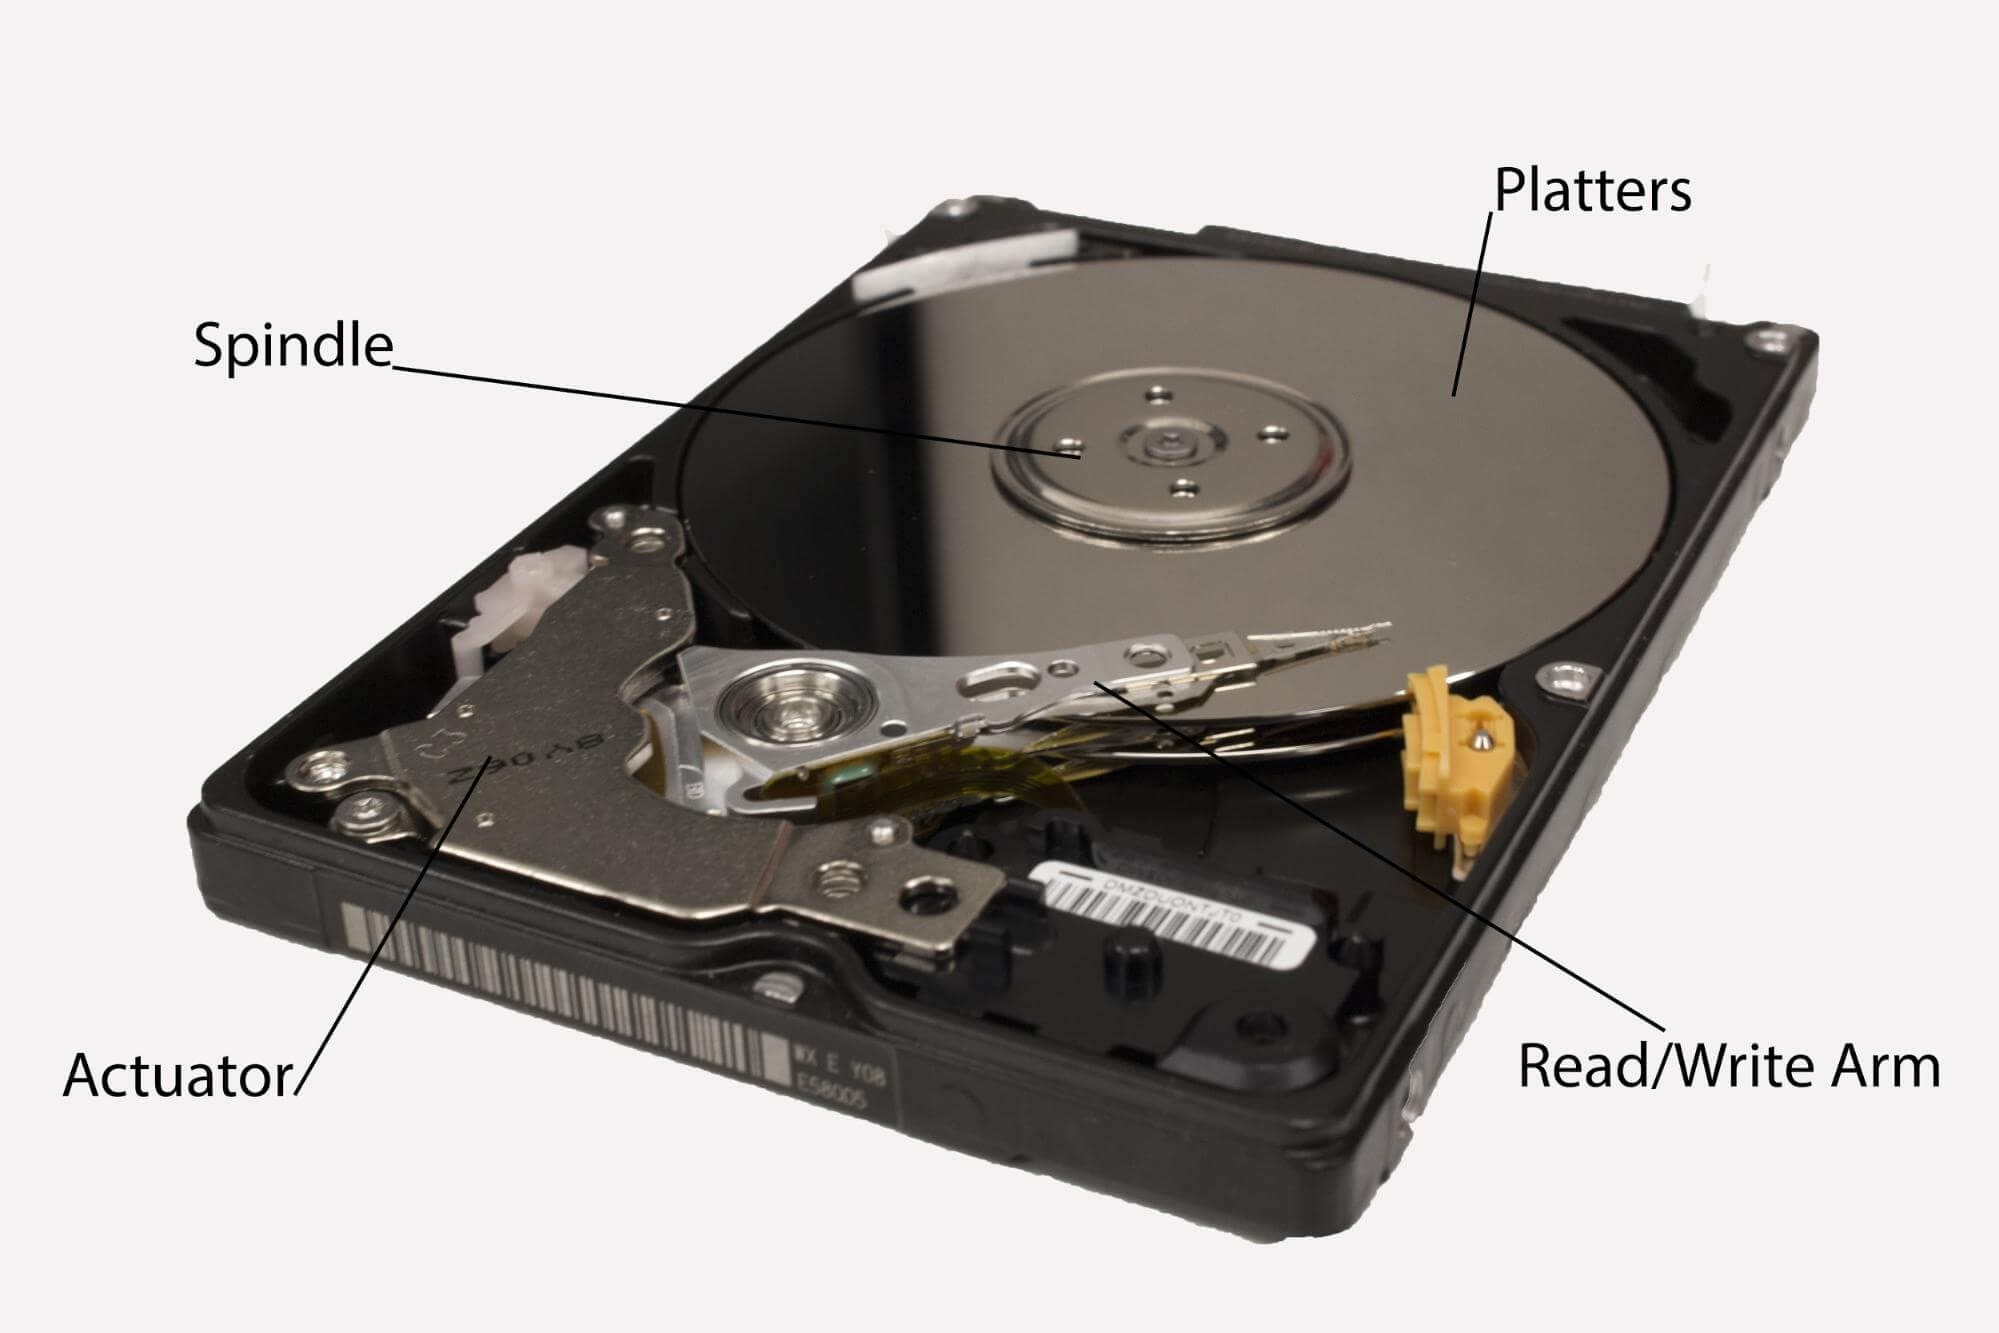
These are the big circular discs where your files are stored. Platters are arguably the most important component of your drive, so it's crucial you don't damage them; don't even scrape them. Never be hasty when removing the drive from your PC.
This is what rotates the platters and keeps them in position. The rotating speed of the platter is parallel to how fast data can be read and written from your drive. Try not to break the spindle when you're removing your drive because, without it, the drive's platters will simply fly all over the place.
This little guy is in charge of how the read/write heads move; the heads are the components that read and write on the platters. So, what happens if the arm breaks off because you yanked the drive out too fast or hard? The answer is obvious, isn't it?
You can think of the actuator as the "manager" within your drive. It's a small but powerful motor that listens to any instructions your drive's circuit board gives it, like controlling how the read/write arm moves and managing how data is transferred to and from the platters.
In a nutshell, the actuator makes certain the read/write head is perpetually in the position it's supposed to be in. Be extra careful when removing your drive because the actuator is quite sensitive.
It's finally time to round up this post. You've been taught all you'll ever need to know when it comes to removing or replacing hard drives. As you have seen, it's a simple and straightforward process. Even though you'll be opening your laptop, there are zero risks if you do as follow the instructions exactly.
If things don't go as planned and you lose your files along the way, Recoverit can step in and cater to that little problem; it may not be such a little issue for other data recovery software but Recoverit, it's just another simple job that needs to be done.
What's Wrong with Drive
- Recover Your Drive
- Fix Your Drive
- Format/Wipe Drive
- Know Your Drive


 ChatGPT
 Perplexity
 Google AI Mode
 Grok
Grok


Theo Lucia
chief Editor