
 TL;DR:
To temporarily disable System Integrity Protection (SIP) on a Mac to install restricted third-party applications, restart the computer in Recovery Mode by holding Command+R, open the Terminal from the Utilities menu, and execute the csrustil disable command.
● Disabling SIP exposes your hard drives and root-level files to malware, making it essential to immediately restore protection after your task by running the csrustil enable command in the Recovery Mode Terminal.
● If full Recovery Mode is unavailable, you can bypass it by holding the Option key during startup, selecting the recovery partition, and pressing Command+S to boot directly into Console mode.
● If a malicious attack causes data loss while SIP is deactivated, a recovery tool like Wondershare Recoverit can be used to scan the designated hard drive and restore the affected files.
Ask AI for a summary
 ChatGPT
 Perplexity
 Gemini
 Claude
 Grok
Grok
Is there a way to let a specific app through System Integrity Protection on macOS?
This is a common question Mac users ask, and one way to do this is by disabling the feature. System Integrity Protection (SIP) was introduced as a security feature in OS X El Capitan. This feature aims to prevent your programs from changing root-level files, even with passwords implemented.
Despite its usefulness, SIP sometimes stops some programs from functioning well. This is even more common with third-party applications. In this article, we’ll explain if it is safe to turn off System Integrity Protection on Mac and how you can enable and disable system Integrity protection on Mac; let’s begin.
In this article
Is It Safe to Disable System Integrity Protection (SIP) on Mac?
Disabling System Integrity Protection on Mac is not safe because its function is to protect your computer hard drives and program files from malware attacks. Some third-party apps require you to disable System Integrity Protection. However, the goal is usually to change your system files and how your PC works to their self-designated drivers. Unfortunately, these apps come with unadvanced techniques that sometimes contain viruses and affect your PC.

Luckily, many apps today are well-designed and can run on Mac with SIP enabled. However, you might still need to temporarily turn off the System Integrity Protection feature so your Mac can install some apps. Of course, you can always enable System Integrity Protection on Mac after downloading and installing.
How to Disable System Integrity Protection on Mac
Turning off System Integrity Protection can be stressful, especially when you don’t know how to achieve it. First, you’d have to restart your Mac in recovery mode. Additionally, it’s crucial to re-enable SIP once you have downloaded the app that the SIP feature was interfering with. On that note, below are the steps to disable SIP on your Mac computer.
- Step 1: Start by restarting your Mac.
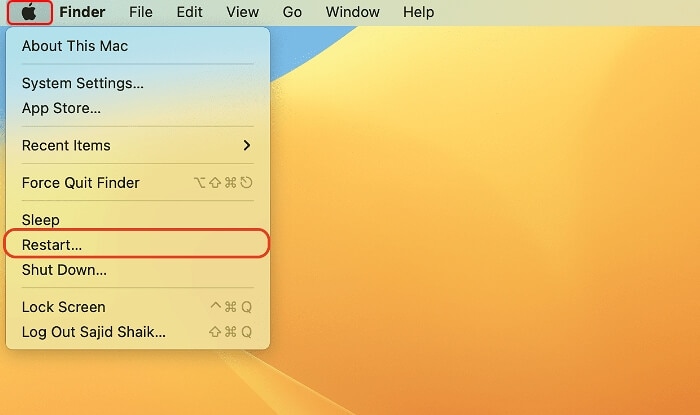
- Step 2: As it reboots, hold down the Command+R button simultaneously until you hear the boot chime and the Apple logo appear.

- Step 3: Wait for macOS to boot up the Utilities.
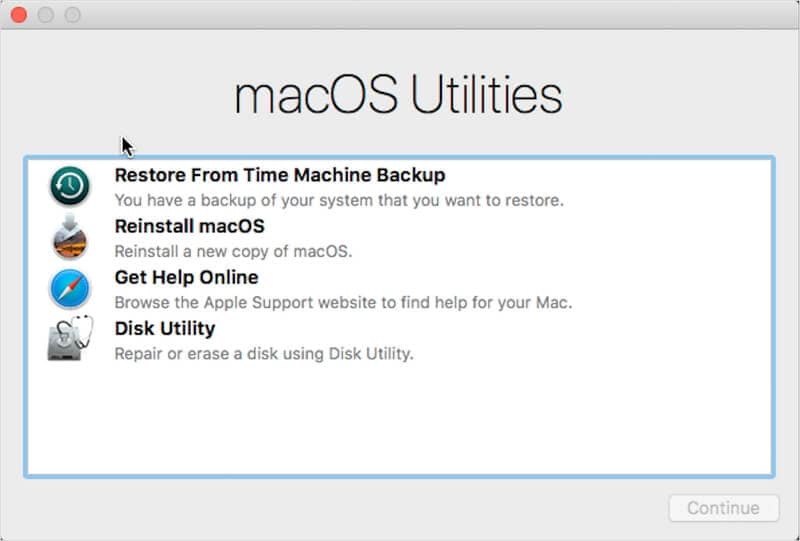
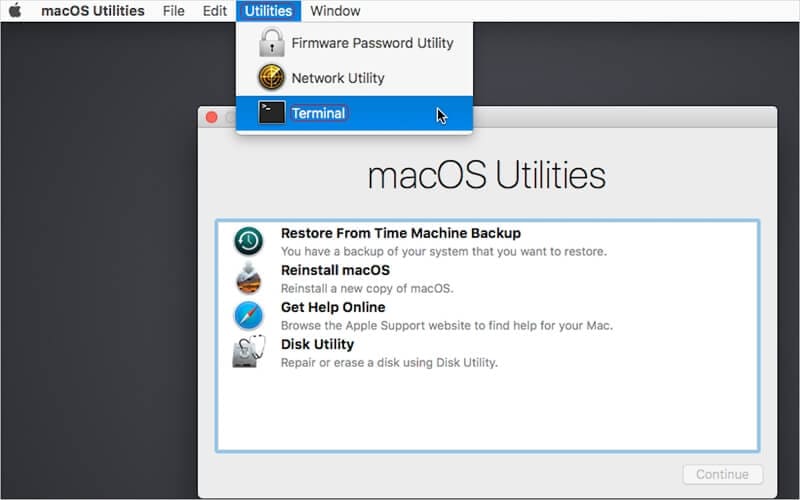
- Step 4: Once this window appears in recovery mode, open a Terminal window from the Utilities dropdown menu. You can usually find the tab at the top of the screen.
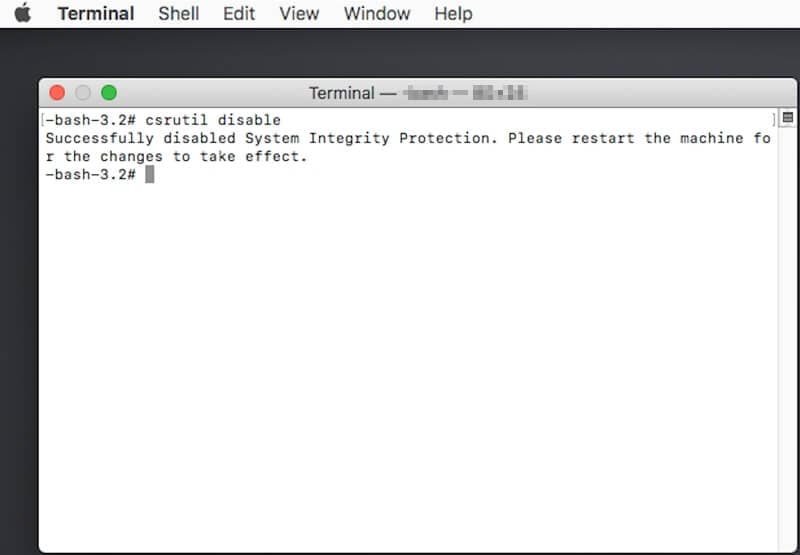
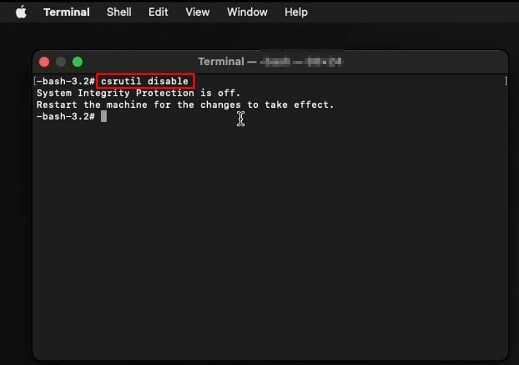
- Step 5: In the Terminal window, enter csrustil disable.

- Step 6: Now, press the Return key, and a message will appear informing you that System Integrity Protection is disabled and that you should restart your PC for the changes to take effect.
- Step 7: Restart your Mac, and you’ll find that SIP is disabled on Mac.

Now, you can install any software without interference from SIP on Mac.
How to Disable SIP Without Fully Recovery Mode
Sometimes, you might look for another method to disable System Integrity Protection on Mac without the Recovery Mode. Whether the Recovery Mode isn’t working or you want the alternative, below are the steps to turn off System Integrity Protection on Mac without the Recovery Mode.
- To begin, shut down the Mac.
- Next, switch the Mac back on and hold down the options key.
- Choose your recovery partition and simultaneously hold down the Command+S buttons to boot Mac in Console/Terminal mode.

- Once this pops up, enter the command csrustil disable and hit 'Return.'
- This would run the System Integrity Protection disabling on your macOS, and you can then install the apps you want.
How to Re-Enable System Integrity Protection
To prevent malware attacks on your PC due to the lack of protection, it’s always essential to re-enable SIP on Mac when you have done the tasks that need the System Integrity Protection service to be off. Below are the steps to re-enable System Integrity Protection.
- Step 1: To begin, restart your Mac.
- Step 2: Hold the Command+R button until the Apple logo pops up.

- Step 3: Once your Mac computer boots into its Utilities window, click Utilities and select 'Terminal.'

- Step 4: Enter csrustil enable to re-enable SIP on your Mac.
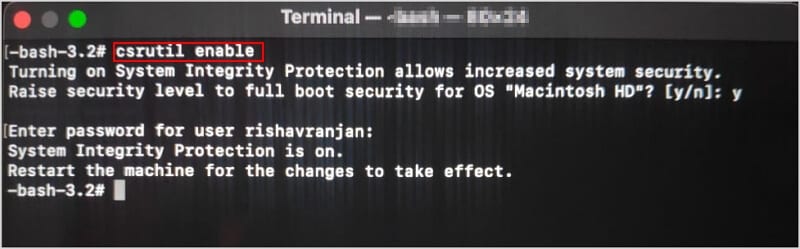
- Step 5: Now hit the Restart button, and your System Integrity Protection will be back up.

Bonus Tips: How to Recover Lost Data After Disabling SIP and Experiencing Malicious Attack
Losing data can be a terrifying experience, and it’s even more possible with SIP disabled on Mac. Once you lose data on your Mac, recovering it becomes a challenge. However, Mac data recovery software can help you get your data back in no time.
Wondershare Recoverit is versatile and assists in the recovery of different file types like lost or deleted music files, documents, videos, photos, system files, and more.

Wondershare Recoverit - Recover Your Precious Videos
5,481,435 people have downloaded it.
Recoverit can find data from emptied Mac trash, data lost from a bad sector, corruption of the hard drive, and accidental permanent deletion.
The software is incredibly easy to use and even has a preview function, so you can double check that you are restoring the proper file.
Support recovering 1000+ types of file formats: DOC/DOCX, XLS/XLSX, PDF, JPG, HEIF, HTML, INDD, EPS, MP4, MP3, zip, etc.
Free version to try and paid version to enjoy more.
Follow these simple steps to recover lost data after disabling System Integrity Protection.
- Step 1: Download Wondershare Recoverit on your Mac and launch the app.
- Step 2: Choose the drive or folder where your lost data was stored under the 'Hard Drives and Locations.'

- Step 3: A scan of the drive or folder will begin. The status of the scan process is displayed on the bottom left corner of the page. You can stop the scan midway if you find the data you lost.

- Step 4: Once the scan is complete, you can double-click on the files to preview them.

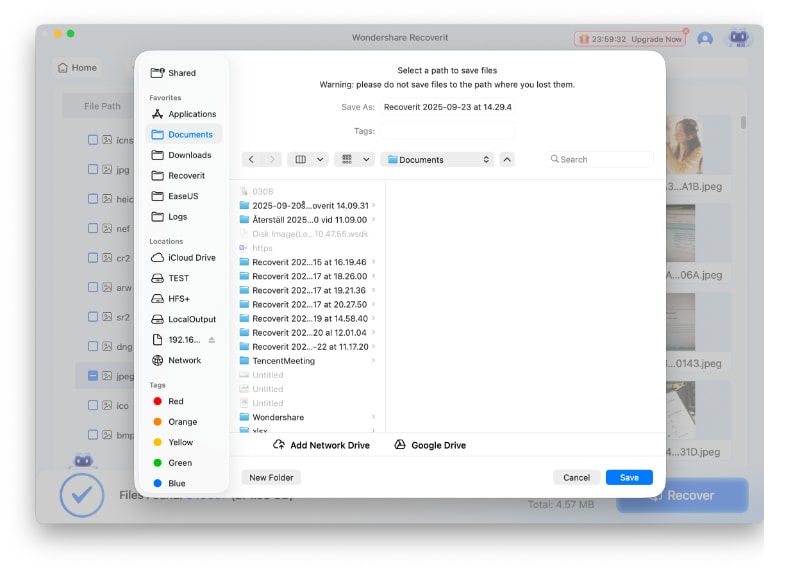
- Step 5: Select the files you want and click the ‘Recover’ button to restore and save them to a secure location.
For Windows XP/Vista/7/8/10/11
For macOS X 10.10 or later
Conclusion
Although most apps can work effectively with System Integrity Protection turned on, there are times when the ideal option for you is to disable it. Follow the steps above to disable System Integrity Protection on Mac and re-enable it after your task. While SIP on Mac is turned off, ensure your MacOS is updated, and you have an efficient antivirus available.


