
 TL;DR:
Cloning a Windows 10/11 bootable hard drive to transfer your operating system or upgrade to an SSD requires formatting a new destination drive to NTFS and duplicating the system data using a dedicated utility like Wondershare UBackit or AOMEI Backupper.
● The destination HDD or SSD must be physically connected via SATA ports or a USB external source, manually formatted to the NTFS file system prior to cloning, and possess enough storage capacity to accommodate all source files.
● Wondershare UBackit offers a one-month free trial and supports Windows 7 through 11, allowing users to execute full disk, specific partition, or bit-by-bit sector-by-sector clones.
● AOMEI Backupper features a dedicated SSD Alignment option within its operation summary, making it the most suitable choice when specifically migrating a boot drive from a traditional HDD to an SSD.
Ask AI for a summary
 ChatGPT
 Perplexity
 Gemini
 Claude
 Grok
Grok
If you’re an avid fan of Windows 10/11, you’re probably packing HDD/SDD in your rig. A good thing about both these hard drives is that you can copy your files and folders and migrate them to an image file or another storage device.
That is known as creating a bootable hard drive clone. It helps you save your data to restore your system or information in case your computer crashes, default boot device missing or your hard disks fail.
Cloning a bootable drive is also a reliable way to create an exact copy of your files and folders, installed programs, etc. You can even clone your entire operating system to avoid the hassle of installing everything from scratch. Read on to learn more about disk cloning, reasons to copy a boot drive, and how to do it.
Things You Need to Create a Bootable Drive Clone
Before you get into copying a boot drive, there’s some preparation to do to ensure you complete the process successfully. You’ll need an HDD or SSD if you’re using a desktop computer. Connect your drive to your PC using the available SATA ports.
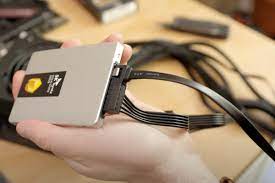
Pay attention to different connectors on your computer. Usually, there are two SATA connectors on the back of your drive – the long plug and the short one. The latter is for the SATA data cable that establishes a direct connection between the motherboard and the SATA port.
The former is the SATA power connector that connects to the power supply unit. If you don’t have a spare SATA data cable, you can use an external source like a USB to connect your new drive to your computer.
Once you connect your new hard drive to your computer, navigate to My Computer and double-click it to locate your new drive. Right-click the new disk and select Format to format it under the NTFS system. That will prepare your new disk for the cloning operation.
Now, all you need is reliable and trustworthy disk clone software for Windows 10/11 to complete the process. We recommend opting for two top solutions – Wondershare UBackit and AOMEI Backupper.
How To Clone a Boot Drive Windows 10/11 Using Wondershare UBackit
Wondershare UBackit is a user-friendly data recovery and backup software solution that can help you clone, backup, and recover your system data according to your needs. It’s a professional data management program designed to help you avoid data loss and keep your data/system safe.
Wondershare UBackit - Your Reliable Disk Cloning Software
Disk Clone: You can clone hard drive to SSD or another HDD easily. It supports a wide range of disk types, such as HDDs from all brands, SATA/M.2 SSDs, NVMe SSDs, USB drives, NAS drives, and SD cards.
Partition Clone: Instead of cloning the entire disk, you have the option to clone a particular partition.
Sector-by-Sector Clone: You are allowed to replicate a hard drive or partition bit by bit.
Supported OS: It is compatible with Windows 11/10/8.1/8/7, 32 bit and 64 bit.
Cloning a bootable hard drive with UBackit is as straightforward as it goes and requires only a few simple steps. Here are the steps to clone a boot drive Windows 10/11 using the UBackit Disk Clone utility. It offers one-month free trial so that you can clone a bootable hard drive for free.
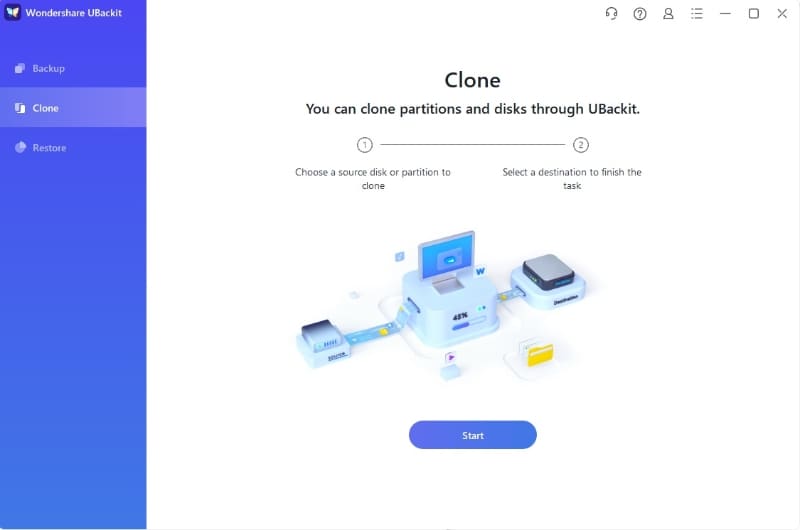
Step 1Select the Clone Feature
Download and install Wondershare UBackit on your PC. Run the program and locate the Clone section in the sidebar. Click on it and select Start.
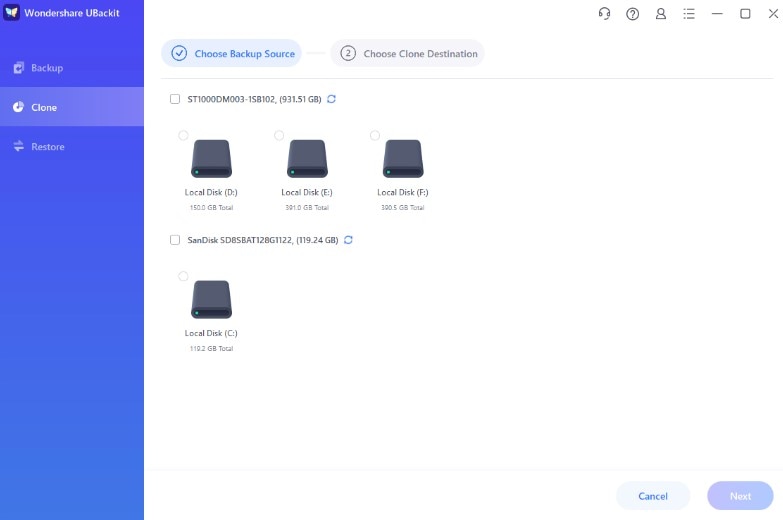
Step 2Select a Bootable Drive to Clone
Under the Choose Backup Source tab, Ubackit will scan your computer and come back with bootable hard drives for cloning. Select the drive you want to clone by checking the box next to it and click Next.
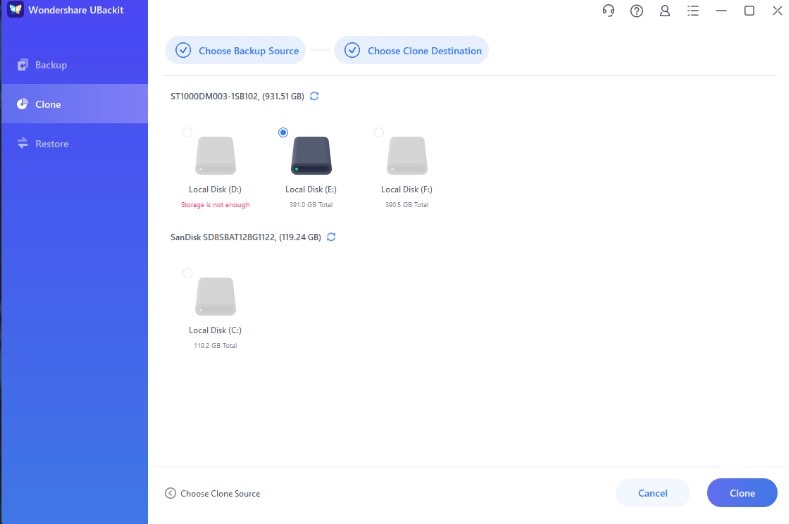
Step 3Choose Your Clone Target Destination
In the Choose Clone Destination tab, select where to store your new hard drive clone. The target destination should have enough storage space to load all your files, folders, program, and app settings, and system data. Click Clone to start the cloning process.
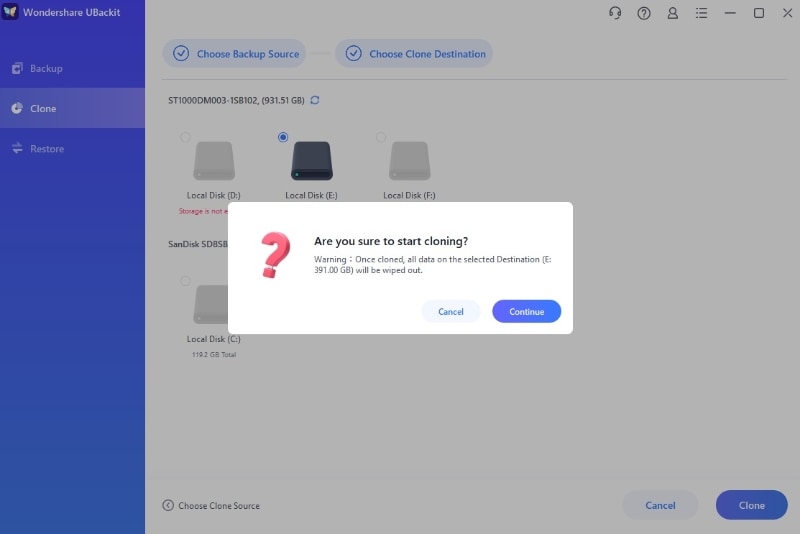
Step 4 Confirm the Boot Drive Clone
After you initiate the cloning process, UBackit will verify your action by asking you to confirm the clone task. Click Continue to let the program finish the operation.
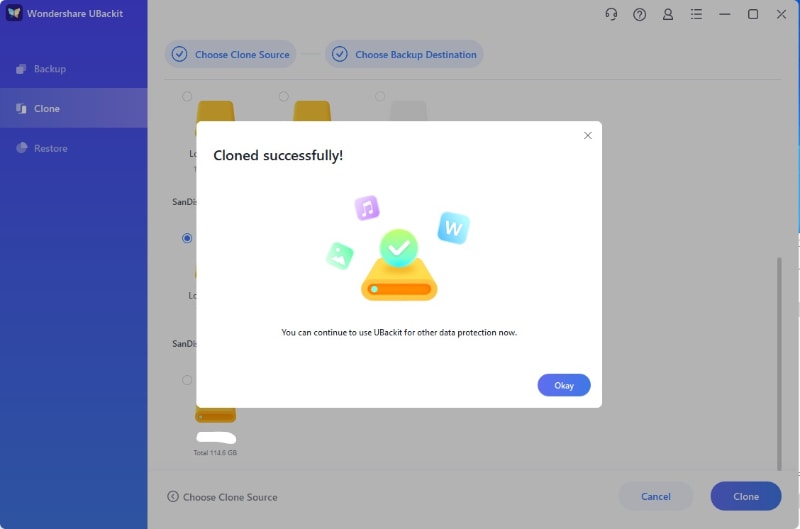
If everything is in order, you should see the Cloned successfully! message. Click Okay to return to the UBackit dashboard. You can now access your disk copy to manage, restore, and view your files.
How To Clone Bootable Hard Drive Using AOMEI Backupper
AOMEI Backupper is one of the best SSD clone tools for copying your hard drives, SSDs, and HDDs on the market. It’s a reliable data backup and recovery program for duplicating your personal settings, files, programs, and Windows settings to the new SSD storage device to avoid wasting time and effort on system reinstallation.
Like Wondershare UBackit, AOMEI Backupper supports backup, restore, and clone operations. The Clone utility allows you to migrate your disk, partition, or system to a new device.
You can use it to clone a hard disk to a new SSD, duplicate one or more partitions, tap into sector-by-sector cloning, replicate boot-required partitions to SSD, and more.
Here’s how to clone a bootable hard drive with AOMEI Backupper.
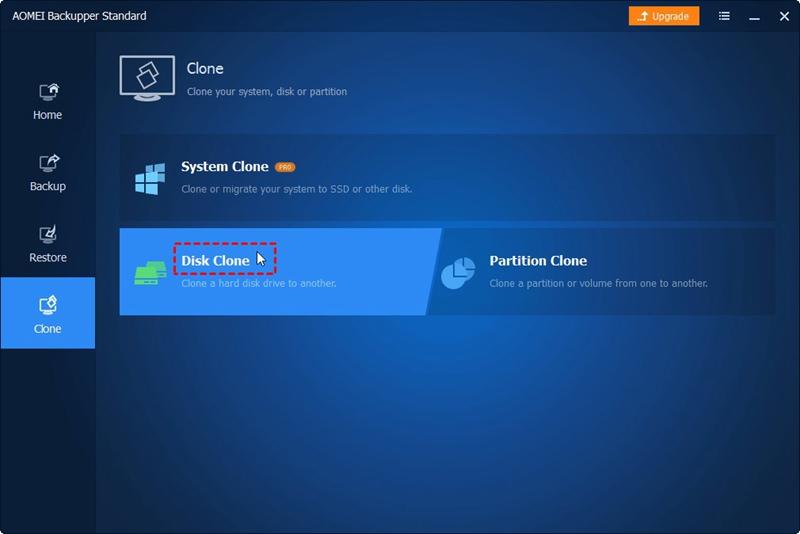
Step 1 Run the Program on Your Computer
Download, install, and launch AOMEI Backupper on your computer. Navigate the dashboard to the Clone section and select Disk Clone to clone a hard drive, System Clone to migrate your OS to SSD, or Partition Clone to copy a partition to another disk.
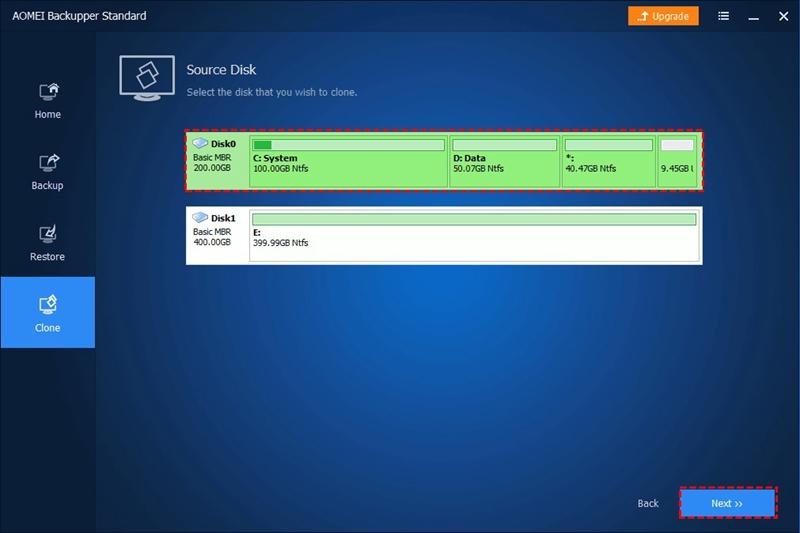
Step 2 Select the Bootable Drive You Want to Clone
AOMEI will scan your computer for bootable hard disks to list them all for you. Choose the disk you want to clone in the Destination Disk tab and click Next.
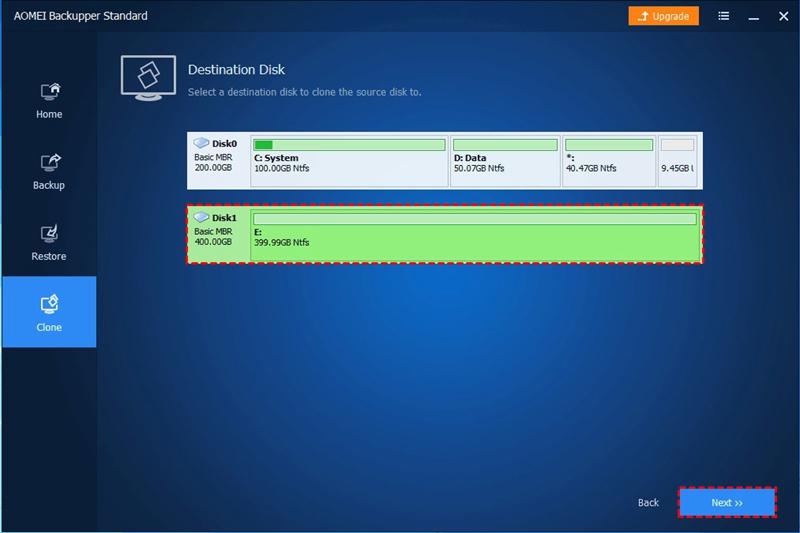
Step 3 Select the Target Destination
Select where you want to store your disk clone in the Destination Disk section. You can select an HDD or SSD disk as the destination disk to transfer your source data.
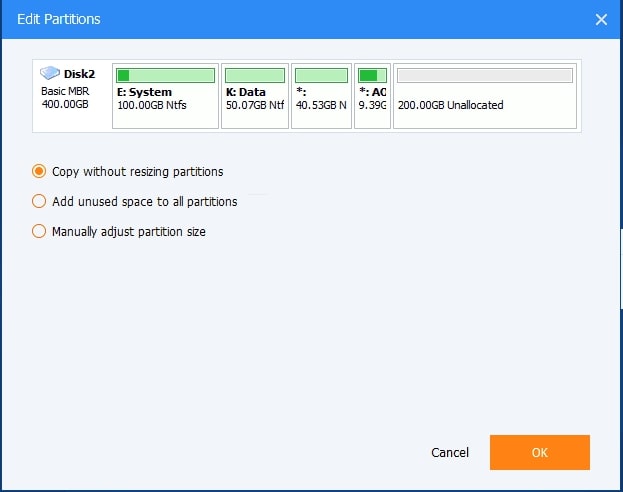
The Operation Summary will also show you three additional options, choose one depending on your needs:
- Edit Partitions – leave partition sizes unchanged, resize the destination disk partitions, or adjust the partition size manually.
- SSD Alignment – allows you to clone a hard drive to an SSD disk;
- Sector By Sector Clone – clone all the sectors on your source drive.
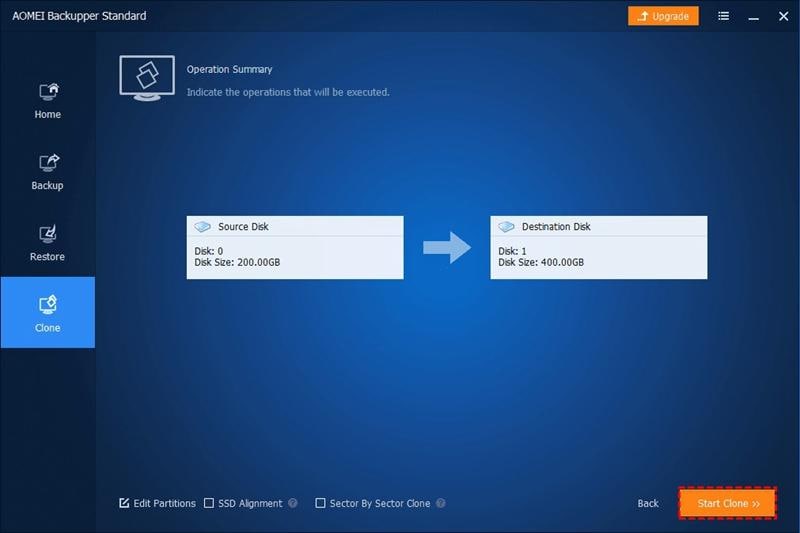
Step 4 Finish the Boot Drive Clone Process
Click Next>Start Clone to start the cloning process (the destination disk should have enough space to store the copied data). Click Finish to complete the process and get access to your disk clone copy.
When AOMEI completes the boot HDD cloning process, you’ll see the Successfully cloned message. Now, you should be able to access your successfully cloned data.
Why Create a Bootable Drive Clone
Bootable hard drive clones can come in handy for a variety of reasons:
- Recover or back up your data – if your system or hard drive shows signs of failure or is oddly lagging while operating, creating a clone might be the easiest way to back up your data. A backup will make data recovery as simple as possible. Since disk cloning enables you to copy all the data on your hard drive, along with system files, you can quickly move everything to a new device and start over. A new clone will give you the exact system configuration, files, and folders as they were on the previous disk.
- Duplicate your hard drive – creating a hard drive clone empowers you to avoid data loss due to a malfunction in your system or a damaged hard disk. Old hard drives are also subject to file corruption. Duplicating your hard disk allows you to have an exact copy of your OS files and program settings and save your data as it was on the source disk.
- Migrate your files – data migration is a viable option to improve data security, file organization, and information management. It also helps you save storage space and avoid data loss. Disk cloning is a reliable and convenient data migration technique for reducing the risk of file corruption and missing data.
- Upgrade from HDD to SSD – since SSD disks are faster and simply better than HDD, you can upgrade your hard drive to the latest SSD edition using a disk clone. Instead of copying your files and system settings manually, you can rely on your disk clone to use your computer the same way as before while saving time and effort.
- Transfer your operating systems – disk cloning helps you save all your files, folders, application details, installed programs, and system updates stored on your C Drive (default system drive). Instead of wasting time on reinstalling all your programs, apps, and system drivers, you can simply use your OS clone to start over right away.
You may also be interested in: Transfer C drive to a new SSD.
Conclusion
Cloning a bootable hard drive or SSD is a reliable and convenient way to back up your files, folders, programs, app settings, and system data to a new storage medium or computer.
Since disk cloning enables you to migrate your data as it is on the source drive, you’ll have all the information readily available. Instead of copying your files manually and exposing yourself to the risk of file corruption or missing data, you can turn to automation to create a clone of your hard drive and use it on a new system.


