
 TL;DR:
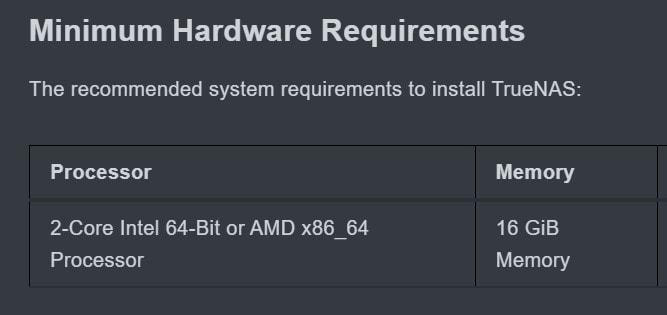
You cannot install TrueNAS or FreeNAS directly on a Raspberry Pi because the software requires a 2-core AMD x86 or Intel 64-bit processor and at least 16 GB of RAM, which are incompatible with the Pi's ARM architecture and memory limits.
● Build a functional NAS alternative by manually installing the Samba package on your Raspberry Pi to manage file and folder sharing across your local area network.
● The setup sequence requires creating a dedicated home directory, defining the server path within the smb.conf file, assigning a secure user password, and restarting the smbd service.
● Restrict the server strictly to your home network to avoid exposing data to public internet threats, and store your shared folders on external SSDs rather than SD cards for improved reliability.
Ask AI for a summary
 ChatGPT
 Perplexity
 Gemini
 Claude
 Grok
Grok
If you’re looking for the perfect and affordable way to build a home NAS server, this guide can help you accomplish that goal. You may think that using Raspberry Pi is an ideal solution for you, but there are a few problems that might get in your way.
Why Would Installing TrueNAS/FreeNAS on Raspberry Pi Be Convenient?
The Raspberry Pi is an excellent choice for building an affordable NAS server for your home needs for several reasons. First of all, it supports external hard drives and SD cards to store as much data as you need for personal use.
In addition, it can support a few users without imposing additional resource requirements. However, you may encounter a few issues when installing FreeNAS (now TrueNAS) on Raspberry Pi. Why? Because TrueNAS runs on an AMD or Intel 64-bit CPU, both of which aren’t ARM architectures.
In other words, Raspberry Pi and TrueNAS aren’t compatible. Since FreeNAS doesn’t support devices like Raspberry Pi, you’ll need an alternative solution to handle your installation requirements.
You may also be interested in: How to clone a Raspberry Pi SD card.
Can You Install FreeNAS on Raspberry Pi?
The Raspberry Pi is a relatively limited computing device you can use as a server. However, it can pretty much handle the same workloads as any standard desktop computer or server. The main benefit of using Raspberry Pi as a server is its different processor (CPU) architecture.
It uses CPU resources differently. To install TrueNAS, you need a 2-core AMD x86 or Intel 64-Bit CPU. Both are ARM architectures that Raspberry Pi models don’t support. Since these devices can’t use that kind of CPU, it isn’t possible to install TruNAS on Raspberry Pi.
Additionally, Raspberry Pi devices don’t have enough RAM to support TrueNAS, as it requires at least 16 GB of RAM to run. If you want your TrueNAS Raspberry Pi configuration to work, you’ll be happy to know that there’s an alternative solution.
You may also be interested in: Setup Plex on TrueNAS
A Similar Option You Can Try - Samba
FreeNAS or TrueNAS works by sharing files and folders on your local area network (LAN). Although it comes with many built-in features, it requires additional services to share data from external devices such as Raspberry Pi.
You can use an alternative solution to manage such services, such as Samba. Since Samba is the main service running in the TrueNAS background, you can install it on Raspberry Pi and use it as a FreeNAS to manage available services on Raspberry Pi.
Samba is also compatible with Linux, making it the perfect option for sharing files and folders with authorized users on the same local network.
You may also be interested in: TrueNAS Mini X Review
How To Install the TrueNAS Alernative Manually on Raspberry Pi?
Although the manual installation can be a bit tricky, you can simplify it by installing the essential Samba package and creating a shared folder. However, your configuration will depend on how you plan to use it.
If you don’t have too much critical data, you don’t need to invest too much effort in security, permissions, and user management. You can simply use an open shared folder to manage temporary files. Here’s how to install Samba manually on Raspberry Pi to get access to your FreeNAS data.
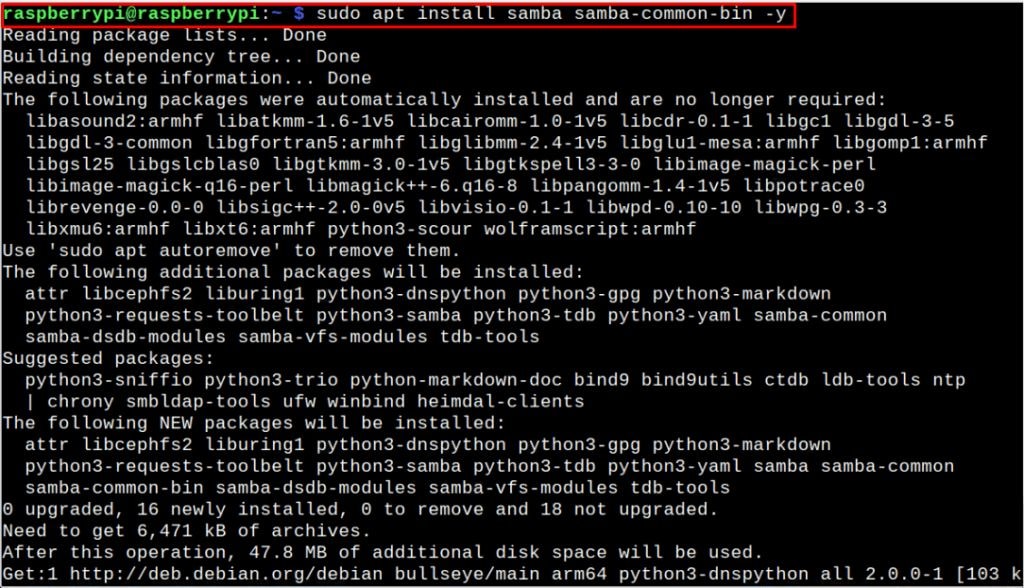
Step 1Install Raspberry Pi-compatible Samba package
The first step is to select the Samba Raspberry Pi package and install it using this command:
$ sudo apt-get install samba samba-common-bin -y.
Step 2Create a Directory for Samba
The next step is to create a directory for Samba and place it in your home folder. Use the following command to grant access to your directory to other devices via your Samba server:
$ mkdir /home/raspberrypi/samba_dir

Now, here’s an important part. You’ll need to replace two parameters in the above command:
- Username “raspberrypi”;
- Directory name “samba_dir”.
Name these parameters however you wish to proceed to the next step.
Step 3Configure Samba Raspberry Pi Sharing
Next, you need to configure Samba sharing so that your server can access your directory from the Raspberry Pi device.
To do that, you’ll need to set a path to the server. Use the following command to open the Samba configuration file:
$ sudo nano /etc/samba/smb.conf
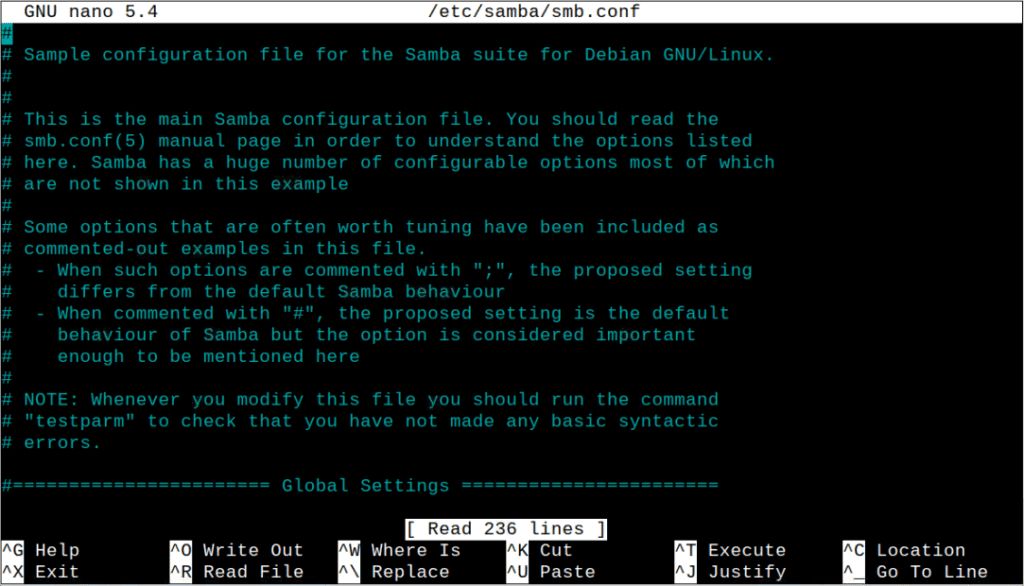
Once the file opens, at these lines at the bottom of the file:
[linuxhintshare]
Your Samba configuration file should now look like this:

Step 4Restart the Samba Server and Create a Password for Samba Share
Although optional, you should create a password for Samba share to protect the files you want to share with others. Use this command to set a password: $ sudo smbpasswd -a raspberrypi. Save your changes and restart the Samba server with the following command: $ sudo systemctl restart smbd.
Tips for Building a NAS at Home
If you want to host a NAS on your Raspberry Pi, here’s how.
- Check and Adjust Security
Since your Raspberry Pi server will be running 24/7 on your LAN, you’ll need to tighten your device security. The best way to check and adjust your security is to run a Raspberry Pi NAS on your home network, as opening it to public internet access might expose you to countless cyber threats.
You should create several backups if you plan to store sensitive data on your Raspberry Pi NAS file server, for exampple, backing up Raspberry Pi to a Synology NAS. Backups prevent losing important files. If your Raspberry Pi drive fails, you’ll have a backup plan.
You should sync the shared folder on your desktop computer occasionally. However, even data backups won’t work once the original data is lost. You must ensure you can recover your data with your backups.
The easiest and most effective way is to use a FreeNAS data recovery tool. Tools like Wondershare Recoverit allow you to recover your TrueNAS/FreeNAS data using either the tool itself or FreeNAS/TrueNAS snapshots.
- Use External Drives
External drives are perfect for building a Raspberry Pi NAS. Creating your shared folder on an external drive allows you to install another distribution. Additionally, it offers more freedom to manage your shared folder without the risk of data loss. Opt for SSDs as they are more reliable and faster than SD cards. You can also use a USB key to manage files in your shared folder.
Conclusion
Thanks to this guide, you can now access your NAS files from your Raspberry Pi device and even use your device as a NAS server. Although installing FreeNAS on Raspberry Pi 4 may not be possible, you still have an alternative option to make your NAS files accessible on Raspberry Pi.
Keep in mind that FreeNAS and Raspberry PI devices support different CPU architectures. That’s why you can’t install TrueNAS on Raspberry Pi 4. However, you can bridge the CPU problem using the Samba TrueNAS main background service to easily share data between your Raspberry Pi and other devices like desktop computers and laptops.
For Windows Vista/7/8/10/11
For macOS X 10.10 or later


