“My file transfer keeps stopping on Windows 10! File transfer stuck? I'm trying to move some large files to my external hard drive, but the transfer suddenly stops after a few minutes. Sometimes the file transfer stuck at 0 bytes, and other times the file transfer speed drops to zero. Why does my file transfer stop like this? Is there any way to fix it when my file transfer is stuck? I'm using Windows 10, but I've heard similar issues happen on Windows 11 too. Any advice would be greatly appreciated!"
Many Windows 10 and Windows 11 users have faced the frustrating issue of file transfers suddenly stopping or getting stuck. Whether you're copying files to an external drive, moving data between folders, or transferring large files over a network, a file transfer that stops unexpectedly can be both time-consuming and worrying.
In this comprehensive guide, we'll explore why file transfers stop on Windows 11/10, how to fix the issue when file transfer speed drops to zero, and what to do if you lose files during the transfer process.
In this article
Part 1: Why Does My File Transfer Stuck?
Before we dive into the solutions, it's important to understand the reasons behind why file transfers might stop or get stuck on Windows 11/10. Here are some common causes:
- Corrupted or outdated device drivers
- File system incompatibility (e.g., trying to transfer large files to a FAT32 drive)
- Hard drive issues or fragmentation
- Conflicts with background processes or software
- Insufficient storage space on the destination drive
- Antivirus software interference
- Network connectivity problems (for network transfers)
- Windows system file corruption
- Hardware issues with the source or destination drive
- Large file sizes or a high number of small files
- Power management settings interrupting the transfer process
Understanding these potential causes can help you pinpoint why your file transfer stops and choose the most appropriate solution.
Part 2: Recover Lost Files When File Transfer Stucks
Sometimes, when a file transfer stops unexpectedly, you may lose files in the process of troubleshooting.
In such cases, a data recovery tool like Recoverit can be invaluable. Recoverit is a powerful data recovery software that can help you retrieve lost or deleted files from various storage devices.
Here's how to recover lost files using Recoverit:
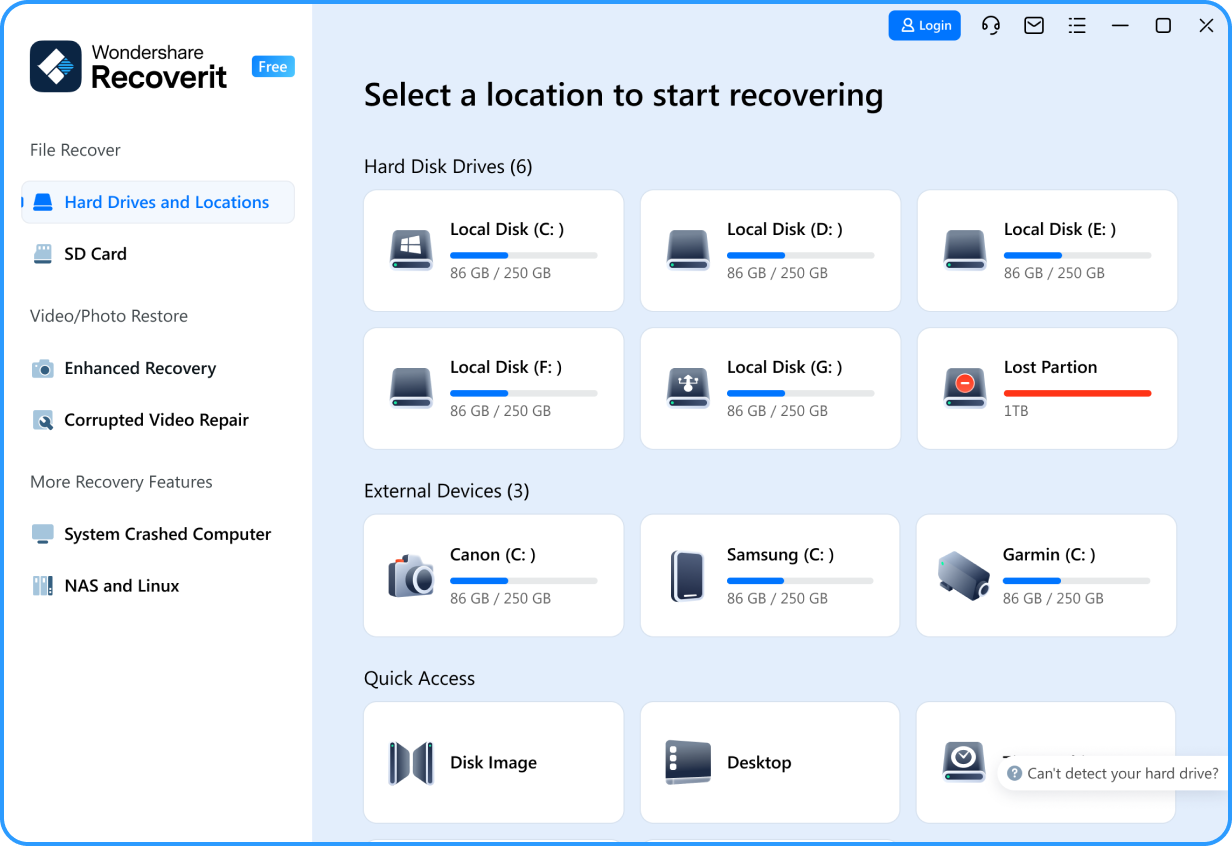
- Install Recoverit on your Windows 11/10 computer. Launch the program and select the drive where you lost your files. Click "Start" to begin scanning for lost files.

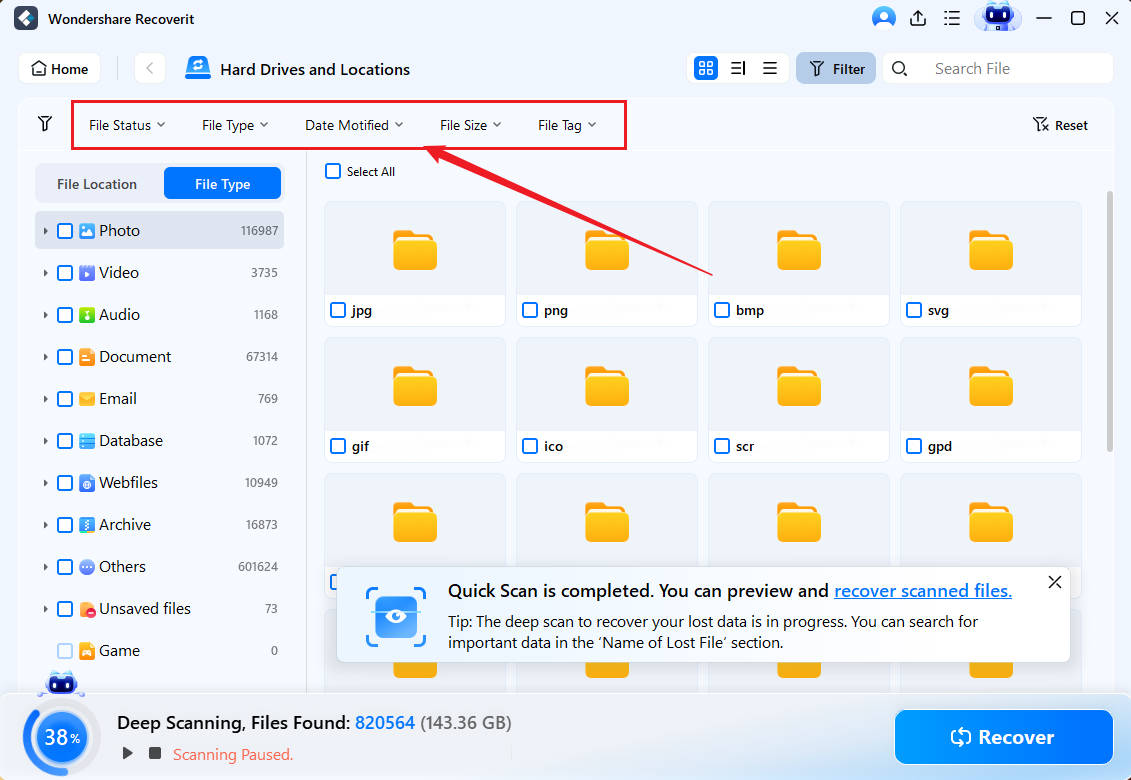
- Wait for the scanning process. You can even filter the search results based on file size, file type, etc.

- And that’s it! Preview the found files and select the ones you want to recover. Click "Recover" and choose a safe location to save the recovered files.

Using Recoverit can be a lifesaver when you're dealing with lost files due to interrupted transfers or accidental deletions during the troubleshooting process.
Part 3: How To Fix The File Transfer Speed Drops To Zero Windows 11/10 Problem?
Now that we've identified some reasons why file transfers might stop or get stuck, let's explore various solutions to fix the problem when file transfer speed drops to zero on Windows 11/10.
Fix 1: Wait Patiently
Sometimes, when it seems like your file transfer is stuck or the file transfer speed drops to zero, the best course of action is simply to wait. This is particularly true when dealing with large files or a high number of small files.
Steps:
- If your file transfer appears to be stuck, resist the urge to cancel it immediately.
- Give the transfer some time (10-15 minutes) to see if it resumes on its own.
- Check if there's any disk activity using Task Manager (Ctrl + Shift + Esc).
- If you see disk activity, it means the transfer is still in progress, even if the progress bar isn't moving.
Windows sometimes needs to process file information or deal with system processes in the background, which can cause the transfer to appear stuck temporarily. Patience can often resolve the issue without any further intervention.
Fix 2: Update Drivers
Outdated or corrupted drivers can cause file transfers to stop unexpectedly. Updating your drivers, especially for storage devices, can often resolve the issue when file transfer is stuck.
Steps:
- Open Device Manager (right-click Start > Device Manager). Click the "Universal Serial Bus controllers" sections. Right-click on each device and select "Update driver".

- Choose "Search automatically for updated driver software". Repeat for all relevant devices. Restart your computer after updating drivers.
- Updated drivers ensure optimal communication between your hardware and Windows, reducing the chances of file transfer stopping due to driver-related issues.
Fix 3: Format the Drive to Which You Are Transferring Data in NTFS
If you're transferring files to an external drive and the file transfer keeps stopping, the drive's file system might be the culprit. FAT32, an older file system, has limitations that can cause issues with large file transfers.
Steps:
- Back up any important data on the drive you want to format. Open File Explorer on your PC. Right-click on the drive. Select "Format".

- Choose "NTFS" as the file system. Click "Start" to begin formatting. Once formatted, try your file transfer again.
NTFS is a more modern file system that supports larger file sizes and is more reliable for file transfers on Windows 11/10. This can resolve issues where file transfer is stuck at 0 bytes due to file system limitations.
Fix 4: Optimize Hard Drives
Fragmented or poorly optimized hard drives can lead to slow file transfers or transfers that stop unexpectedly. Optimizing your drives can help resolve these issues.
Steps:
- Open File Explorer and right-click on the drive you want to optimize. Select "Properties". Go to the "Tools" tab.
- Under "Optimize and defragment drive", click "Optimize". Select the drive and click "Optimize" again. Wait for the process to complete, which may take some time.
Optimizing rearranges file fragments on your hard drive, making it easier and faster for Windows to read and write files. This can prevent file transfers from stopping due to fragmentation issues.
Fix 5: Perform a Clean Boot
Sometimes, third-party applications or services can interfere with file transfers, causing them to stop or slow down. Performing a clean boot can help identify if this is the cause of your file transfer problems.
Steps:
- Press Win + R, type "msconfig", and press Enter. Go to the "Services" tab. Check "Hide all Microsoft services". Click "Disable all".

- Go to the "Startup" tab and click "Open Task Manager". Disable all startup items. Close Task Manager and click "OK" in System Configuration. Restart your computer. Try your file transfer again.

A clean boot starts Windows with minimal drivers and startup programs, eliminating potential software conflicts that might cause file transfers to stop.
Fix 6: Disable Antivirus Software
While antivirus software is crucial for system security, it can sometimes interfere with file transfers, causing them to stop or slow down significantly.
Steps:
- Locate your antivirus software icon in the system tray. Right-click on it and look for an option to disable or turn off real-time protection. If you can't find this option, open the antivirus program and look for settings to temporarily disable it.

- Try your file transfer again with the antivirus disabled. Remember to re-enable your antivirus after the transfer is complete.
Antivirus software can sometimes misidentify file transfer activities as potential threats, causing the transfer to stop. Temporarily disabling it can help you determine if it's the cause of your file transfer issues.
Fix 7: Free up Storage Space
When the destination drive is running low on space, file transfers can stop unexpectedly or the file transfer speed can drop to zero. Ensuring sufficient free space can resolve these issues.
Steps:
- Open File Explorer and check the free space on your destination drive. If it's low, delete unnecessary files or move them to another drive. Empty the Recycle Bin to free up more space.

- Use Disk Cleanup (search for it in the Start menu) to remove temporary files. Consider using a disk space analyzer tool to identify large files or folders you can remove.

Sufficient free space ensures that Windows has enough room to manage file transfers effectively, preventing situations where file transfers stop due to lack of space.
Conclusion
File transfer stuck can be frustrating for Windows 11/10 users. Whether your file transfer is stuck at 0 bytes, the file transfer speed drops to zero, or you're wondering why your file transfer keeps stopping, there are several potential causes and solutions.
By knowing why file transfers stop and using the solutions we talked about—like updating drivers, making hard drives work better, starting your computer in a clean way, and clearing out space—you can fix most file transfer problems on Windows 11/10.
If you lose any data during this, tools like Recoverit can help you get your important files back. Always make sure you have copies of important data before doing big file transfers or changing your system.
FAQ
-
Why does my file transfer stop at 99%?
File transfers stopping at 99% is a common issue that can occur for various reasons. It might be due to file system limitations, particularly when transferring large files to a FAT32-formatted drive. Another possibility is that Windows is processing file attributes or updating the file index, which can take time for large files. In some cases, it could be due to bad sectors on the destination drive. To resolve this, try formatting the destination drive to NTFS, checking for drive errors, or using a different USB port if you're transferring to an external drive. -
How can I speed up file transfers on Windows 11/10?
To speed up file transfers on Windows 11/10, you can try several methods. First, ensure your drivers are up to date. Next, optimize your hard drives using the built-in Windows tool. Using an SSD for file transfers can significantly increase speed. If you're transferring over a network, check your network connection and consider using a wired connection instead of Wi-Fi. Disabling your antivirus temporarily during large transfers can also help. Lastly, avoid running resource-intensive programs while transferring files to ensure your system can dedicate more resources to the transfer process. -
What should I do if my file transfer is stuck and won't cancel?
If your file transfer is stuck and won't cancel, you have a few options. First, try closing File Explorer through Task Manager (Ctrl + Shift + Esc). If that doesn't work, you can try restarting the Windows Explorer process through Task Manager. In more stubborn cases, you might need to restart your computer. After restarting, check both the source and destination locations to ensure no partial files were left behind that might cause conflicts in future transfers.


 ChatGPT
 Perplexity
 Google AI Mode
 Grok
Grok


