How to Delete Duplicate Photos on Mac Easily

Feb 05, 2026 • Filed to: Photo/Video/Audio Solutions • Proven solutions
These days gadgets come with limited storage. The same is the case with the Mac computer. But the situation deteriorates with duplicate photos on Mac. To help you out, Let's see how to remove duplicate photos on Mac.
What Can Bring Duplicate Photos on Your Mac Computer
There are many instances when your Mac computer starts running slow. It generally happens due to the accumulation of temporary and duplicate files. Duplicate photos on Mac computers are one among them. Now finding duplicate images on Mac is a tricky and time-consuming process. There are a lot of reasons behind the duplication process. They can be both manual and automatic.
1. Why You Have Duplicate Photos?
When we talk about Mac, it is loaded up with a lot of security and system features. But one of the system's features causes Mac to create the duplicate copies automatically. It generally happens when you upload some photos to your Mac or when you take some screenshots. The System's feature starts creating copies. With time it goes on increasing in numbers without letting you know.
2. Why Do You Need to Find and Delete Photo Duplicates?
- With time duplicate photos go on increasing in number.
- They are stored in different files with different names thus making it difficult for you to find them or any regular image.
- Slowly with time, they start consuming the device storage.
- You start facing issues with a smooth experience. The system starts lagging a lot. This happens because most of the storage is used by duplicate photos on Mac.
Hence it becomes necessary to find and delete them.
Follow the Mac Ways to Find and Delete Duplicates Free
When it comes to Mac ways to find and delete duplicate photos for free. There are basically two techniques that provide you the ability to remove duplicate images from Mac. let us discuss them one by one.
Way 1. Use Finder
This is one of the easiest and efficient techniques from Mac.
Step 1: Start by opening the "Finder" window on your Mac.
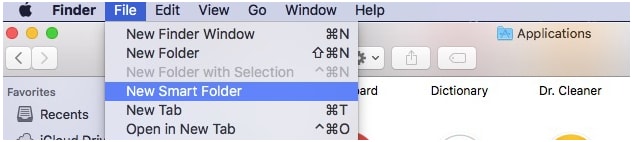
Step 2: Go to the Apple menu and click on the "File". Choose "New Smart Folder" from the given options.
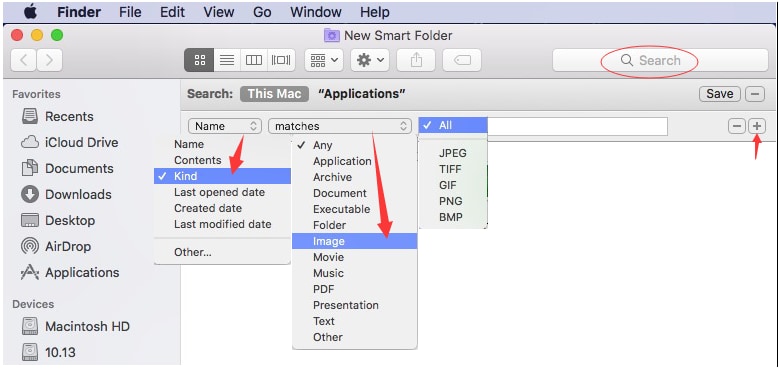
Step 3: Now click on the "+" button as shown and select parameters like "Kind" from names and "Image" from matches. Now select the image format. You can also select all as shown in the image.
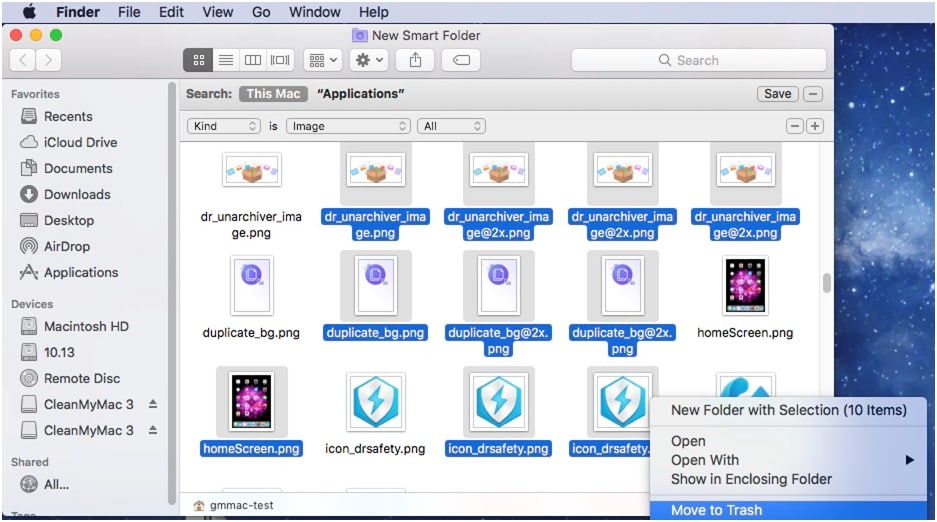
Step 4: Now select the duplicate photos. Right-click on your mouse, choose "Move to Trash" from given options and you are done.
Way 2. Use iCloud
iCloud provides you an opportunity to download all of your photos. Then you can re-upload to your Mac after deleting duplicate images.
Step 1: Launch browser on your Mac and login into your Apple id at iCloud.com.
Step 2: Now go to the photos tab and select all photos.
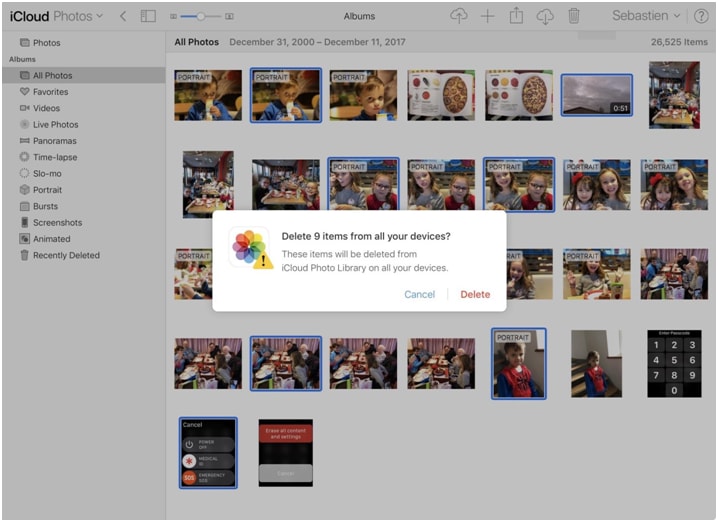
Step 3: Now keep holding the command key, click identical and similar images. Once you are done with selecting duplicate images, press the "Delete" button.
Step 4: Now delete all of the old photos and re-upload images again.
Way 3. Free Mac Software to Remove Duplicate Photos
When we talk about deleting duplicate pictures on Mac There are many free Mac software available for the same. You can easily download them from the Mac app store. For your ease, we are presenting one of the trusted and tested software to remove duplicate photos on Mac.
Photos Duplicate Cleaner: It is difficult to spend hours looking for duplicate photos when you have no idea of their name and location. Photos Duplicate Cleaner can make your task easy. It is available free of cost and can be easily downloaded from the Mac app store.
Step 1: Open the Photos app and Launch the Photos Duplicate Cleaner on your Mac via the Applications folder.
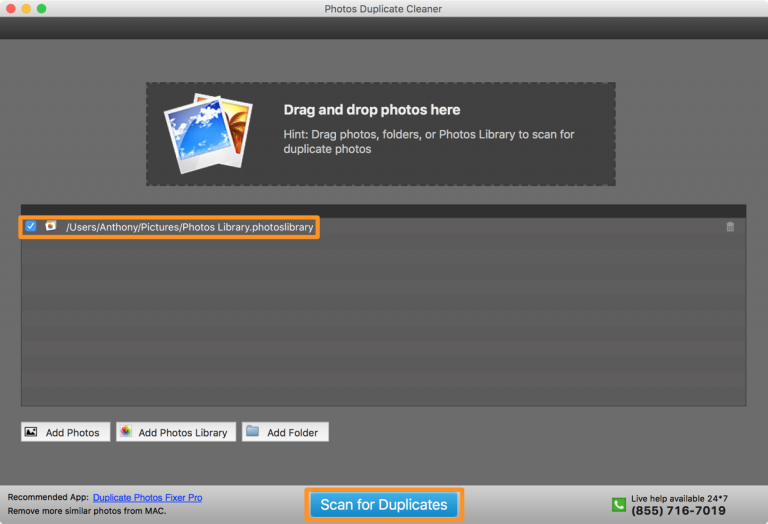
Step 2: Now go to the app's interface and click on "Add Photos Library".

Step 3: Double click on "Photos Library" from the finder browser.

Step 4: Once you are done processing your photo library, look for its path checked off in the app's path list. If it is correct you can proceed with clicking on "Scan for Duplicates". This button is available at the bottom as shown.
Step 5: Now if your photos app will be opened you will get the message as shown in the image. In this case, you are required to choose "Quit & Retry" to proceed further.
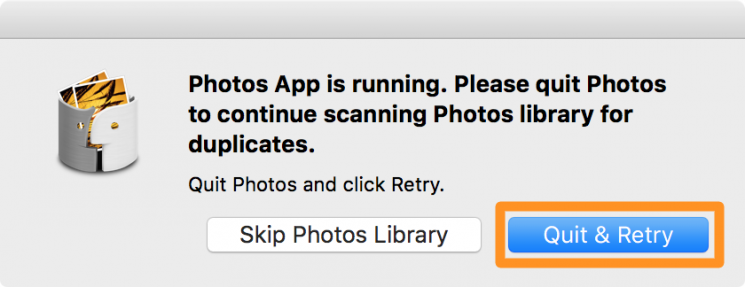
Note: This message will only be displayed when your photo app is opened. If not. This message will not be displayed.
Step 6: Once this software processes your photo library, you can relaunch the Photos app from the applications folder or by using the spotlight. Now let the Photos app remain opened in the foreground and go to the menu bar. Then click on "View" followed by the "Show Sidebar" in the Photos app.
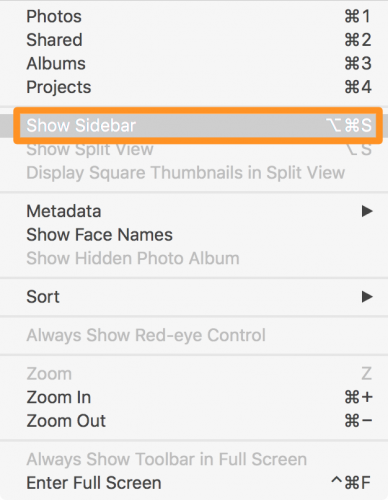
Note: You will go for this step if it wasn't enabled earlier. If it is already enabled leave it.
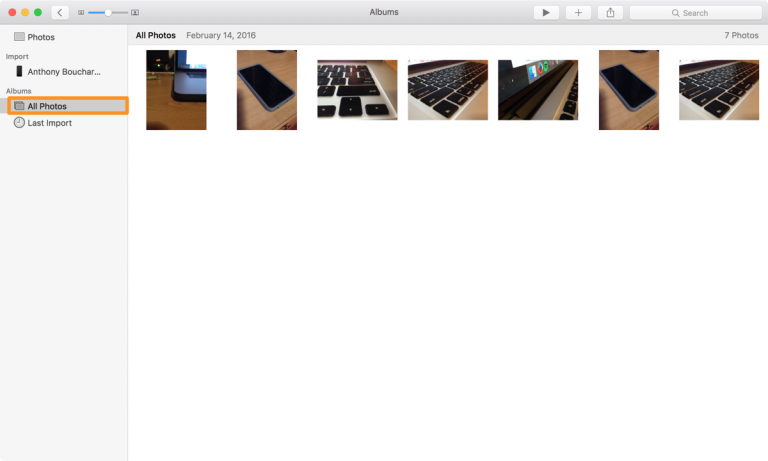
Step 7: Now let the sidebar enabled in the Photos app and click on the "All Photos" option from the sidebar as shown.
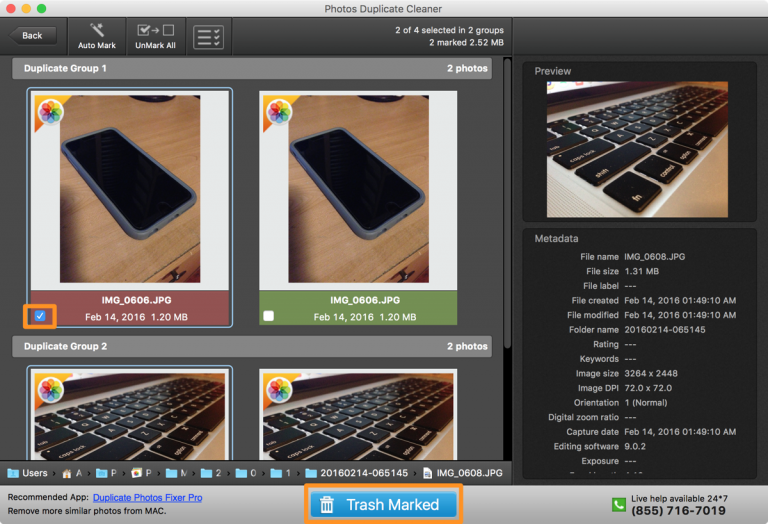
Step 8: Now go back to the Photos Duplicate Cleaner app. Here you will find all the duplicate photos detected by the software. Now you are required to go through these duplicate photos manually. You can checkmark in the boxes of the images that you want to delete the duplicates of. Once you are done with this, all the selected photos will be shown with a red border and the unselected will have a green border.
When you are finally done with selecting just click on "Trash Marked".
Step 9: Once you click "Trash Marked" the software will process all of the selected duplicate photos into another folder. This folder will be named "Duplicate Marked Photos" in the Photos app.
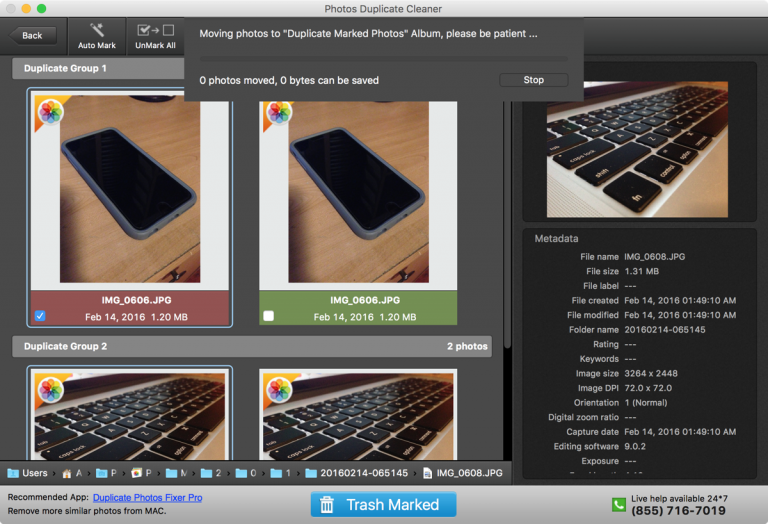
Step 10: When the process will be finished the app will notify you, as shown in the image.

Now go to the Photos app and you will notice a new "Duplicate Marked Photos" folder, present in the sidebar. This folder contains all the photos that have been marked as duplicates and are deleted. One thing you need to know is these photos are actually not deleted yet. They are just added to the folder named "Duplicate Marked Photos".

Step 11: Now select all the photos from this folder and right-click from your mouse on any photo. It will present you with some options "Delete X Photos". Here X means the total number of photos. Here 2 photos are selected so "Delete 2 Photos" is shown.
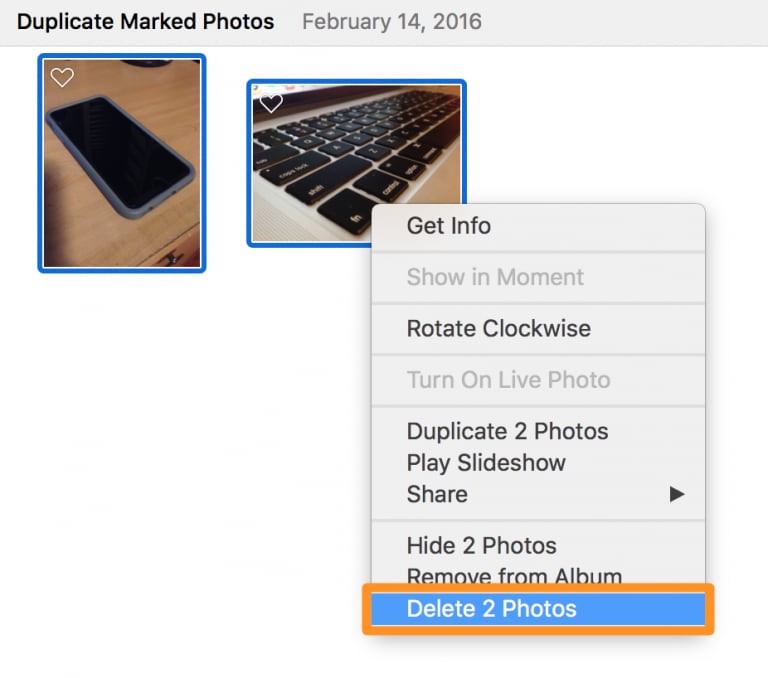
Once you select "Delete X photos" all duplicate photos will be deleted from your Photo library in your Mac Photos app. This leaves your library with only original photos. Hence an easy and rapid technique to remove duplicate images on mac
Remember the Tips to Avoid Unnecessary Photo Duplicates
There are many instances when you get photo duplicates on Mac. This a general situation for many as there is a large number of factors for the same. Moreover, it is a very common issue that can happen to anyone without any prior knowledge about it. Most of the people came to know about this issue when they start facing some common problems like lesser available storage, system lagging, and so on.
The best way to avoid this happening is to follow some tips to prevent photo duplication on Mac. Some of the trusted and tested tips are presented here.
- Go to the "Photos app" and choose the option "Preferences" from the menu bar. Now Disable "Copy items to the Photos Library" from the given options. This is one of the simple and easy techniques that will prevent the duplication of the images in the future.
- It is good that all of your photos should have a proper designated home. It means that your main objective should be to get your photos from each device to that designated home itself. This will prevent any duplication as there will be no repetition at all.
- You should back up your entire photo library in at least two locations. Automated backup can actually reduce the anxiety that often leads to duplicates.
- One of the things that you need to take utter care of is to check the last imported photo. You should always consider this thing as this will prevent you from importing the same photos again.
- There are several instances when you edit some images or make a copy. In this case, do not forget to delete the duplicate copy as soon as possible. You can also go for a spot-check. This will prevent any duplication of images.
Get Powerful Tips to Recover Accidentally Deleted Photos on Mac
There are many instances when you accidentally deleted photos on Mac. There can be several reasons for this. No matter what will be the reason once the image got deleted, it is difficult to recover.
One thing you need to know is, this is not the end. You can easily recover your deleted photos on Mac using "Recoverit Data Recovery".
It is an efficacious Photo recovery software. It is available for both Windows OS and Mac OS. With more than 96% of the effective recovery rate (data collected from customer reviews), this software can help you to recover your photos easily and rapidly. You just need to follow three simple steps.
Step 1: Select The Location
Launch "Recoverit Data Recovery" on your Mac and select the location from where your photos got deleted. Once you select the location, click on the "Start" button to continue.

Step 2: Scan the Chosen Location
Once you click on "Start" "Recoverit" will begin an all-around scan of the selected device or location. With the advanced scanning and searching algorithm, all of your deleted photos from the chosen location will be shown to you.

Note: You can also stop the scanning process in case you find your deleted photos earlier. In case the search results become overwhelming, you can also filter the results by going through the right panel.
Step 3: Preview and Recover Photos
"Recoverit" allows you to preview photos. You can do this before proceeding with the final recovery. You just need to click on the "Preview" button, present on the right panel. You can also double click the file from the "result menu".

Once you are done with a preview just click on the "Recover" to restore your deleted photos. You will be asked for a location. Just choose the location where you want to save your restored photo and click on "Save". Your photo will be saved in the selected location.
Closing Words:
Deleting duplicate photos on Mac is a tricky task for many. It requires a technique to prevent yourself from being involved in the tedious and time-consuming task of finding and deleting photos on Mac. To help you out, simple and tested techniques are presented here.
Fix Media File Issues
- Recover & Repair Photos
- Recover deleted photos.
- Recover photo booth.
- How to repair JPEG images?
- What is JPG File?
- What is GIF File?
- Guide for PNG File
- Recover Videos
- Best video recovery software for Windows
- Best video recovery software for Mac
- Recover DVR recordings
- Recover CCTV footage
- Recover deleted Vivint videos
- Recover deleted MKV files
- Recover deleted Youtube videos
- Recover deleted CapCut videos
- Recover After Effects Project
- Recover Premiere Pro Project
- Recover iMovie Project
- Recover videos from GoPro
- Repair Videos
- Fix error code 0xc00d36c4.
- Repair corrupted MP4 video.
- Fix 0xc10100be video error.
- Solve blurry videos.
- Fix MOV can't play on QuickTime.
- Free video repair software.
- Fix frozen video files.
- Recover & Repair Audio
- Moov Atom Not Found ?
- Repair your MP4 file online.
- Can't play recorded video?
- AVI/MP4/MKV cannot render?
- Fix 0xc00d5212 error of AVI.
- Recover & Repair Cameras
 ChatGPT
 Perplexity
 Google AI Mode
 Grok
Grok


Eleanor Reed
staff Editor