 TL;DR:
To resolve the VIDEO_DXGKRNL_FATAL_ERROR (Bug Check 0x113) on Windows 11 and 10, start your PC in Safe Mode to roll back recent display driver changes or install an OEM-verified graphics package instead of immediately resetting the operating system.
● Secure your BitLocker recovery key and back up important files to an external drive before attempting a System Restore or Windows reset, as the crash itself does not delete data but intrusive recovery steps can.
● Do not manually replace the dxgkrnl.sys file; use DISM and SFC commands to repair corrupted Windows system components, understanding that these tools cannot fix failing physical GPU hardware.
● Recoverit cannot fix the blue-screen stop code and should only be used to retrieve deleted or inaccessible personal files from a detectable storage device after a crash.
Ask AI for a summary
 ChatGPT
 Perplexity
 Gemini
 Claude
 Grok
Seeing VIDEO_DXGKRNL_FATAL_ERROR on a blue screen? This Windows stop code is Bug Check 0x113, indicating that the Microsoft DirectX graphics kernel subsystem detected a violation. The message does not, by itself, identify a faulty graphics card or prove that a particular driver is responsible. Start with recently changed display drivers, updates and connected hardware; protect important files before attempting a reset or reinstall. Microsoft's Bug Check 0x113 reference explains the technical meaning.
This guide applies to Windows 11 and Windows 10, including systems that restart before the desktop loads. Settings names and available recovery options vary with the Windows build and manufacturer. Windows 10 reached its general end of support on October 14, 2025; eligible devices may have Extended Security Updates (ESU). After addressing the crash, check whether your PC has a supported update or upgrade path. If you cannot access Windows normally, use the Safe Mode steps below before making major changes.
In This Article
Part 1. What Does VIDEO_DXGKRNL_FATAL_ERROR Mean?
The crash is associated with the Windows graphics-kernel path, which coordinates work between the operating system and display components. Common investigation areas include graphics-driver changes, updates, unstable graphics hardware, firmware, power or overclocking problems. These are possibilities, not a diagnosis from the stop code alone.
| What you observe | First safe step |
| Crash started after a graphics-driver update | Try rolling back the display driver in Device Manager |
| Repeated BSOD before sign-in | Enter Windows Recovery Environment and Safe Mode |
| Crash after an update or new software | Check update history; consider a suitable restore point |
| Display artifacts, overheating, or crashes under load | Stop heavy workloads; check cooling, connections and hardware |
| Files missing after the crash | Protect the storage source and investigate recovery separately |
For deeper diagnosis, note when the crash occurs (startup, waking from sleep or a graphics-heavy task), the last driver or Windows update you installed, and any crash dump under C:\Windows\Minidump if Windows creates one. If you need technical support, share those details with the PC manufacturer or IT team. A crash dump can help identify a failing driver or component; the error name alone cannot.
Part 2. Before You Troubleshoot: Protect Your Files
A blue screen does not automatically delete personal files. But repeated hard restarts, an unstable drive, a reset or a clean installation can put accessible data at risk. Make a backup before making major system changes.
- If Windows starts, copy important documents, photos, projects and videos to a separate healthy drive or a supported cloud destination.
- If the PC is not stable enough to back up, avoid repeatedly installing tools or writing files to the affected disk. Consider professional help or a suitable independent recovery environment.
- If the drive makes unusual noises, repeatedly disconnects, is not detected, or shows other signs of physical damage, stop software recovery attempts and consult a professional.
- If BitLocker is enabled, locate the appropriate recovery key before changing recovery or startup settings. Do not disable encryption or format the drive as a shortcut.
Microsoft provides an overview of Windows recovery options. Use it to assess the consequences of any later restore, reset or reinstall action.
Part 3. How to Fix VIDEO_DXGKRNL_FATAL_ERROR on Windows 11 and 10
Work through these methods from the most reversible to the more intrusive. A driver rollback, for example, is usually preferable to resetting Windows when a crash began immediately after a graphics-driver update.
Start in Safe Mode When Windows Keeps Crashing
Use when: Windows repeatedly crashes before you can access Device Manager or Settings. Safe Mode loads a reduced set of drivers and services for diagnosis; it does not itself repair the underlying fault.
Step 1. Open Windows Recovery Environment. If Windows can still load the sign-in screen, hold Shift while choosing Power > Restart. If it cannot boot, use the manufacturer-supported recovery route or appropriate Windows installation/recovery media. If prompted for a BitLocker recovery key, use the key for your own device rather than attempting to bypass encryption.
Step 2. Choose Troubleshoot > Advanced options > Startup Settings > Restart. The precise navigation can differ by release.

Step 3. Select 4 or F4 for Safe Mode; choose the networking option only if genuinely required. Sign in and continue with the graphics-driver checks.

If Safe Mode also crashes, stop repeating the same driver operations. Record the symptom and investigate hardware, storage health or a qualified repair service. See Microsoft's Safe Mode instructions.
Check or Roll Back the Display Driver
Use when: the blue screen began after a display-driver installation, graphics update or switching between integrated and discrete graphics.
Step 1. Right-click Start, open Device Manager, and expand Display adapters. Check each active graphics device; laptops may list both integrated and discrete GPUs.

Step 2. Open the adapter Properties > Driver. If Roll Back Driver is available and the crash began after a change, choose it, confirm the reason if prompted, and restart. You may need administrator rights, and the button can be unavailable when Windows has no earlier driver saved. Microsoft documents the driver rollback process.

Step 3. If a rollback is unavailable, note the installed driver version and move to a compatible vendor-supplied update rather than downloading a random DLL or replacing dxgkrnl.sys.
If rolling back fixes the problem, avoid reapplying the same suspect package until an improved vendor version is available. A graphics-driver error cannot be established solely from the blue-screen text.
Install a Compatible Graphics Driver
Use when: Device Manager shows a driver problem, a suitable rollback is unavailable, or your PC maker provides a relevant corrected graphics package.
Step 1. Identify the exact laptop/desktop model, GPU, Windows edition and system architecture. For laptops, check the manufacturer's support page first because switchable graphics can depend on OEM-customized drivers.

Step 2. Download the correct signed graphics driver from your PC maker or the official Intel, AMD or NVIDIA site. Choose the version explicitly compatible with your device and Windows release.
Step 3. Follow the vendor's installer, restart and check whether the same stop code returns. Keep the prior package or restore option available when practical. Do not assume a generic newest driver is always the correct one.

If the crash persists after a compatible driver change, record the installed version and move to Windows and system-integrity checks. Do not repeatedly remove drivers or use a third-party driver cleaner as a first resort. The settings shown may differ from older screenshots and from one manufacturer to another.
Install Windows and Hardware Updates
Use when: the system has pending cumulative, optional driver or firmware updates supported by its manufacturer.
Step 1. In Windows 11 open Settings > Windows Update. On Windows 10, use Settings > Update & Security > Windows Update. Select Check for updates.

Step 2. Review available updates and install relevant, verified updates one group at a time if you are isolating a new crash. Restart when prompted.
Step 3. If the BSOD began just after a particular update, record its KB number and consult the current Microsoft known-issues guidance before removing anything.
Windows 10 reached end of standard support on October 14, 2025, for most editions. Check whether your device has an applicable extended security update arrangement; do not promise that old Windows 10 machines will receive all fixes. See Windows 10 support status.
Run DISM and System File Checker
Use when: you suspect Windows component corruption or recent failed servicing. These commands repair or check Windows system components, not a failing disk and not the DirectX hardware path itself.
Step 1. Open Command Prompt or Windows Terminal as administrator from a Windows session that is stable enough to finish the checks.

Step 2. Run DISM /Online /Cleanup-Image /RestoreHealth and wait for it to complete. DISM repairs the Windows component store used for servicing; this /Online command targets the running Windows installation, not a booted recovery image. Do not reuse it unchanged for offline recovery.
Step 3. Then run sfc /scannow. SFC checks protected Windows system files and repairs detected corruption when a valid replacement is available. Let the verification finish and record the result. If Windows Resource Protection cannot complete the scan, Microsoft recommends trying Safe Mode. If it finds problems it cannot repair, save the error details before moving to a repair or support option.
Microsoft explains the order of these tools in the System File Checker guide. Neither command is a substitute for creating a copy of at-risk files, and SFC is not a bad-sector repair tool.
Use System Restore When the Error Began Recently
Use when: a suitable restore point predates the crashes and earlier troubleshooting did not resolve them. Save and verify important personal files first.
Step 1. Search Windows for Create a restore point, open System Protection, and choose System Restore; or find System Restore in Advanced options if Windows cannot start.
Step 2. Choose an appropriate restore point, review affected applications and drivers, then confirm only if the consequences are acceptable.
Step 3. After the restore, test a normal boot and check Event Viewer or the next error report if the system still crashes.
System Restore can undo some system changes, but it is not a substitute for a full file backup. If no restore point exists, do not manufacture one by reinstalling Windows.
Part 4. If Windows Still Will Not Start
If the previous steps do not help, separate software-level troubleshooting from signs of physical instability. Escalate carefully rather than attempting destructive repairs simply because the error is frustrating.
Check for Hardware Warning Signs
Check for repeated overheating, failed fans, abnormal GPU artifacts, unstable power, loose connections or hardware overclocking. Return supported overclock settings to defaults only if you understand the device and can do so safely. Desktop hardware checks should be performed with power disconnected and appropriate precautions; laptops may need professional service.
If more than one hardware component fails diagnostics or the PC repeatedly loses access to storage, avoid further write-intensive diagnostics until the data has been protected.
Use Windows Recovery Options Carefully
From Windows Recovery Environment, review Startup Repair if Windows cannot start and System Restore if a relevant restore point predates the failure. Startup Repair targets startup problems; it does not repair a defective GPU. Check the consequences of each option before confirming. A reset or clean installation is a last resort only after successful backup or suitable recovery planning. See Microsoft's Windows recovery options for version-specific paths.
Do not choose Remove everything, format the internal drive, or use DiskPart Clean merely to troubleshoot Bug Check 0x113. Even a reset described as keeping files can affect apps, settings and access, so verify a separate backup first. For encrypted systems, be prepared with the correct recovery key.
Part 5. Recover Missing Files After the Blue Screen
Recoverit is not a tool for fixing VIDEO_DXGKRNL_FATAL_ERROR. It may be relevant if personal files became deleted, missing or inaccessible after a crash, an interrupted update or a recovery attempt. If files are still present, back them up rather than scanning needlessly.
Recover Files from a Detectable Storage Device
Use when: the affected HDD, SSD or external drive is detectable, there are no signs of severe physical damage, and files are truly missing. Avoid installing software or saving results to the same storage volume that contains deleted data.
Step 1. If the lost files were on an external HDD or SSD, connect that drive to a working Windows PC only if it remains stable and readable, and run Wondershare Recoverit from the working PC. If the files are missing from the crashed computer's internal system disk, do not install a new recovery program onto that same disk; follow the bootable recovery path below when appropriate.
Step 2. Select the original detected drive or location in Recoverit and start a scan. If Windows asks to format or initialize a drive, cancel the prompt instead of modifying the data source.
Step 3. Review the found files and preview supported types when available. Save selected results to a different healthy physical drive, not another folder on the source disk, and open the saved files to confirm they are usable before repairing or resetting Windows.
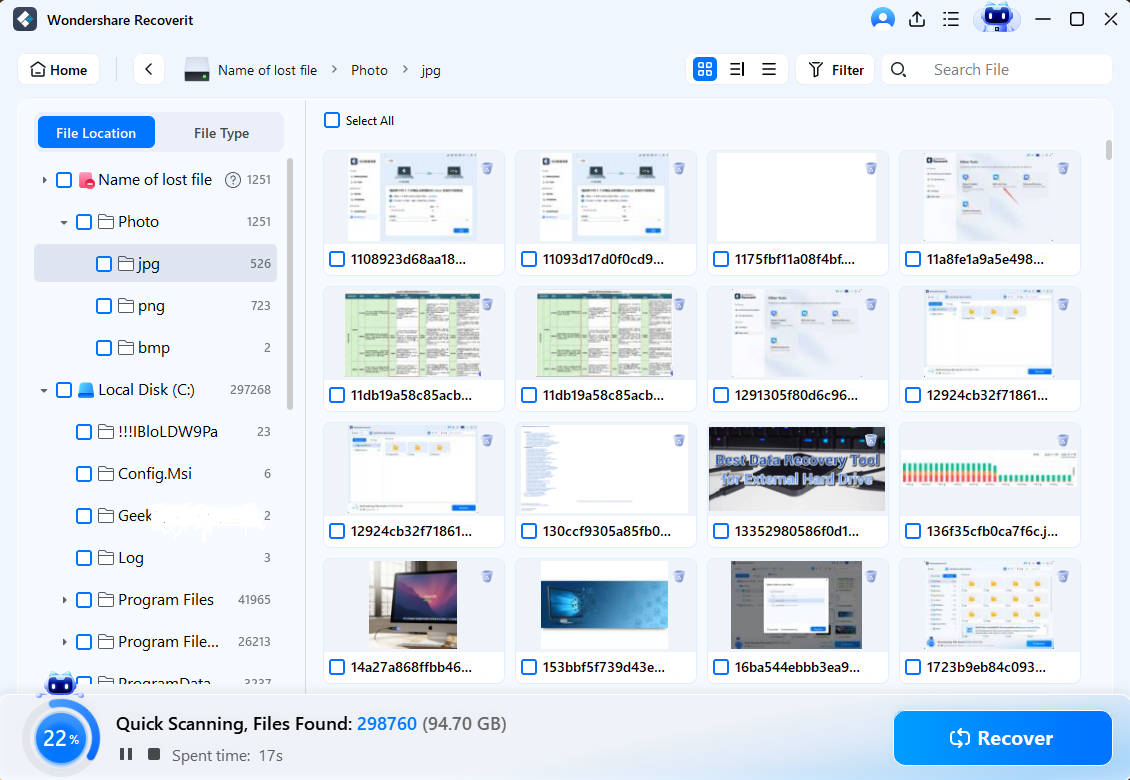
If Recoverit cannot detect the disk, the device disconnects continuously, or a drive shows physical faults, stop repeated scanning and consult a professional. Recovery success depends on the condition of the storage and whether the data has been overwritten.
The Recoverit Windows guide shows the scan and recover workflow. These steps address missing files, not the blue-screen error itself.
When Windows Will Not Boot: Protect Files Before Resetting
Use when: the PC cannot enter Windows, your important files are not backed up, and the original system disk is still detectable without signs of physical failure. The Recoverit Windows System Recovery workflow may let you retrieve files before any reinstall or reset. You need another functioning Windows computer, a blank USB drive to create recovery media, and a different healthy drive to store the recovered files.
Step 1. On a working Windows PC, install Recoverit and open Other Tools > System Crashed Computer, then choose Start as shown in the official crashed-computer recovery guide. Connect an empty USB drive for boot media. Creating boot media formats the selected USB, so confirm its identity and back up anything on it first. Do not use the affected computer's data drive as boot media.

Step 2. Complete the bootable USB creation process and start the affected computer from that USB using the PC manufacturer's boot menu. Use the correct model-specific boot key or firmware instructions rather than guessing. Leave the source disk's partitions and file system unchanged.
Step 3. If Recoverit's bootable environment recognizes the original disk, use Data Recovery to scan for missing files or the available copy workflow for still-accessible files, as appropriate to the current interface. Save the results to a separate external drive, then open a sample of the files on a working computer before proceeding with Windows repair.
If the drive cannot be accessed: You need the authorized recovery key to unlock BitLocker-protected storage; Recoverit does not bypass encryption. Stop scanning if the drive is physically failing, undetected or repeatedly disconnecting, and seek professional advice. A recovered file is not evidence that the graphics-kernel issue has been fixed.
Part 6. How to Prevent Another Graphics-Kernel Crash
Once the PC boots normally, focus on preventing recurrence rather than running unnecessary repair commands every day.
- Keep a verified copy of important files on storage that is separate from the PC.
- Use OEM-compatible graphics and chipset packages and record the versions before major changes.
- Monitor temperatures and cooling, especially when a crash occurs under GPU load.
- Keep Windows and device firmware supported and up to date where compatible.
- If crashes recur, preserve the stop code and diagnostic logs for targeted analysis instead of guessing the failing component.
Conclusion
VIDEO_DXGKRNL_FATAL_ERROR (0x113) indicates a serious DirectX graphics-kernel condition, but not a single proven cause. After backing up data, try Safe Mode, inspect recent graphics-driver changes, use verified OEM drivers and Windows servicing, and then consider System Restore or professional hardware diagnosis. Confirm the result by returning to a normal boot and checking whether the same stop code recurs during the previously affected task. Reserve Recoverit for actual missing or inaccessible files, not for blue-screen repair.
FAQ
-
What is VIDEO_DXGKRNL_FATAL_ERROR 0x113?
It is the Windows bug check code 0x113. The DirectX graphics kernel subsystem has detected a violation; more evidence is needed to identify the failing component. -
Does the error happen on both Windows 10 and Windows 11?
Yes. The stop code can appear in both systems. The recovery menus and driver update paths may differ, and most Windows 10 editions are past standard support. -
Is dxgkrnl.sys a virus?
dxgkrnl.sys is a legitimate Windows graphics-kernel component when it is the authentic Microsoft file. A crash naming it is not proof of malware; investigate the system context before making conclusions. -
Should I replace dxgkrnl.sys or download a DLL from a website?
No. Avoid downloading arbitrary system files or replacing the DirectX kernel component manually. Use official Microsoft and device-manufacturer servicing methods. -
Will DISM and SFC repair my graphics card?
No. They check and repair certain Windows system components. They do not repair damaged GPU hardware or guarantee a stop-code fix. -
Can Recoverit fix VIDEO_DXGKRNL_FATAL_ERROR?
No. Recoverit can help recover certain deleted or inaccessible files from detectable storage; it is not a blue-screen repair tool. -
Should I reset Windows to remove the stop code?
Only after backing up or recovering critical files and carefully reviewing the Windows recovery option. A reset is not a recommended first step and may remove data, apps or settings. -
Is VIDEO_DXGKRNL_FATAL_ERROR the same as VIDEO_TDR_FAILURE?
No. VIDEO_DXGKRNL_FATAL_ERROR uses bug check 0x113, while VIDEO_TDR_FAILURE uses 0x116. Both concern graphics, but they indicate different Windows stop conditions. If your screen shows 0x116, follow the separate VIDEO_TDR_FAILURE troubleshooting steps.


