
![Error: Enter the Recovery Key to Get Going Again [Fixed]](https://images.wondershare.com/recoverit/article/enter-recovery-key-to-get-going-again.jpg)

 TL;DR:
To fix the continuous BitLocker recovery key loop triggered by hardware modifications or TPM data corruption, retrieve your 48-digit key to bypass the initial lock screen, then either temporarily suspend BitLocker or resolve the underlying boot authorization mismatch.
● Locate your 48-digit recovery key via your online Microsoft account, a saved USB text file, or a printed document to gain temporary access to Windows.
● Stop the recurring prompt by running `manage-bde -protectors -disable C:` in an Administrator Command Prompt, updating your motherboard BIOS/UEFI firmware, or toggling Secure Boot settings to reset hardware security baselines.
● Formatting the boot drive is a guaranteed final fix for unreadable drives but will erase all files; extract your data using Wondershare Recoverit before attempting a format if the drive remains completely locked.
Ask AI for a summary
 ChatGPT
 Perplexity
 Gemini
 Claude
 Grok
Grok
BitLocker is one of the most important functions of your Windows operating system. Windows relies on this disk encryption tool to safeguard sensitive data by encrypting entire hard disk volumes and storage devices.
If you’re using BitLocker frequently, chances are you’ll have to enter your BitLocker password to mitigate unauthorized access to your files by boosting system protection mechanisms and enhancing file systems.
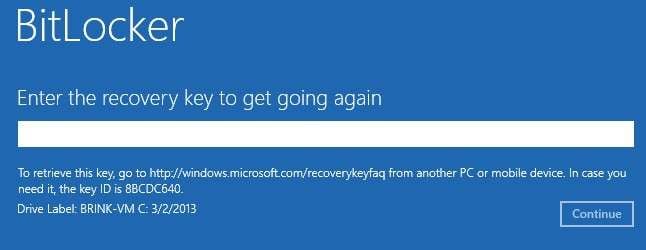
However, frequent use of the BitLocker program exposes you to common problems. One of the problems you’ll often run into is the “Enter the recovery key to get going again” prompt message. This article will explain why this message appears on your screen and what you can do to fix this issue.
What Is the BitLocker “Enter the Recovery Key to Get Going Again” Message?
To understand this message, we must first explain what BitLocker drive encryption is all about. This Windows data protection tool is a full-volume encryption utility that encrypts system data using the latest encryption protection and algorithms.
When you run BitLocker to encrypt the target drive, the BitLocker shields the data stored on your drive by creating a special encryption key called the BitLocker recovery key. The program automatically generates this protection key using the encryption algorithm.
Each time you attempt to access your encrypted data, BitLocker will ask you for the recovery key. If you don’t save the key information when encrypting the drive, you’ll get the “Enter the recovery key to get going again” error prompt.
The problem is that you can’t access your data or start Windows without the recovery key, meaning BitLocker will lock you out of your system. The only way to access your system and start Windows normally is to enter the recovery key.
Why Does BitLocker Ask for a Recovery Key Constantly?
BitLocker uses a hardware security chip called a Trusted Platform Module (TPM) to verify that your system boot configuration hasn't been tampered with. If anything changes along the boot pathway, BitLocker seals the drive volume to prevent data theft and forces you to input the 48-digit recovery key.
The following environmental and structural changes trigger this endless loop:
| Trigger Category | Technical Root Cause | Impact on System |
| Firmware Modifications | Motherboard UEFI/BIOS updates, ROM flashing, or TPM firmware patches. | Resets the hardware security baselines, causing a verification mismatch. |
| Boot Configuration Changes | Altering the boot order, enabling Legacy Boot support, or disabling Secure Boot. | Windows detects an unverified boot sequence and halts execution. |
| Hardware Hardware Swaps | Installing a new GPU, upgrading RAM modules, or attaching complex docking stations. | Alters the hardware signature stored inside the TPM registry. |
| File System Instability | Bad sectors on the system drive or corrupted Master Boot Record (MBR/GPT) maps. | Prevents the operating system from reading the encryption markers cleanly. |
| Windows Version Conflicts | Incomplete Windows 11 quality updates or corrupted security patches. | Disrupts the internal manage-bde encryption execution subsystem. |
These scenarios could trigger an error message and prevent you from accessing your data. Thankfully, there are actions you can take to access your BitLocker encrypted drive and recover your data.
How to Stop BitLocker From Asking for the Recovery Key Error
Use this diagnostic lookup matrix to locate the precise solution based on your computer's current configuration state:
| If Your System State Is... | Technical Cause | Recommended Action | Success Rate |
| Can access Windows occasionally | Intermittent TPM authorization error | Method 2: Suspend and resume BitLocker | 95% |
| Locked completely at boot screen | Active boot signature verification failure | Method 3 / Method 6: Run CMD unlock or toggle Secure Boot | 88% |
| Recently updated motherboard | Outdated BIOS or cleared cryptographic keys | Method 5: Flash/Update UEFI Motherboard Firmware | 85% |
| Using multiple legacy drives | Graphical boot menu rendering conflict | Method 7: Force Legacy Boot Policy | 75% |
| Drive is corrupted/Unreadable | Corrupted metadata inside encryption sectors | Method 11 & [Bonus]: Extract data with Recoverit, then format | 100% (Data Safe) |
Method 1: Find the BitLocker recovery key
If you’ve lost the device with the saved BitLocker key or you can’t remember your PIN, this method will help you fix it.
You can find your BitLocker recovery key via a text file saved on USB. Here’s how.
- Connect the USB with a saved recovery key file to your PC;
- Locate the file with the recovery key and open it.


You can also find the BitLocker in a saved .txt file on your computer (if you saved it on your PC). Navigate to the Search bar and type BitLocker Recovery Key.txt. Another method is to check for the recovery key in a .PDF document (if you used the Microsoft Print to PDF option). To check for the file, type BitLocker Recovery Key.pdf in the Search bar.
Method 2: Fix the error by decrypting the drive (disable BitLocker encryption)
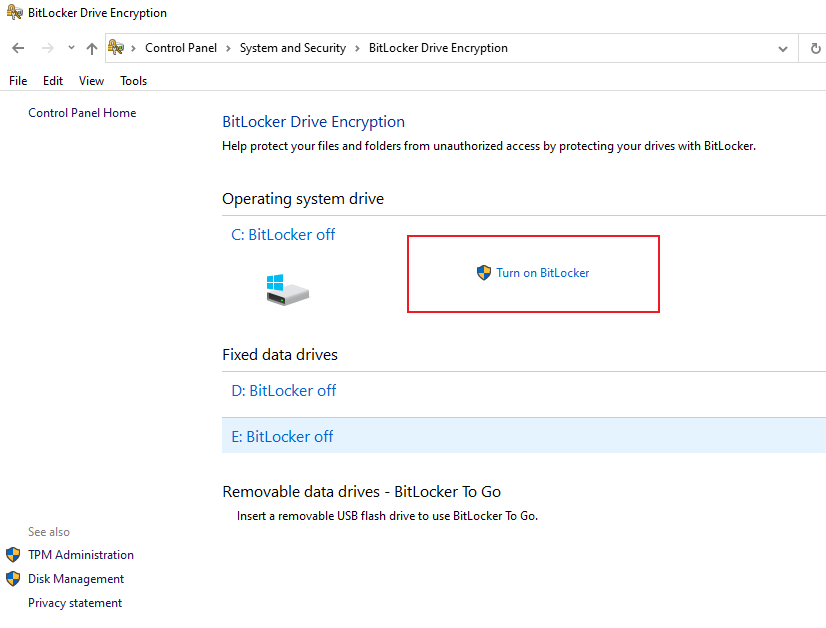
You can disable BitLocker encryption directly from the Control Panel. This method also allows you to choose a different encryption method, depending on your needs. In addition, disabling BitLocker encryption helps you fix the “Enter the Recovery Key to Get Going Again” error after you’ve updated TPM/ROM firmware.
Here’s how to disable BitLocker encryption via Control Panel:
- Go to the Search bar and navigate to Control Panel>Bitlocker Drive Encryption>Turn off the Suspended Protection option next to the drive you want to unlock.

- Click Yes to confirm your action when you see the “Do you want to suspend BitLocker protection” message, then click Decrypt to initiate the process.
Method 3: Unlock BitLocker in CMD
Command Prompt or CMD is an excellent Windows command line application you can use to fix an array of system errors, bugs, and issues, including the BitLocker problem.
It allows Windows users to troubleshoot system errors, perform advanced administrative functions, and solve specific Windows problems.
Here are the steps to unlock BitLocker in CMD:
- Go to the Search bar and navigate to Command Prompt>Run as administrator to open CMD;

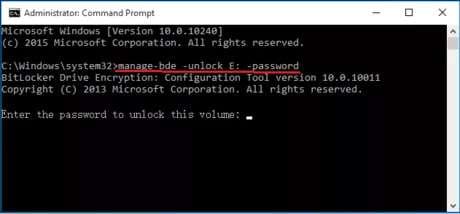
- In the Administrator Comand Prompt window, type the following command: manage-bde -unlock E: -password, and hit Enter.
- Enter your BitLocker password and hit Enter to unlock BitLocker.

If the operation is successful, you’ll see the prompt window saying, “The password successfully unlocked volume X.”
Method 4: Fix the BitLocker recovery key problem by addressing the file system error
BitLocker could be showing the recovery key error message due to an issue with the file system. In that case, you can fix the problem by booting Windows from a bootable USB drive.
Here’s how to create a bootable USB drive using the Command Prompt command line in Windows 10.
- Connect your USB to the PC, type cmd in the Search bar, and select Run as administrator;
- Type diskpart and hit Enter to open the DiskPart utility;
- Type list disk and hit Enter;
- Find your USB drive and type select disk X (X is the number of your USB disk);
- Type clean and hit Enter to delete all partitions on your flash drive;

- Type create partition primary and hit Enter;
- Type select partition 1 and hit Enter;
- Type active and hit Enter to activate the newly created USB partition;
- Type format fs=ntfs quick and hit Enter;
- Type assign letter=x and hit Enter;

- Type exit and hit Enter;
- Locate your Windows installation ISO and copy its contents to your USB.
You have now created a bootable USB drive you can use to reinstall Windows 10 on your PC and fix the BitLocker recovery key error.
Method 5: Update BIOS
If you’ve recently turned off some BIOS functions, the changes you’ve made might have triggered the BitLocker recovery key error. Defective BIOS can cause compatibility issues, tamper your PC performance, increase boot time, and make your desktop device slower than usual. Updating BIOS might help you solve the BitLocker recovery key problem.
Here’s how to update BIOS on Windows 10:
- Check your PC model name;
- Visit the manufacturer's website to check whether the latest BIOS update is available;
- Download and unzip the BIOS update file;
- Save the file on a USB stick;
- Restart your PC to boot into BIOS;
- Back up your current BIOS file;
- Connect USB to your PC, type Reset this PC in the Search bar, and click Open;

- Select Advanced startup and click Restart Now;

- In the Choose an option window, select Troubleshoot>Advanced options>UEFI Firmware Settings;


- Wait for your PC to reboot and enter the motherboard BIOS menu;

- Navigate to the M-Flash tab and choose the Select one file to update BIOS option (if you’re using a Gigabyte motherboard, the M-Flash tab will appear as Q-Flash or EZ-Flash if you have an ASUS motherboard);

- Select your USB flash drive with the BIOS file and choose BIOS;

- Allow your PC to restart again and enter the M-Flash mode to initiate the update process.

After your system completes the update process, you should receive a message saying your BIOS has been updated.
Method 6: Turn Secure Boot on or Off
Some users have reported that they’ve fixed their BitLocker recovery screen issue by turning Secure Boot on or off. Let’s give it a shot.
Here are steps for you to turn Secure Boot on or off:
- When you’re on the BitLocker recovery screen, press Esc to open advanced options.
- Click Skip this drive.
- Go to Troubleshoot > Advanced Options > UEFI Firmware Settings.

- Click Restart and wait for your computer to boot to UEFI.

- Go to the Security section.
- Set the Secure Boot to Enabled or Disabled. Then, press F10 to save the changes.

Method 7: Use Legacy Boot
Windows 10 introduced a new graphical boot menu that could cause BitLocker recovery key and password error messages. You can fix this problem by switching back to the legacy boot menu.
Here are the steps to get to the Legacy Boot menu:
- Go to the Windows Search bar and type CMD;
- Right-click Command Prompt and select Run as administrator;

- In the Command Prompt window, type the following command: bcdedit /set {default} bootmenupolicy legacy and hit Enter. Restart your PC to see if the problem persists.
Method 8: Turn off the Auto-Unlock Option
Turning on the Auto-Unlock option instructs BitLocker to automatically unlock your encrypted drive without asking you for a recovery key or password.
If you don’t want to manually enter a password to unlock your BitLocker, turn on Auto-Unlock. However, if BitLocker suddenly starts asking for a recovery key, you can fix this by turning off Auto-Unlock.
Here’s how:
- Type Manage Bitlocker in the Search box and click Open;

- Find the drive on which you want to disable auto-unlock and select Turn off auto-unlock.

Method 9: Update Windows
If your PC is running an outdated Windows version, that could be why BitLocker keeps asking for a recovery key. Check for Windows updates to fix this problem and get the latest security and system upgrades.
Follow these steps to update Windows:
- Type Windows in the Search bar and select Check for updates;

- If there are updates available, click Install updates. Wait for your PC to complete the installation process and restart your computer to apply new changes. That should resolve the BitLocker recovery key error.
Method 10: Remove Unnecessary External Devices
If you have any external devices connected to your PC when booting, disconnect them immediately. External devices may create BitLocker issues when booting your system. Remove unnecessary external devices and restart your PC to see if the problem persists.
Method 11: Format Your Drive
If none of these methods give the desired results, the last resort is to format the boot drive and solve the BitLocker recovery key problem.
Here’s how to format the boot drive:
- Get to the BitLocker recovery screen, hit Esc for more recovery options, and click Skip this drive;
- Navigate to Troubleshoot>Advanced options>Command prompt;
- In the WinRE command prompt window, type list disk and hit Enter;

- Type select disk X and hit Enter;

- Type list volume and hit Enter;

- Type select volume X and hit Enter (replace X with the volume letter/number of your boot drive);

- Type format fs=ntfs label=volume label quick and hit Enter to apply your changes. Restart your PC to see if this has solved your BitLocker problem.
[Bonus] How to Recover Data if BitLocker Keeps Asking for Recovery Key
You can recover files from your BitLocker encrypted drive with a data recovery tool like Wondershare Recoverit. This software allows you to restore various data formats and file types across an array of storage devices, including camcorders, digital cameras, USB drives, memory cards, hard drives, etc.
Recoverit successfully retrieves lost emails, music, audio, video, images, etc. Whether you’ve lost your files due to a system crash, virus infection, malware attack, accidental deletion, hard disk corruption, or unintentional formatting, Recoverit can get your data back.
You can recover data from your BitLocker encrypted drive, but you’ll need a recovery key or password to complete the process.
Here are the steps to recover a BitLocker encrypted drive data with Recoverit:
- Download, install, and launch Recoverit on your PC;
- Click the Hard Drives and Locations tab on the left, find your BitLocker drive in the Select a location to start recovery, and click Start;

- Allow Recoverit to scan the selected drive for retrievable data;

- Select the files you want to recover by using available filters or keywords;

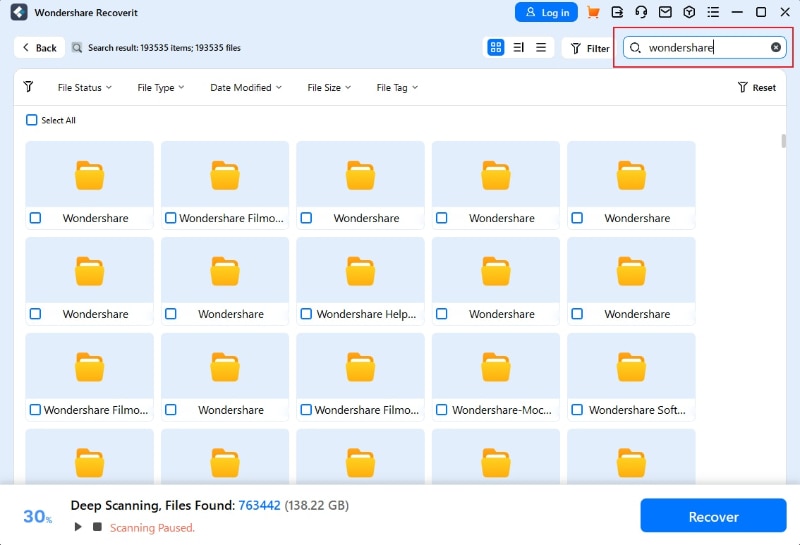
- Preview the scanning results before recovery;

- Click Recover to recover your files from the BitLocker encrypted drive (internal hard drive).

🏁 Scannable Fix Validation Checklist
Before closing this guide, walk through these quick verification checkpoints to make sure your system remains secure and boot-loop free:
- Key Backup: Have you saved a physical copy or printed your 48-digit key somewhere outside your computer?
- Secure Boot Check: Is Secure Boot set to *Enabled* inside your UEFI firmware panel?
- Peripheral Test: Have you disconnected unneeded external hard drives or docking hubs during startup?
- TPM Health Check: Does `tpm.msc` show that your Trusted Platform Module is initialized and ready for use?
- Firmware Alignment: Is your motherboard operating on the latest stable BIOS version provided by the manufacturer?
Conclusion
The BitLocker keeps asking for a recovery key error is one of the most annoying PC problems you can run into. Thankfully, these fixes we mentioned here significantly increase your chances of solving this issue once and for all.
However, before getting into fixing your BitLocker encrypted drive, make sure you create a data backup to avoid data loss. If you’ve already lost your files, use Wondershare Recoverit to get your data back from any internal or external drive.
FAQ
-
How can I verify my BitLocker recovery key?
If you’re a Windows 10 user, you can verify your BitLocker recovery key by following these steps:1.Type recovery key in the Search bar and select Verify BitLocker Recovery Key;
2.Type in the 48-digit key number and click Verify.
Wait for your PC to complete the verification process. If your recovery key is valid, you’ll receive a confirmation message. -
How do I get my BitLocker recovery key?
BitLocker automatically generates the unique recovery key during the program installation. You should save this key in a secure place, such as a Notepad text file or a USB flash drive. -
How should I store my BitLocker recovery key?
Here are a few ways to help you save your recovery key:1. Save your key to a .pdf or .txt file on your PC;
2.Print your key and store a physical copy in a filing cabinet;
3.Store your key on a USB drive or external storage device.


