Organizing your computer's files into multiple partitions is an excellent way to manage data and ensure that vital files stay intact in a secondary section if an operating system fails or needs reinstalling. That's why many users partition their drives into multiple units.
However, it's pretty challenging to determine how much space you'll need on one partition, and users often find themselves outgrowing their storage resources and needing to combine C and D drives. We'll discuss partition merging today and show you how to merge C and D drives in Windows 11.
In this article
Reasons Why You Should Merge Drives
While having two or more partitions and keeping different computer data types in separate sections is a terrific way of organizing files and protecting them in case of operating system failure, merging C and D drives in Windows 11 is also beneficial.
You may want to combine C and D drives for various reasons, including some of the following:
- 💻 One Drive Full / Other Drive Empty: Determining how much you'll use each drive when setting up partitions is difficult. Even with careful planning, the C drive can quickly fill up as various apps default to installing on it, while your D drive is nearly empty. In that case, you may want to merge these partitions.
- 📦 Enough Partition Size for Certain Apps: SSD is still relatively limited regarding space. You may encounter situations where a single partition is not big enough to install a large game. This is really frustrating. Combining C and D drives can fix your issue.
- ⛽ Better System Performance: Fragmentation and slow read/write speeds are a thing of the past since HDDs have mostly been replaced with SSDs. However, even SSDs can benefit from combining C and D drives and having all your data in a single partition.
- 😃Streamlined Data Handling: Managing all your files is more straightforward when you have everything in a single partition. You'll be able to locate all your files much more effortlessly, leading to better data organization and even increased productivity if you use your PC as a workstation.
- ✨ Effortless Drive Backups: While most backup software can quickly and efficiently handle multiple individual partitions, creating and managing single backups of your HDD or SSD is far easier than backing each section. The smaller the number of partitions, the more convenient managing them is.
Whatever your reasons for merging C and D drives in Windows 11, they're entirely justified. We'll now show you how to merge drive C and D effectively and without data loss.
How to Merge Drive C and D in Windows 11
Combining C and D drives in Windows 11 is relatively straightforward, and you don't need additional software. Windows comes out-of-the-box with a relatively simple-to-use yet powerful drive management tool called Disk Management.
On top of that, there's also the Command Prompt, which, if you know how to use it, can handle just about anything you need to do on a PC.
How to Combine C and D Drives using Disk Management
Since Disk Management is explicitly designed to handle any disk-related operations, it's recommended for all drive merging, shrinking, and formatting needs. You should combine C and D drives in Windows 11 with Disk Management, and we'll provide you with steps on using the tool. Here's how:
- Right-click on This PC > Show more options > Manage > Disk Management. Alternatively, hit the Windows + R keys and search for diskmgmt.msc and hit Enter.
- Right-click on drive D > Delete Volume.

- Right-click on drive C > Extend Volume.

- Click Next and adjust the amount of space in MB. You can also keep it as is, and it'll use the entire D drive and combine it with drive C.
- Hit Next again and click Finish.
Your C and D drives will now be combined into one. However, it's worth noting that while this method keeps the C drive intact, it deletes the D drive before merging it. You will lose data from the secondary volume.
It's best to back up your vital data from the D drive before you delete the partition, and you can do so to an external HDD or USB drive with the help of backup software like Wondershare UBackit.
There's also a way of retrieving those files if you've already deleted the partition. You only need a proper data recovery tool – Recoverit, and we'll show you that in a second.
How to Combine C and D Drive With Diskpart
Diskpart is a much older Microsoft drive-handling tool built into Windows versions since 2000. It comes embedded into the Command Prompt tool and offers much more freedom when handling drives and partitions. However, it also comes without a graphical user interface, making it far more complicated than Disk Management.
We've included a simple step-by-step guide on using Diskpart to merge C and D drives on Windows 11. You'll have no issues if you carefully follow the instructions below. So, let's dive into it:
- Tap the Windows key on your keyboard and search for CMD.
- Right-click on Command Prompt and select Run as administrator.
- Type in diskpart to open the embedded tool.
- List the partitions and pay attention to drive numbers and letters.
list volume
- Choose your D drive by using the appropriate command.
select volume d
- Delete the partition by inputting the following:
delete volume
- Now, choose the C drive.
select volume c
- Extend the partition by typing in this command:
extend volume
- Finally, exit Diskpart by typing in exit and hitting Enter.
Drives and partitions are likely organized differently on your PC from others. While the included pictures can help navigate the Diskpart tool and merge partitions, they only serve as pointers. Diskpart may appear differently, and volume numbers and letters might not match those in our example.
Therefore, you should pay extra attention to these elements when using Diskpart. Otherwise, you may end up deleting the wrong partition and losing your critical files. While this might sound catastrophic, that data is still recoverable when you have the right software in your arsenal.
We'll also cover data loss situations and show you what to do if merging C and D drives in Windows 11 goes wrong.
How to Deal With Data Loss While Merging C and D Drives
Data loss is an inevitable part of using a computer. Mistakes can happen, and hardware can fail regardless of your careful handling of critical files. It's also frequent when merging C and D drives in Windows 11, as the process requires deleting the secondary partition before combining it with the primary one.
Fortunately, instead of being frustrated over lost files, users can recover these files with the help of dedicated, reliable, and trustworthy recovery software. Wondershare Recoverit is one such tool, and it was specifically designed to help in over 500 data recovery situations, including accidental deletion, formatting, system crashes, virus and malware attacks, disk damage, etc.
The app supports over 1,000 file types and over 2,000 storage devices like SSDs, HDDs, external and internal drives, USB sticks, SD cards, NAS servers, etc. Its intuitive user interface and beginner-friendly data recovery process make it a perfect tool for data loss situations.
Below is a quick guide on using Wondershare Recoverit to recover from data loss caused by merging C and D drives. Follow the instructions, and you'll have your vital files back in a few minutes and clicks. Here's how:
- Launch the Wondershare Recoverit on your Windows 11 PC.
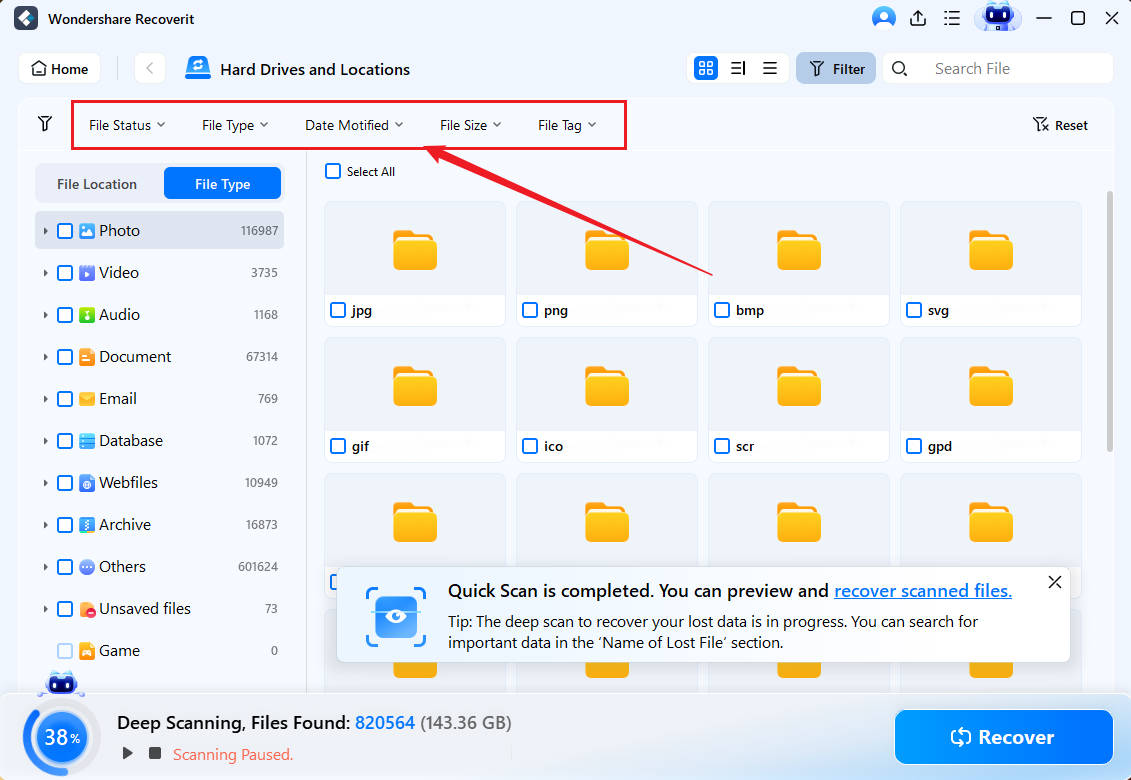
- On the left side of the interface, select Hard Drives and Locations, then choose the drive.

- Wondershare Recoverit will automatically begin scanning for lost files on your selected drive.

- You can pinpoint files while scanning by adjusting file type and size filters.

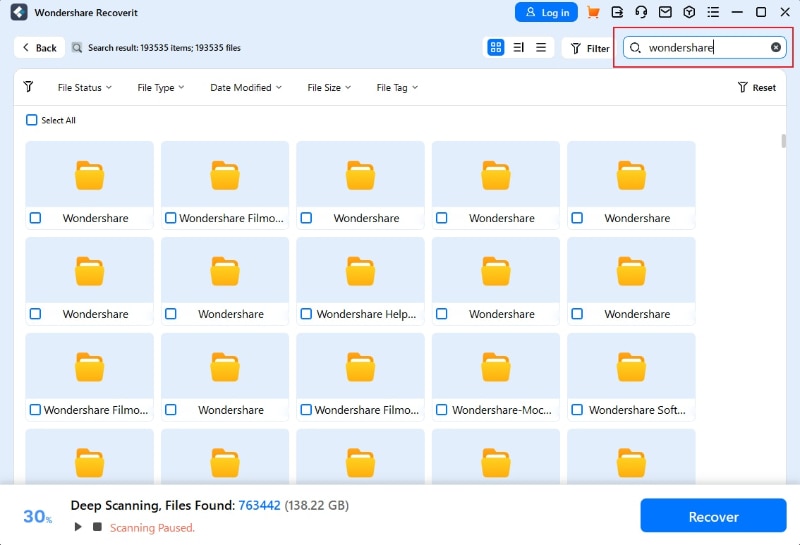
- You can also add keywords to help Wondershare Recoverit look for particular files.

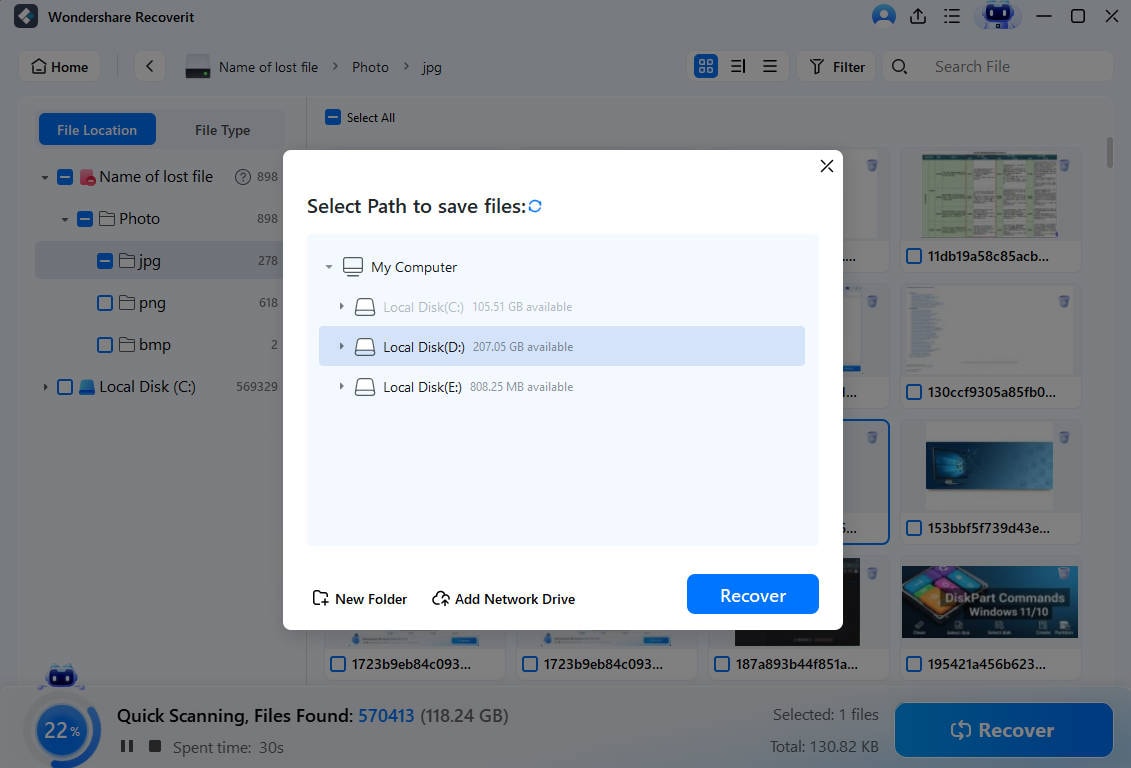
- Wondershare Recoverit will also let you preview the found files while it's still finding data.

- Click the Recover button to retrieve your lost data and choose a path to save the recovered files.

That's all there is to it. Using Wondershare Recoverit is incredibly fast, and it's an excellent tool to have in your arsenal in case you need to recover files from internal or external drives, emptied Recycle Bin, disk images, crashed computers, or NAS and Linux devices.
Conclusion
Whether you're running out of space on one partition, need a larger singular partition for an enormous game, want to increase your HDD or SSD's performance, or improve data management, multiple reasons exist for merging C and D drives in Windows 11.
Fortunately, Microsoft includes two built-in tools for such operations on the Windows operating system, and we've examined both methods and provided step-by-step instructions. However, it's worth noting that it's vital to back up the secondary partition beforehand, as you may lose critical data otherwise.
If that has already happened, you can still retrieve your crucial files using a dedicated data recovery application like Wondershare Recoverit, which we've also covered in detail.
FAQ
Is It Safe to Combine C and D Drives?
While combining C and D drives is entirely safe for the primary partition, the C drive, the process also requires deleting partition D before merging it with C, so backing up drive D beforehand is vital. Otherwise, you'll need recovery software like Wondershare Recoverit if you lose critical files from partition D.Is It Possible to Merge Drives C and E?
Unfortunately, no. You can think of a hard drive's partitions like a line where the C drive is first, D is second, and so on. Thus, the third or fourth drives can't join the first partition, as drive D is in the way. Only drives right next to each other in this row of partitions can be merged.What Are the Limitations of Merging Partitions?
Partition limits depend on the type of drive you're using and its partition scheme. Older Windows versions, like XP, Vista, and 7, mainly used MBR drives and were limited to four primary partitions or three primary ones and infinite logical ones. However, most newer drives on recent Windows versions use the GPT partition scheme, allowing up to 128 primary partitions on a single HDD/SSD.


 ChatGPT
 Perplexity
 Google AI Mode
 Grok
Grok


