Most Windows users know of Microsoft’s Office suite and its many powerful apps, with many using these apps in their daily tasks. However, only a handful of these users are versed in Excel. Yet, Excel is filled with features like macros and VBA codes, which can make your daily tasks so much more straightforward.
Today, we will discuss these advanced features and teach you to streamline your workflow. We'll dive into VBA codes and Excel macros and show you how to use them by providing examples. There'll also be a section about preventing data loss, as VBA codes can delete your Excel data if misused.
In this article
- Insert Multiple Columns
- Insert Multiple Rows
- AutoFit Columns
- AutoFit Rows
- Unmerge Cells
- Highlight Greater-than Values
- Highlight Lower-than Values
- Highlight Negative Numbers
- Highlight Misspelled Cells
- Unhide Worksheets
- Delete Everything Except the Active Worksheets
- Delete Blank Sheets
- Save Worksheets as PDFs
- Close Workbooks
- Refresh PivotTables
- Add Charts as Images
- Insert Pictures
- Remove Characters from Strings
- Reverse Text
- Replace Empty Cells with Zeros
What Is a VBA Code?
Before looking into VBA code examples, we must first discuss VBA and explain what it is. VBA, or Visual Basic Applications, is a programming language that Microsoft Office apps like Excel use to create, save, and deploy macros, also known as automated task scripts.
On the other hand, macros are programming scripts or a set of commands that can automate your Excel workflow. These scripts let users complete complex and time-consuming spreadsheet actions with a pre-recorded shortcut, allowing them to save time while managing data, pivoting tables, and tidying spreadsheets.
How to Use Macro Codes in Excel
Now that we know the basics behind Excel macros, we'll immediately jump into using these codes and show you how to create one through an example of a macro in Excel. Here's what you'll need to do:
- Launch Microsoft Excel and navigate to File > Options > Customize Ribbon.
- Under Main Tabs, check the box next to Developer to enable the feature that's hidden by default.

- Save your settings by clicking OK and then navigate to the Developer tab.

- Select the Record Macro option.

- Name your macro and briefly describe what it does so you can identify it later. You can also add shortcuts to invoke the macro.
- Once you input macro details, you can tap OK and perform the actions you want to add to the macro. The Excel app will record and save these actions inside the created macro.
- Click on Stop recording once you complete your actions, and your macro will be done.

- When you need to use these steps again, you can press the keyboard buttons and invoke the macro through the shortcut you set. Alternatively, navigate to Developer > Macros > View Macros and hit Run on your desired macro.
Your pre-recorded actions will run through the macro, and you can check the results. Remember that checking is a highly vital step, especially for macro beginners, and lets you ensure your new automated tasks work well. You'll need to edit your macros if your actions don't work like you wanted them to.
20 Basic Excel VBA Code Examples For Beginners
As mentioned above, VBA stands for Visual Basic Applications, a language that Excel can understand. Any macros you make with the abovementioned steps will record your spreadsheet actions, turn them into Excel-readable VBA code, and save them as something Excel can recognize and understand.
With that said, we're also provided some basic examples of VBA code and macros, so let's see how helpful macros look like and what you can use them for:
- Insert Multiple Columns
- Insert Multiple Rows
- AutoFit Columns
- AutoFit Rows
- Unmerge Cells
- Highlight Greater-than Values
- Highlight Lower-than Values
- Highlight Negative Numbers
- Highlight Misspelled Cells
- Unhide Worksheets
- Delete Everything Except the Active Worksheets
- Delete Blank Sheets
- Save Worksheets as PDFs
- Close Workbooks
- Refresh PivotTables
- Add Charts as Images
- Insert Pictures
- Remove Characters from Strings
- Reverse Text
- Replace Empty Cells with Zeros
These macros do what their name suggests, and you can copy and try them out in your own XLS files. You'll find their VBA codes below, but remember to test them out in unimportant spreadsheets or create copies of your vital files beforehand.
Insert Multiple Columns
Sub InsertMultipleColumns()Dim i As IntegerDim j As IntegerActiveCell.EntireColumn.SelectOn Error GoTo Lasti = InputBox("Enter the number of columns to insert", "Insert Columns"For j = 1 To iSelection.Insert Shift:=xlToRight, CopyOrigin:=xlFormatFromRightorAboveNext jLast: Exit SubEnd SubInsert Multiple Rows
Sub InsertMultipleRows()Dim i As IntegerDim j As IntegerActiveCell.EntireRow.SelectOn Error GoTo Lasti = InputBox("Enter the number of rows to insert", "Insert Rows")For j = 1 To iSelection.Insert Shift:=xlToDown, CopyOrigin:=xlFormatFromRightorAboveNext jLast: Exit SubEnd SubAutoFit Columns
Sub AutoFitColumns()Cells.SelectCells.EntireColumn.AutoFitEnd SubAutoFit Rows
Sub AutoFitRows()Cells.SelectCells.EntireRow.AutoFitEnd SubUnmerge Cells
Sub UnmergeCells()Selection.UnMergeEnd SubHighlight Greater-than Values
Sub HighlightGreaterThanValues()Dim i As Integeri = InputBox("Enter Greater Than Value", "Enter Value")Selection.FormatConditions.DeleteSelection.FormatConditions.Add Type:=xlCellValue, _Operator:=xlGreater, Formula1:=iSelection.FormatConditions(Selection.FormatConditions.Count).StFirstPriorityWith Selection.FormatConditions(1).Font.Color = RGB(0, 0, 0).Interior.Color = RGB(31, 218, 154)End WithEnd SubHighlight Lower-than Values
Sub HighlightLowerThanValues()Dim i As Integeri = InputBox("Enter Lower Than Value", "Enter Value")Selection.FormatConditions.DeleteSelection.FormatConditions.Add _Type:=xlCellValue, _Operator:=xlLower, _Formula1:=iSelection.FormatConditions(Selection.FormatConditions.Count).StFirstPriorityWith Selection.FormatConditions(1).Font.Color = RGB(0, 0, 0).Interior.Color = RGB(217, 83, 79)End WithEnd SubHighlight Negative Numbers
Sub highlightNegativeNumbers()Dim Rng As RangeFor Each Rng In SelectionIf WorksheetFunction.IsNumber(Rng) ThenIf Rng.Value < 0 ThenRng.Font.Color= -16776961End IfEnd IfNextEnd SubHighlight Misspelled Cells
Sub HighlightMisspelledCells()Dim rng As RangeFor Each rng In ActiveSheet.UsedRangeIf Not Application.CheckSpelling(word:=rng.Text) Thenrng.Style = "Bad"End IfNext rngEnd SubUnhide Worksheets
Sub UnhideAllWorksheet()Dim ws As WorksheetFor Each ws In ActiveWorkbook.Worksheetsws.Visible = xlSheetVisibleNext wsEnd SubDelete Everything Except the Active Worksheets
Sub DeleteWorksheets()Dim ws As WorksheetFor Each ws In ThisWorkbook.WorksheetsIf ws.name <> ThisWorkbook.ActiveSheet.name ThenApplication.DisplayAlerts = Falsews.DeleteApplication.DisplayAlerts = TrueEnd IfNext wsEnd SubDelete Blank Sheets
Sub deleteBlankWorksheets()Dim Ws As WorksheetOn Error Resume NextApplication.ScreenUpdating= FalseApplication.DisplayAlerts= FalseFor Each Ws In Application.WorksheetsIf Application.WorksheetFunction.CountA(Ws.UsedRange) = 0 ThenWs.DeleteEnd IfNextApplication.ScreenUpdating= TrueApplication.DisplayAlerts= TrueEnd SubSave Worksheets as PDFs
Sub SaveWorkshetAsPDF()Dimws As WorksheetFor Each ws In Worksheetsws.ExportAsFixedFormat _xlTypePDF, _"ENTER-FOLDER-NAME-HERE" &; _ws.Name & ".pdf"Next wsEnd SubClose Workbooks
Sub CloseAllWorkbooks()Dim wbs As WorkbookFor Each wbs In Workbookswbs.Close SaveChanges:=TrueNext wbEnd SubRefresh PivotTables
Sub vba_referesh_all_pivots()Dim pt As PivotTableFor Each pt In ActiveWorkbook.PivotTablespt.RefreshTableNext ptEnd SubAdd Charts as Images
Sub ConvertChartToPicture()ActiveChart.ChartArea.CopyActiveSheet.Range("A1").SelectActiveSheet.Pictures.Paste.SelectEnd SubInsert Pictures
Sub Image nameedPicture()Selection.CopyActiveSheet.Pictures.PasteEnd SubRemove Characters from Strings
Public Function removeFirstC(rng As String, cnt As Long)removeFirstC = Right(rng, Len(rng) - cnt)End FunctionReverse Text
Public Function rvrse(ByVal cell As Range) As Stringrvrse = VBA.strReverse(cell.Value)End FunctionReplace Empty Cells with Zeros
Sub replaceBlankWithZero()Dim rng As RangeSelection.Value = Selection.ValueFor Each rng In SelectionIf rng = ““ Or rng = “ “ Thenrng.Value = "0"ElseEnd IfNext rngEnd Sub🚀[Bonus] How to Ensure Data Security While Using VBA Codes
As you may have noticed, some VBA code examples above include data deletion tasks, and many Excel experts use such macros daily. However, it's worth noting that mistakenly using these can delete your valuable Excel spreadsheets, and you'll need to be careful with such macros.
There's nothing to fear even if you're already used data deletion VBA codes, though, as there are solutions that can restore your Excel files. Data recovery apps work wonders in these situations, and a tool like Wondershare Recoverit is a perfect example.
Whether you're dealing with lost Excel spreadsheets, unsaved recent changes, deleted data, or accidentally used data deletion VBA codes, this app can help. Its efficient and advanced search and recovery algorithm can quickly restore lost files, regardless of the data loss situations, as the app supports over 500 of these. Using it is a piece of cake, and here's how you can do it:
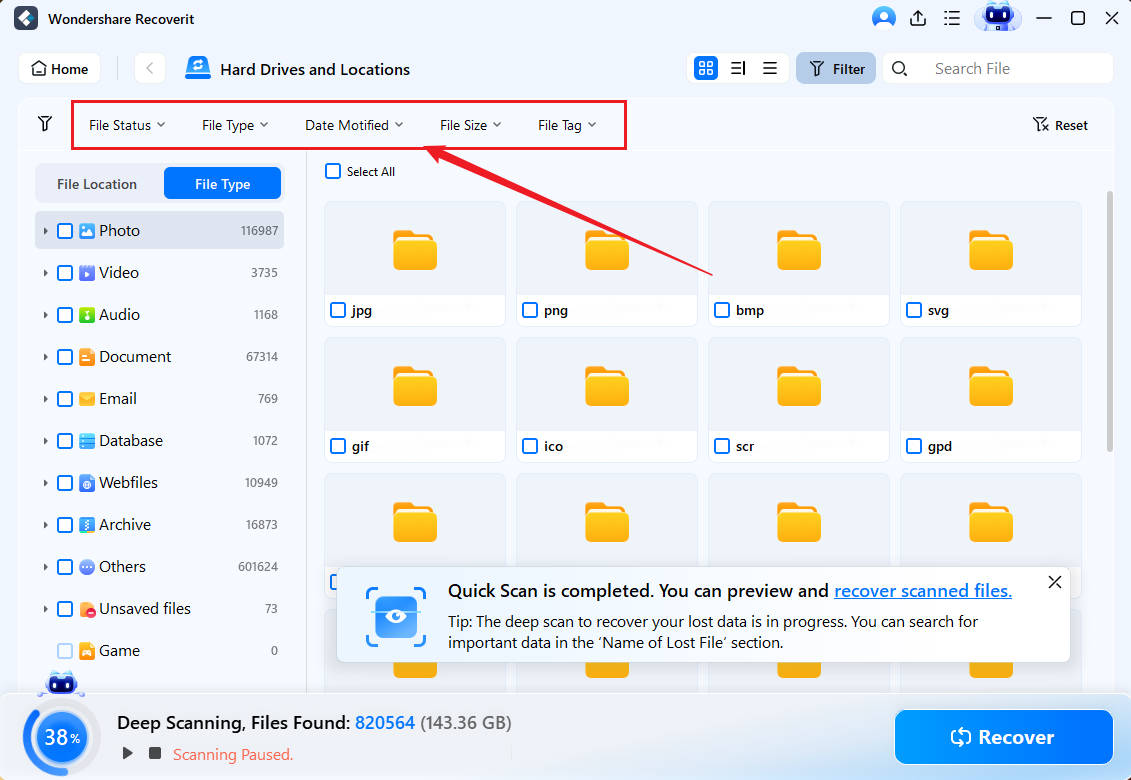
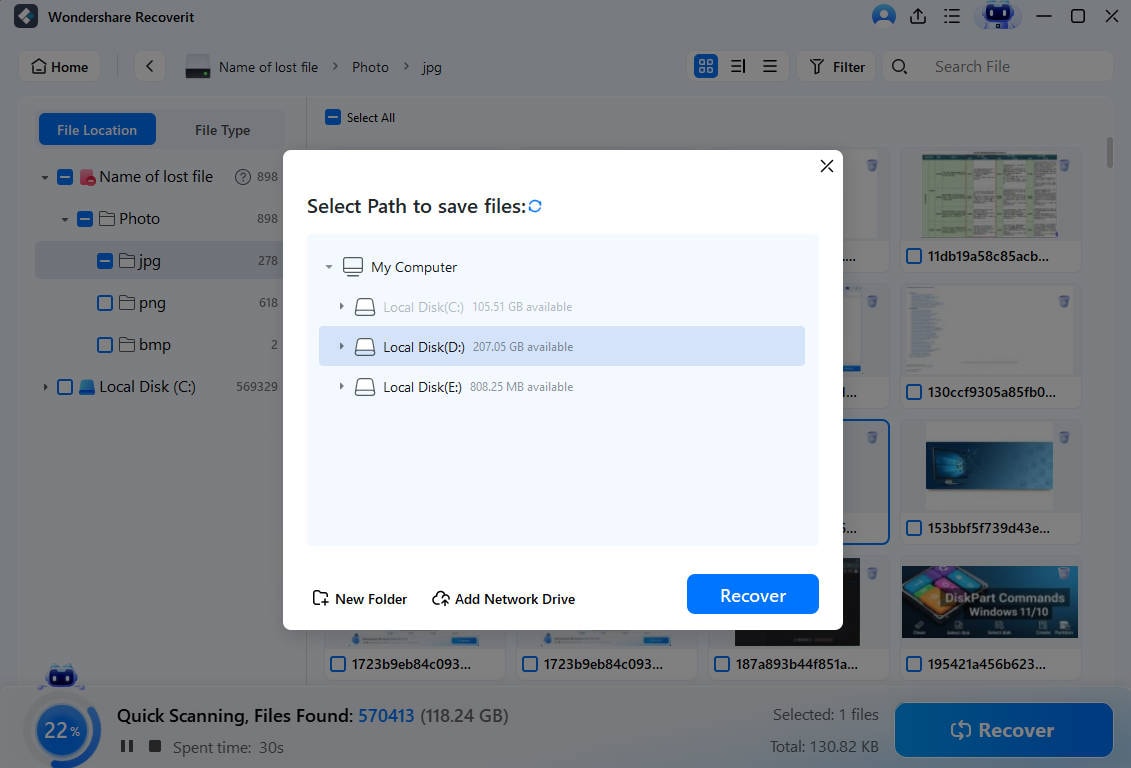
- Open Wondershare Recoverit and choose the Hard Drives and Locations option.

- Select the disk drive where you store XLS files – the app will immediately scan it for lost data.

- Add file filters and keywords to look for specific Excel files.

- Wondershare Recoverit will let you preview Excel files when it finds them. If you're satisfied with the preview, you can pause or stop the scan and tap Recover to save the discovered data to your PC.

With Wondershare Recoverit in your arsenal, you can safely use and practice with advanced VBA codes and take your Excel workflow to another level without worrying about getting it wrong. It can also handle files like music, photos, and videos, supporting over 1,000 recoverable file types.
You can use the app on internal disks, external storage, NAS, USBs, and others, as Wondershare Recoverit supports over 2,000 storage devices. It's perfect for data loss caused by malware, system crashes, interrupted file transfers, failing disk drives, etc., making it an ideal tool to ensure data safety.
Conclusion
On top of calculation, computation, and spreadsheet capabilities, Microsoft Excel has various advanced features, such as macros, that can streamline your workflow and automate tedious tasks to save you precious time. These macros transform your pre-recorded actions into VBA code, a programming language that Excel can understand and use.
From adding multiple rows or columns to autofitting data entries to highlighting values, mistakes, and characters to formatting your spreadsheets, VBA codes can take your Excel skills to the next level with some practice. And if things go wrong and you make a mistake with data deletion VBA codes, recovery apps like Wondershare Recoverit can effortlessly retrieve your vital XLS files and Excel data.
FAQ
Is VBA code hard?
For a beginner, VBA codes can appear frightening and complex, and that’s somewhat true, especially for someone with no coding knowledge. However, dabbling with existing macros from Excel forums can quickly teach you the basics of VBA coding. You won’t need to become a programmer to create VBA code, but utilizing the power of these advanced Excel features will undoubtedly require investigation, learning, and practice.How do I find VBA codes?
Getting started with VBA codes can seem challenging, especially when you’re new to macros and VBA. However, some digging online can lead you to countless Excel forums and threads where experts have already provided countless examples of functional and valuable VBA code.
You can either copy these exact VBA codes and try them out in your Excel spreadsheets or dive deeper into the coding aspect and learn what each line of code does, allowing you to edit these macros and customize them to your Excel needs.
How do I edit my VBA codes or macros?
Editing existing macros is as easy as creating a new one. Here’s how you can do that:
1.Navigate to the Developer tab and select Macros.
2.Choose the macro you want to change and hit Edit.
3.Change the VBA code inside the Visual Basic editor and save your macro.
You can then test your macros again and refine them as often as necessary.


 ChatGPT
 Perplexity
 Google AI Mode
 Grok
Grok


