How to Fix Black Screen of Death After Installing Windows 10/11
Resolving a Windows 10/11 installation black screen typically requires booting into Safe Mode to disable or update faulty display drivers, disconnecting unnecessary external USB devices, or launching Windows Startup Automatic Repair.
● Using System Restore within the Advanced options menu can revert your system to a working state, but it will automatically remove any software or settings configured after the selected restore point.
● If third-party theming software is causing the display failure, start the PC in Safe Mode, launch services.msc via Task Manager, and set the "App Readiness" startup type to disabled.
● When the system completely fails to boot, you can extract files using Recoverit Data Recovery by creating a bootable media on a separate functioning computer, though formatting the USB drive will erase all of its existing data.
Ask AI for a summary
While installing Windows 10/11, when the computer restarts after finishing the installation, everything went black on the screen. Neither the cursor nor anything else is visible on Windows 10/11 install black screen. Is your computer displaying the same? Many users experience it.
Upgrading your system to Windows 10/11 is not smooth sailing always. After a successful update, users reported getting a black screen. It usually occurs when the computer restarts. Some users can see the cursor, while in some cases, it is not present at all.
When you experience it, it seems like you have lost your desktop icons. Read on to know the causes of Windows install black screen, solutions to fix it, and how to recover data with Recoverit.
Part 1: Cause and Solutions for Black Screen During Win10/11 Installation
When you get a black screen after installing Windows 10/11, you must be wondering what is causing it and how to fix it. Before moving to the solution, first, take a look at the possible causes of this error.
- It could be due to the connection of any faulty external drive – mouse, keyboard, joystick, printer, hard disk, etc.
- If your video or display driver is outdated, it can also cause a black screen during Windows 10/11 installation or maybe after.
- Sometimes installation gets interrupted, and due to incomplete installation, a black screen appears.
- If the fan in the system is not working properly, overheating can also cause a black screen of death.
- Transferring large data files during setup can take several hours. During this process, the computer can get stuck and display a black screen.
Well, the reason can be any, but we have listed some of the possible ones that users generally experience. Now navigate through the solutions to fix the black screen during Windows 10/11 installation or maybe after installation.
12 Tips to Fix Black Screen After Installing Windows 10/11
Solution 1. Check the Hardware Issues
If there is some problem with the hardware, it can also cause the problem of the black screen. Check it with the below steps:
- Log in with safe mode and click on Start.
- Look for the option Device Manager and then click on the result for opening the app.
- Expand the option that you need to check.
- Right-click on the particular device and click on the Properties option.

- Click on the General tab and confirm the component status in "device status."

When the process, if the status is "This device is working fine," that means the hardware is not experiencing any issues.
Solution 2. Press Ctrl+Alt+Del to Restart the Computer
Even after waiting for several minutes, when the black screen does not disappear, enter the Windows security screen to restart your computer.
- Press the three keys simultaneously – Alt + Ctrl + Del and reach the "shut down" option.
- Select the drop-down menu with the "tab" key and use the arrow keys to select "restart."

This will restart the system, and probably the black screen issue disappears. While restarting the system, if Windows prompts you to save any open file, use the arrow keys to save it, or don't save as per your preference.
Solution 3. Enter the Safe Mode on Windows 10/11 to Fix the Black Screen
You can repair Windows 10/11 install black screen by repairing it in safe mode with the below steps:
- Reach the "install now" screen and click on "repair."

- Reach advanced options and click on "safe mode."
Here if you get the message that installation can't be completed in safe mode, press Shift + F10. You will be directed to the command prompt. Open the device manager by typing devmgmt.msc and disable display adaptors.
Check if are you able to boot your system normally now. If your Windows installation completes and you can boot the system normally, then update display drivers and then restart your computer. The problem might have been fixed.
Solution 4. Launch a Windows Repair
If the PC turns to black screen after installing Widows 10, you can launch a Windows repair to fix the problem.
Follow this way to launch the Windows Startup Automatic Repair:
- Repeatedly restart your computer until it launches the Windows Startup Automatic Repair screen.
- Click Restart to see if it can fix the black screen issue. If not, repeat the step and select Advanced options.
- Select System Restore, then select one system restore point that happened before the black screen issues.
- Click Next and wait for Windows to return to the previous working status when there isn’t black screen issue.
Noted: This method will reset the settings and remove the software you installed after the restore point.
Solution 5. Roll Back or Update the Drivers in Safe Mode
The black screen after installing Windows 10/11 issue can be caused by a malfunctioned device driver. So, you can try rolling back or updating any drivers that could cause the problem. Follow this:
- Right-click on the Start menu->click Device Manager.
- Usually, the drivers under Device adapters, Network adapters, or Sound, video and game controllers can be the problematic device drivers.

- Expand the section, such as Display adapters, and double click the driver.
- Go to the Driver tab, select Roll Back Driver, and click Yes.
- If rolling back doesn’t work, you can try updating the drivers.

Solution 6. Unplug unnecessary USB equipment
The connected external devices can also cause Windows 10/11 to install a black screen. Follow the below steps to fix it:
- Unplug all the connected external devices.
- Restart your computer.
- If the problem is resolved, plug all the devices back into the system. But do this one by one to determine the faulty external drive. First, try to update the drivers of the device that is creating the error. If this does not work, try replacing it.
Solution 7. Remove the Software or Programs Installed Recently
If you are getting the black screen after installing any software, programs, or Windows update recently, then this could be the reason for the black screen after installing Windows 10/11. There are chances that the installed programs are not compatible with your system or Windows. Remove the recently installed updated with these steps:
- Open the control panel and reach programs and features.
- Look for the latest installed programs. Right-click on the respective program and then select "uninstall."

- Now restart your system and see whether the black screen disappears or is it still there.
If the screen is returned to normal, it signifies the installation of any incompatible software. But if you are still viewing the same black screen, proceed to the next solution.
Solution 8. Update your graphics card driver
An outdated graphics card driver can also cause a black screen. Update it with the below steps:
- Log in with safe mode and click on start then move to the control panel.
- Click on the option "system and security" and search for updates.
- Install the updates if you see any while checking for updates.
Solution 9. Uninstall any installed Windows theming software from the third party
Any of the installed Windows theming software from any third party can cause a black screen. Uninstall them to fix the Windows install black screen.
- Start the computer in safe mode.
- Right-click on your taskbar and select task manager.

- Click on "file" then on "Run new task.

- Now type services.msc and click on OK after you check the box.

- Select "App Readiness" in the pop-up services.

- Startup type should be "disabled," click on apply, and then OK.

- Restart the computer to see if the problem is fixed.
Solution 10. Disable all automatic applications
If there are too many applications set to load automatically after the computer start up, it can also cause black screen issue. To fix this, you can disable all the automatic apps:
- Press Ctrl+Alt+Delete, and select Task Manager.
- Go to the Startup tab.
- Right-click on the programs listed here and click Disable.
- Reboot the computer to test if the black screen after installing Windows 10/11 problem is solved.
Solution 11. Log in using a different account
Any corrupted Windows profile can also cause a black screen. Log in to your system using different users through safe mode to check it. If you can log in without seeing any black screen, this means that your previous account has some problems. Replace the problematic user account folder with the working user account. Proceed with the below steps:
- estart your system in Safe Mode.
- Log in with the working account.
- Go to C:\Users\{***}\AppData\Local\Microsoft then Windows -> Caches. Replace *** with a working user account name.
- Copy folder Caches.
- Log in with your corrupted user account.
- Proceed to C:\Users\{***}\AppData\Local\Microsoft then Windows -> Caches. Replace *** with the broken user account name.
- Replace the broken folder with the working user account folder.
But if you do not have a working account, create a new account with these steps:
Step 1. Your Windows account needs to be an administrator. If it is not, activate it with the below steps:
- Open cmd, right-click on it, and click on "run as administrator."
- Type the command in cmd – net user administrator /active: yes
- Press enter
- Restart the computer, you can log in with the administrator account
Step 2: Click "Start" and then "Settings."

Step 3: Click on accounts

Step 4: Click on "Other people" and then tap on "Add someone else to pc." Now follow the instructions on the screen.

Step 5: Log into the account and see if the black screen is resolved.
Solution 12. Reset your PC
If you are not able to fix the Windows install black screen try resetting the computer. Here is how you can reset it:
Step 1: Reset the computer in safe mode and click on start -> settings

Step 2: Click on "Update and Security"
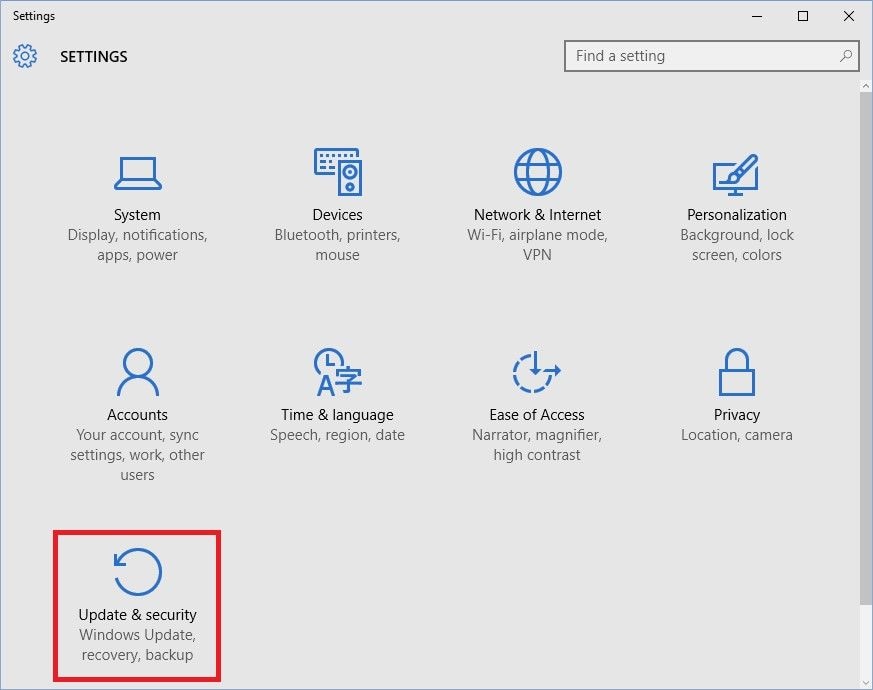
Step 3: Click on recovery

Step 4: Now click on "Get started" to reset this pc. Follow the instructions on-screen to reset pc.

Video Tutorial: How to Fix Black Screen After Windows 10 Update?
Part 3: What to do if Windows 10/11 just keeps the black screen and won't boot up?
After trying all the above solutions, if the screen remains black or while resetting PC if you lose your data, then do not worry. You can recover it with the best data recovery software.
Recoverit Data Recovery is an excellent software with the highest recovery rate. It can recover data of any size that is lost under various scenarios. Follow the below steps to recover data from a crashed computer.
Download and install the recovery software Recoverit on a different computer that works normally. Now create a bootable media on that computer.
Step 1: Create USB Bootable media
Launch Recoverit on another computer that is working fine and select the option "recover from the crash computer." After making the selection click on "Start."

Connect the USB to the computer and create a Bootable media. When the system recognizes the drive, click on "Start." Now, select the attached USB and then click on "Create."

You will get a message to format the selected USB drive and select the USB. But remember, all the stored data will be deleted. So make sure you have a backup. After clicking on the format, the firmware starts getting downloading. This software is embedded in other hardware devices and is vital for creating a bootable drive.
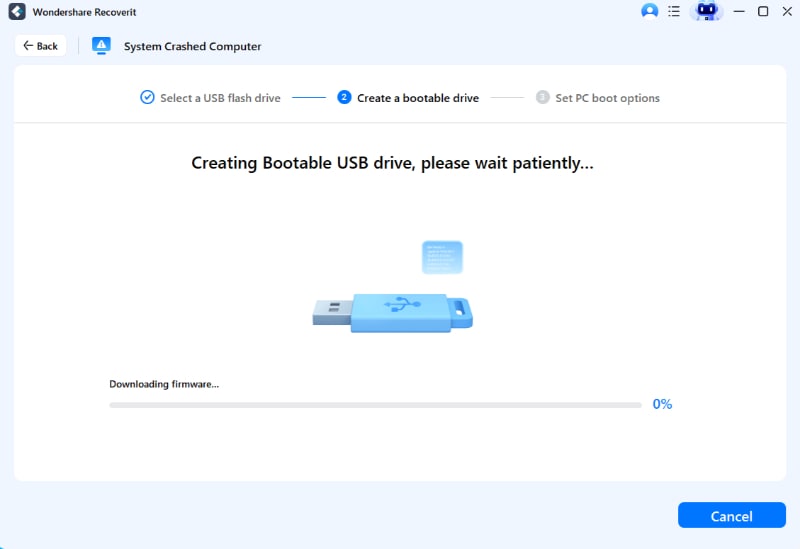
After downloading the firmware, the formatting of the connected USB begins. Then the creation of bootable media starts. Do not eject the USB until the process of creating a bootable media is complete.
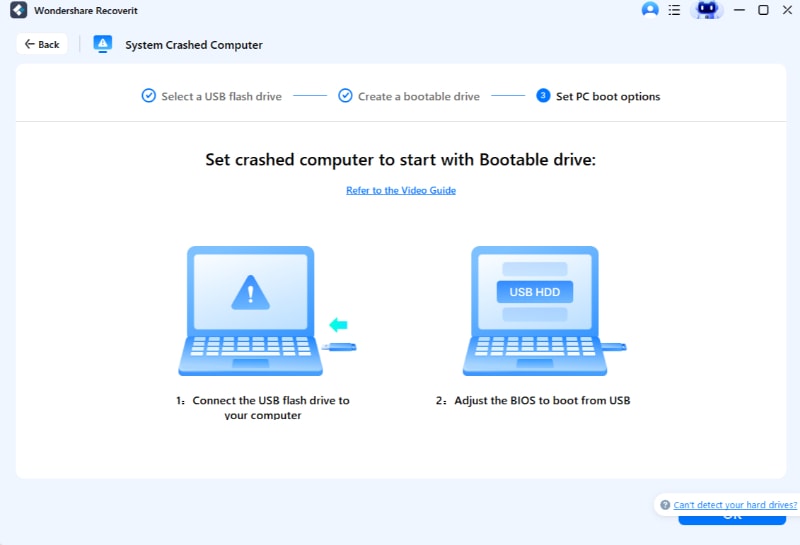
Step 2: Booting from USB
Connect bootable media - USB drive to your computer that is displaying a black screen. Start and press the BIOS key to select the bootable media and boot your system.
Step 3: Recovering data
When the computer boots from the created bootable media, click on data recovery or hard disk copy.
If you are selecting data recovery, select the disk to begin the scanning and connect a drive to your computer. When the scanning completes, select the location to save your recovered data. Select the hard drive connected to your computer and then click on "recover." All the data will be recovered from the computer to a hard drive. When the recovery completes, it displays the message – file recovery completed.
If you select hard disk copy, click on the copy directory option and connect the drive to your computer. Select the connected drive and click on "copy." You will see the process of copying data from your computer to a hard drive. When the process completes, it displays the message.
Preview data when the recovery process completes and save it to your preferred location.
The Bottom Line
Windows install black screen is the error that users experience while installing or after installing Windows 10/11. The reasons for this black screen can be any. We have discussed the possible causes of the black screen and solutions.
While trying the solutions if your data gets lost, we recommend recovering it with the Recoverit Data Recovery. It is the best software with the highest recovery rate. You can create bootable media to boot your computer from it and perform the recovery process.
We hope our guide helps you fix the black screen issue!
People Also Ask
-
Why am I encountering a black screen after installing Windows 10/11?
There can be several reasons for experiencing a black screen after installing Windows 10. Some common causes include incompatible or outdated graphics drivers, incorrect display settings, hardware issues, or conflicts with other installed software. It's essential to troubleshoot and identify the specific cause to resolve the black screen issue.
-
How can I prevent a black screen issue when installing Windows 10/11?
To prevent encountering a black screen issue during or after installing Windows 10/11, consider the following precautions:
1.Ensure that the PC meets the minimum system requirements.
2.Back up important files and data.
3.Download the latest drivers for your hardware components.
4.Disable or uninstall any unnecessary software or antivirus programs.
5.Connect to a stable power source during the installation process.
6.Follow the installation instructions provided by Microsoft carefully.
-
Does Windows 11 have a blue screen of death?
A blue screen of death and other issues with Windows 11 have been reported. Blue Screen of Death error occurs due to compatibility issues with Intel drivers in Windows 11. Users will have difficulty updating or repairing apps due to the failure of Microsoft Installer (MSI).
-
What causes the black screen of death in Windows 10?
If you experience Windows 10 black screen, it could be because of a Windows update or installation that was not completed. Overheating of your computer and power supply issues are all factors leading to this error.
Computer Troubleshooting
- Win System Crash
- Windows Tips
- Computer Problems
- Blue Screen Errors


 ChatGPT
 Perplexity
 Gemini
 Claude
 Grok
Grok


David Darlington
staff Editor