

 TL;DR:
To fix a Windows 10/11 black screen before login, immediately verify your monitor cable connections, then boot into Safe Mode to resolve underlying graphic driver conflicts or system update errors.
● Press F8 repeatedly during startup to access Safe Mode, navigate to Device Manager, and uninstall your display adapter to force Windows to automatically install a fresh graphic driver upon reboot.
● Access your BIOS settings during startup (typically via F2, F12, Delete, or Esc) and disable the Fast Boot option to prevent system loading conflicts that bypass essential display drivers.
● If the computer remains completely inaccessible and you need to salvage files, you must use a separate, functional PC to install Wondershare Recoverit and create a bootable USB media drive to bypass the crashed system.
Ask AI for a summary
 ChatGPT
 Perplexity
 Gemini
 Claude
 Grok
Grok
"Hey folks, I'm dealing with a black screen before login on Windows 10. Any suggestions on how to fix this?"
This type of forum question pops up more often than you might think. Windows 10/11 black screen before login is a common and frustrating problem. Staring at a black screen when you're trying to log in can be nerve-wracking. It's usually caused by faulty drivers, corrupted files, or even bad connections. But don't worry—you aren't alone in this, and you can solve it.

In this guide, we'll break down the causes and provide solutions to fix the "black screen before login on Windows 10" issue. From simple restarts to advanced recovery tools, we've got you covered.
Try Recoverit to Recover Lost Data Due to Black Screen Issues
![]() Security Verified. Over 7,302,189 people have downloaded it.
Security Verified. Over 7,302,189 people have downloaded it.
In this article
Part 1: What Causes Windows 10 Black Screen Before Login Issue?
Understanding the "black screen before login on Windows 10" can greatly help in troubleshooting:
- Driver Issues: The graphic drivers may have malfunctioned or are outdated.
- Boot Issues: Problems during the boot process might cause black screens.
- Corrupted System Files: Essential Windows files may be damaged or missing.
- Display Connection Problems: Improper connections can result in a black screen.
- Hibernation/Sleep Mode Errors: Issues coming out of hibernation or sleep mode.
- Power Supply Issues: Your computer might not be getting proper power.
- BIOS Conflicts: Sometimes, BIOS settings can cause display problems.
- Recent Updates: An update that didn’t install correctly.
Part 2: How to Fix a Windows 10 Black Screen Before Login?
If you're dealing with a black screen before login on Windows 10, don't worry—there are several solutions to get your PC back to normal. From simple restarts to more advanced steps like rebooting in Safe Mode or updating your drivers, there are many ways to tackle this issue.
Here are some practical fixes you can try.
Fix 1: Restart PC
When you see a black screen before login on Windows 10, try restarting your PC first. Restarting can often fix temporary glitches. It might seem too simple, but it works.
Restarting is the easiest solution. It should be your first step. This process clears minor problems causing the black screen.
Here’s how to fix the black screen Windows 10 before login issue:
- Hold down the power button until your PC shuts down.

- Wait a few seconds, then press the power button to turn it back on.
Check if the black screen before login is resolved.
Fix 2: Reboot in Safe Mode
If restarting doesn't solve the problem, rebooting in Safe Mode can help diagnose and fix the "black screen before login on Windows 10". Safe Mode starts your computer with a minimal set of drivers and services, which can help determine if background processes or drivers are causing the issue.
Rebooting in Safe Mode is a more advanced step. It allows you to access your system with only the essential drivers and services running. This can help isolate whether the black screen before the login issue is caused by software conflicts or driver problems.
Steps:
- Power down your computer and restart it. Once it begins to boot, repeatedly press F8 until the Advanced Boot Options menu shows up.

- Select Safe Mode with arrow keys and press Enter.
Fix 3: Uninstall and Reinstall Graphic Drivers
Faulty graphic drivers can cause a Windows 10 black screen before login. Reinstalling them can help. Graphic drivers are crucial for your display to work correctly, and if they are outdated or corrupted, they can lead to a black screen issue.
Updating or reinstalling graphic drivers can often resolve display issues on Windows 10. This fix addresses the common problem of malfunctioning drivers, which are frequently the culprits behind a black screen before login.
Steps:
- Boot into Safe Mode. Press Win + X. Select Device Manager. Expand the Display Adapters section.

- Right-click the adapter, then select Uninstall. Restart your PC. Windows will automatically reinstall the drivers.
Fix 4: Disable Fast Boot in BIOS Settings
Fast Boot can sometimes lead to a black screen on Windows 10 before login. Disabling it might help. Fast Boot is a feature designed to reduce boot time, but occasionally it can cause issues on some systems, leading to problems like a black screen before login.
Disabling Fast Boot in BIOS settings can remedy the black screen problem by allowing your system to boot more traditionally. This step ensures that all devices and drivers load correctly, avoiding any conflicts caused by the Fast Boot feature.
Follow these steps to fix a Windows 10 black screen before login issue:
- Access your BIOS settings (often by pressing F2, F12, Delete, or Esc during startup). Navigate to the Boot section.

- Locate the Fast Boot option and disable it. Save and exit the BIOS settings. Restart your PC.
Fix 5: Check Your Display Connection
Loose or faulty connections can cause a black screen on Windows 10 before login. Ensuring that all cables and connections are secure and functional is crucial. Sometimes, the problem isn't with your computer but with the monitor or the connection itself.
Checking your display connection involves ensuring that all cables are securely plugged in and functional. By ruling out any issues with your monitor or the cables, you can determine if the black screen before login on Windows 10 is due to a display connection issue.
Steps:
- Check the cable connections between your monitor and PC. Ensure cables are securely plugged in.

- Try different cables or ports if necessary. Connect your PC to a different monitor to rule out monitor issues.
Fix 6: Update Windows
Updating your Windows system can fix various bugs causing the black screen before login. Microsoft regularly releases updates to address known issues and improve system stability. Keeping your system updated ensures that you have the latest fixes and improvements.
Updating Windows is a proactive step to fix the black screen before login on Windows 10. By ensuring your system is up to date, you reduce the risk of encountering issues caused by outdated system files or drivers.
Steps:
- Boot into Safe Mode. Go to Settings > Windows Update.

- Click Check for updates. Install any available updates. Restart your PC.
Fix 7: Use System Restore
System Restore can revert your PC to a state before the black screen issue occurred. This feature allows you to roll back your system to an earlier point in time, resolving any recent changes that might have caused the problem.
Using System Restore is an effective way to undo system changes that might have led to the "black screen before login on Windows 10". This tool can restore your computer to a previous state without affecting your personal files.
Steps:
- Boot into Safe Mode. Open the Search Bar, type Create a Restore Point. Hit Enter. Click System Restore.

- Select a restore point before the issue was started.
Follow the on-screen instructions to complete the restore.
Related Video >>: 4 Methods to Fix Stuck at Preparing Automatic Repair Black Screen Issue on Windows 10/11?
Part 3: Lost Data Due to Black Screen? Use Recoverit Today: Crashed Computer Recovery
The black screen on Windows 10 isn't just a frustrating issue, it can also lead to data loss. When you're unable to access your computer, valuable files and documents may become unreachable. Fortunately, tools like Recoverit can help you retrieve your data even if your computer has crashed.
Recovering data from a black screen computer may seem daunting, but it's quite manageable with the right tools. Recoverit is a powerful data recovery tool that can help you recover data from a crashed or black screen computer.
Here’s how to recover data from crashed computer:
- Click the download link above to download and Install Recoverit on a working PC. Switch to the System Crashed Computer tab. Hit Start.

- Follow the instructions to create a bootable USB or CD/DVD.

- Insert the bootable media into the black screen computer and restart it.
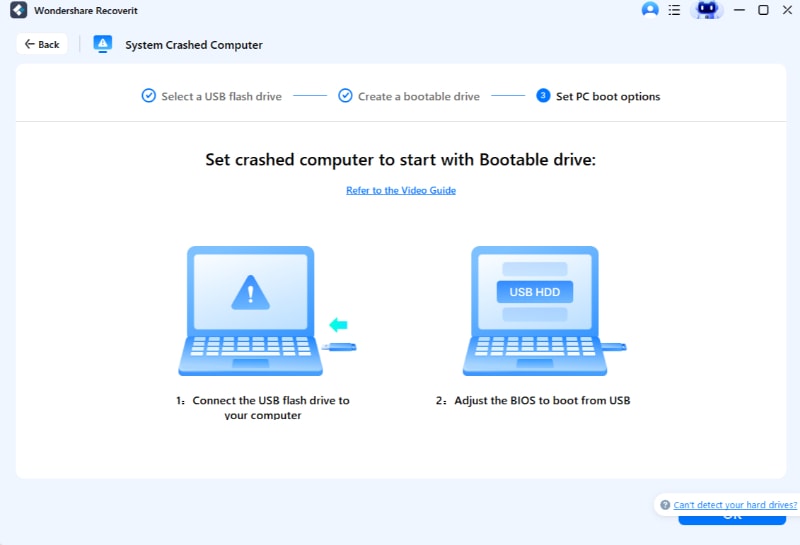
- Follow the on-screen instructions to recover your data.

Part 4: Tips to Recover Data from Crashed Computer
Recovering data from a crashed computer can be challenging, but it's necessary to prevent data loss. Here are some tips to help you:
- Use Data Recovery Software: Tools like Recoverit are designed to recover lost or inaccessible data. These applications are user-friendly and effective.
- Check Your Hard Drive Connections: Ensure that your hard drive is properly connected. Sometimes, loose or improper connections can cause data inaccessibility. Reconnect the hard drive to confirm it's securely attached.
- Utilize Bootable Media: Creating a bootable USB or CD/DVD with data recovery software can help. Use the bootable media to start your crashed computer and recover your data. This method bypasses the regular boot process, allowing you to retrieve files directly from the hard drive.
- Consult Professional Services: If your hard drive is physically damaged, seek professional data recovery services. They have advanced tools to recover data from damaged devices. This option may be costly but offers a higher chance of successful recovery.
- Backup Your Data Regularly: Regular backups prevent data loss. Use external storage devices or cloud services to keep backups secure and up-to-date. This ensures that you can restore your important files even if a crash occurs.
Following these tips can help you recover your data and minimize the risk of permanent loss. If you encounter issues, don't hesitate to seek professional help.
Related Video >>: How to Fix Black Screen Issue After Windows 10 Update?
Conclusion
Experiencing a black screen before login on Windows 10 can be alarming. However, understanding the causes and knowing the fixes can relieve the stress. Being proactive with regular updates and backups also minimizes future risks.
If the black screen before login remains unresolved, consider seeking professional help. The solutions mentioned above should get most users up and running. Don't forget, tools like Recoverit provide a safety net for your data.
Try Recoverit to Recover Lost Data Due to Windows Issues
![]() Security Verified. Over 7,302,189 people have downloaded it.
Security Verified. Over 7,302,189 people have downloaded it.
FAQ
-
What causes a black screen before login on Windows 10?
A black screen before login on Windows 10 can be caused by various issues. These include malfunctioning or outdated graphic drivers, improper boot processes, corrupted system files, or display connection problems. It could also be due to hibernation or sleep mode errors, power supply issues, BIOS conflicts, or incorrect recent updates. -
How can I fix the black screen before login on Windows 10?
Fixing the black screen before login on Windows 10 can involve several steps. You might start by restarting your PC, which can clear temporary glitches. Rebooting in Safe Mode can help diagnose driver or software conflicts. Uninstalling and reinstalling graphic drivers can address display issues. Disabling Fast Boot in BIOS, checking display connections, updating Windows, and using System Restore can also resolve the issue. -
How can I recover data from a black screen computer?
Recovering data from a black screen computer typically involves using data recovery software like Recoverit. You need to download and install Recoverit on another working computer, create bootable media, and use it to boot your crashed computer. Follow the on-screen instructions to recover your data. Ensuring your hard drive is functional and, if necessary, seeking professional data recovery services can help as well.


