Did you try to shut down your Windows 10/11 system, but it did not work? Did your system crash or freeze in between updates? There have been errors in your system which are preventing the update from happening. Whether you are a Windows 10 user or Windows 11, you must update it regularly.
Windows often releases updates with newer features and advanced security. So, if you come across Windows 10/11 freezing and crashing issues, several methods exist to fix them. You are not the only one; there are others who struggle with this Windows update stuck issue. This blog deals with some of the top ways through which you can fix Windows 11/10 updates especially if it freezes or crashes. Go through all the data to find potential fixes for your problem.
Try Wondershare Recoverit to Perform Windows Data Recovery

In this article
Why is Windows Update Crashing Windows 10/11?
Windows Update crashing can happen for a wide range of reasons. Some of the common reasons why Windows updates stuck may have crashed or frozen include the following:
- Third-party software: Some third-party software can interfere with your Windows update, which will lead to a crash. It is advisable to uninstall any recently installed software or disable the startup programs.
- Outdated drivers: The outdated drivers can interfere with the Windows updates. It is advisable to check the third-party drivers or update the ones that you have so as to fix the windows update crashed error.
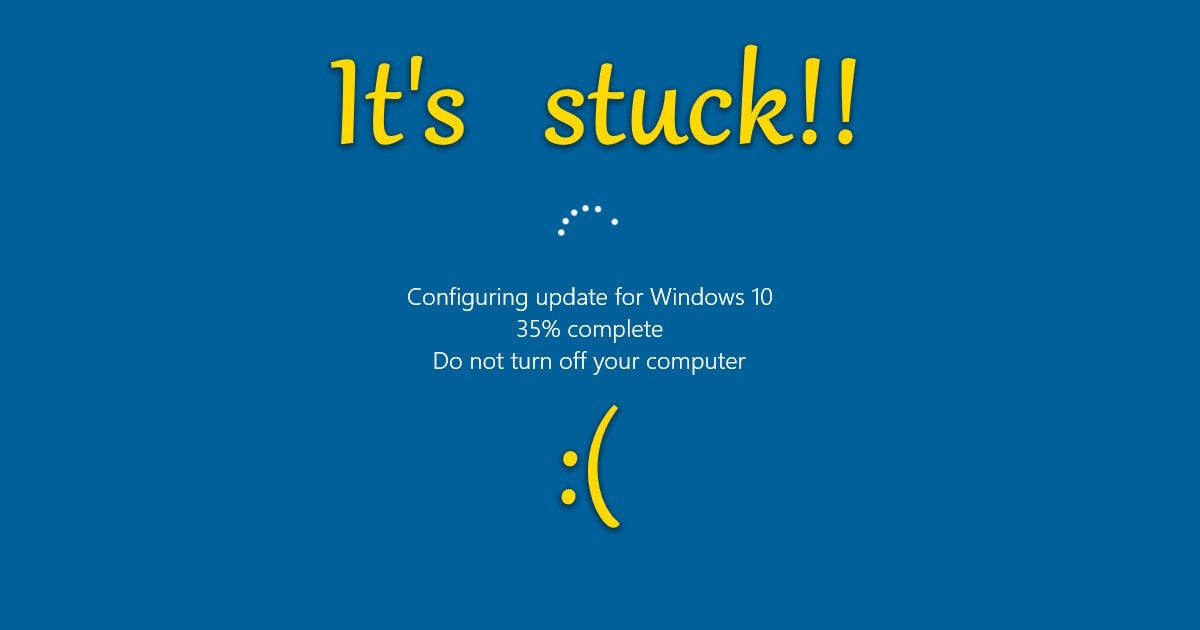
- Software compatibility: If the software and devices aren't compatible, you may have errors with PC updates.
- System file corruption: Missing or corrupted systems can often interfere with the Windows Update. Therefore, checking the same via System File Checker and then updating the systems is advisable.
- Cybersecurity software update: Sometimes, you may encounter cybersecurity issues that may lead to your Windows system crashing or freezing.
How to Fix Windows Update Crashing Computer?
If you have been encountering Windows Update crashing or freezing issues frequently, you must adopt the methods to fix the problem quickly. However, for that, you must identify the root cause of the problem.
Some of the key methods through which you can fix Windows update stuck for Windows 10/11 are as follows:
Method 1. Change Screen Resolution
Windows 11 can have unexpected issues, such as freezing or crashing, because of the hardware requirements. The random freeze will lead to a sudden crash for the 4K resolution, especially for the low-end GPU. So, watching 4K videos on a highly powerful monitor with a low-end graphics card will lead to your Windows 11 freezing. You can modify the built-in settings to fix the Windows crashing issues effectively.
Therefore, reducing the screen resolution is helpful, especially to fix the Windows update stuck issue. Follow the steps given below to reduce the screen resolution to prevent Windows 11 freezing issues:
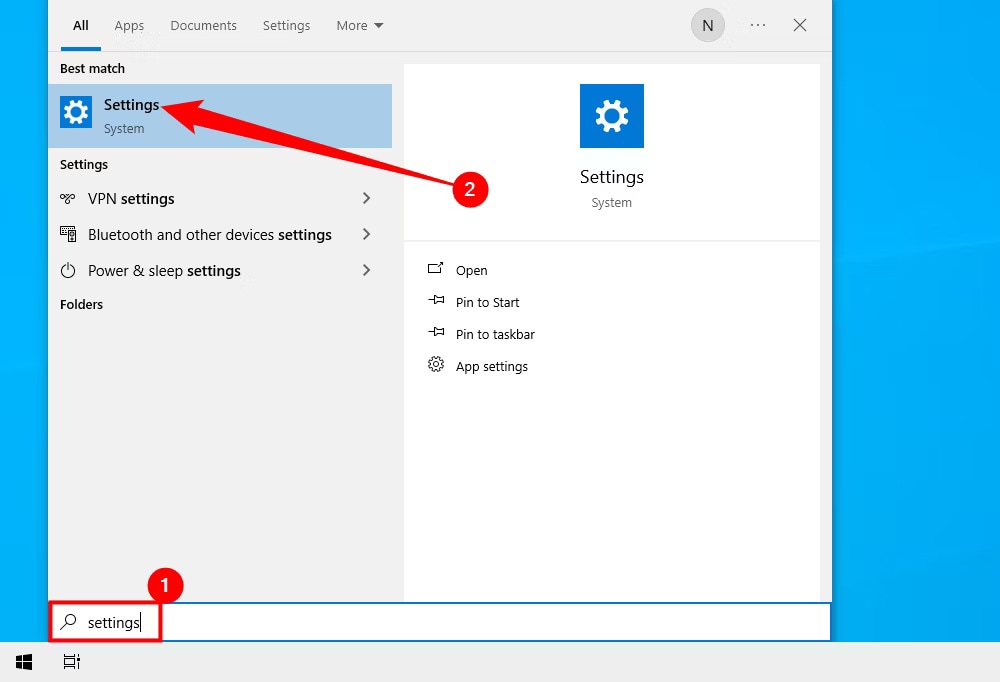
Step 1: Select the Settings option from the Start Menu on the Taskbar.
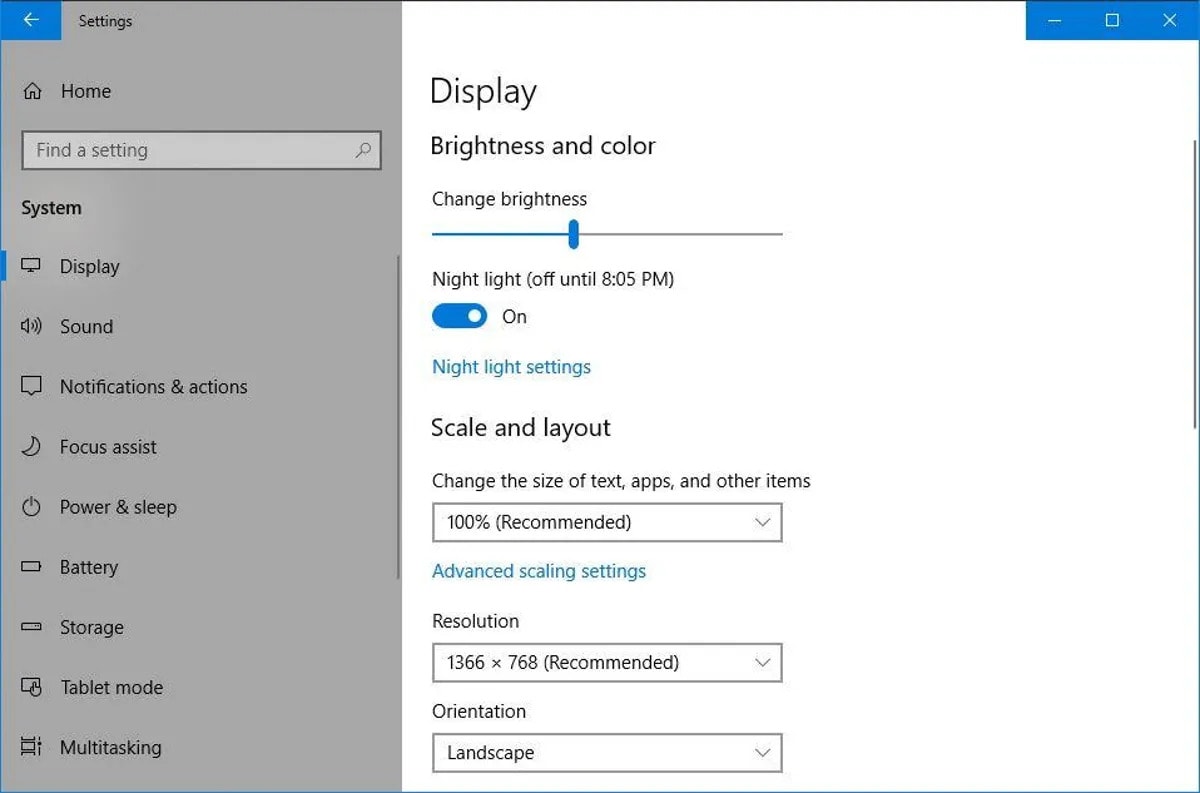
Step 2: Scroll and look for Display. Now, you must click on the Scale and Layout option.
Step 3: You will get a drop-down menu where you have to select Display Resolution.
Step 4: You will receive a drop-down menu with all the resolutions. Click on the ones that suit you and click on the Ok button.
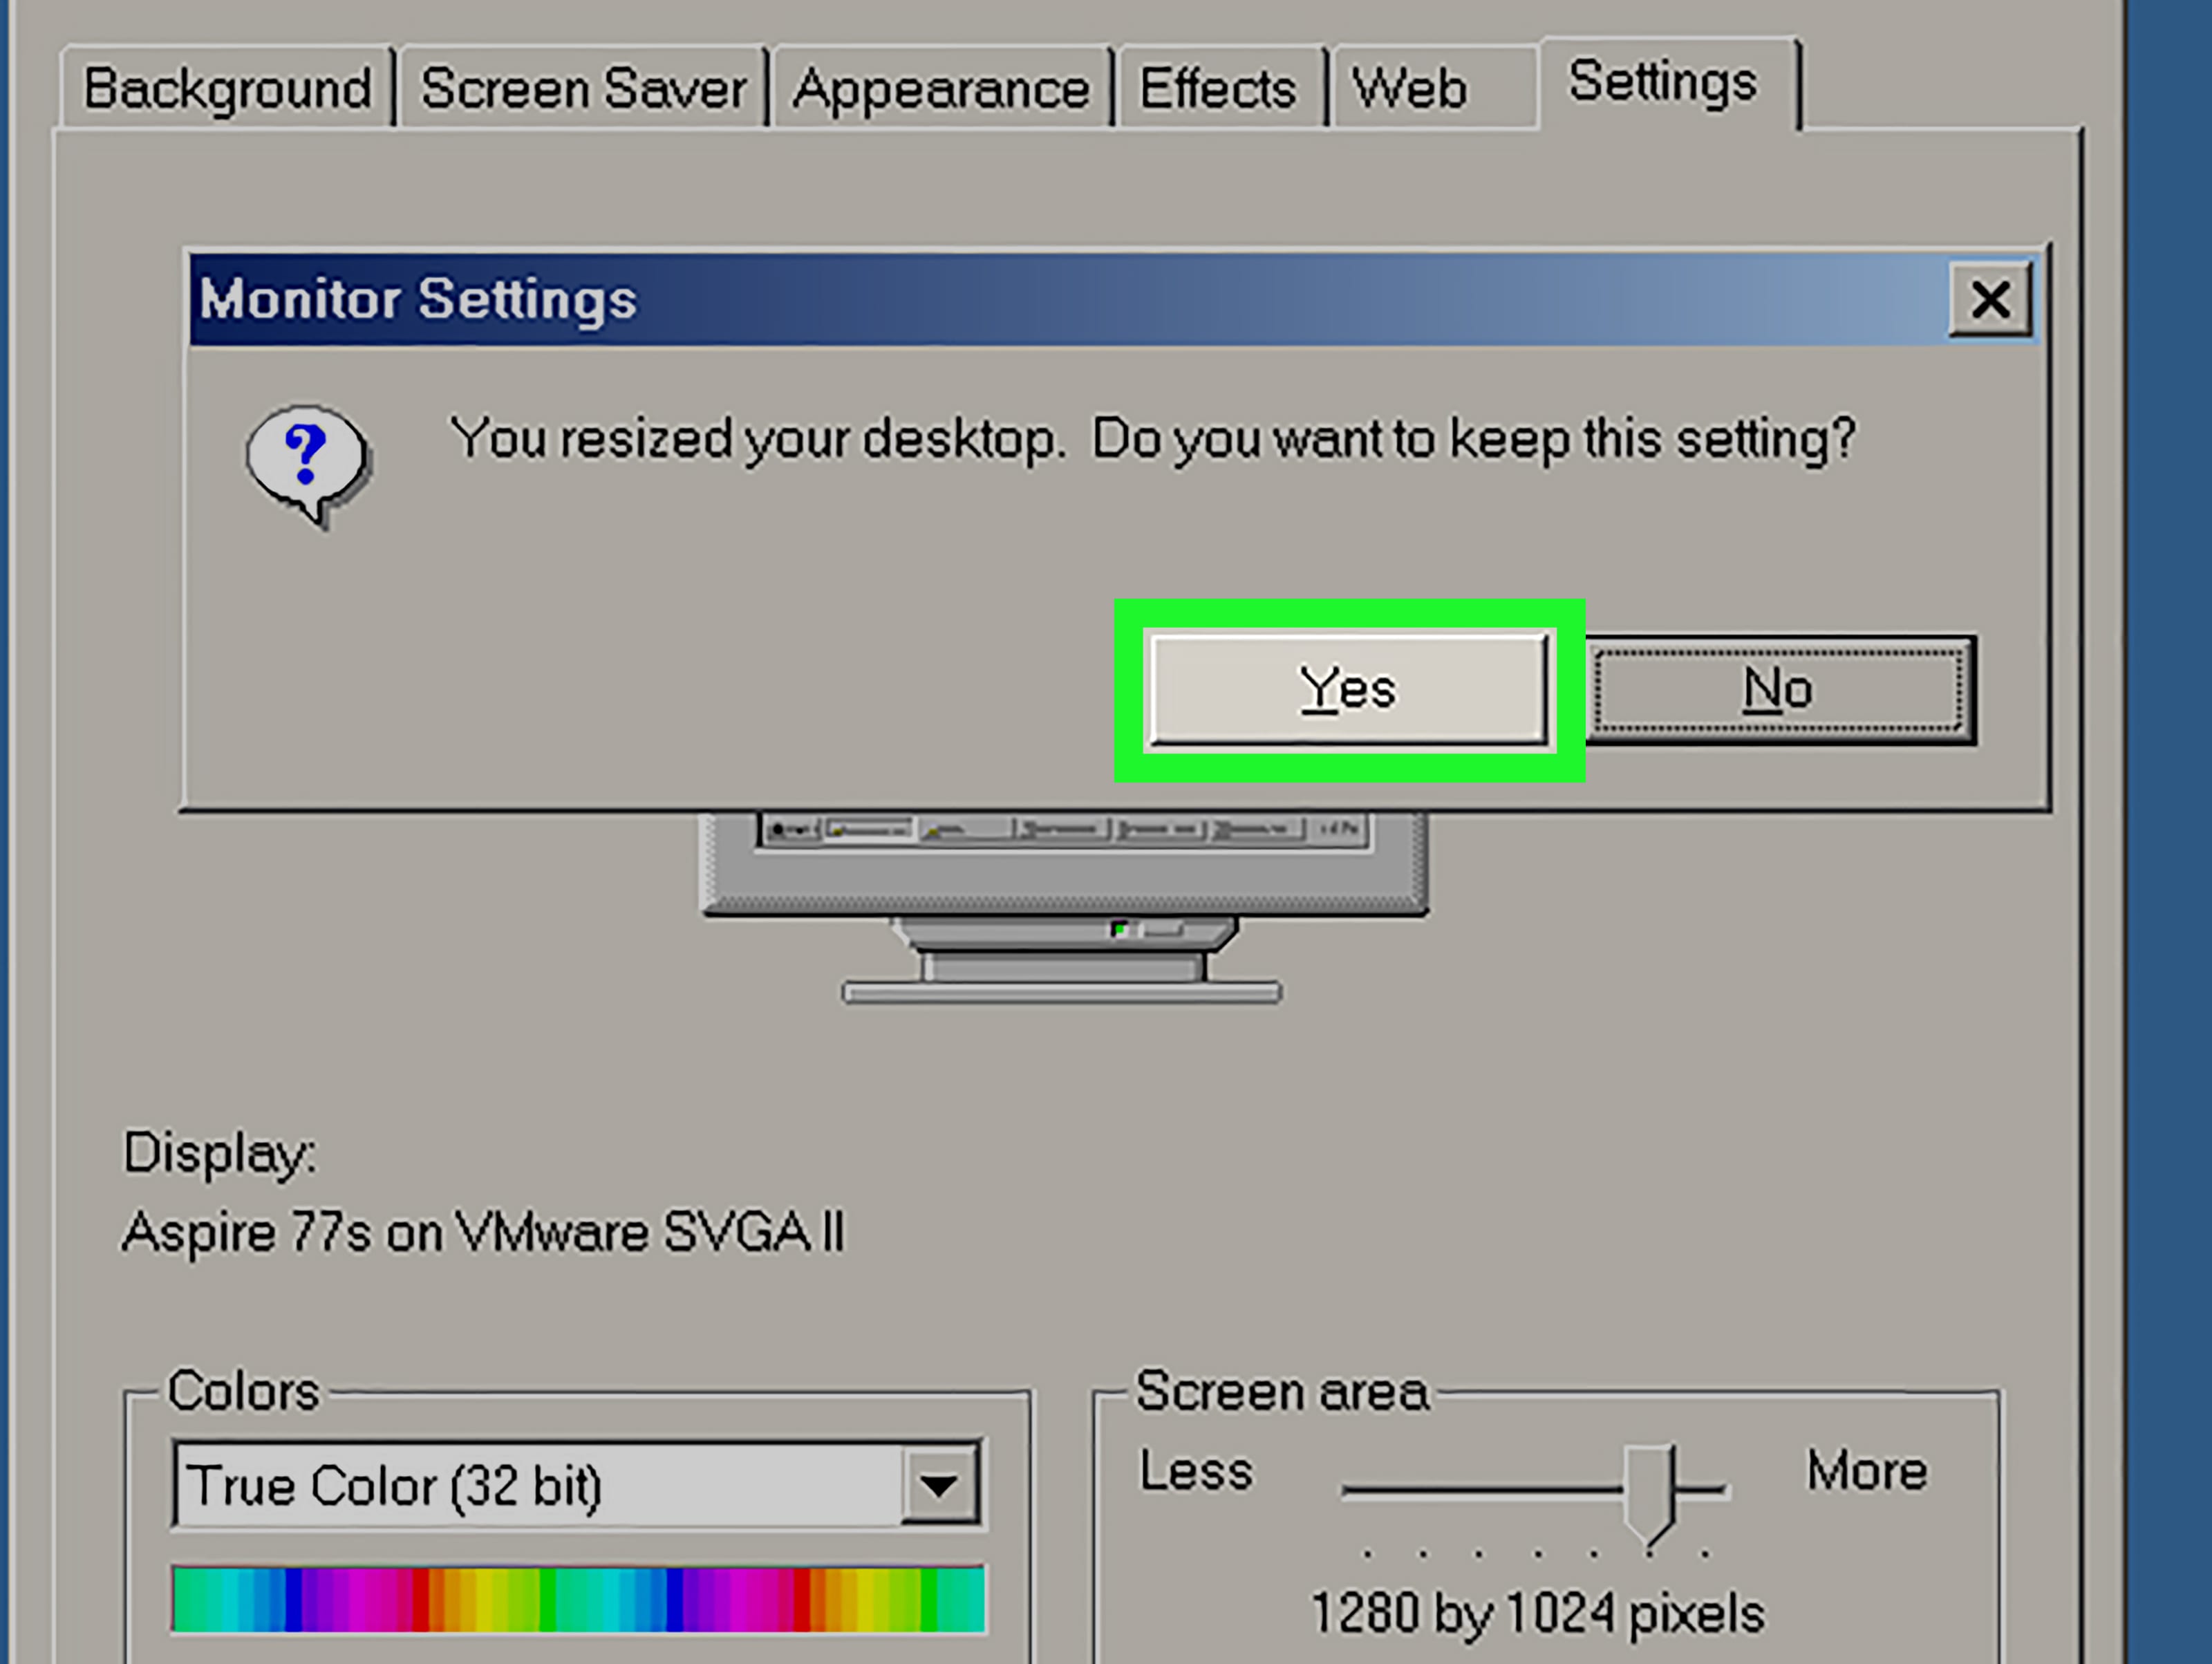
Step 5: Click the Keep Changes option to save from the Display Settings.
Step 6: If the issue continues, change the resolutions for better options.
Method 2. Update GPU Drivers
If the current Windows 10/11 crashes constantly after the installation, you need to check the GPU driver. The crash must have happened during the update process and not after that. You must look into checking the network drivers.
The OS must have a stable internet connection to update the drivers constantly. If the drivers aren't updated, it will lead to system corruption. You can update the GPU drivers using the steps as follows for configuring windows updates stuck:
Step 1: Look for Device Manager on your system's Search panel. Click on it to open the system.
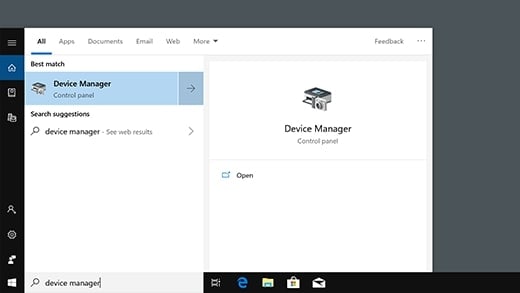
Step 2: In the dialog box, scroll to the Network Adapters. Double-click on it to check all the drivers.
Step 3: Right-click on all the network drivers and click on the Update Driver option.
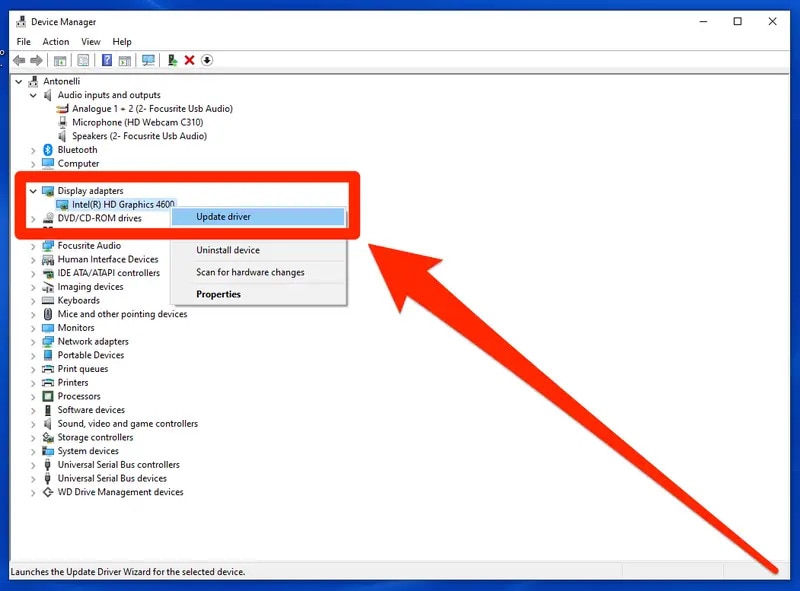
Step 4: Now, you can select the Search automatically for drivers option to begin the process.
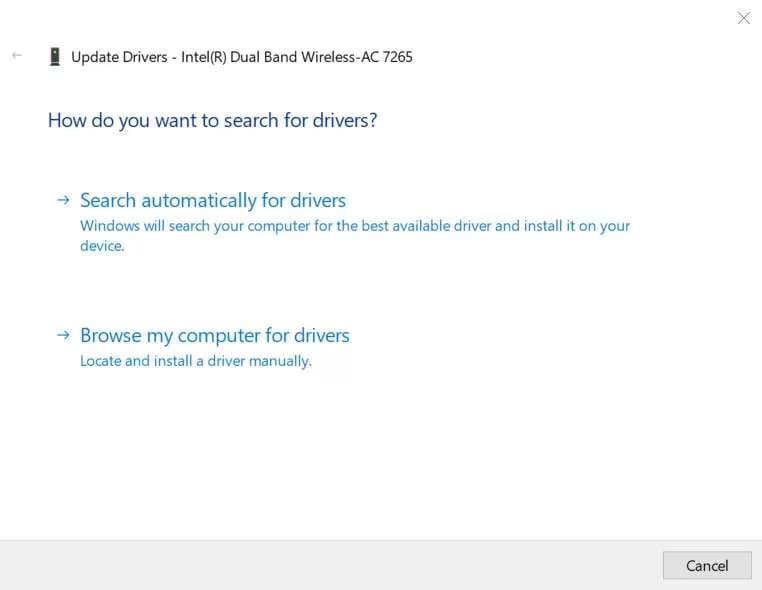
You should prefer Windows 11 update troubleshooter if there are internet connection issues. This will help fix the error and prevent Windows Update from crashing.
Method 3. Switch External Display to a 16:9 Aspect Ratio
If you have been seeing unexpected errors on your Windows 10/11 update, it is probably because of the wrong aspect ratio. However, you must fix the external display, especially in the case of aspect ratio, to ensure that the update is supported properly.
Follow the steps given below to switch your external display to the 16:9 aspect ratio to fix Windows update stuck:
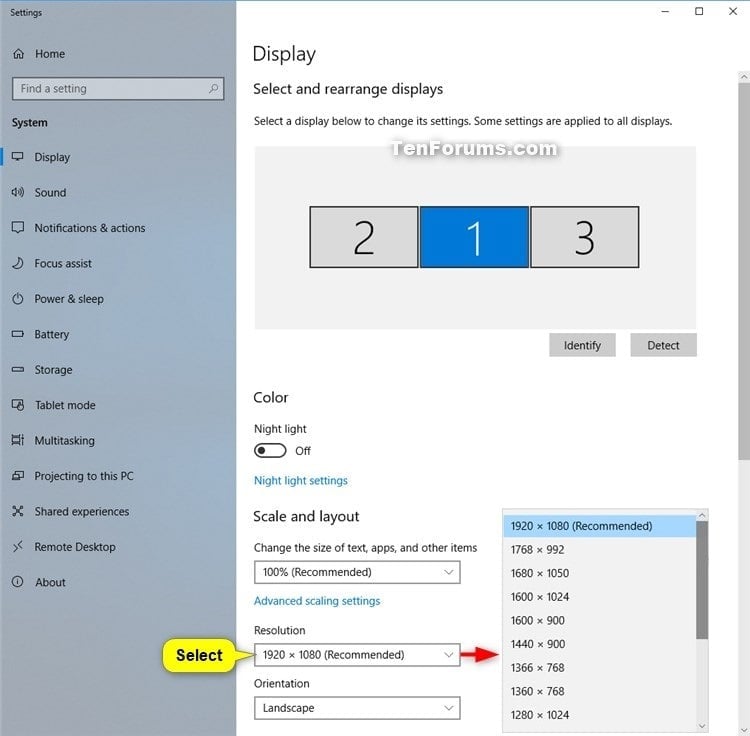
Step 1: Follow the steps: Start > Settings > System > Display
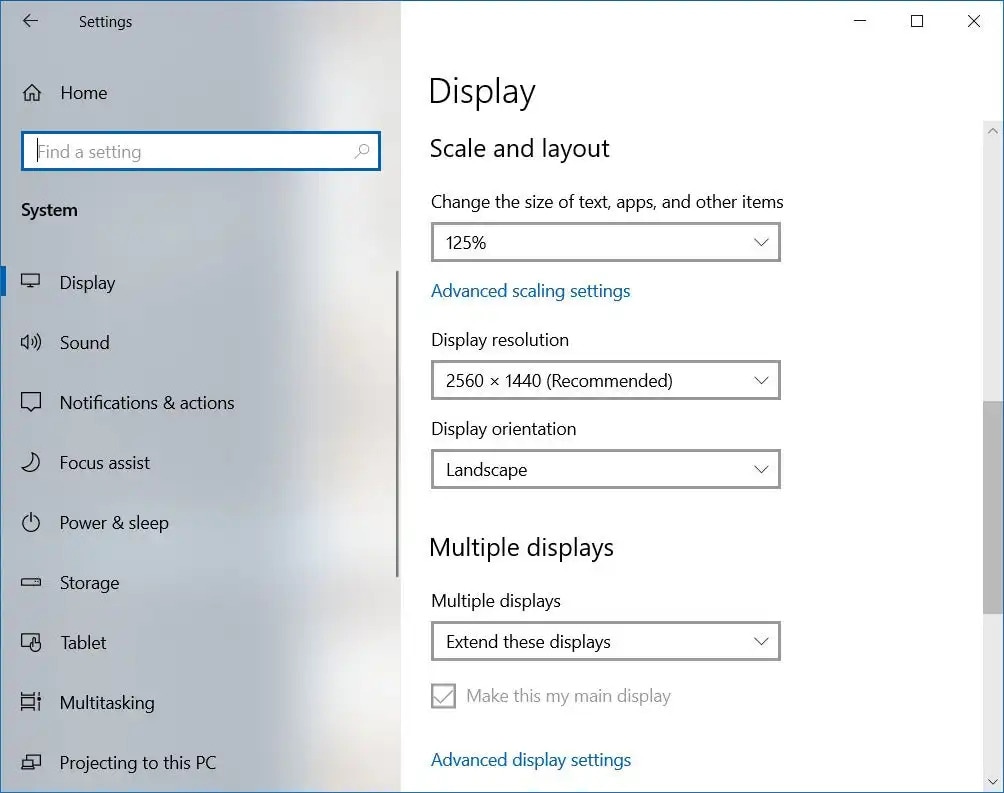
Step 2: Open the display settings that you want to change.
Step 3: Scroll to the Scale and Layout section to change the aspect ratio. Enter the Scale option.
Step 4: From the drop-down menu of the Display resolution, click the aspect ratio to be 16:9.
Method 4. Disable Driver Signature Enforcement
Windows 10 and Windows 11 have a security feature called Driver Signature Enforcement. This feature is meant to prevent your computer from running drivers which may not be certified by Windows. The Driver Signature Enforcement feature will be enabled by default, which can sometimes malfunction, leading to a faculty update. If you can’t update to Windows 11 then you must disable driver signature enforcement.
It is advisable to disable Driver Signature Enforcement to prevent the windows update crashed:
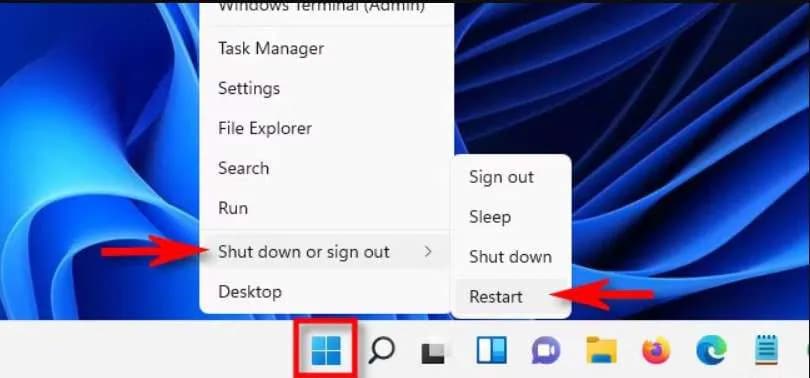
Step 1: You can disable the Driver Signature Enforcement from the Recovery Mode. From the Search Panel, click on the Power button. Then, you must hit the Restart button while continuing to press the Shift key on the keyboard.
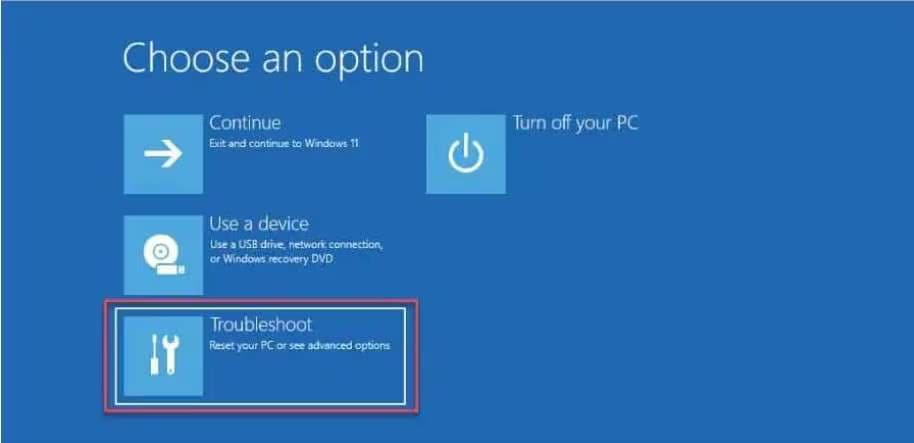
Step 2: Once the Recovery Mode tab appears on the screen, click on Troubleshoot.
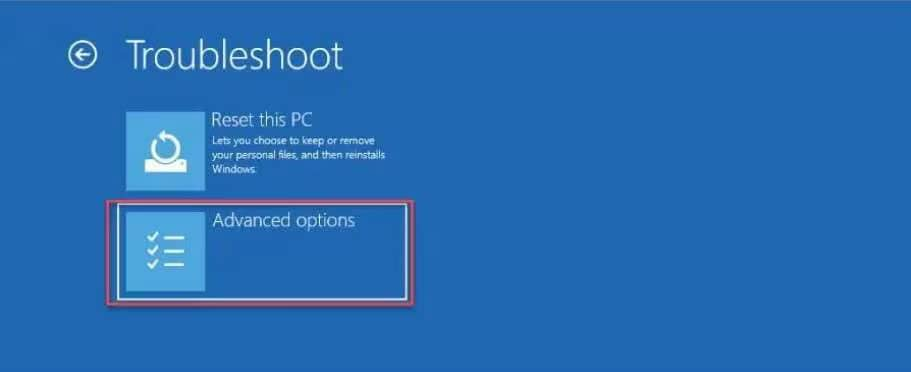
Step 3: In the next tab, click Advanced Options.
Step 4: Under the Advanced Options, you must click on the Startup settings option.
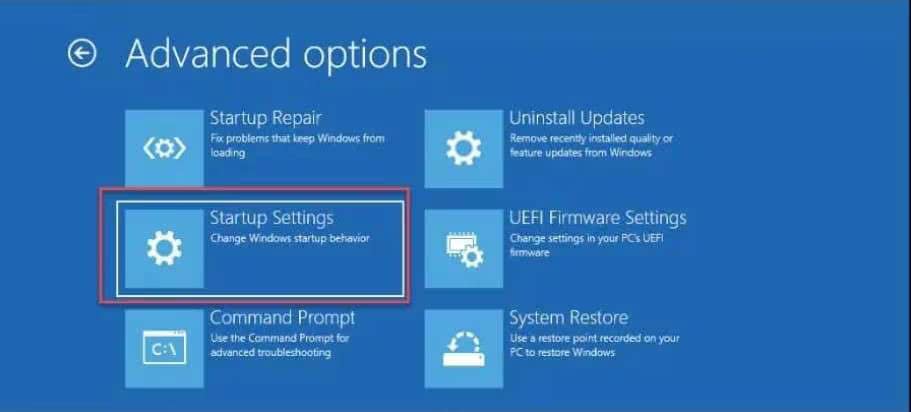
Step 5: Go through all the pointers on the screen and click on the Restart button in the bottom right corner of the screen.
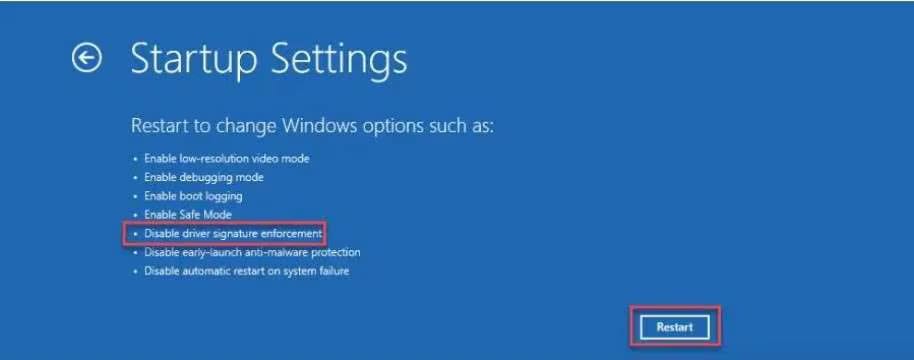
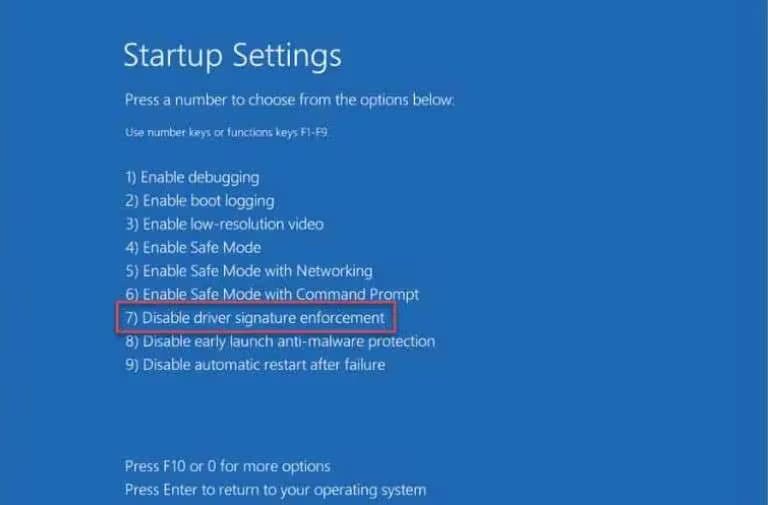
Step 6: Now, you must press 7 on your keyboard to choose the Disable Driver Signature Enforcement option.
Since Driver Signature Enforcement is a security feature, ensure the system works fine after you have disabled it. You can check the functioning of the computer and then turn on the feature again.
Method 5. Disable Link State Power Management
Link State Power Management is the power-saving feature of your device. One of the major benefits of this feature is that it allows you to adjust the performance depending on how the user proceeds with it. If you often have your computer plugged in, disabling the Link State Power Management system is best in terms of fixing Windows update crashed. This is because not disabling the system will only slow down the performance of your device.
Your laptop battery uses this feature a lot. The Link State Power Management system will continue to maintain optimal performance while also preserving battery life. However, when enabled, the Windows update efficiency may be severely affected. Therefore, it is advisable to disable the Link State Power Management.
You may follow the steps given below to disable Link State Power Management to fix Windows update stuck issue:
Step 1: Look for the Control Panel from your computer's Search panel. Click on it to open it.
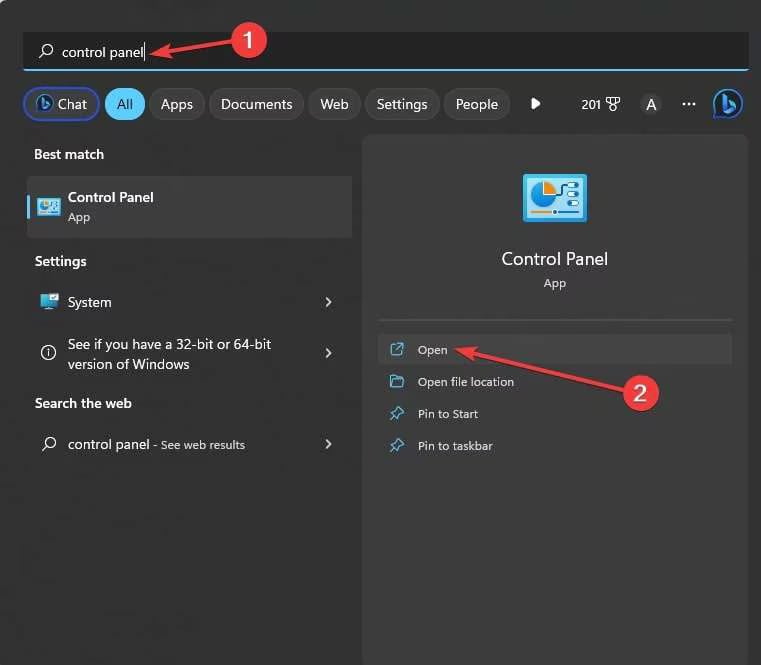
Step 2: In the Control Panel option, click on Power Options and then choose Change Plan Settings.
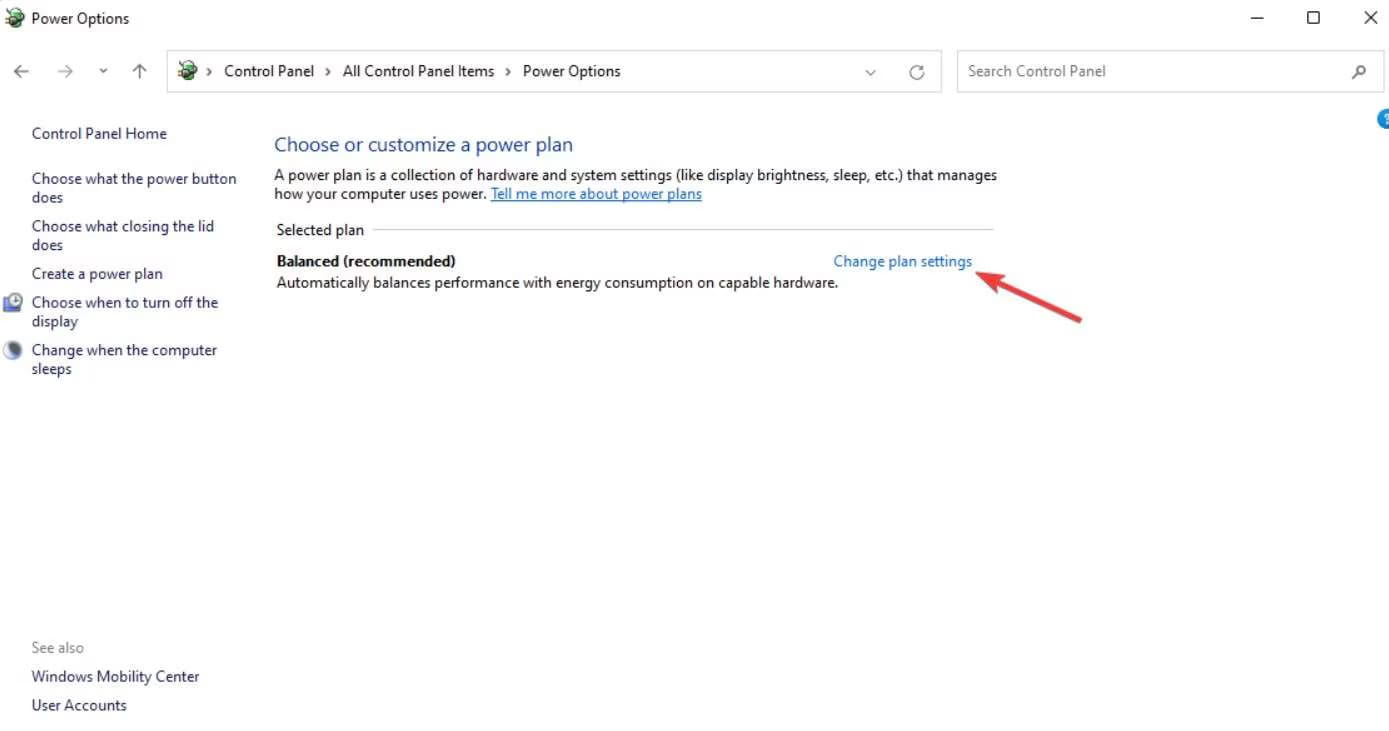
Step 3: Now, select the Change Advanced Power settings.
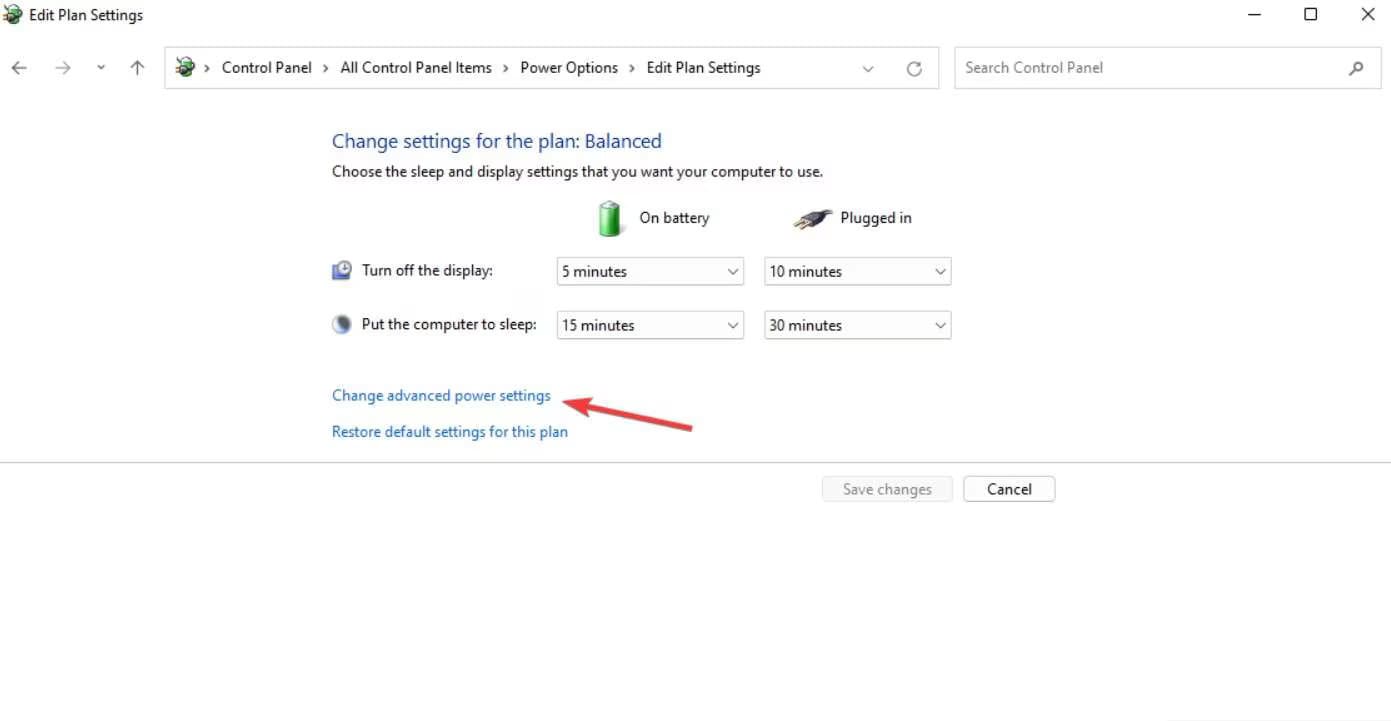
Step 4: Scroll down the screen to look for PCI Express. Then, double-click to expand the same. Move down a little, double-click LinkedIn State Power Management, and click Adjust settings.
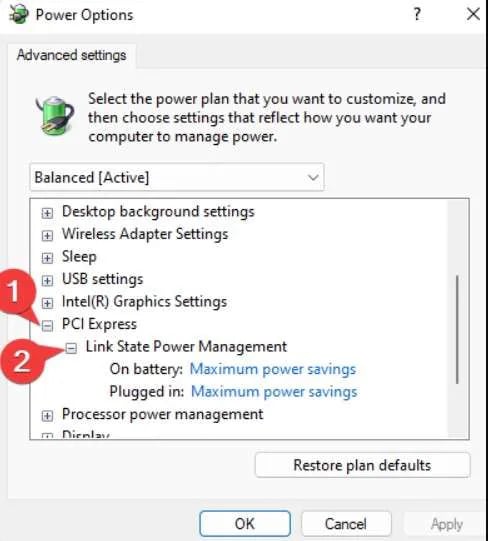
When you're integrating the same in your system, you need to change the settings, and how you use it, you can maintain Moderate or Maximum power settings. This is crucial for power mode. After the update, you can switch to Maximum.
Method 6. Run Windows Update, Troubleshooter
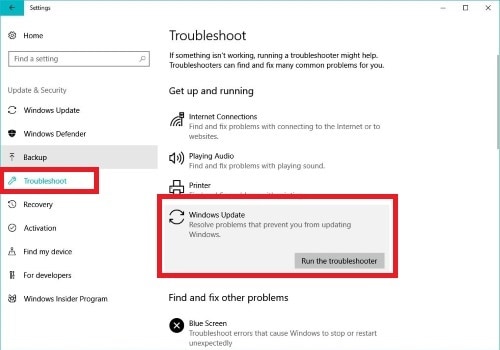
Windows OS will allow you to troubleshoot across different departments so that you can fix the error. If Windows keeps crashing, running the troubleshooter may help fix it. You can run Windows Update Troubleshooter for Windows 10 and 11 accordingly.
Here's how you can run Windows Update Troubleshooter for configuring windows updates stuck:
- Windows 10: Settings > Update and Security > Troubleshoot > Additional troubleshooters> Windows Update
- Windows 11: Start > Settings > System > Troubleshoot > Other troubleshooters> Windows Update
Method 7. Run SFC and DISM
If the latest Windows keeps crashing, you need to check whether the files are corrupt. The corrupted file system may seem weird to the average user. However, if you have Windows utilities, you can easily work towards fixing a corrupt file system. You can easily fix it using an SCF and DISM if you can’t update to Windows 10.
You need to follow the steps given below for running SCF and DISM:
Step 1: On your Search panel, right-click and then move to choose Windows Terminal (Admin).
Step 2: As soon as you see the Command Prompt screen, open the same and type the command sfc /scannow. After entering the command, press on it.
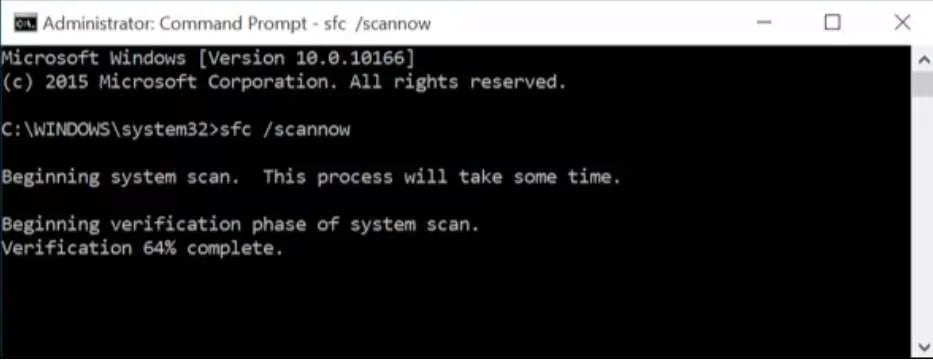
Step 3: The process will take a few minutes. You must wait until you receive the message: Windows Resource Protection did not find any integrity violations, and Windows Resource Protection found corrupt files but was unable to fix some of them.
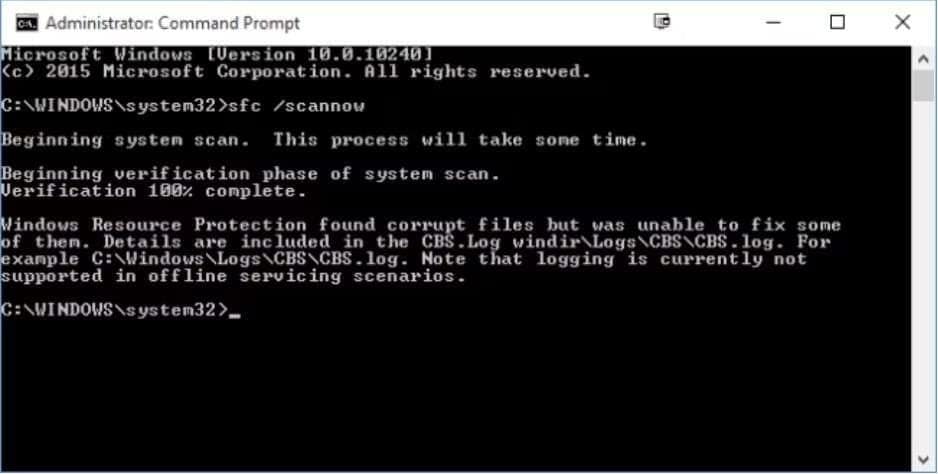
Step 4: Once you receive the message, restart your system and run the command. However, it must be in Safe Mode. If this doesn't work properly, you must try the DISM tool.
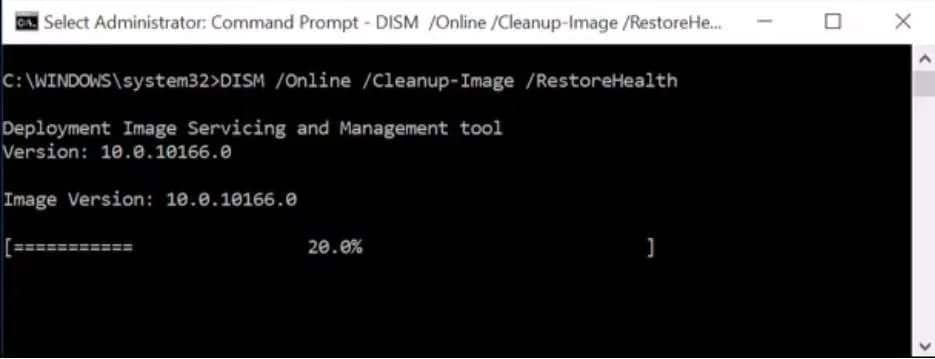
Step 5: Again, open the Command Prompt screen on your Windows. Type the command: DISM /Online /Clean-up Image /RestoreHealth.
More related: Top 6 Solutions For “Your Device is Missing Important Security and Quality Fixes” Issue.
Bonus Tip: Use Wondershare Recoverit
When your Windows Update is failing continuously, you may end up losing some important data. A buggy update can be a huge problem, thereby leading to significant data loss. Sudden damage caused by crashes can lead to system corruption and more. Therefore, it is important to conduct regular updates in your system to prevent such issues from happening.
Sometimes, you may have lost essential data as a result of an update failure or forgot to perform a backup. It may feel like it is difficult to recover the data. However, the good thing is that you can easily recover the data using a software data recovery tool- Wondershare Recoverit.
Wondershare Recoverit is one of the top tools that can handle numerous situations of data loss. It is available for download for macOS and Windows OS, thereby providing the chance to recover data. You must download the software from the official website to your system so that you can recover the lost videos, pictures, and documents. Wondershare Recoverit will allow you to get back all the lost data with just a few clicks.
You can follow the steps given below to recover the lost data using Wondershare Recoverit:
Step 1: Launch Wondershare Recoverit in your system and choose the System Crashed Computer option on the left sidebar. Now, hit the Start button to initiate the process.
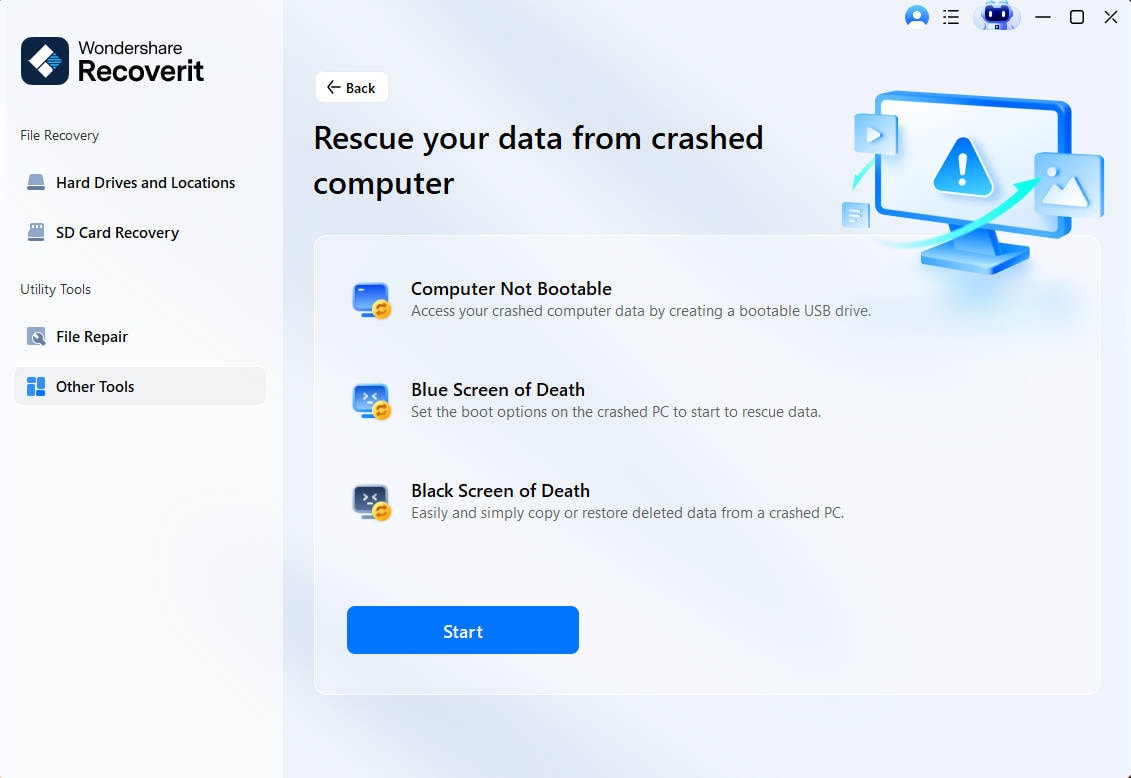
Step 2: Now, you must prepare a different working computer and a new or pty USB card. This is required for bootable media. Connect the empty USB to the computer.
Step 3: Select the device you want to convert to the bootable media. Next, hit the Create button.

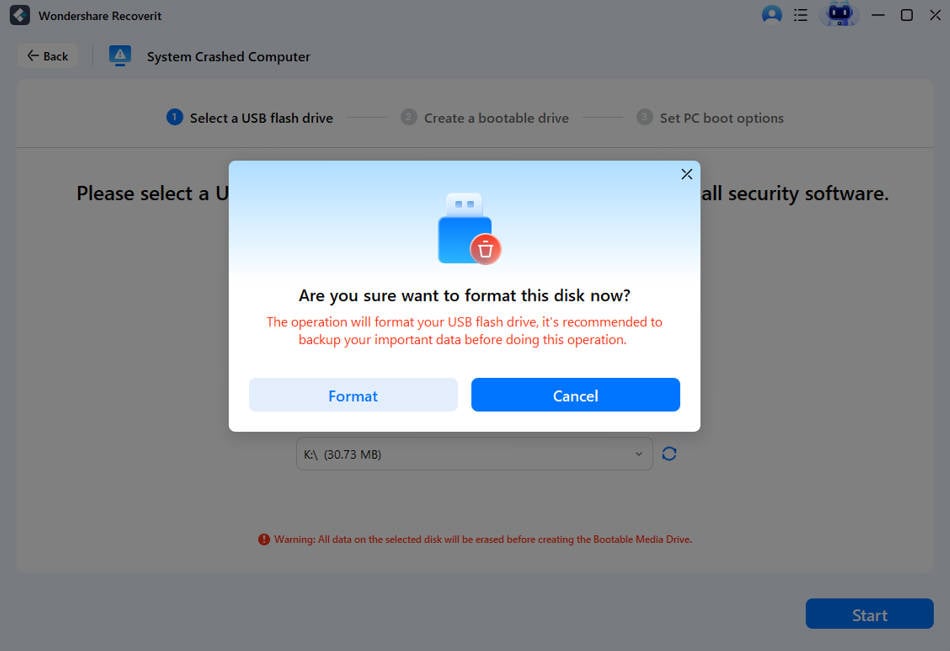
Step 4: Recoverit will read all the data and then format the USB card to make it empty. Make sure to back up any existing data on the USB card. If the card is empty and you don't need to back up the data, click on Format to continue the process.
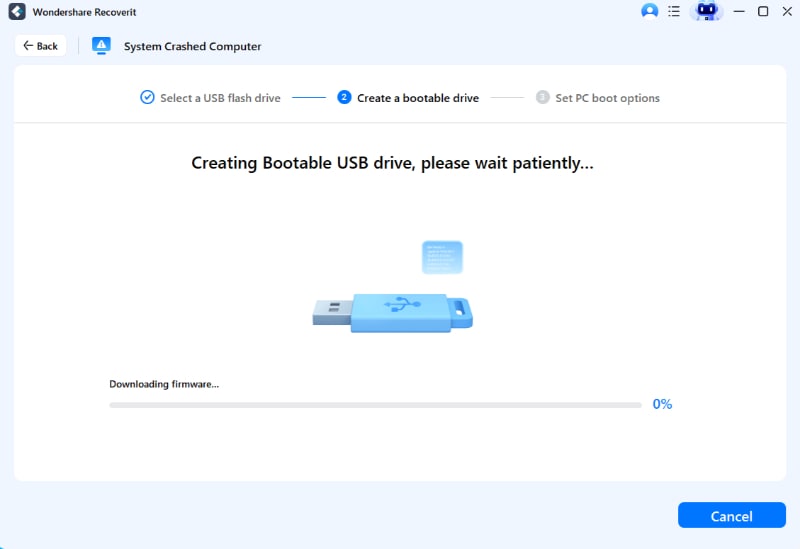
Step 5: By now, Recoverit should work towards converting USB into the bootable media. It is an automatic process which should be completed in a few minutes.
Step 6: After this is done, connect the USB card to the crashed computer. Now, you must adjust the BIOS to begin the booting process via the USB drive.
Step 7: Once the computer boots using the USB bootable drive, you must click on Data Recovery. Now, from all the available options, select the disk that Recoverit has to scan. The scanning process will be completed in a few minutes. However, the time taken for the scan will completely depend on how much data you have stored on the disk.
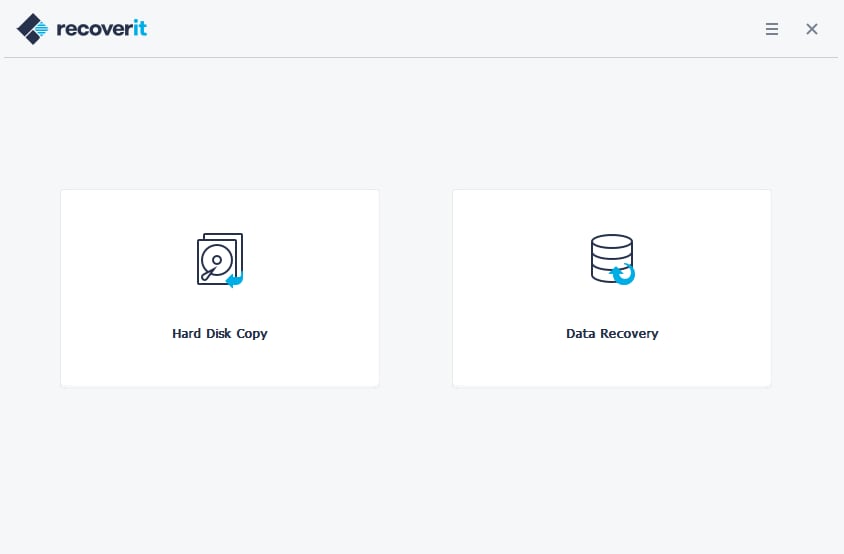
Step 8: You must select the location in which you want to restore the recovered data. Then, hit the Recover button. The recovered data will be saved in the chosen location. Then, you can verify if the data has been recovered.
How to Fix Windows Update Crashing Computer?
Sometimes, even after fixing the Windows Update, your computer wouldn't stop crashing. In this case, several problems will arise. You must figure out the issues and then work towards solving them accordingly. As a result, you will experience several windows update problems.
Some of the common problems that you will fix in case of the Windows update stuck issue your computer regularly:
- Windows won't shut down: Even after performing Windows Update numerous times, the system wouldn't shut down. Therefore, you will have to hibernate your system using the Command Prompt. You can open the Command Prompt in your system and write ‘powercfg /h off’ to disable hibernation via command.
- Loss of saved settings: Sometimes, due to Windows Update crashing, you may lose some important data that may have been saved on your computer. Therefore, you will have to restore the data from the earlier data. You can get help from Restore Points to fix this issue.
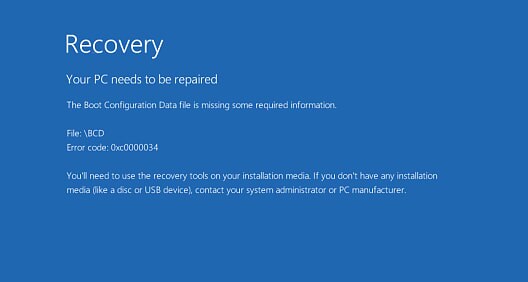
- Loss of data: Data loss is one of the most problematic issues you will face when Windows Update crashed. If you have updated your system recently, you may end up losing data, which is why you will have to take the help of a data recovery tool. This tool has an easy-to-use interface which will provide secure and highly reliable results. You can use this to recover various data types, such as PDFs, compressed files, documents, videos, and more.
Conclusion
All the above methods can be useful for fixing the Windows 10/11 freezing or crashing error. If you come across a Windows update stuck problem often while updating, it is important that you adopt the fixing methods appropriately. However, you must follow the steps correctly so that you can avoid the problem. Make sure to fix it regularly and then conduct data recovery to avoid the risk of data loss.
FAQs
-
1. How do I fix Windows 11 update failure?
If you are experiencing Windows 11 update failure, you must consider freeing up space. Often, Windows 11 may not be updated due to space issues. So, free up the space, check your internet connection, and then try to update again. -
2. How do I fix Windows 11 from freezing?
First, you must conduct a System File Checker (SFC) scan to check the reason behind Windows 11 freezing. After that, you can disable the background updates and startup programs. Then, you can restart the program to fix the issue. -
3. How do I fix Windows 11 from crashing?
In order to keep Windows 11 from crashing, it is advisable to always boot in safe mode. Furthermore, it is also advisable that you enable crash dumps so that you can fix the issue. You can check for a system restore to fix the crashing elements.


 ChatGPT
 Perplexity
 Google AI Mode
 Grok
Grok


