


 TL;DR:
To resolve a Windows system stuck on "Scanning and repairing drive C," you must bypass the boot loop by disabling the automatic disk check via Command Prompt (`chkntfs /x c:`) or manually force a deep repair using `chkdsk C: /f /r /x`.
● If the system remains completely unbootable, first create a bootable USB drive using Recoverit on a working PC to extract your data before executing potentially risky command-line fixes.
● Users who can access Safe Mode can halt the repair loop by running `bcdedit /set {default} recoveryenabled No` in an administrator Command Prompt or by unchecking the "Turn on fast startup" setting in Power Options.
● Never interrupt the scanning process unless it has been frozen for over 24 hours; if forced to stop it, try pressing `Ctrl + C` before performing a hard hardware shutdown to minimize further file system corruption.
Ask AI for a summary
 ChatGPT
 Perplexity
 Gemini
 Claude
 Grok
Grok
Have you ever sat in front of your computer, feeling frustrated because scanning and repairing drive C stuck? This is a common issue for many Windows users and can be very bothersome, especially when you need to access important files or just use your computer.
In this detailed guide, we'll explain why the scanning and fixing process for drive C might get stuck. Also how to recover data from a Windows computer that won't start, and offer several solutions to try when you encounter this problem.
Whether you're dealing with the scanning and fixing process stuck at 100% or just trying to get your data from drive C, we've got you covered. So, let's get started and learn how to get your computer working smoothly again!
In this article
Part 1: Why Does Scanning and Repairing Drive C Get Stuck at 100%?
Before we jump into the solutions, it's important to understand why scanning and repairing drive C might get stuck in the first place. There are several reasons why this process might hang or seem to be stuck at 100%:
- Large Drive Size: If your C drive is particularly large or contains a lot of files, the scanning and repairing process can take a very long time. What appears to be "stuck" might actually be the system working through a massive amount of data.
- Bad Sectors: Your hard drive may have bad sectors that the scanning process is having trouble reading or repairing. This can cause the process to slow down significantly or appear to be stuck.
- File System Corruption: Severe corruption in the file system can cause the scanning and repairing process to struggle, leading to it appearing stuck.
- Interrupted Previous Scans: If previous attempts to scan and repair the drive were interrupted (e.g., by a power outage or forced shutdown), it might cause issues with subsequent scans.
- Malware Interference: In some cases, malware on your system might interfere with the scanning and repairing process, causing it to hang.
- Hardware Issues: Problems with your hard drive or other hardware components can lead to issues during the scanning and repairing process.
- Windows Update Problems: Sometimes, incomplete or corrupted Windows updates can cause issues with system processes like scanning and repairing drives.
Understanding these potential causes can help you approach the problem more effectively. Now, let's look at how to recover your data if you're dealing with an unbootable Windows system.
Part 2: Getting Started: Recover Data from Unbootable Windows - Recoverit Tool
When scanning and repairing drive C is stuck, one of the biggest concerns is often how to retrieve your C drive data, especially if Windows becomes unbootable. In such cases, a reliable data recovery tool can be a lifesaver. One such tool is Recoverit, which can help you recover data from unbootable Windows.
Recoverit is a powerful data recovery software designed to help users retrieve lost or inaccessible data from various storage devices, including hard drives, SSDs, USB drives, and more. It's particularly useful when you're dealing with an unbootable Windows system and need to recover your important files.
The Need for a Data Recovery Tool:
When your Windows system becomes unbootable and scanning and repairing drive C is stuck, you might worry that your data is lost forever. This is where a data recovery tool becomes essential.
Here's why you might need Recoverit or a similar tool:
- Access to Inaccessible Data: When Windows won't boot, you can't access your files through normal means. A recovery tool allows you to bypass this limitation.
- Prevent Data Loss: If you need to perform more drastic repairs on your system, having a backup of your data is crucial. A recovery tool lets you save your files before attempting potentially risky fixes.
- Recover Deleted or Lost Files: Even if you manage to fix the boot issues, you might find that some files are missing. A recovery tool can help you retrieve these lost files.
- User-Friendly Solution: For those who aren't tech-savvy, using a recovery tool is often easier than trying to manually recover files through complex command-line operations.
Here's a step-by-step guide on how to use Recoverit to retrieve your C drive data when Windows is unbootable:
- On a working computer, download and install Recoverit. Launch Recoverit and select the "System Crashed Computer" recovery mode.

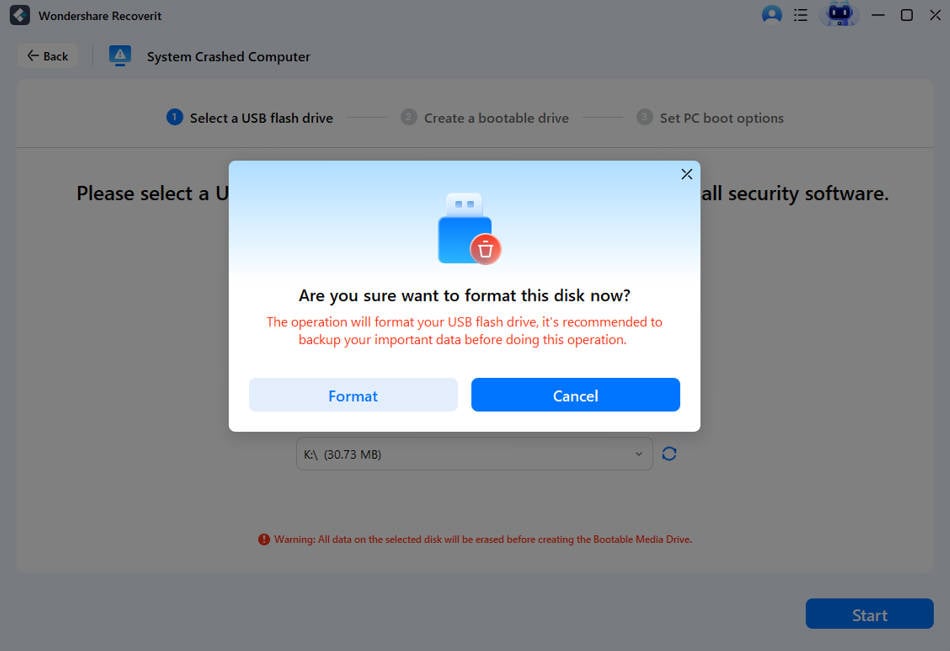
- Follow the prompts to create a bootable USB drive using Recoverit.

- Format the bootable drive.
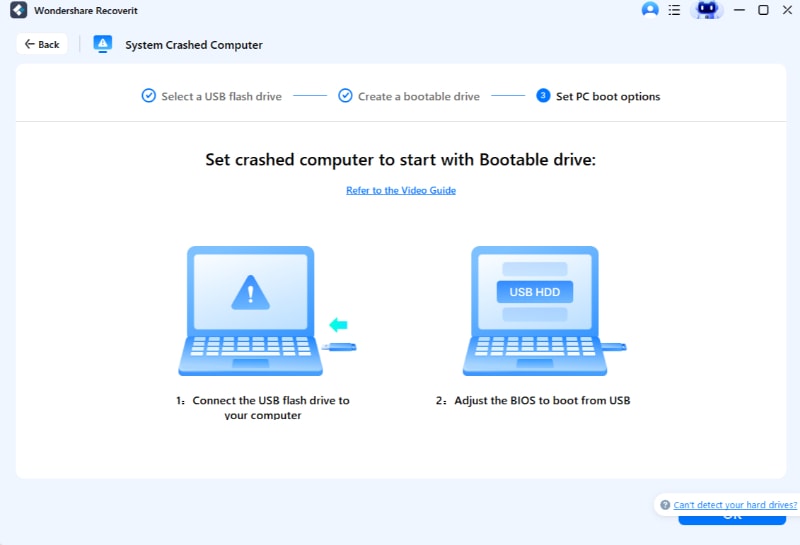
- Insert the bootable USB drive into the unbootable computer. Restart the computer and enter the BIOS/UEFI settings (usually by pressing F2, F12, or Del during startup). Save and exit the BIOS/UEFI settings.
- The computer should now boot into the Recoverit recovery environment. Select the “Data Recovery” option. Recoverit will start scanning the selected drive for recoverable files.

- Once the scan is complete, you can preview the recoverable files. Select the files you want to recover. Click on the "Recover" button to start the file recovery process. Wait for the process to complete.
By following these steps, you can retrieve your C drive data even when Windows is unbootable and scanning and repairing drive C is stuck.
Now that we've covered how to recover your data let's move on to fixing the scanning and repairing drive C stuck issue.
Part 3: Scanning and Repairing Drive C Stuck? Try These Fixes!
When you're faced with scanning and repairing drive stuck at 100 or any other point, it can be frustrating. Here are several fixes you can try to resolve the issue:
Fix 1: Check the Drive Status in Control Panel
Before trying more complex solutions, it's a good idea to check the status of your drive in the Control Panel. This can give you more information about what might be causing the issue.
- Open the Start menu and type "Control Panel", then open it. Go to "Security and Maintenance.

- Under the "Maintenance" tab, check the "Drive Status".

- If this process completes successfully, it might resolve your scanning and repairing drive C stuck issue. If not, move on to the next fix.
Fix 2: Use Windows Error Checking Tool
Windows has a built-in error-checking tool that can help resolve issues with your drive. Here's how to use it:
- Open File Explorer and right-click on your C drive. Select "Properties" from the context menu. Go to the "Tools" tab.

- Under "Error checking", click on "Check". If Windows doesn't find any errors, it will tell you so. If it does find errors, follow the prompts to fix them.
- This tool can often resolve minor issues that might be causing the scanning and repairing process to get stuck.
Fix 3: Disable Automatic Repair via CMD
Sometimes, the Windows Automatic Repair feature can interfere with the scanning and repairing process. Disabling it might help:
- Restart your computer and boot into Safe Mode. Once in Safe Mode, open Command Prompt as an administrator.
- Type the following command and press Enter:
bcdedit /set {default} recoveryenabled No

- Restart your computer normally and try the scanning and repairing process again.
- Remember to re-enable Automatic Repair after you've resolved the issue by running the same command with "Yes" instead of "No".
Fix 4: Disable Fast Startup Feature
The Fast Startup feature in Windows can sometimes cause issues with drive scanning and repairing. Here's how to disable it:
- Open the Control Panel. Go to "Power Options" > "Choose what the power buttons do". Click on "Change settings that are currently unavailable".
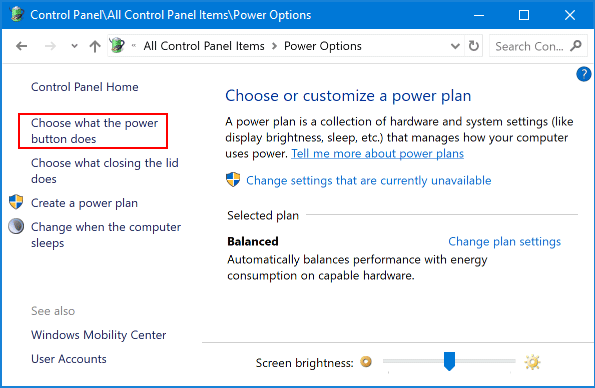
- Uncheck the box next to "Turn on fast startup (recommended)". Click "Save changes" and restart your computer.

- After disabling Fast Startup, try running the scanning and repairing process again
Fix 5: Disable Check Disk on Booting
If the scanning and repairing process is automatically starting on boot and getting stuck, you can try disabling it:
- Open Command Prompt as an administrator.

- Type the following command and press Enter:
chkntfs /x c:
Restart your computer.
This command disables automatic Check Disk for the C drive on boot. You can still manually run Check Disk when needed.
Fix 6: Run SFC Utility
The System File Checker (SFC) utility can help repair corrupted system files that might be causing the scanning and repairing process to get stuck:
- Open Command Prompt as an administrator. Type the following command and press Enter:
sfc /scannow

- Wait for the process to complete. It may take some time. Restart your computer and try the scanning and repairing process again.
Fix 7: Run System Restore
If the problem started recently, you might be able to resolve it by running System Restore:
- Open the Start menu and type "Create a restore point", then open it. Click on "System Restore".

- Follow the prompts to choose a restore point from before the issue started. Complete the System Restore process and restart your computer.
- After the restore is complete, check if the scanning and repairing drive C stuck issue is resolved.
Fix 8: Launch CHKDSK Scan
CHKDSK (Check Disk) is a powerful tool that can help fix various drive issues. Here's how to use it:
- Open Command Prompt as an administrator. Type the following command and press Enter:
chkdsk C: /f /r /x

- You'll be asked if you want to schedule the scan for the next restart. Type 'Y' and press Enter.
- Restart your computer. The CHKDSK scan will run before Windows loads.
- This scan can take a long time, especially for large drives, but it can often resolve issues causing the scanning and repairing process to get stuck.
Bonus Video Tutorial: How to Run CHKDSK for Repairing Sectors?
Conclusion
Dealing with scanning and repairing drive C stuck issues can be frustrating, but with the right approach, you can often resolve the problem and retrieve your C drive data. We've covered a range of solutions, from simple checks in the Control Panel to more advanced techniques like using CHKDSK and third-party recovery tools.
By following the steps outlined in this guide, you should be able to resolve most scanning and repairing drive stuck at 100 issues and recover your important files.
FAQ
-
Q1: Why does scanning and repairing drive C take so long?
Scanning and repairing drive C can take a long time due to several factors. The size of your drive plays a significant role – larger drives with more files naturally take longer to scan. The condition of your drive also matters. If there are many errors or bad sectors, the repair process will take longer as it attempts to fix these issues. -
Q2: Can I stop the scanning and repairing drive C process if it's stuck?
While it's generally not recommended to interrupt the scanning and repairing process, there may be times when it's necessary. If the process has been stuck for an unusually long time (e.g., more than a day for a typical drive), you might need to stop it. To do this safely, try pressing the Ctrl + C keys. If that doesn't work, you may need to perform a hard shutdown by holding down the power button. -
Q3: How can I prevent scanning and repairing drive C from getting stuck in the future?
To minimize the chances of scanning and repairing drive C getting stuck in the future, there are several steps you can take. First, make sure to always shut down your computer properly instead of forcing it off, as improper shutdowns can lead to file system errors. Regularly defragment your hard drive (for HDDs, not SSDs) to optimize file storage. Keep your Windows system and drivers updated, as outdated software can sometimes cause disk errors. Use a reliable antivirus program to prevent malware infections that could corrupt your files.


