

 TL;DR:
When folders unexpectedly vanish in Windows 10/11, they are rarely permanently deleted and can usually be restored by revealing hidden file attributes, adjusting OneDrive synchronization settings, or releasing them from your antivirus quarantine.
● To fix standard visibility blocks, open File Explorer, navigate to the View tab, and check "Hidden items" in the Show/hide section.
● If the folder structure remains but files are missing locally, verify that OneDrive's "Choose folders" settings are synced and check your antivirus Quarantine or Vault logs to restore falsely isolated directories.
● For raw directory recovery after hard drive crashes, partition formatting, or shift-deletion, run Wondershare Recoverit to perform an emergency sector scan, provided you immediately stop saving new files to the affected drive to prevent block overwrites.
Ask AI for a summary
 ChatGPT
 Perplexity
 Gemini
 Claude
 Grok
Grok
Folders disappeared from Windows 10 or 11? It's a common issue that affects many users, with countless people realizing daily that their important files and folders have vanished without warning or explanation.
Losing access to your documents can be unsettling, making you fear that your work is gone for good. Fortunately, most cases of missing folders can be resolved. If your "My Documents" folder is missing, there are several effective solutions to help recover it.
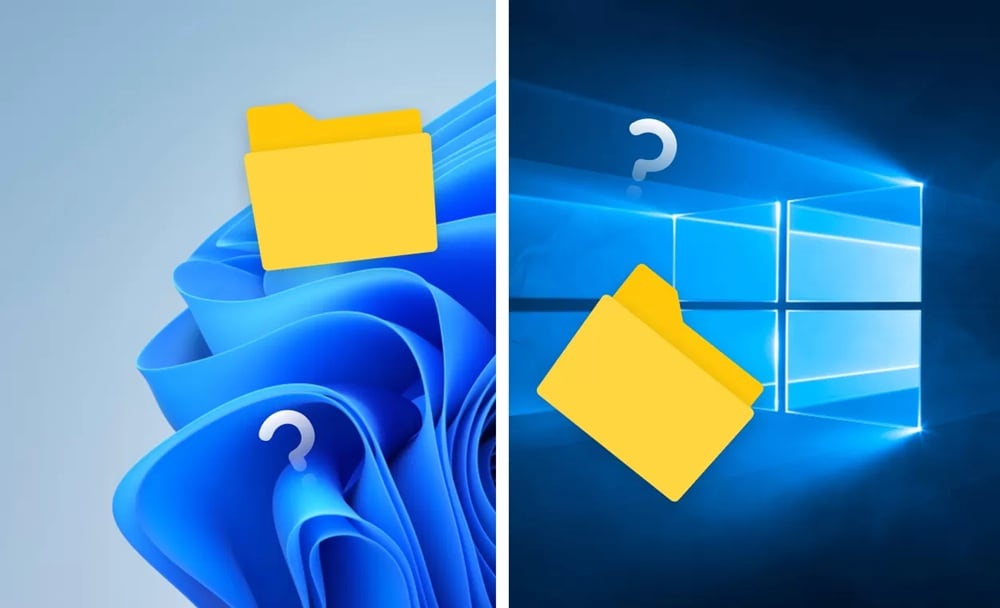
There's no need to worry if desktop folder has disappeared. This comprehensive guide will walk you through each step, providing proven methods to restore your data. Whether your document folders have gone missing on Windows or Mac, these solutions can help you regain access.
Why Files and Folders Disappeared From Windows?
Understanding why desktop folders disappeared is the first step to fixing the problem. When your files and folders disappeared, there's always a reason behind it. Knowing these reasons helps you prevent future problems with document folder is missing.
Here are the main reasons why your folders disappeared:
📊 Root-Cause Diagnostic Matrix
Folders do not disappear without a structural system trigger. Use this lookup table to pinpoint the technical issue behind your missing data paths:
| Root Culprit | How it Affects Your Files | Common Signs to Look For |
| Hidden Attribute Flag | Windows or malware alters file properties to "Hidden," making them invisible in normal view. | Folder space is still occupied on disk, but directories are missing visually. |
| Antivirus False Positive | Security heuristics mistake data for a threat and isolate the folder paths entirely. | Sudden disappearance immediately following a software installation or background scan. |
| OneDrive Sync Drop | Cloud optimization settings remove local copies, leaving files strictly on cloud servers. | An empty folder structure remains, or folder shortcuts show sync error badges. |
| User Profile Corruption | Windows loads a temporary user profile (TEMP), decoupling access to original user directories. | A "You've been signed in with a temporary profile" notification appears. |
| File System Errors | Logical block corruption on the hard drive breaks down the directory tree. | Sluggish disk read speeds, freezing File Explorer, or unreadable sector errors. |
My Document Folder is Missing? Try These Fixes
When your document folder is missing, there are several proven methods to get it back. Each fix targets different causes of folders disappeared problems. These solutions work for most Windows versions and can restore your files and folders disappeared quickly.
We've arranged these fixes from simple to advanced. Most documents folders disappeared on Mac/Windows cases get solved with these methods. Don't skip any steps, as each one checks for different problems.
🛠️ Quick-Selection Directory: Choose Your Fix Pathway
Before implementing solutions, use this evaluation table to find the fix that matches your current system state, technical confidence, and potential risk to surrounding storage files:
| Troubleshooting Pathway | Primary Target Error | Technical Effort | Data Integrity Risk |
| Recycle Bin Audit | Accidental user deletion errors | Low (Standard UI) | Zero Risk |
| Toggle Hidden Items | Attribute visibility blocks | Low (Toggle switch) | Zero Risk |
| Global Index Search | Misplaced or dragged paths | Low (Search query) | Zero Risk |
| Antivirus Release | Quarantined application files | Medium (Security console) | Zero Risk |
| Index Database Rebuild | Broken Windows Search links | Medium (Control Panel) | Zero Risk (Takes time) |
| OneDrive Account Fix | Cloud detachment & sync issues | Medium (App settings) | Low Risk |
| Sector Recovery Scan | Formatted, corrupted, or deleted drives | Medium (Recoverit UI) | Safe (Read-only scan) |
Fix 1: Check the Recycle Bin
The Recycle Bin is the first place to look when desktop folders disappeared. Many users accidentally delete folders and forget about them. When your document folder disappeared, it often ends up in the Recycle Bin waiting to be restored.
This method is quick and easy to try. It solves a large number of files and folders disappeared cases immediately. The Recycle Bin keeps deleted items for a certain period before permanent deletion. Checking here should be your first step when you notice document folder is missing.
Detailed Steps:
- Double-click the Recycle Bin icon on the desktop. Right-click on the folder.
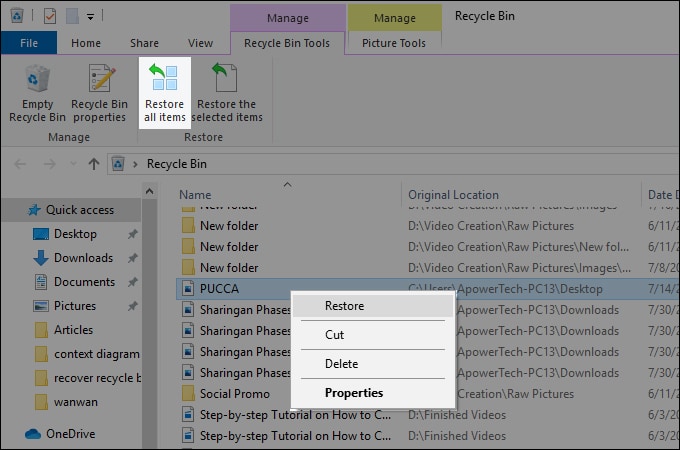
- Select "Restore" from the context menu.
Fix 2: Enable the Show Hidden Files and Folders Option
Windows hides many system folders and files by default. Your folders may appear as empty. Your folders disappeared problem might be a simple visibility issue. When folders get marked as hidden, they become invisible in normal file explorer views. This is why your document folder disappeared even though it's still there.
Enabling the hidden files option reveals all concealed content on your system. Many users discover their files and folders disappeared were simply hidden from view. This setting change is safe and won't harm your computer. It's a standard troubleshooting step for file disappeared from hard drive situations.
Detailed Steps:
- Open File Explorer. Click on the "View" tab.
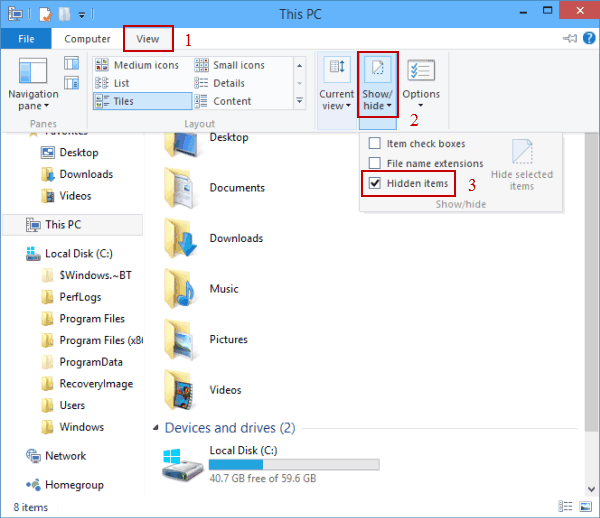
- Look for the "Show/hide" section in the ribbon. Check the "Hidden items" option.
If your document folders went missing on a Mac rather than a Windows PC, the root cause is often an optimized iCloud Drive sync or a hidden file attribute change.
You can instantly toggle hidden folders visibility on macOS by launching Finder and pressing the keyboard shortcut: Command + Shift + Period (.). If the directories are completely gone from the desktop, navigate to `Finder > Settings > Sidebar` and ensure the Recurrent Documents and Desktop options are checked.
Fix 3: Search for the Missing Folder
Windows has a powerful search function that can locate folders anywhere on your system. When folders disappeared, they might have moved to an unexpected location. The search tool scans your entire hard drive to find missing items. This method works well when you know the folder name but not its current location.
The search function is particularly useful for document folder disappeared. It can find folders even if they're buried deep in the file system. Windows Search indexes most locations on your computer automatically. This makes finding files and folders disappeared much faster and more reliably.
Detailed Steps:
- Press Windows key + S to open search. Type the name of your missing folder. Press Enter to start the search.

- Wait for results to appear. Click on the found folder to open its location. Move the document folder is missing back to the correct spot
Fix 4: Check Your Antivirus Quarantine Section
Antivirus software protects your computer but sometimes makes mistakes. Security programs can quarantine safe files that seem suspicious. This causes your file disappeared from hard drive situation even though the files are safe. Most antivirus programs have a quarantine or vault section where they store flagged files.
When your document folder disappeared suddenly, check your antivirus quarantine first. The antivirus thought the folder contained threats and moved it for safety. You can easily restore safe files from quarantine back to their original locations.
Detailed Steps:
- Open your antivirus program. Find the "Quarantine" or "Vault" section.
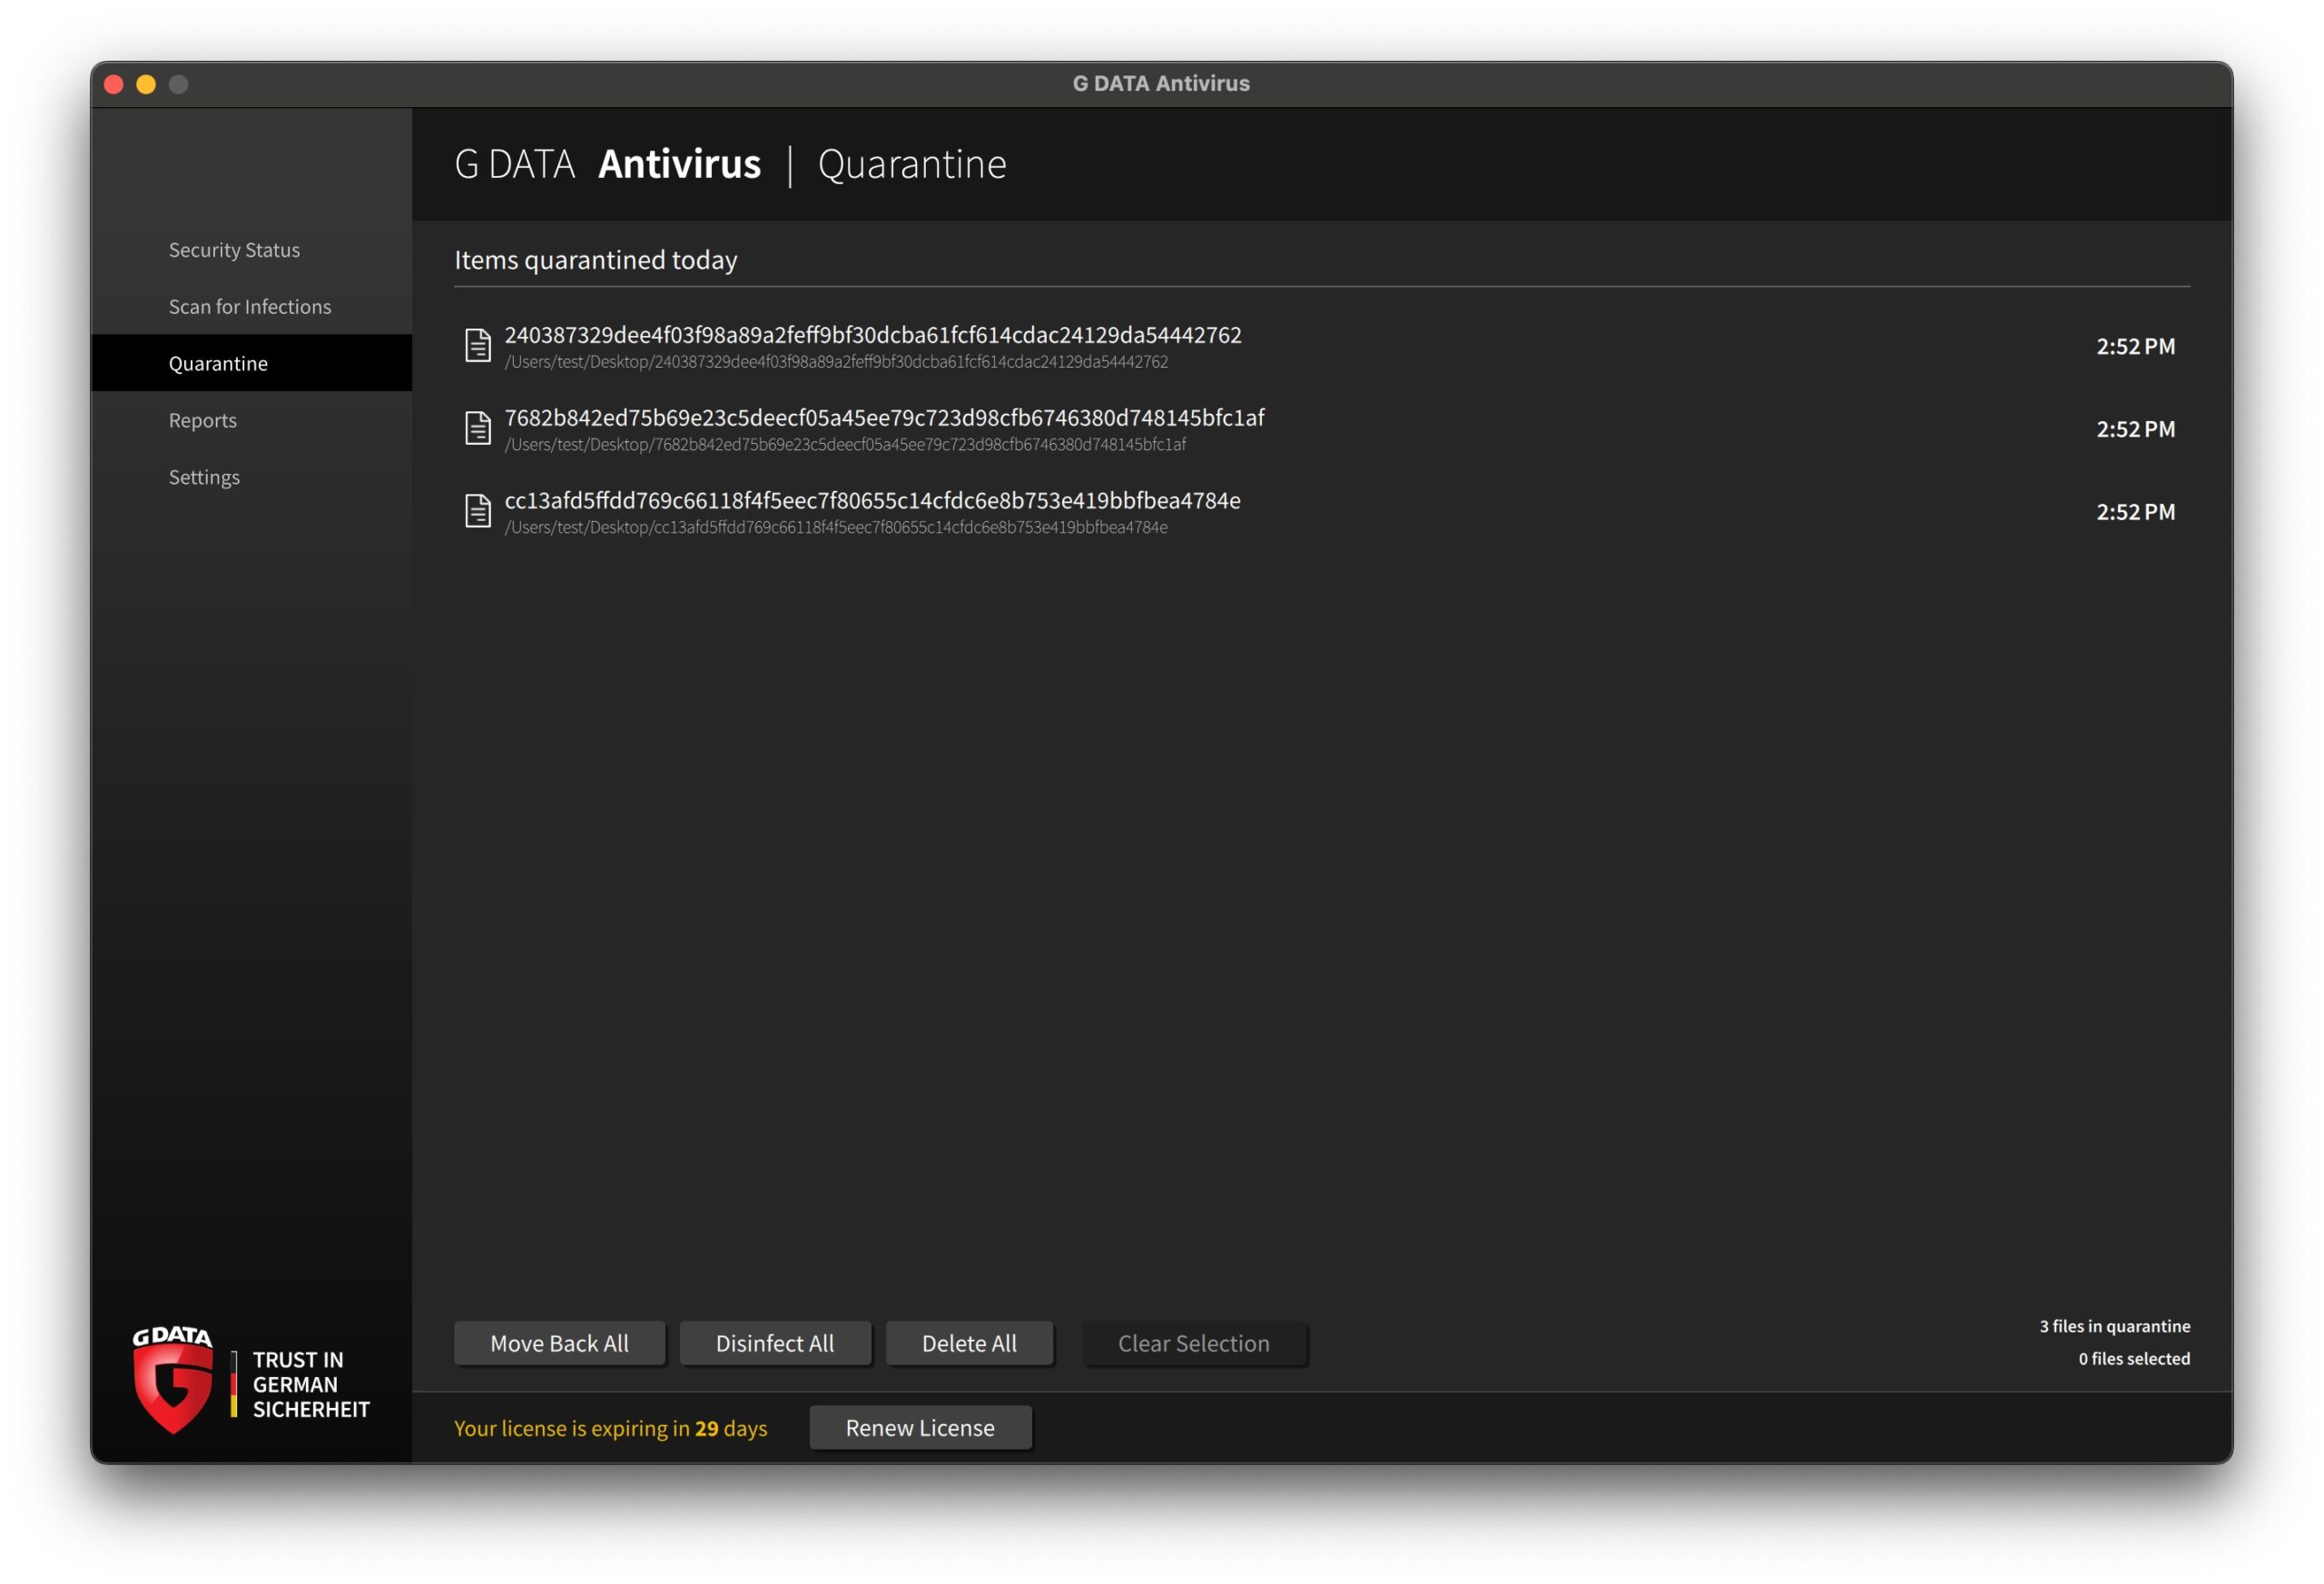
- Look for your documents folders disappeared on Mac/Windows. Select the quarantined folder. Click the "Restore" or "Whitelist" option.
Fix 5: Rebuild Windows Search Index
Windows maintains a search index to quickly find files and folders. Sometimes this index gets corrupted and causes folders disappeared from search results. When the index is broken, your document folder is missing from searches even though it exists. Rebuilding the index refreshes the entire file database.
This process fixes search-related issues that make files and folders disappeared from view. The indexing service scans all your files again and creates a fresh database. This can take several hours depending on how many files you have. However, it often resolves stubborn document folder disappeared problems.
Detailed Steps:
- Press Windows + R to open Run dialog. Type "control" and press Enter. Search for "Indexing Options" and click it.
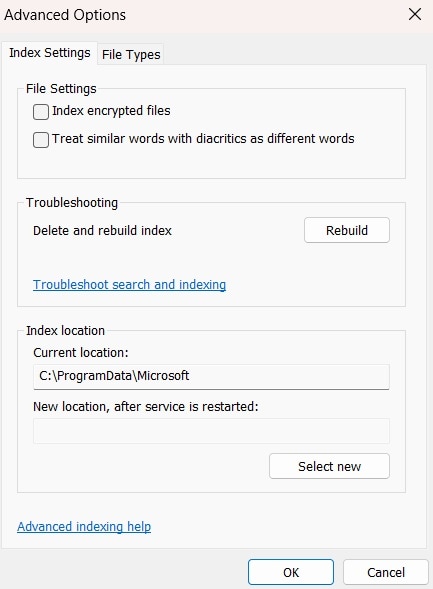
- Click "Advanced" button. Click "Rebuild" under Troubleshooting. Wait for the process to complete. Check if my document folder is missing reappears.
Fix 6: Fix OneDrive Synchronization Settings
OneDrive sync problems are a common cause of folders disappeared issues. Your documents folders disappeared on Mac/Windows might be a sync configuration problem. OneDrive sometimes stops syncing certain folders without warning. This makes folders appear missing from your local computer even though they exist in the cloud.
Checking and fixing OneDrive settings often resolves these sync issues. The folders are usually safe in your online OneDrive account. You just need to configure the sync settings properly again. This fix works for both personal and business OneDrive accounts that cause document folder is missing problems.
Detailed Steps:
- Right-click the OneDrive icon in system tray. Select "Settings" from the menu. Go to the "Account" tab. Click "Choose folders" link.
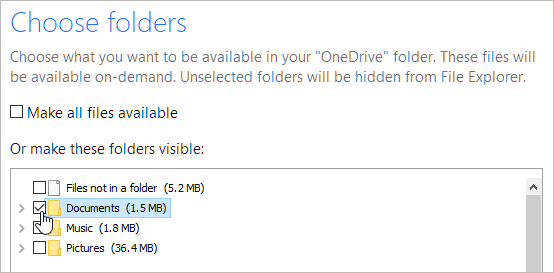
- Make sure your my document folder is missing is checked. Click "OK" to save changes. Wait for OneDrive to sync your file disappeared from hard drive
Files Disappeared From Hard Drive? Use Data Recovery Tool
When basic fixes don't work, you need professional data recovery software. Sometimes a file disappeared from hard drive due to serious corruption or deletion. Simple methods can't always recover permanently lost data. This is when specialized recovery tools become essential for getting your files back.
Recoverit is one of the most trusted data recovery tools available today. It works when other methods fail to find your folders disappeared. The software uses advanced scanning algorithms to find deleted or lost files. It can recover data from various scenarios, including accidental deletion, system crashes, and hardware failures.
This powerful tool has helped millions of users worldwide recover their lost data. When your my document folder disappeared permanently, Recoverit offers the best chance of recovery. The software supports all major file systems and storage devices. It works equally well whether your documents folders disappeared on Mac/Windows or other operating systems.
📈 Recoverit Scenarios: Data Salvage Probability Index
When standard operating system switches fail to show your missing folders, file block corruption requires a raw directory scan. Review the structural capabilities of Wondershare Recoverit across common loss scenarios:
| File Loss Scenario | Recovery Type Profile | Salvage Probability | Best Practice Protocol |
| Accidental Empty Recycle Bin | Shift + Delete Deletion Bypass | 99% Success Rate | Stop saving new files to the drive immediately to prevent block overwrites. |
| Interrupted Windows Update | System Upgrade File Loss | 95% Success Rate | Scan the C:\ partition directly to look for the system-generated Windows.old folder tree. |
| Format or Partition Loss | Blown Logical Drive Structure | 92% Success Rate | Use the Deep Scan algorithm to read raw file signatures across unallocated space. |
| Severe Malware Corruption | Cryptographic or Script Erasure | 88% Success Rate | Run Recoverit from an isolated bootable USB environment to keep active scripts quiet. |
Steps to Use Recoverit:
- Download and install Recoverit software. Launch the program on your computer. Select the drive where document folder is missing. Click "Start" to begin the scan process.

- Wait for the scan to find files and folders disappeared. Preview the recovered files before restoration.

- Select your documents folders disappeared on Mac/Windows. Click "Recover" to save files to a safe location.

Part 4: Tips to Avoid Folder Disappeared Problems in the Future
Most document folder is missing problems can be avoided with proper preparation. Creating good backup habits and maintaining your system prevents data loss. These prevention strategies take little time but provide huge benefits. They protect against both common issues and serious disasters that cause file disappeared from hard drive problems.
- Create regular backups - Back up important folders weekly. This prevents permanent documents folders disappeared on Mac/Windows loss.
- Use reliable antivirus - Good security software protects without causing folders disappeared issues. Configure it properly to avoid quarantine problems.
- Keep system updated - Install Windows updates regularly. This prevents compatibility issues that cause my document folder is missing.
- Monitor OneDrive sync - Check sync status regularly. This prevents cloud-related files and folders disappeared problems.
- Avoid suspicious downloads - Don't download unknown files. Malware causes many file disappeared from hard drive cases.
- Check disk health - Run disk checks monthly. This prevents hardware-related folders disappeared issues.
- Organize files properly - Keep important folders in standard locations. This makes my document folder disappeared easier to find.
- Use folder shortcuts - Create shortcuts to important folders. This helps when documents folders disappeared on Mac/Windows temporarily.
🏁 Automated Proactive Maintenance Checklist
Do not wait for folder paths to drop out of view again. Go through this automated checklist once a month to verify data safety:
- Redundant Backup Architecture: Are your crucial user folders synced weekly to both an external local hard drive and an automated cloud engine like **Wondershare UBackit**?
- Cloud Sync Audit: Have you verified that OneDrive's "Files On-Demand" setting isn't silently clearing physical local assets off your hard drive to save disk space?
- Smart SMART Disk Diagnostic: Have you run a monthly command-line drive check via `chkdsk c: /f` to find and isolate logical storage blocks before they corrupt your directory pointers?
- Security Exclusion Tuning: Is your third-party antivirus profile adjusted to alert you *before* it automatically quarantines an entire active project subfolder?
- Search Index Stability Verification: Is your local Windows Indexing Service updated and running correctly without hanging mid-pass during background system indexing?
Conclusion
Folders disappeared problems are frustrating but usually fixable with the right approach. Most files and folders disappeared cases have straightforward solutions that don't require technical expertise. Start with simple checks like the Recycle Bin and hidden file settings before moving to advanced methods. These basic steps resolve the majority of document folder is missing situations quickly.
For more serious cases where basic fixes don't work, professional recovery tools offer the best solution. When your file disappeared from hard drive due to corruption or permanent deletion, software like Recoverit provides excellent recovery rates. Don't wait too long to attempt recovery as the chances decrease over time. The sooner you act, the better your chances of getting back documents folders disappeared on Mac/Windows.
Try Recoverit to Recover Lost Folders
![]() Security Verified. Over 7,302,189 people have downloaded it.
Security Verified. Over 7,302,189 people have downloaded it.
FAQ
-
Q: Why did documents folder suddenly disappear from Windows 10/11?
Your documents folders disappeared on Mac/Windows can happen for several common reasons that are usually fixable. The most frequent cause is Windows hiding the folder due to changed view settings or system updates. Sometimes your my document folder disappeared after installing new software that modified system settings. Antivirus programs also cause this by quarantining folders they mistakenly flag as suspicious. -
Q: Can I recover permanently deleted folders from my hard drive?
Yes, you can often recover folders even when they seem permanently gone from your system. When your file disappeared from hard drive due to deletion, the data usually remains on the storage device until overwritten by new files. Professional recovery software like Recoverit can scan deep into your storage to find these deleted files and folders. The success rate depends on how much time has passed since the deletion and how much new data has been written to the drive. -
Q: How can I prevent my folders from disappearing in the future?
Preventing folders disappeared requires a combination of good backup habits and proper system maintenance practices. Create automatic weekly backups of your important folders to external drives or cloud storage services. This ensures you always have copies available when your my document folder is missing. Use reliable antivirus software, but configure it properly to avoid false positives that quarantine safe files.


