
Regardless of how careful you are, there's always a chance that you can lose your data to a malware attack or corrupt sectors. While OS like Windows and Mac have native recovery support, those operating Linux kernels often rely on third-party solutions. If you're one of those, you might come across Safecopy for Linux.
This guide will serve as a definitive Safecopy Linux tutorial, letting you understand all about the software from the inside out. We'll also inform you of the best alternative for it if it fails to meet your expectations.
In this article
Part 1. What Is Safecopy?
Safecopy is a simple, free-to-use program that can access corrupt or damaged sectors of a storage device, even when the input/output protocols have failed. It can't necessarily retrieve deleted files but can copy them to a new destination when the native file browser proves inadequate for the job. It works with almost any digital device, including floppy disks, DVD and Blu-Ray discs, flash drives, SD cards, and hard drives, amongst numerous others.
The program uses bi-level access tools that let it browse even unallocated sectors. Users have highlighted that they can use Safecopy to retrieve necessary files even as there was heavy physical damage on the storage drives. The code is open-source, and you can conveniently configure various settings from your Linux terminal to retrieve all required data before your storage device gives in.
Key Features of Safecopy
Safecopy for Ubuntu and other Linux kernels comes with several valuable features. A few notable ones are described below.
- With Safecopy, you can recover entire blocks and partitions to a new disk of your choice.
- Safecopy allows you to resurrect ISO files and virtual images stored on any device.
- It has the most readable output factor of most other open-source Linux data recovery tools.
- Safecopy supports RAW access and can copy file system images from the disk. That's best to preserve the configuration of older storage devices and emulate older media, such as old DVD movies and console games.
2026 Hardware Note: Safecopy on NVMe and USB 4.0 While Safecopy was originally designed for older media like DVDs, its low-level I/O access is remarkably effective for modern NVMe SSDs and USB 4.0 drives that have "locked up" due to controller errors. If your Linux kernel reports "Input/Output Error" when trying to mount a high-speed SSD, Safecopy can bypass the standard mounting process to pull data directly from the raw flash cells. However, be aware that high-speed I/O retries on a failing SSD can generate significant heat; always monitor your drive's temperature when using the --stage3 deep scan.
Goal |
Command Syntax |
Best For |
| Basic Rescue | safecopy source dest |
Simple file duplication. |
| Deep Scan | safecopy source dest --stage3 |
Dying drives with heavy I/O errors. |
| Fast Image | safecopy source dest --stage1 |
Quickly saving readable sectors first. |
| Resume Scan | safecopy source dest -I badblockfile |
Continuing after a system crash. |
Part 2. How To Use Safecopy on Linux?
Now that you know what Safecopy can do on Linux, let's observe how you can use it. It is, after all, a command-based system. So, you must follow a few steps before using Safecopy for data retrieval.
1. Prerequisites
First, you must ensure that your user login has administrative rights, as you will be dealing with file system modifications. Moreover, verify that you have a strong and consistent internet connection. You don't need 5G speed, but a stable connection doesn't force you to postpone a scan in the middle of a session.
2. How To Install Safecopy on Linux
You can download Safecopy from several websites that offer open-source links. Yet, SourceForge is the best bet, as it has all the installers for various Linux kernels. Ubuntu users can also run the following command to install Safecopy straight from the terminal.
sudo apt update
sudo apt install safecopy
3. Different Use Cases of Safecopy
Various use cases make Safecopy a viable option. Here's how you can:
● Resurrect a file from a mounted yet damaged disk that a copy will likely fail on.
safecopy /path/to/problemfile ~/saved-file
● Create a file system image of a damaged disk/storage device.
safecopy /dev/device ~/diskimage
● Resurrect data through a thorough scan.
safecopy source dest -l 1* -R 8 -Z 2
(If logical misalignment persists in sectors of blocks)
safecopy source dest -l 1* -r 1 -R 8 -Z 2
● Resurrect data as fast as possible, or resurrect data with a low risk of further damaging the file system.
safecopy source dest -l 10% -R 0 -Z 0
● Resurrect some of the files swiftly. Then, scan for more data thoroughly at a later point.
safecopy source dest -l 10% -R 0 -Z 0 -o badblockfile
safecopy source dest -l 1* -R 8 -Z 2 -I badblockfile
An alternate approach using the new preset features:
safecopy source dest --stage1
safecopy source dest --stage2
safecopy source dest --stage3
● Utilize a friend's disk drive to complete the data from my damaged drive.
safecopy /dev/mydrive imagefile <someoptions> -b <myblocksize> \
-o myblockfile;
safecopy /dev/otherdrive imagefile <someoptions> -b <otherblocksize> \
-I myblockfile -i <myblocksize> -o otherblockfile;
safecopy /dev/anotherdrive imagefile <someoptions> \
-b <anotherblocksize> -I otherblockfile -i <otherblocksize>
● Pause and later resume a data rescue procedure.
safecopy source dest
<CTRL+C> (safecopy aborts)
safecopy source dest -I /dev/null
● Interrupt and later resume a data rescue procedure with the appropriate bad block output.
safecopy source dest <options> -o badblockfile
<CTRL+C> (This aborts Safecopy.)
mv badblockfile savedbadblockfile
safecopy source dest -C /dev/null -o badblockfile
cat badblockfile >>savedbadblockfile
● Pause and resume in incremental mode.
(It needs a bit of bash scripting to get the correct bad block lists)
safecopy source dest <options> -o badblockfile1
safecopy source dest <options> -I badblockfile1 -o badblockfile2
<CTRL+C> (safecopy aborts)
latest=$( tail -n 1 badblockfile2 )
if [ -z $latest ]; then latest=-1; fi;
cat badblockfile1 | while read block; do
[ $block -gt $latest ] && echo $block >>badblockfile2;
done;
safecopy source dest <options> -I badblockfile2 -o badblockfile3
● Find any corrupted files on a file system that is only partially rescued.
safecopy /dev/filesystem image -M CorruptedImage
fsck image
mount -o loop image /mnt/mountpoint
grep -D /mnt/mountpoint "CorruptedImage"
Note: You might only find some affected files if the unreadable data portions are smaller than your designated marker string.
● Exclude the previously known bad blocks list of a filesystem from filesystem image creation.
dumpe2fs -b /dev/filesystem >badblocklist
safecopy /dev/filesystem image \
-X badblocklist -x <blocksize of your fs>
● Create an image of a disk that starts at a destination (X) and is of a specific size (Y).
safecopy /dev/filesystem -b <bsize> -s <X/bsize> -l <Y/bsize>
● Combine two partial images of retrieved data without access to the damaged source.
(This is a bit tricky. You need to get bad block lists somehow for both files to make Safecopy know where the missing data is. You can process those automatically if you use the -M (mark) feature. However, this feature is not present on Safecopy. Let's assume you have two bad block files as follows.
imag1.dat
imag1.badblocks (blocksize1)
imag2.dat
imag2.badblocks (blocksize2)
The file size of imag1 needs to be greater or equal to that of imag2. If not, you may need to swap them to proceed further.)
cp imag2.dat combined.dat
safecopy imag1.dat combined.dat -I imag2.badblocks -i blocksize2 \
       -X imag1.badblocks -x blocksize1
(That gets you the combined data but no output bad block list. The resulting bad blocks list would be the bad blocks that are
1: in both bad block lists, or
2: in image1.badblocks and beyond the file size of image2
Solving this logic in a short shell script should be reasonably straightforward. The solution might be shipped with Safecopy in future patches. Until then, consider this tutorial your chance to contribute to a random open-source project.)
● Rescue data of a tape device.
If the tape device driver supports lseek(), Sfecopy will treat it as any regular file. Otherwise, it would help if you utilized the "-S" option of Safecopy with a self-written script to skip over the bad blocks. (For instance, using "mt seek"). Furthermore, ensure your tape device doesn't auto-rewind or disconnect on close.
Part 3. The Best Alternative to Safecopy for Linux Data Recovery
As versatile as Safecopy for Ubuntu is, it still can't retrieve files that were accidentally deleted or whose images got wiped off the disk. Additionally, the command-line-based interface makes it exceptionally troublesome for people with little or no experience in programming.
That's where Wondershare Recoverit can help you with Linux data recovery. You can download your preferred installer from the official website and selectively recover the files that you want without any issues. It offers free data recovery of up to 100 MB of data at a time, but the premium version unlocks access to several features, including but not limited to the following.

Wondershare Recoverit - Your Safe and Reliable Linux Recovery Software
5,481,435 people have downloaded it.
Recovers lost or deleted documents, photos, videos, music, emails, and other 1000+ file types effectively, safely, and completely.
Compatible with all mainstream Linux distros, including Ubuntu, Linux Mint, Debian, Fedora, Solus, Opensuse, Manjaro, etc.
Assists in 500+ data loss scenarios, such as deletion, disk formatting, OS crash, power outage, virus attack, lost partition, and many more.
Works through a remote connection. You can recover lost data even when your Linux device is crashed.
You can follow the below-mentioned procedure to use Wondershare Recoverit as a Safecopy alternative on the Linux distribution of your choice.
For Windows Vista/7/8/10/11
For macOS X 10.10 or later
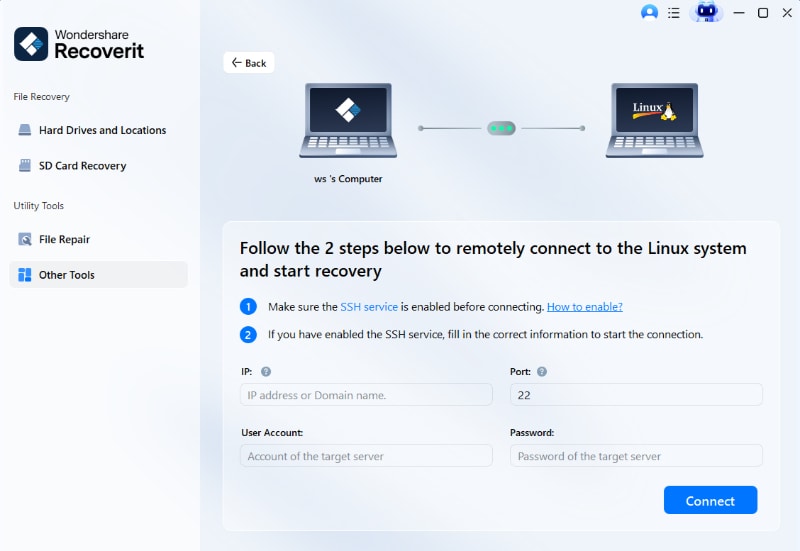
The Security Advantage: Remote SSH Recovery The biggest challenge with Safecopy is that you must run it on the affected machine, which can increase the load on a failing system. Wondershare Recoverit utilizes a Remote SSH connection to scan your Linux device. This means the heavy lifting—the scanning and processing—happens on your Windows or Mac workstation, while only the essential data blocks are read from the Linux drive. This "Remote" approach significantly reduces the risk of the Linux system crashing entirely during the recovery process.
Step 1: Download and install Recoverit on your computer.
Step 2: Navigate to the sidebar and click on the NAS and Linux tab. Then select Linux Recovery to proceed with the data recovery process.

Step 3: The Safecopy alternative requires information about the Linux device from which files have been lost to establish a remote connection. Provide the necessary information and select Connect to grant Recoverit access to the device.
Step 4. Once the connection is established, the software automatically begins the scanning process. It might take a while so that you can complete other urgent tasks on your system in the meantime.

Step 5. You can preview files during the scanning process and interrupt them at any time. Once the desired files have been identified, select them, click the Recover button, and the files will be successfully retrieved and saved.

For Windows Vista/7/8/10/11
For macOS X 10.10 or later
Comparison Factor |
Safecopy (CLI) |
Wondershare Recoverit |
| Ease of Use | Low (Steep Learning Curve) | High (User-friendly GUI) |
| Deleted File Recovery | No (Data Rescue Only) | Yes (Full File Recovery) |
| File System Support | Raw Blocks | Ext4, BTRFS, XFS, etc. |
| Resume Support | Manual (via Badblock files) | Automatic (Resume Scan) |
Summing Up
While Safecopy is a reliable tool to retrieve data from corrupted drives, there are more suitable options for recovering deleted files from Linux. For that, Recoverit can suit the application. We hope this Safecopy Linux tutorial helps you make the appropriate decisions for your storage devices and file systems.


