XFS file system is a high-performance journaling Linux file system developed by Silicon Graphics, Inc (SGI). However, like most file systems, this isn’t entirely immune to data loss. Whether it’s due to device failure or accidental deletion, you might find that your data is lost, and you’re probably wondering how you can recover XFS partition and files.
This article will walk you through the best Linux XFS undelete methods. We’ll explore what they are and how they work to ensure XFS file recovery. On that note, let’s dive right in.
Overview of the XFS File System

XFS is known as a journaled file system. It is quite different from EXT file systems in many ways. One of the ways is that it only records metadata changes in the journal. The XFS file system isn’t popularly used and is only popular in Red Hat-based distributives. As a Linux file system, it is also commonly used in ready-made NAS (Network-attached Storage) devices produced by various people. Some NAS vendors like NetGear, LaCie, TeraStation, and others use the XFS file system on their devices.
When XFS first arrived at the scene, it became popular because it fulfilled a growing need by users for a file system that could effectively handle higher-capacity devices. XFS was also popular because it could organize large amounts of data in no time. At the time, other filesystems buckled under the pressure of growing volume size. The amount of data people sifted through started to grow faster, and so did the filesystem metadata. XFS efficiently handled the expansive metadata, which is why many file systems today are built on the features of XFS.
Features
There are many impressive features that the XFS file system offers, and some of them are explored below:
- Storage of Large Files: XFS supported the storage of large normal files. It also accommodated ballooning filesystem metadata without an effect on its performance.
- Speedy Access to Files: Despite the large size and number of files, users can easily and speedily access their files. This is due to the B-tree balanced tree algorithm used by the file system. This system allowed it to allocate disk space quickly. It also allowed the file system to find each file on the disk easily.
- Allocation Group for Scalability: Although XFS isn’t the only file system utilizing extents and inodes, it is one of those that groups them with allocation groups. These allocation groups make XFS scalable and support the running of several processes simultaneously.
- Use of Delayed Allocation: One of the impressive features of the XFS file system is that it utilizes delayed allocation. When you write new data to the XFS file system, it first makes the new changes to the buffer cache before moving it to the disk once it has amassed a large backlog of write commands. This process allows files to be written to the disk easily. It also prevents fragmentation which is common in file systems that don’t use delayed allocation.
Method 1: Recover Data From XFS Linux and NAS Using Wondershare Recoverit
XFS is a complicated file system to recover data from. It can prove a challenge even with the Linux XFS undelete tools that we will introduce later. Therefore, in most XFS data loss situations, using a professional data recovery tool like Wondershare Recoverit might be the best option for you. It supports recovering various file types and formats from varying storage devices, including the Linux XFS file system.

Wondershare Recoverit - Your Safe and Reliable Data Recovery Software
5,481,435 people have downloaded it.
Recovers lost or deleted documents, photos, videos, music, emails, and other 1000+ file types effectively, safely, and completely.
Compatible with all popular file systems, including exFAT, FAT32, NTFS, APFS, HFS+, XFS, EXT4, BTRFS, etc.
Assists in 500+ data loss scenarios, such as deletion, disk formatting, OS crash, power outage, virus attack, lost partition, and many more.
The simple point-and-click interface allows you to recover data from Linux hard drives in just a few clicks.
Licensing and Pricing
Wondershare Recoverit offers a free version that you can use to recover up to 100MB files. For the premium version, pricing begins from $59.95 to access its many features.
Steps to Undelete Files From Linux XFS File System Using Wondershare Recoverit
Step 1. Download and Install
First, download Wondershare Recoverit on your PC from the official website and install it following the instructions provided. After installation, launch to begin the Linux XFS file recovery process.
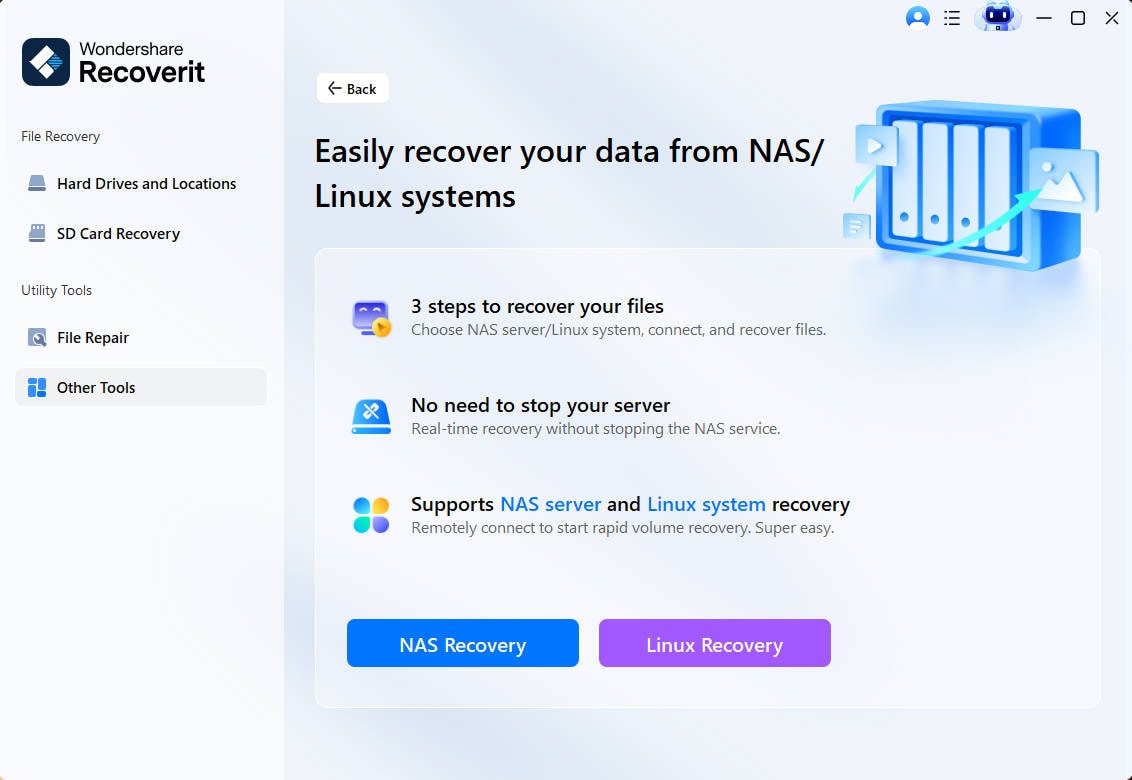
Step 2. Select Linux Recovery
Find the NAS and Linux option from the sidebar, and click Linux Recovery. Follow the instruction to fill the Linux server's information, and click Connect to start recovery.
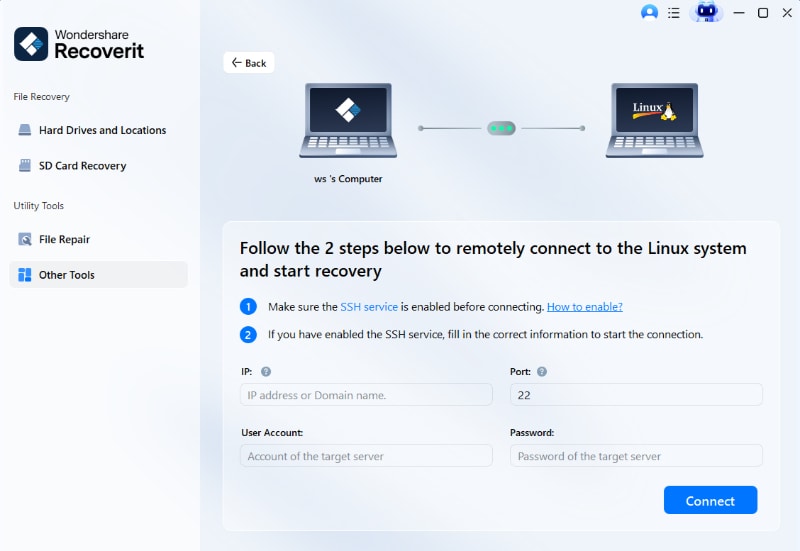
Step 3. Scan for Deleted Files
Recoverit will begin scanning the chosen location automatically. The storage size and data stored within the device determine how fast the scanning process can be. However, you can now speed up the process using various filters like date modification, file type, and many more.
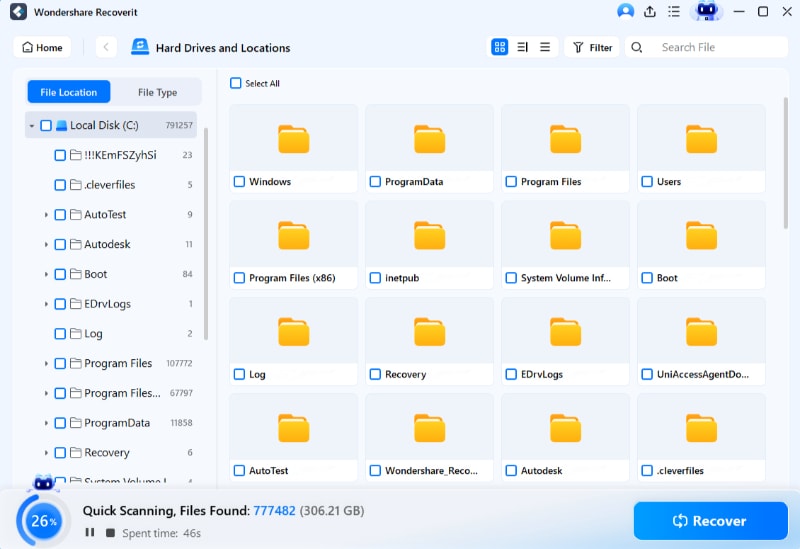
Step 4. Preview and Recover
After the recovery process, you can preview the recovered files to determine if they’re the files you’re looking for. After previewing, select the files you would like to recover and hit the Recover button to begin recovering your files from the Linux XFS file system.

For Windows Vista/7/8/10/11
For macOS X 10.10 or later
Other Competitor Tools
Although Wondershare is quite effective in helping recover all file types and from the XFS file system, some competitor tools you can explore include.
- Hetman Partition Recovery: This is a reliable tool that allows users to recover data from damaged hard disks, RAW partitions, deleted partitions, and missing volumes. It provides users with a step-by-step wizard and intuitive interface to ensure a seamless recovery interface.
- ReclaiME: Another tool for your XFS file recovery is ReclaiME. This tool helps recover data from storage devices like USB drives or hard drives formatted in the XFS file system.
- UFS Recovery: With this data recovery software, you’ll find an easy solution to your data-related problems. It gives you access to lost files and ensures easy data recovery from various storage systems.
Method 2. Undelete Files on Linux XFS File System Using xfs_undelete (CLI Tool)

One of the tools you can use for XFS file and RAID recovery is the xfs_undelete tool. This tool attempts to recover all the files marked as deleted on the XFS file system. Different filters are available for finding your specific file, like the file type, date modified, and many more. When carrying out the recovery process, the recovered file isn’t recovered to the same location where you deleted it. Therefore, it creates a subdirectory tagged xfs_undeleted and stores the recovered files.
During the Linux XFS undelete process using this tool, it carries out sanity checks on the file you’re recovering. This is to prevent the recovery of sparse files. It also avoids the recovery of unidentifiable files. Users have to specify if they want to proceed with the recovery of these unidentifiable files.
Since the tool only reads from the XFS file system during recovery, it is quite safe. It also automatically remounts the file system read-only on startup, so it doesn’t mistakenly overwrite the source data. This makes it a relatively safe tool to use.
Pricing and License
The xfs_undelete tool is free; therefore, users don’t have to pay any price before accessing it. Users are free to distribute, use and modify the tool under the terms of its license.
How To Recover XFS Files and Partitions Using xfs_undelete
When you launch this tool, it travels through the inode B+ trees of each allocation group and checks for deleted files. Once it finds them, it tries to make sense of the file’s data blocks before recovering them. Below are some of the commands you can utilize when recovering your data.
-t:This command refers to the time range of the file. When used, it only recovers files deleted within a specific time range. Users must put the time range value as time specs separated as a double dot. An example is2023-01-16..-2hours.-r:This is a command that refers to file types. When utilized, it only recovers files within a particular file type.-i:When used, the xfs_undelete tool ignores files with the file type matching a pattern from the type specified. By default, it ignores files of this type and only recovers the -r options.-z:Another command concerning file types makes the tool remove trailing zeroes from files with a file type matching a pattern indicated by this comma-separated list of patterns.-o:This command refers to the output directory. It specifies the directly the recovered files should be copied.-s:This specifies the inode number at the recovery should begin. However, you should ensure an existing inode number exists in the source file system. The tool will travel through the inode trees till it finds this particular number to begin the recovery process.-m:This command is known as magic files and specifies an alternate list of directories and files containing magic. It could be a single item or several separated by a colon. If it finds a compiled magic file alongside a directory or file, it will use it instead.-I:This command shows you a list of file types you can use with the-r, -i,and-z commands.
Prerequisite
Xfs_undelete is a tiny script, so using it means you’ll need a Tcl interpreter. It utilizes some of the features of the Tcl-8.6. Therefore, it’s best to download this version. Since the tcllib package was utilized when parsing the command line, you’ll also need a version of dd that supports the skip=, count=, bs=, conv=notrunc, and status=none options. Users will also need a stat version that supports the –format=%m and L options. You can easily get them from the GNU core utilities.
Examples
An example of how you can recover XFS partition using the Linux xfs undelete script includes:
# cd ~ ; xfs_undelete /dev/mapper/cr_data
This stores the recovered files from /dev/mapper/cr_data in the directory ~/xfs_undeleted.
# xfs_undelete -o /mnt/external_harddisk /dev/sda3
This stores the recovered files from /dev/sda3 in the directory /mnt/external_harddisk.
# xfs_undelete -t 2023-01-16 /dev/sda3
This ignores files deleted before January 16th, 2023.
# xfs_undelete -t -3hour /dev/sda3
This ignores files deleted more than three hours ago. The -t option accepts all dates understood by Tcl’s [clock scan] command.
# xfs_undelete -i "" -t -4hour /dev/sda3
This recovers all files deleted not more than four hours ago, including “bin” files.
Method 3: Recover Data From Linux XFS File System Using Raise Data Recovery (GUI Tool)
Raise Data Recovery is an effective GUI tool for recovering data from the XFS file system. This tool makes it easy to restore files in simple and complicated situations like accidental deletion, system malfunction, malware attack, software crash, and many more scenarios.
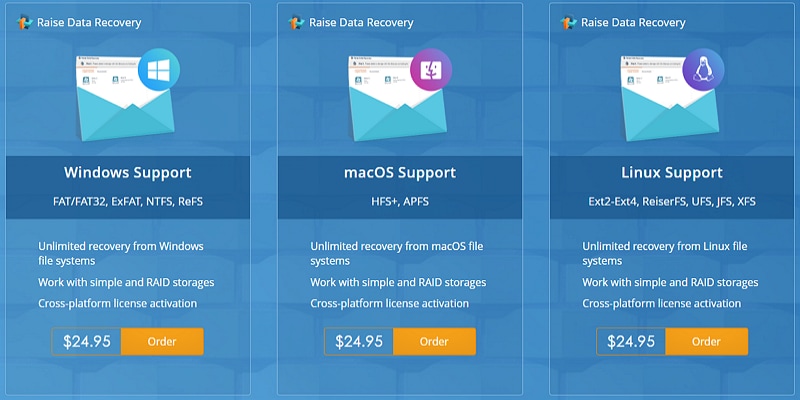
Raise Data Recovery can also effectively reconstruct RAID sets of basic configurations and spanned volumes for a successful XFS RAID recovery. This recovery solution utilizes a flexible modular licensing scheme that allows you easily select the formats you want to work with without opting for unnecessary features.
Pricing and Licensing
To use Raise Data Recovery, users require a license. This license allows you to copy and save recovered files that are higher than 256KB. If you don’t purchase and activate this license, you won’t be able to copy the files recovered. The License price begins at $24.05. The software will automatically show you the license you need in your case during the XFS file recovery process.
How To Recover XFS Files and Partitions Using Raise Data Recovery
This software utilizes an advanced data recovery algorithm to recover your data. However, users don’t have to deal with complicated commands. It offers a simple and intuitive user interface that can easily guide you through the recovery process. Below are the simple steps you need to follow to undelete files from the Linux XFS file system.
Step 1: Download and Install
First, you have to install the XFS file recovery software. You can visit the official website to download it on your Linux PC and install it following the instructions.
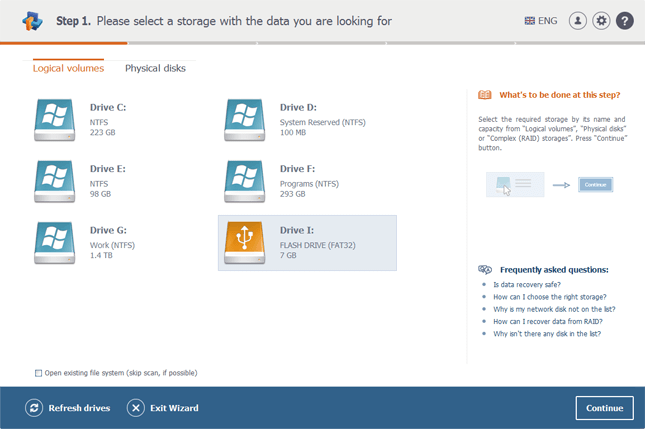
Step 2: Choose Your XFS Device
Launch the software after installation. On the homepage, choose the XFS storage device from which you want to undelete files.
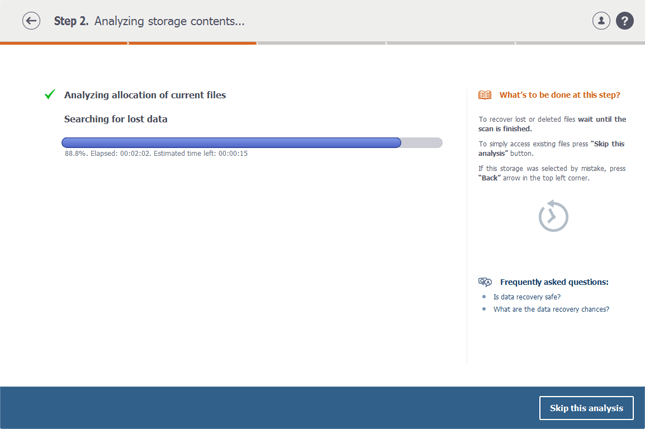
Step 3. Scan for Lost Data
The software will begin a scanning process. Wait till the scanning process is complete; this usually depends on the storage capacity and the type of connection.
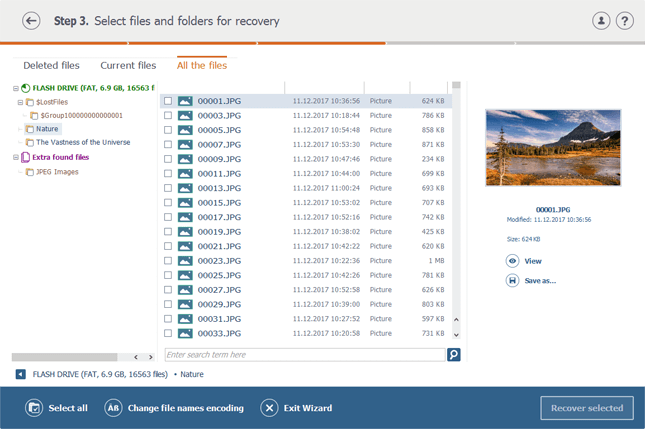
Step 4. Preview and Recover
Once the scanning process is complete, choose the files and folders you want to recover and hit the Recover selected button. A preview option is available to ensure you are restoring the desired ones.
Step 5: Start Recovery
The software would require you to choose a safe location for your recovered data. Select a location and hit the Start recovery button. It will save the rescued data within minutes.
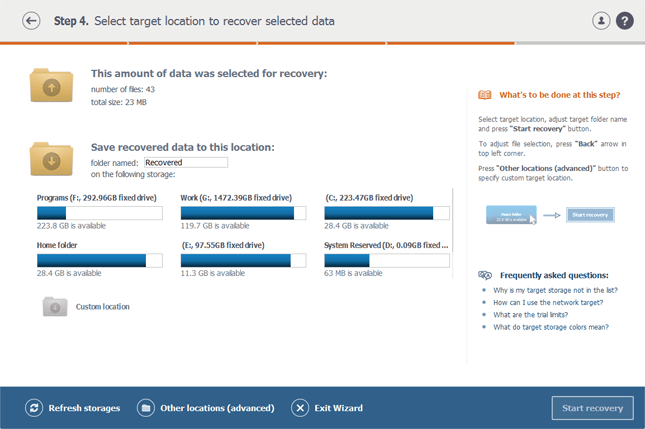
That’s it; you have your data back. You can access it whenever you want from the new location you saved your files.
Conclusion
Losing data is something everyone will have to face at some point. Whether it’s in an XFS file system or otherwise, we’ve all been in a situation where we wished there were ways we could get our data back. Luckily, many effective data recovery solutions exist to undelete files on the XFS file system. With the solutions explored in this article, the Linux XFS undelete process is quite easy. You can simply select any of these tools and begin the recovery process.

 ChatGPT
 Perplexity
 Google AI Mode
 Grok
Grok


