
 TL;DR:
Extundelete restores deleted files and directories on Linux EXT3 and EXT4 file systems by rebuilding data blocks from journal entries, provided the target drive is completely isolated from read and write operations.
● Users must strictly unmount the target partition using the umount command before running recovery flags like --restore-all, because executing Extundelete on a mounted or busy drive risks corrupting the entire disk.
● The command-line utility recovers approximately 2 GB of data per minute but requires manual compilation from source files using the ./configure and make commands prior to installation.
● Wondershare Recoverit serves as a GUI-based alternative for users seeking to avoid command-line errors, allowing remote data recovery from crashed Linux devices via an IP and port connection.
Ask AI for a summary
 ChatGPT
 Perplexity
 Gemini
 Claude
 Grok
Grok
Part 1. What Is Extundelete?
Extundelete is an open-source command-line utility that allows users to recover deleted files from a Linux EXT3 or EXT4 file system. It is designed to be efficient in both recovering individual files or entire directories. The utility works by scanning the file system and creating copies of any deleted inodes. These can then be inspected, backed up or restored.
One of the main benefits of using Extundelete is its ability to scan and undelete files without damaging the existing file system. This makes it ideal for situations where data must be recovered without any loss or corruption.
Features of Extundelete
Extundelete comes with several valuable features. A few notable ones include:
- Searching for and recovering recently deleted Files and directories,
- Recursive scanning for recovery possibilities,
- Ability to search for files by inode number, file type or pathname,
- Filtering results based on file attributes such as size, modification time and access time,
- Supports the EXT3 and EXT4 file systems with journal and directory index data structures,
- Allows the user to recover only specific types of files such as text documents, images etc.
How Does Extundelete Work?
When scanning a partition, Extundelete uses the information within its journals to locate the relevant images of lost data. EXT3 and EXT4 partitions have journals registering the type and volume of data stored on the drive. If the disk isn’t wiped, that journal offers enough information to locate and rebuild data blocks from scratch and recover them to a designated directory.
Once the scan concludes, Extundelete requires the user to output the results in an inode or block form. An inode is best for recovering small files such as documents, pictures, and compressed videos, whereas blocks are better suited for large files like video games and server upgrade projects. When you obtain the required scan results, you can restore the desired files or use the ‘restore-all’ command to restore all the files in a new directory. The Extundelete restore directory is located within the same drive where you install the software. Although, you can also change the output path to your desired location if you wish.
Extundelete also allows users to recover large sections of drives, called superblocks, without any issues. That’s a helpful feature turned on by default if you desire to retrieve data from drives that contain multiple partitions.
Part 2. How To Restore Deleted Files or Directories Using Extundelete?
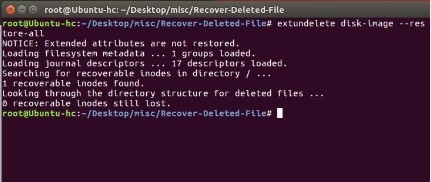
It helps to note that Extundelete can only work on unmounted drives. It may corrupt the entire disk if you try to access the required drive when it’s still mounted or under heavy read/write operations. Thus, you should isolate the drive using the following command.
$ mount
/dev/sda7 on /home type ext4 (rw)
$ sudo umount -l /home
You might get an error when trying to unmount the drive, stating that the “device is busy.” That’s why you should verify the mounted drive with the required file system. Once you’re done with that, you can conveniently unmount the drive to your desired destination. The above code chooses ‘home’ since it’s readily accessible by Extundelete for Linux, even with limited access.
Download Extundelete
Downloading Extundelete on your Linux distribution of choice is straightforward. You can visit Sourceforge and follow the steps mentioned below.
- Type “Extundelete” within the search bar and press Enter.
- Choose the result that’s developed by ‘necase.’ It’s a verified download link with the latest version available free to download.
- Click on the Download button.
Compile and Install Extundelete
Compiling and installing Extundelete just requires two commands. You must enter them as mentioned below, pressing the Enter key after each line.
Sudo apt-get update
Sudo apt-get install extundelete
Note: The above command is for Extundelete Ubuntu or related Debian Linux distributions. It may differ for the kernel on your system. In order to compile the program, you must enter the command “./configure” from the directory that contains the core files. The configuring step ensures all the necessary programs to install and run Extundelete are ready. Then, run “make” from the same directory to compile the program. You can then locate an executable file called “extundelete” in the “src” directory.
Restore Files Using Extundelete
You can restore all lost files or select specific ones when using Extundelete for Linux. The following process details all the steps involved.
- Unmount the required partition using the command:
$ sudo umount -l /home
You can replace ‘home’ with your desired directory.
- To restore all deleted files, type the following command within the terminal and press Enter.
Extundelete /dev/sda4 - -restore-all
- To recover specific files, you can use the following command. Replace ‘dirname’ and ‘filename’ with the location and name of the file as required.
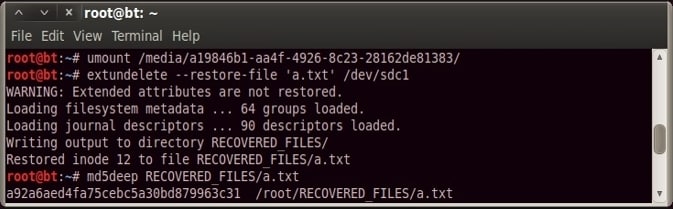
sudo extundelete /dev/sdb1 --restore-file /dirname/filename
Restore Directory Using Extundelete
To recover entire directories using Extundelete, just enter the command mentioned below and press Enter.
sudo extundelete /dev/sdb1 --restore-directory /dirname
Replace ‘dirname’ with the appropriate name of the directory. Keep in mind that it will take longer than usual, depending on the directory size. Usually, Extundelete recovers 2 GB every minute.
Examples of Extundelete
Part 3. The Best Alternative to Extundelete for Data Recovery on EXT4
While the Extundelete installer for Linux is free to use, it has several limitations. You can’t use the drive that undergoes recovery, nor can you ensure a thorough scan after repeated attempts. There’s also the possibility of you making a mistake when typing the various commands.
Therefore, a GUI-based data recovery tool thoroughly scans each drive is much more practical. Wondershare Recoverit Linux Recovery is one such program that can improve upon those limitations. It comes with several valuable features, like the ones described below.

Wondershare Recoverit - Your Safe and Reliable Linux Recovery Software
5,481,435 people have downloaded it.
Recovers lost or deleted documents, photos, videos, music, emails, and other 1000+ file types effectively, safely, and completely.
Compatible with all mainstream Linux distros, including Ubuntu, Linux Mint, Debian, Fedora, Solus, Opensuse, Manjaro, etc.
Assists in 500+ data loss scenarios, such as deletion, disk formatting, OS crash, power outage, virus attack, lost partition, and many more.
Works through a remote connection. You can recover lost data even when your Linux device is crashed.
Follow the below-mentioned steps to recover deleted files and directories from your linux device using Wondershare Recoverit.
Step 1: Choose Linux Recovery
Launch the Extundelete alternative after installation and navigate to the NAS and Linux on the left-hand side of the main interface. From there, select the Linux Recovery option to initiate the process.

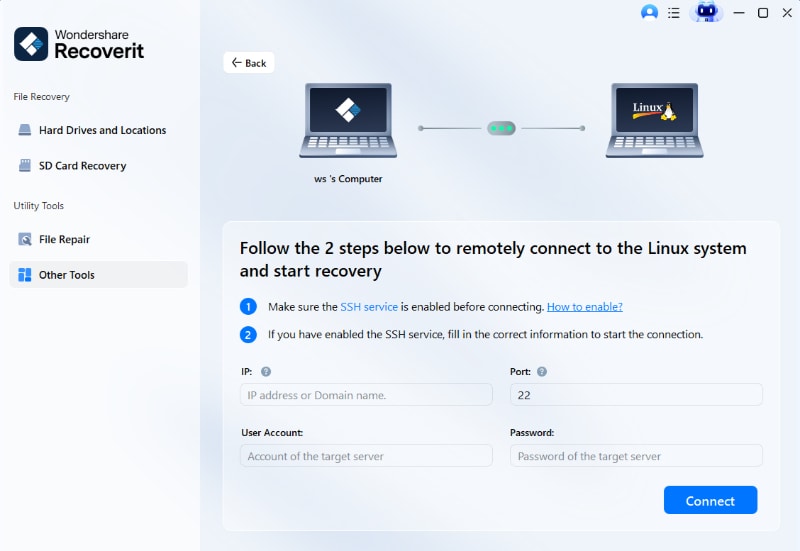
Step 2: Connect to Your Linux Device
A dialog box will appear where you can input the IP, Port, User Account, and Password of your Linux device for remote connection. After completing the information, initiate the connection by clicking the Connect button.
Step 3. Scan and Recover
Upon a successful connection, Recoverit will initiate an automated scan to search for any missing files on the Linux PC. Once the desired file is located, the scan can be stopped and the file restored.

Once the scan completes, preview the files to ensure they are the desired ones for recovery. Then, press the Recover button to save the files to the Linux device.

For Windows Vista/7/8/10/11
For macOS X 10.10 or later
For Windows Vista/7/8/10/11
For macOS X 10.10 or later
Conclusion
Data recovery in Linux is relatively complicated compared to Windows and Mac OS. While Extundelete is a viable option for regular cases, you can take advantage of premium features through Wondershare Recoverit with a pocket-friendly plan. It also ensures a more thorough PC scan without affecting the hardware performance.


