


 TL;DR:
To undo an ESD-USB conversion and restore your external drive to its normal capacity and NTFS format, you must format the drive, which requires recovering or backing up your data first since the Windows Media Creation Tool wipes existing files.
● **Data Recovery First**: If you accidentally converted your drive to an ESD-USB and lost files, use a tool like Wondershare Recoverit (available for Windows and Mac) to scan and recover the lost data, ensuring you save the recovered files to a *different* storage device before attempting to fix the ESD-USB.
● **Fix via File Explorer**: You can quickly restore the drive by right-clicking it in Windows File Explorer, selecting "Format," setting the File System to NTFS with an allocation unit size of 2048 bytes, and checking the "Quick Format" box.
● **Fix via Command Prompt**: For a more thorough reset on Windows 7/8/10, open Command Prompt as an administrator, use the `diskpart` utility to select your USB drive, and execute the `clean`, `create partition primary`, `format fs=ntfs`, and `assign` commands in sequence.
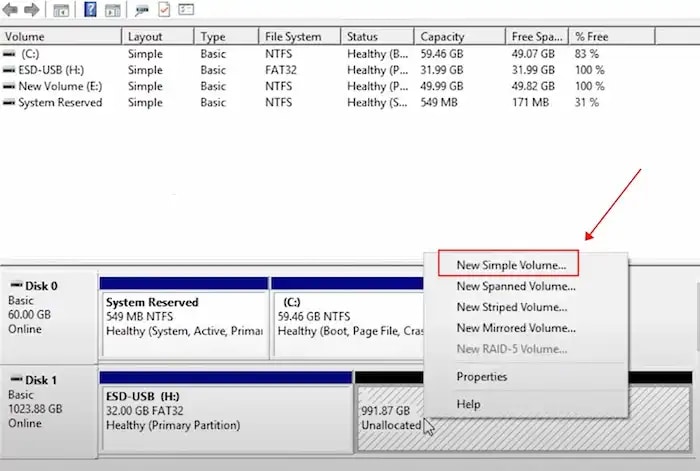
● **Fix via Disk Management**: Since the ESD-USB process only allocates a 32 GB partition and leaves the rest of the drive unallocated, open Windows Disk Management, right-click the unallocated space, select "New Simple Volume," allocate the maximum disk space, and format it to NTFS.
Ask AI for a summary
 ChatGPT
 Perplexity
 Gemini
 Claude
 Grok
Grok
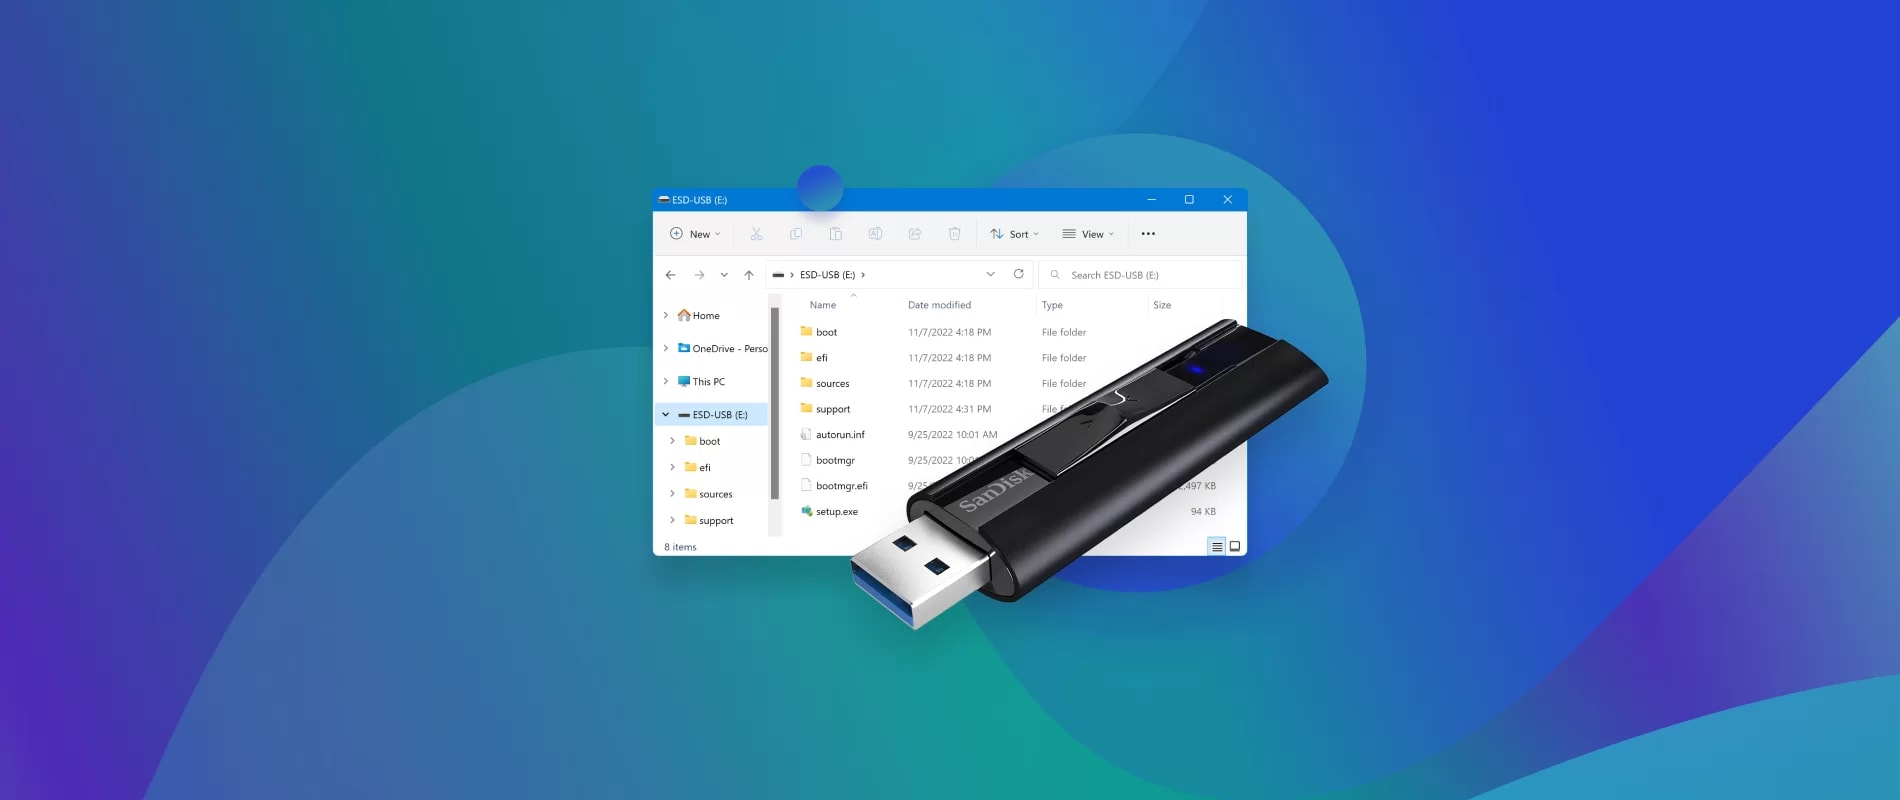
ESD USB, or Electronic Software Delivery USB, is a type of flash drive used for installing a copy of Windows on your device. When you create or opt for Windows installation using ESD USB, the drive will be formatted and all the data removed. A 32 GB partition will be allocated to the format, and you may not be able to see any additional information.
ESD-USB conversion will often lead to unwanted data loss. Therefore, if you have not backed up the data, this can be problematic for you. If you want the data, you will have to undo the ESD USB and then choose the files accordingly. There are different methods through which you can undo ESD-USB files and then get them back to working normally. This blog will guide you through all the potential ways you can turn ESD USB to normal and recover the data.
Try Wondershare Recoverit to Perform Data Recovery
 Security Verified. Over 7,302,189 people have downloaded it.
In this article

What is an ESD USB?
ESD refers to Electronic Software Delivery. ESD USB meaning refers to the external storage device that will be installed by the Windows system onto the computer. This is mostly an ISO file that has the OS Installer or media creation tool for Windows. As a result, you will be able to create the ESD USB partition in your system.
Usually, a 32 GB hard drive partition is assigned to store all the operating system files. However, when an additional ESD partition is created, it will format the USB drive, thereby deleting all the existing files. Therefore, you will have to carefully handle the ESD_USB file and take a backup of the files to prevent further losses.
How to Recover Lost Data from ESD-USB with Wondershare Recoverit?
If you have lost data from ESD-USB, it is advisable to use a reliable tool to recover the video. One of the most reliable tools for recovering files from ESD_USB is Wondershare Recoverit. This professional data recovery tool will help you recover data from ESD USB efficiently, ensuring no further accidental losses.
Wondershare Recoverit is available for free download for Windows and Mac. It can recover all types of files from the ESD_USB, ensuring that even when it is turned back to normal, you won't have to face much damage.
You need to download and install Wondershare Recoverit on your device. This is to ensure that it works fine and you don't face any challenges with data recovery. You can follow the steps given below to recover lost data from ESD USB using Wondershare Recoverit:
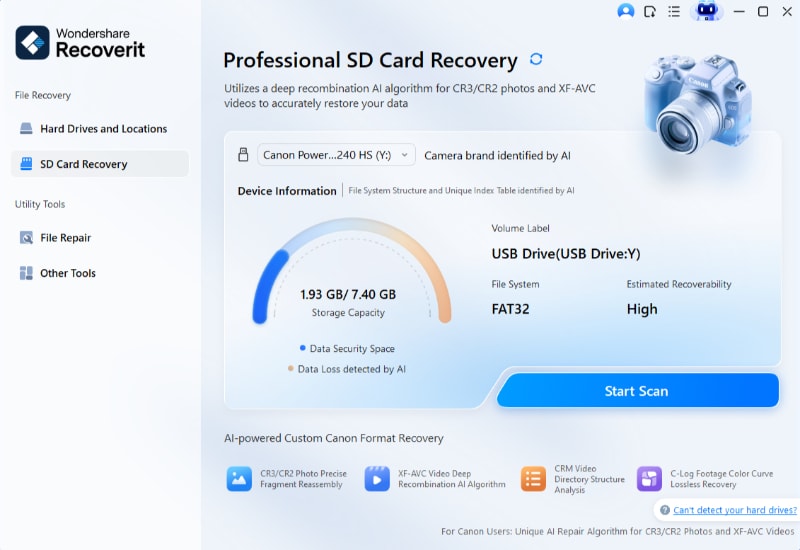
Step 1: Launch Wondershare Recoverit
As soon as Wondershare Recoverit has been downloaded and installed to your system, launch it to perform the system repair. Connect the ESD-USB drive and ensure that the software detects it. Now, click on the SD card section within the Hard Drives and Location option. Hit the Scan button to continue with the scanning process.
Step 2: Scan the ESD USB Drive for Searching Data
Recoverit Flash Drive Data Recovery will begin the scanning process for searching the data. If the data is not found in the first scan, click on the All-around Recovery option. This Recovery option will take a few extra minutes and will ensure that all the data files are recovered.
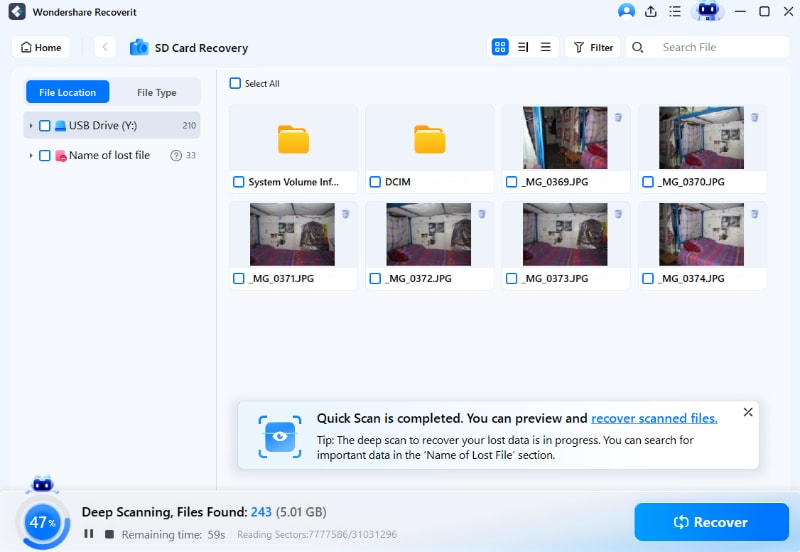
Step 3: Preview and Recover Data from the USB Drive
Once the scanning is complete, you will get the chance to preview all the recoverable files in the ESD USB, such as photos and images. Go through all the data and click the Recover option for the files you want to recover. It will allow you to get your data back.

Wondershare Recoverit is one of the top data recovery software programs that can assist in recovering lost data from the ESD-USB. It also helps in recovering deleted and lost files from other external devices such as digital cameras, mobile phones, and external hard disks.
How to Undo ESD-USB and Get It Back to Normal?
If you accidentally convert your external storage device to ESD-USB, you will have to find ways to restore it to normal. This is extremely important to ensure that the system files in it work normally.
The tips to undo the change and bring the ESD USB to normal are as follows:
Method 1: Format External Hard Drive
Formatting the external hard drive will erase all the data on your hard drive. Once the data is erased, the device will return to its default format of NTFS. However, since formatting the external hard drive will remove data, it is important to back up and store the files on another external hard drive.
Formatting the external hard drive will allow you to store and transfer the data smoothly. You can follow the steps given below to format the external hard drive and bring ESD USB to normal:
Step 1: Press the Windows + E key on your keyboard to open File Explorer on Windows.

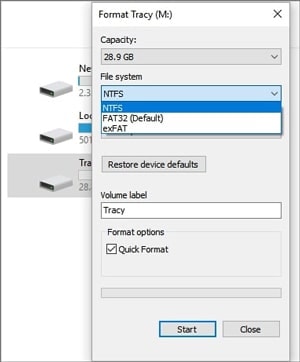
Step 2: Navigate to the hard drive that you want to format and right-click on it. Choose the Format option from the available options.
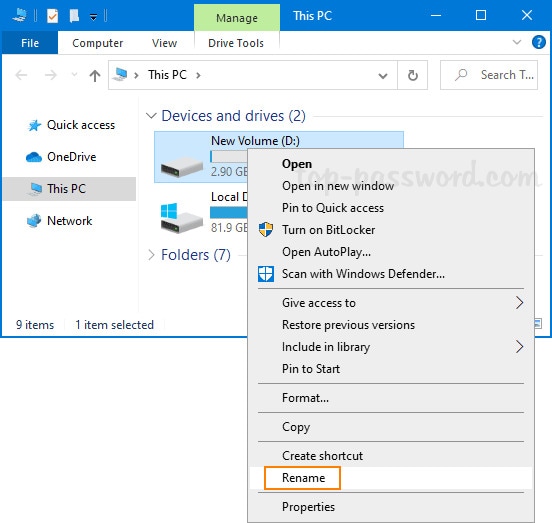
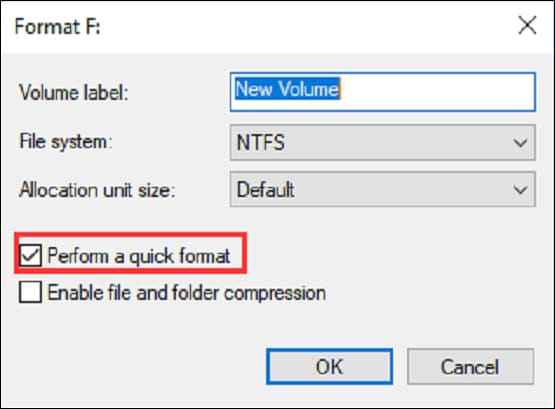
Step 3: Now, you will have to customize the details. Set the File System to NTFS; the allocation unit size must be 2048 bytes.
Step 4: Tick on the Quick Format box and click on Start to begin the formatting process. This will take a few minutes.
Method 2: Undo ESD-USB via Command Prompt
Command Prompt is Windows's built-in command-line interpreter. It is one of the best tools for tech-savvy people as it can play an important role in making changes and fixing devices. The DiskPart feature of Command Prompt allows you to format the ESD USB device completely, thereby changing the same system file to NTFS.
You can follow the steps given below to undo ESD-USB using the Command prompt:
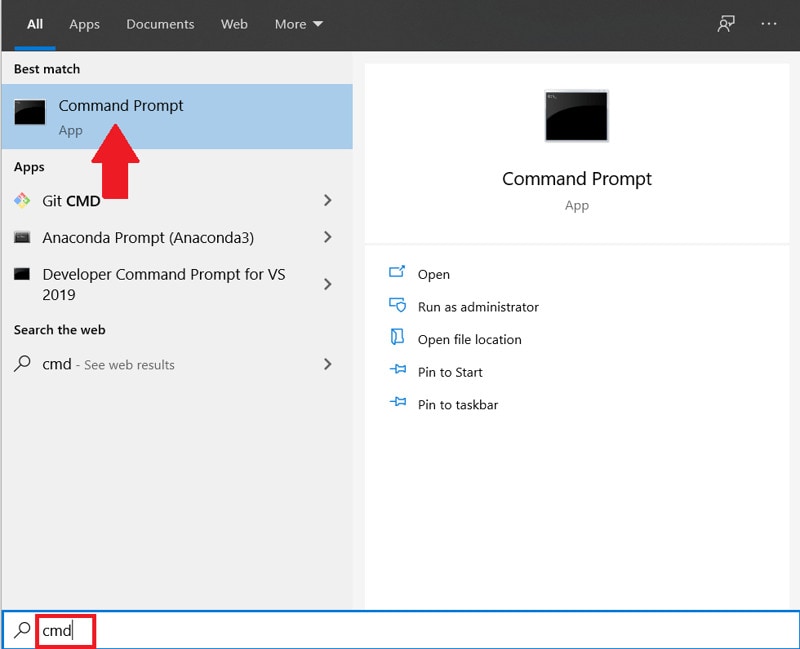
Step 1: Type cmd on the search bar and right-click on the Command prompt option. Choose Run as administrator.
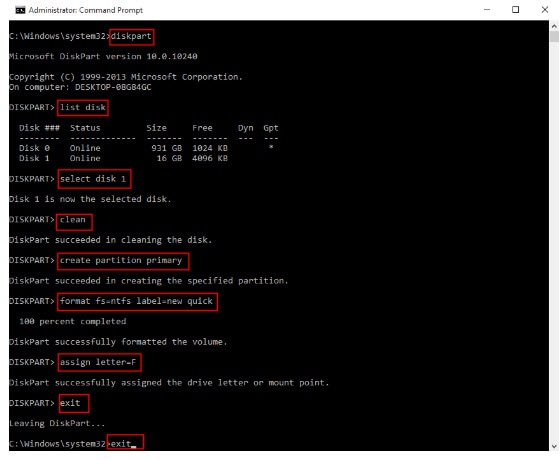
Step 2: Type the following commands and press enter after typing every command:
Diskpart
List disk (Navigate to the disk number corresponding to the ESD USB drive).
Select disk Z (Here, Z refers to the corresponding number of the ESD USB drive you’ve found).
Clean
Create partition primary
Format fs=ntfs
Assign
This method is available for Windows 10/8/7 and is one of the most reliable methods for manually formatting data. However, you need to be mindful to ensure that you're entering the right commands to avoid accidental data loss. Not entering the right commands can lead to complete malfunction, which will be dangerous for your device.
Method 3: Create a New Volume
If you want to erase all data from your drive, you must create a new partition. Furthermore, it will also play an important role in saving data across recovery methods.
ESD_USB will completely format the drive and only allocate around 32 GB of the total capacity to the format. The remaining space or storage will be allocated for the NTFS format. Therefore, you can create a new volume using the steps given below:
Step 1: Open Windows Disk Management on your system.
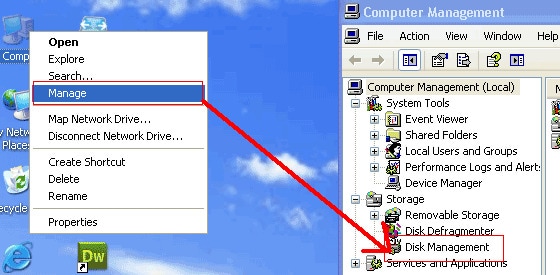
Step 2: Go through the list of drives available on the Disk Management system and choose the external hard drive. Now, right-click on the unallocated space.
Step 3: Select New Simple Volume and enter the size of the partition you want. It is advisable to enter the maximum disk space.
Step 4: In the next screen, select format this volume and then convert the same to NTFS format.
Step 5: Choose the ‘Perform a quick Format' option and proceed with it.
This will restore your hard drive to its original state, allowing you to use this storage device again.
Tips to Prevent USB Data Loss
The Windows Media Creation Tool tends to delete everything stored in external storage devices. Therefore, you must convert them to SSD-USB to ensure that no data is lost.
Here are some of the common tips to prevent USB data loss:
Tip 1: Create Bootable Media on a Blank Hard Drive
You will have to create a bootable media on a blank hard drive to undo ESD-USB and prevent data loss. Even when you're maintaining the external hard drive in the best condition, there will always be a risk of losing the data.
Rather than using this drive, you may use an alternative external storage with significant space. This is a type of bootable media on the hard drive that you can use to prevent the risk of data loss in your external hard drive.
Tip 2: Back up Data to Somewhere Else
One of the easiest ways to protect yourself against unwanted data loss is to create a backup of the drive. Some of the common ways through which you can create a backup and save the data to the external drive are as follows:
- Copy the files from the external hard drive to the new external drive for backup.
- Copy the files from the external drive to your PC. Then, store them in any folder in the documents.
- Turn on automatic backup on Google Drive or OneDrive. This will create automatic backups every time you plug the drive into the PC.
If you back up the data from the external hard drive into the Cloud, you will have to be mindful of the storage limitations. If you cannot back up a lot of data and have only a limited amount of data to deal with, you may use the Cloud.
Conclusion
Now that you know how to undo the ESD USB file error, make sure to use it correctly. You will have to be mindful of the device, or it can lead to accidental deletion. There are different methods that you can adopt to undo and recover the files that have been accidentally deleted or converted to the ESD_USB format. You may download a file recovery tool to recover the deleted files easily.
FAQs
1. How do I remove ESD from the USB?
You can remove ESD from USB using the command prompt. It is a type of data formatting. Therefore, you will have to take a backup of all the files.2. What is a Windows 10 ESD USB?
Windows 10 ESD USB refers to the electronic software delivery file for installing and upgrading the Windows operating system. Compared to the traditional media installation process, this is a better option and assists in quick downloading and meeting a higher transfer speed. Moreover, it takes up less space on the drive which is why most people prefer it.3. Can I format ESD USB?
Yes, you can format ESD USB files. You will have to use Disk Management, and CMD Prompt to format the ESD USB drive. Apart from that you can also format the same from Windows File Explorer option.4. How to use ESD USB?
You can use ESD USB by plugging the same to the USB port into the system. You can also access the same from Disk Utility and Disk Management. You can also integrate the same with your Windows to continue using it.


