


 TL;DR:
To resolve 100 percent disk usage in Windows 10, alleviate system overload by updating device drivers, clearing temporary files, and restricting background processes.
● Disable non-essential launch applications from the Task Manager's Startup tab and change your Control Panel Power Options to "High Performance" to prioritize processing power over energy savings.
● Execute the `chkdsk /f /r` command within an administrator Command Prompt and restart your PC to automatically scan for and repair underlying hard drive errors like bad sectors.
● If troubleshooting procedures result in accidental file deletion, use Wondershare Recoverit (compatible with Windows Vista/7/8/10/11 and macOS X 10.10 or later) to retrieve your lost data.
Ask AI for a summary
 ChatGPT
 Perplexity
 Gemini
 Claude
 Grok
Grok
Many users face 100 disk usage Windows 10. This problem slows the system. It makes your PC sluggish and unresponsive. You need a solution fast to get back to smooth operation.
When disk usage 100, performance drops. It feels like your computer is stuck in slow motion. Tasks take longer than usual. Simple actions become frustratingly slow. It's a common issue that can affect anyone using Windows 10. Recognizing the problem early helps in quick resolution. The sooner you identify the cause, the quicker you can fix it.
Fixing 100 percent disk usage Windows 10 is important. It ensures your PC runs smoothly. A well-performing PC is vital for daily tasks. Whether it's work, browsing, or gaming, you need a responsive computer. Let's dive in and explore solutions to this issue.
Try Wondershare Recoverit to Perform Data Recovery
 Security Verified. Over 7,302,189 people have downloaded it.
In this article

What is 100 Disk Usage Windows 10?
100 disk usage Windows 10 indicates your disk is constantly active. This impacts performance, causing even basic tasks to slow down.
When 100 disk in Windows 10, you need to check what causes it. Only then can you fix it. Recognizing 100 disk utilization on Windows 10 is the first crucial step. High disk usage isn't normal. It indicates a problem that needs addressing. Identifying the cause can be tricky. Several factors can contribute.
Your disk should not always be at 100. If it is, it’s overworked. This can lead to wear and tear. Prolonged usage at 100 percent can damage your hard drive.
What Causes 100 Disk Utilization on Windows 10
Understanding the reasons behind 100 disk usage Windows 10 is key. Here are the main causes:
- Running Too Many Apps: Multiple apps running simultaneously can overload the system. Each app consumes disk space and memory.
- Outdated Drivers: Outdated drivers might not work well with Windows 10. This can cause 100 percent disk usage.
- Windows Updates: While updates improve security and performance, they can also cause high disk usage temporarily.
- Background Processes: Various system and third-party processes can run in the background. These can use significant disk resources.
- Virus or Malware: Malicious software can run without your knowledge.
- Hard Disk Issues: Problems with the hard disk itself, such as bad sectors, can cause high usage.
- High Disk Space Usage: Having very little free disk space can cause the system to overwork.
- Poor System Management: Not managing system settings and resources properly can lead to high disk usage.
- Improper Shutdowns: Sudden shutdowns can cause the system to perform disk checks at startup, leading to high usage.
Pinpointing the exact cause is essential. It enables you to apply the correct solution to minimize 100 disk space Windows 10. Regular upkeep and updates can avert these problems. Keep your system tidy and current to prevent 100 disk utilization on Windows 10.
Fixing the 100 Percent Disk Usage Windows 10 Issue
Handling 100 percent disk usage Windows 10 can be difficult. It slows down your computer. You might find it hard to open apps or files. This issue can cause a lot of frustration. Finding the exact cause is not easy. Many different factors could be behind it.
Let's explore each fix step-by-step.
Fix 1: Restart PC
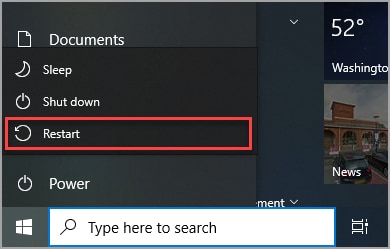
Restarting can solve many issues. Turn off your PC. Turn it back on. This simple step can clear out temporary processes and free up resources. A restart refreshes the system. It can resolve minor software conflicts that cause high disk usage. If your PC has been on for a long time, a restart can give it a much-needed reset.
Fix 2: Update Windows 10
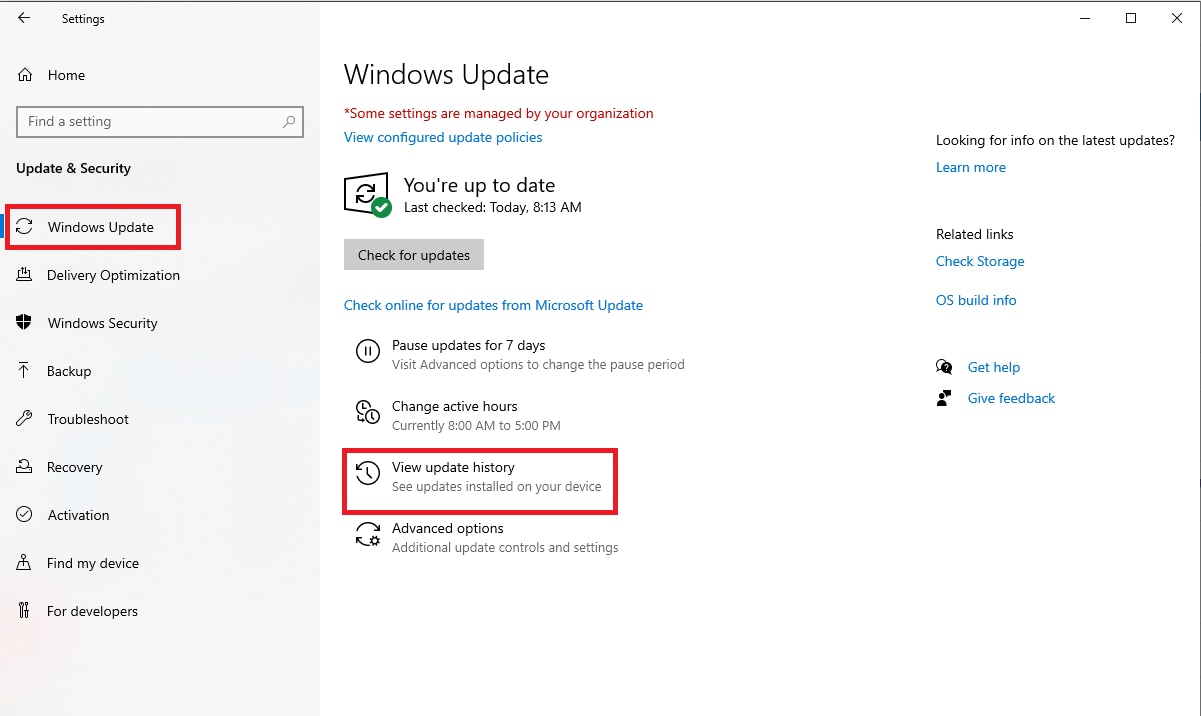
Keeping Windows updated is crucial. Go to Settings. Click Update & Security. Check for updates. Install them. Updates often include performance improvements. They also fix bugs that might be causing high disk usage. After updating, monitor your disk usage. Ensure it's back to normal levels.
Fix 3: Manage Startup Apps

Startup apps can significantly impact disk usage. Open Task Manager. Go to the Startup tab. Disable unnecessary apps. Startup apps run every time you boot your PC. Disabling them reduces the load on your disk during startup. Only allow essential apps to run. This speeds up your PC's startup process.
Fix 4: Update Device Drivers
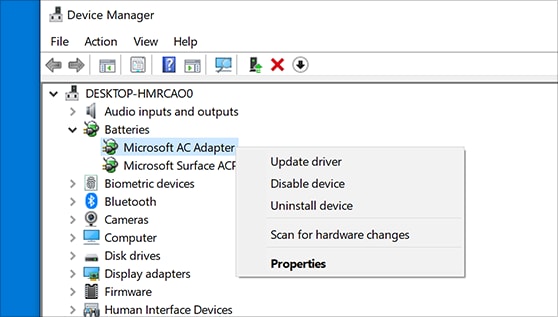
Outdated drivers can cause high disk usage. Go to Device Manager. Update all drivers. Updated drivers ensure compatibility with Windows 10. They can fix issues that lead to 100 disk space Windows 10. Regularly check for driver updates. This keeps your hardware running smoothly.
Fix 5: Use Disk Cleanup
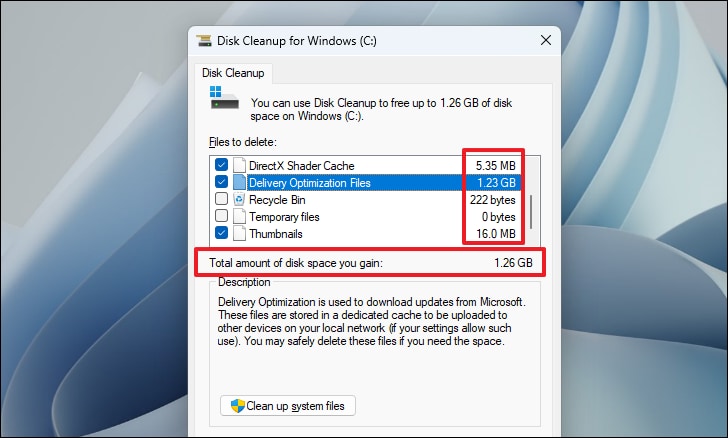
Disk Cleanup is a useful tool. Open Disk Cleanup. Select the drive you want to clean. Remove unnecessary files. These can include temporary files, system files, and trash. Removing these files releases disk space. Regular use of Disk Cleanup can prevent high disk usage. It also improves overall system performance.
Fix 6: Change Power Options
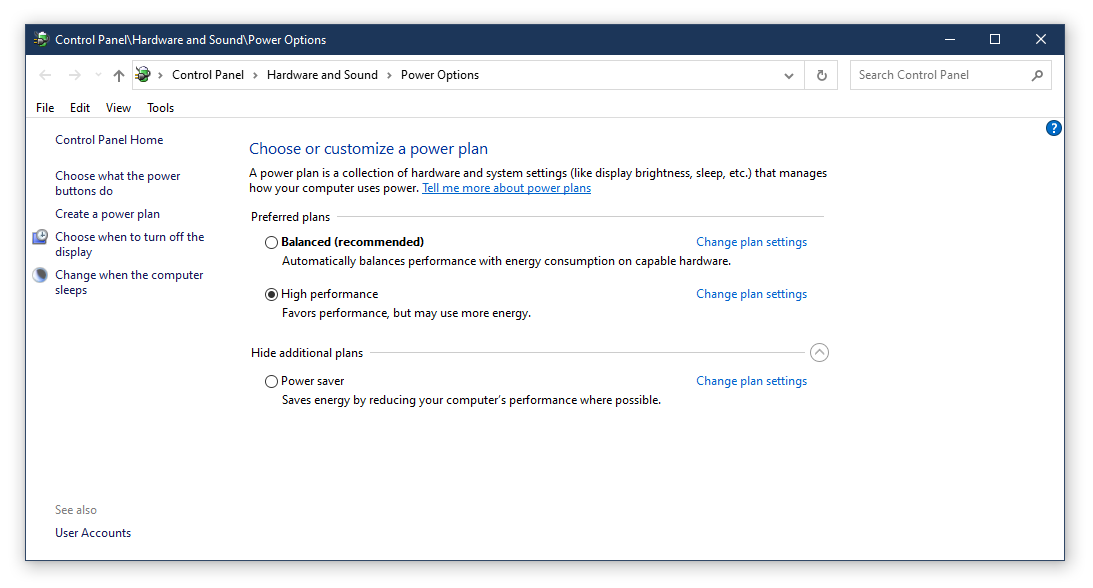
Power settings can affect disk usage. Go to Control Panel. Click Power Options. Choose High Performance. This setting prioritizes performance over energy savings. It can reduce disk usage. Ensure your PC is plugged in when using this setting. It consumes more power.
Fix 7: Run the CHKDSK Command
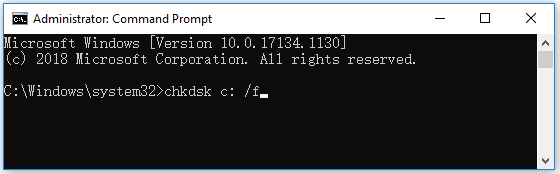
The CHKDSK command checks and repairs disk errors. Open Command Prompt as an administrator. Type chkdsk /f /r. Press Enter. The system will schedule a disk check. Restart your PC to start the check. This command scans the disk for errors and fixes them. It can improve disk performance. Running CHKDSK regularly keeps your disk healthy.
Lost Files on Windows PC? Use the Recoverit Data Recovery Tool
Recoverit is an excellent tool for retrieving lost files. It's user-friendly and dependable, making it ideal for recovering data that might be lost while fixing 100 disk utilization on Windows 10. Troubleshooting can sometimes lead to data loss, but with Recoverit, you can rest assured that your important files are safe.
The simplicity and reliability of Recoverit stand out. Even if you're not tech-savvy, you can easily navigate the tool to recover lost data. This ensures that you don't lose any critical information while addressing high disk usage issues on your PC.
Why Choose Recoverit?
- User-Friendly Interface: Recoverit is easy to use, even for those with limited tech skills.
- High Recovery Rate: It offers a high success rate for recovering lost files.
- Supports Multiple File Types: Recoverit can recover various file types, including documents, photos, videos, and emails.
- Quick Scan and Recovery: The tool provides fast scanning and quick recovery of lost data.
- Preview Before Recovery: You can preview files before recovering them, ensuring you retrieve the right data.
- Advanced Features: Recoverit includes advanced recovery features, such as deep scan and partition recovery.
- Compatibility: It supports a wide range of devices and file systems.
- Reliable and Trusted: Trusted by millions of users globally for data recovery needs.
- 24/7 Customer Support: Access to round-the-clock customer support for any issues or queries.
- Regular Updates: Frequent updates ensure compatibility with the latest operating systems and improvements in recovery algorithms.
Steps to recover files using Recoverit:
- Install Recoverit on your Windows PC. Open the tool and select the drive.

- Scan for lost files.

- Preview and recover files.

Recoverit is user-friendly. It's reliable for data recovery. Even if you’re not tech-savvy, you can use it easily. The steps are straightforward. Recoverit helps in retrieving almost all types of files. Photos, documents, and videos can be recovered. It's a trusted tool for many users.
Conclusion
100 disk usage Windows 10 can be frustrating. You need to act fast. Understand the issue and apply fixes. Regular maintenance can prevent this issue. Keep an eye on disk usage.
Use Recoverit for lost files. This ensures you don't lose important data. Recoverit is a lifesaver in data recovery. Don't let high disk usage cause data loss.
Regular maintenance is key. Keep your system updated and clean. Disk usage should be monitored regularly. A well-maintained PC runs smoothly. Avoid installing unnecessary apps. Keep drivers and system updated.
FAQs
Q1: Why is my disk usage 100?
Disk usage can hit 100 percent for various reasons. It might be due to outdated drivers, running too many applications simultaneously, or a potential virus or malware infection. Background processes, Windows updates, and issues with the hard disk can also contribute. Identifying the specific cause is essential to apply the correct fix and prevent high disk usage from causing further problems.Q2: How do I check disk usage in Windows 10?
To check disk usage in Windows 10, you can use the Task Manager. Open Task Manager by right-clicking on the taskbar and selecting Task Manager. Once open, navigate to the 'Processes' tab. Here, you'll see a column labeled 'Disk,' which shows the disk usage for each running process. If the percentage is consistently high, it's an indication that there might be an issue causing excessive disk usage.Q3: Can 100 percent disk usage damage my PC?
While 100 percent disk usage won't immediately damage your PC, it can lead to long-term issues. Constant high disk usage can slow down your computer significantly, leading to poor performance and extended boot times. Over time, this excessive use can cause wear and tear on the hard disk, potentially leading to hardware failure. Therefore, it's important to address the underlying causes promptly to maintain the health and longevity of your PC.


