


 TL;DR:
To safely resolve a "disk unknown, not initialized" error in Windows without permanent data loss, you must extract your files using a dedicated recovery tool before attempting to repair or initialize the drive.
● Use Wondershare Recoverit to extract inaccessible files first, or use TestDisk to repair the corrupted partition table, though TestDisk's command-line interface requires caution since selecting the wrong partition style (EFI GPT vs. MBR) will wipe your data.
● Shut down your computer and replace or reseat the SATA cable connecting the drive to the motherboard, as faulty or loose hardware connections frequently trigger this error on older HDDs and SSDs.
● Only use the Windows Disk Management tool to initialize the drive if the storage device is brand new or after data recovery is complete, as the initialization process overwrites the boot sector and makes existing files unreadable to the operating system.
Ask AI for a summary
 ChatGPT
 Perplexity
 Gemini
 Claude
 Grok
Grok
Most Windows users experience the frustrating disk 1 not initialized error at least once in their lifetime, and that's especially true for users who've disconnected their HDDs/SSDs for cleaning or transferred older disk drives into newer PCs.
The infamous disk not initialized popup is a widespread occurrence on computers with a Windows operating system, but it's not one you should worry about too much.
In today's guide, we'll explain why “disk unknown, not initialized” happens and how to handle it. We'll also teach you how to recover data from an uninitialized disk, so strap in, and let's get started.
In this article
Reasons Why Your Disk Is Not Initialized
While it's mostly nothing to worry about, a “disk unknown, not initialized” situation isn't something you want to see on your PC when you fire it up. It refers to a disk that hasn't been formatted or initialized for use by Windows or a drive whose partition table became corrupted, making its data inaccessible.
The most common culprits behind the disk not initialized situation are usually the following:
- New Storage Device – If you've purchased a new HDD or SSD, it will likely appear with the disk not initialized popup. These drives are entirely free of data, and you'll first need to initialize and format them to use them.
- Corrupted File System – Whether it's an external disk drive that you haven't used in a while, an older HDD you connected to a new PC, or a situation caused by a power failure, a corrupted disk drive, or one with a broken partition table will frequently appear in disk not initialized situations.
- Bad Cable Connection – Cleaning a computer or transferring hardware from one device to another can cause many problems. The disk not initialized error isn't an exception, and it, too, can be caused by a lousy SATA cable connection.
- Viruses and Malware – While rare, computer infections can also cause the infamous error, as some viruses are known to attack the disk drive's boot sector and partition table.
- Malfunctioning Device – Physically damaged hardware can cause the disk not to initialize. That's especially true for HDDs, as they have many moving parts, and even more so for external HDDs.
- User Error – We all make mistakes. Some of these, like accidental formatting or file removal, can cause your disk to become uninitialized.
Regardless of the cause, your files are likely still on the disk drive, but they won't last long in this state. You'll need to recover data from an uninitialized disk immediately.
How to Recover Data From an Uninitialized Disk
With your precious data in a vulnerable state, recovering it as soon as possible is essential, and you can apply one of the following methods to get your files back.
Recover Data From an Uninitialized Disk With Recoverit
For those looking for a straightforward and effective method to deal with the infamous disk not initialized error, dedicated data recovery tools like Wondershare Recoverit can help. This robust app can see and access your precious files, even if Windows can't.
Characterized by its ability to restore files from over 500 data loss situations and support for 2,000+ storage devices, the app can quickly and efficiently recover data from a disk not initialized situation.
The app also works with 1,000+ file systems and formats, so you'll have no issues restoring photos, videos, music, and documents or recovering data from an uninitialized disk.
Wondershare Recoverit's user interface is remarkably straightforward and beginner-friendly. Even if this is the first time you've encountered the disk not initialized error, you'll have no problems navigating the app's process and recovering data from an uninitialized disk.
Here's how you can do that:
- Launch the app, click Hard Drives and Locations, then select an uninitialized disk drive.

- The app will launch a deep scan of the disk drive. The app's deep scan technology digs deep through storage devices, finding even long-lost files. It'll have no problem accessing your initialized disk, its boot sector, or the partition table and recovering data from the HDD/SSD.

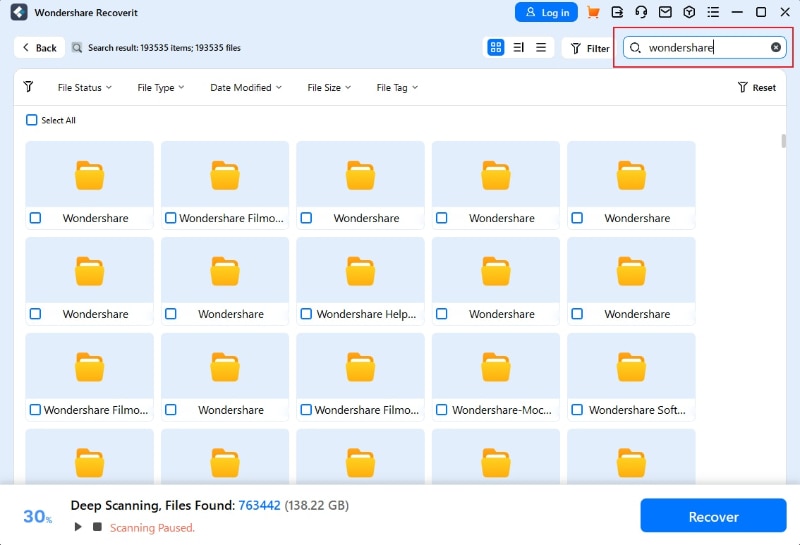
- You can adjust the app's file filters to search for specific file types or sizes.

- You can also add keywords to look for specific files.
- When it finds data, Recoverit will let you preview it. Tap the Preview button to ensure it's the item you're searching for before recovering it.

- Finally, click the Recover button to save the discovered items to your PC. Remember to save to a different disk drive from the one from which the files are being recovered.

Recoverit's 20 years of industry experience and 35 patented technologies will tremendously help in any data loss situation, including the “disk not initialized” cases. Its many satisfied customers can also vouch for the app's data security and privacy protection, making it indispensable in any data loss situation.
Recover an Uninitialized Disk by Reconnecting the Drive
More often than not, the disk unknown, not initialized error is connected to the cable and not the disk drive itself. That's especially true when users connect an older HDD/SSD from a broken computer to a new one or use an older SATA cable.
Fortunately, troubleshooting this issue is often straightforward, and all you'll need to do is this:
- Shut down the computer and then turn off the power supply.
- Remove the side panel.

- Disconnect the HDD/SSD cable on the motherboard and the disk drive.

- Reconnect the disk drive on both ends, turn on the power supply, and turn the PC on.
If using the same cable and disconnecting and reconnecting the disk drive doesn't help, you can also try a new SATA cable. It's highly recommended that you use a cable that came with your motherboard box, especially if you're putting an HDD/SSD from an older or broken PC into a new one.
Restore the Partition Table With TestDisk
If you're sure the SATA cable isn't the issue, you can start focusing on the disk drive itself. Restoring the HDD or SSD's partition table is the first thing to try here, as it'll make your files accessible again.
You can do that with Testdisk, a powerful data recovery tool focusing on recovering partitions and making unbootable disks bootable again.
Here's how:
- Download TestDisk from the official website and launch it on your PC.
- Choose the Create option and hit Enter.

- Select the uninitialized disk drive, choose Proceed, and tap Enter again.

- When you get to the partition table types, continue with the default option, as TestDisk can automatically detect the partition table of your HDD/SSD.

- Select the Advanced option.

- Pick a partition, press Enter on the Boot option below, and select BackupBS.

- Confirm your choices, let TestDisk do its thing, and then restart the PC when it's done.
While effective, TestDisk uses a command-line interface (CLI), making it challenging for beginners. Furthermore, choosing the EFI GPT option for an MBR (the Intel option) disk drive or vice versa will wipe your data, so you must be careful.
Initialize the Hard Disk Using Disk Management
If you encounter the “disk not initialized” popup for a fresh HDD or SSD you just added or one that doesn't hold valuable data yet, you can also use the built-in Disk Management tool on any Windows operating system.
Here's how to do that:
- Right-click the Windows Start menu and select Disk Management.

- Wait for the tool to read your disk drives.
- If you see the Initialized Disk prompt, leave the partition style (MBR or GPT) as the default selection and hit OK.

- Alternatively, right-click an uninitialized disk drive and tap Initialize Disk.

Conclusion
The disk unknown, not initialized error is a frustrating and common occurrence on Windows machines. It can happen for various reasons, including corrupted file systems and partition tables, lousy SATA cable connections, virus infections, faulty HDD or SSD, and user error. The popup will also appear for new HDDs and SSDs you just added to the PC.
Fortunately, this issue is nothing to worry about in most cases, and you can recover data from an uninitialized disk with multiple methods.
The first step is to use a professional data recovery tool like Wondershare Recoverit to recover data from a disk-not-initialized situation. This robust app can see and access your disk's data, even if the Windows OS can't, allowing you to restore files before attempting to fix the situation.
From there, disconnecting and reconnecting your disk drive's SATA cable on both ends, restoring the drive's partition table with TestDisk, and initializing the disk with Windows' built-in Disk Management are all excellent fixes.
However, none should be used before recovering data from an uninitialized disk.
FAQ
What Does Initializing Disk Mean?
A question can always appear on many technology forums - Does initializing a disk erase it? The answer is of course YES. That is also what we want to tell you - Do not initialize a hard disk unless it is extremely necessary.
Initializing a disk may wipe almost all the data present on the initialized disk. Oftentimes, we initialize a hard drive to create partitions on the disk and then format the partition to create a file system. This action should only be done when you plug a brand new hard disk that hasn't been used and formatted yet.Disk 1 is not initialized. What can I do?
While seeing the disk 1 not initialized error can be frightening and frustrating, there are a couple of ways to tackle this issue. You can try some of the following fixes:
1. Recover data with a professional data recovery tool like Wondershare Recoverit;
2. Reconnect the disk by disconnecting and reconnecting the SATA cables;
3. Restore the partition table with a data recovery tool like Testdisk;
4. Initialize the disk with Windows' built-in Disk Management tool.
5. You can also try changing the disk's drive letter or formatting the HDD/SSD, but these actions will result in data loss and are only applicable to new disk drives.Will my data be erased if I initialize a disk?
Not necessarily. Initializing a disk is undoubtedly a destructive process that involves creating or recreating the drive's first sector – the boot sector. That's either the Master Boot Record (MBR) or the GUID Partition Table (GPT), hence the popup asking you to choose when you click initialize.
The process deletes only this sector, which acts as a map of your drive's partitions, making your data unreadable and seemingly lost. However, the files still exist on your disk drive, and you can access them with data recovery tools.Is it possible to recover data from an uninitialized disk?
Absolutely! If you ever encounter the “disk unknown, not initialized” popup in Windows, staying calm is essential. It doesn't mean that your data is gone; it's just that Windows might be unable to read the disk drive.
However, data recovery apps can still see your files and help you recover data from an uninitialized disk quickly and efficiently.How to recover data from an unknown, not initialized hard drive?
The safest way to recover data from an uninitialized disk is to use a professional data recovery tool like Wondershare Recoverit. Here's how you can do that:
1. Launch the app and scan the disk drive.
2. Select the files you want to restore and tap Recover.
3. Save the recovered data to another HDD/SSD.
This process should always be the first step in any “disk-unknown, not-initialized” situation, as it ensures your data stays safe even if the HDD/SSD can't initialize or wipes your data when it does succeed.


