
Synology NAS DLNA is widely popular, but only some users know they can access their multimedia files from this advanced solution. Whether you want to read emails, open documents, listen to music, or watch videos, you can easily do that with Synology NAS via DLNA/UPnP.
Here is a detailed guide to using Synology NAS to browse and open all multimedia files. If that is something you’re interested in, make sure to keep reading.
What Is DLNA?
DLNA stands for Digital Living Network Alliance, a non-profit organization that creates guidelines for devices to share digital media in a home network.
DLNA defines a standard for sharing digital media such as music, photos, and videos over a network. It provides a common platform for devices such as TVs, smartphones, tablets, and game consoles to communicate with each other and stream media. DLNA-certified devices can connect wirelessly or through a wired network and stream content without additional cables, drivers, or software solutions.
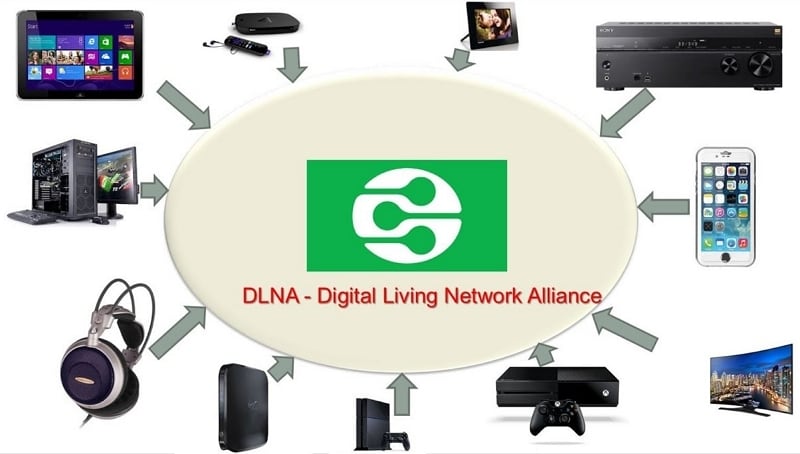
DLNA uses Universal Plug and Play (UPnP) networking protocols to connect and control devices, and it supports a range of media formats, including JPEG, MP3, and MPEG. DLNA also includes a Digital Media Server (DMS), which allows devices to access media content from a server, and a Digital Media Player (DMP), which enables devices to play the content.
In a nutshell, DLNA enables users to easily share their digital media across various devices and platforms, providing a seamless and convenient entertainment experience.
What Is UPnP?
UPnP stands for Universal Plug and Play. It’s a set of networking protocols that enable devices to discover and communicate with each other on a local network. UPnP simplifies communication between devices on the same network without requiring manual setup or configuration.
UPnP allows devices to discover and connect on a network automatically. A series of protocols and messages enable devices to request and share information such as IP addresses, port numbers, and device capabilities. That way, devices can communicate and interact with each other, even if they are from different manufacturers and use different protocols.
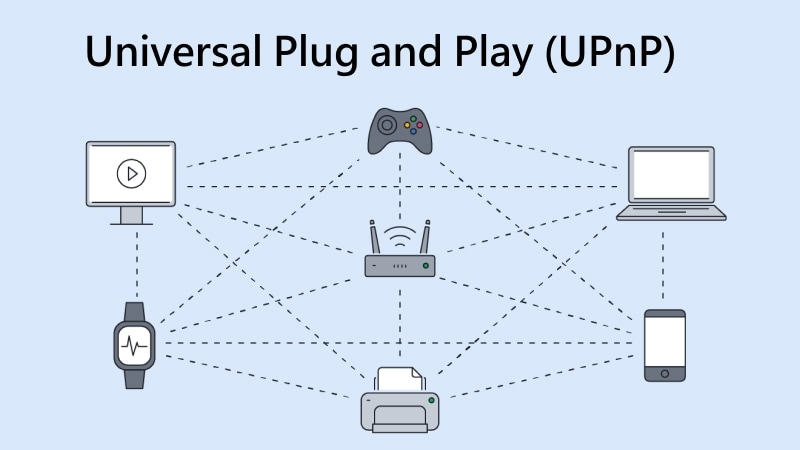
One of the most common uses of UPnP is allowing devices to share media content such as music, photos, and videos over a network.
For example, a UPnP-enabled TV can discover a UPnP-enabled media server on the same network and access its files without configuration or setup. UPnP is also popular in other applications like network printing, remote desktop, and internet gateway devices.
Since the purpose of UPnP is to simplify the process of connecting and communicating with devices on a network, it makes it easier for users to share, access, and enjoy digital content.
Functions of DLNA/UPnP
Having in mind the DLNA/UPnP technology enables devices to communicate and interact with each other on a local network, some of its essential functions include:
- Media streaming: DLNA/UPnP allows devices to discover and stream media content from each other. For instance, a DLNA-enabled TV can stream photos, music, and videos from a DLNA-enabled media server on the same network.
- Remote control: DLNA/UPnP can help remotely control other devices. With this technology, many people use a smartphone or tablet to control a DLNA-enabled TV or stereo system on the same network.
- File sharing: DLNA/UPnP can also help share files between devices on a network. Whether you want to share documents, photos, or other files between computers or mobile devices, the DLNA/UPnP technology will allow you to do that easily.
- Print sharing: DLNA/UPnP can share printers on a network, making it easy for multiple devices to print to the same printer. That is a game-changer for companies with an increased workload.
- Network security: DLNA/UPnP can help configure and manage network security settings, such as firewalls and port forwarding. This feature ensures the devices on the network are secure and safe from external threats.
With the functions above in mind, you understand that the DLNA/UPnP technology provides a convenient and easy way for devices to connect and interact on a local network. Users can share media, files, and other resources without complex configuration or setup.
Component |
Requirement for DLNA |
2026 Performance Tip |
| NAS Hardware | Synology DiskStation (All models) | Use Plus (+) Series for 4K video transcoding. |
| Network | Local Area Network (LAN) | Use Cat6a/Cat7 or Wi-Fi 7 for stutter-free 8K streaming. |
| Software | Synology "Media Server" Package | Keep DSM updated to 7.2 or later for security. |
| Client Device | Smart TV, PS5, Xbox, Mobile | Ensure the device is DLNA-Certified. |
How To Access Multimedia in Synology NAS via DLNA/UPnP
Considering the Synology DLNA server has so many functions and benefits, Synology users increasingly want to know how to access multimedia content via this technology. The process is simple; this step-by-step guide will show you how to access your multimedia content quickly and easily on Synology NAS through DLNA/UPnP.
DLNA vs. UPnP vs. Plex
Feature |
DLNA / UPnP |
Synology Video Station |
Plex Media Server |
| Setup Difficulty | Very Low (Plug & Play) | Moderate | High |
| Rich Metadata | No (Folders only) | Yes (Posters/Ratings) | Excellent (Full Library) |
| Remote Access | Local Network Only | Yes (QuickConnect) | Yes (Plex Pass/Remote) |
| Compatibility | Highest (Universal) | High (App based) | Moderate (App based) |
Step 1: Set Up Your Synology NAS
The first thing you should do is set up your Synology NAS. Before you start the installation and setup process, ensure your NAS is plugged in and has stable internet access. Once you secure that, it’s time to set up your Synology NAS.
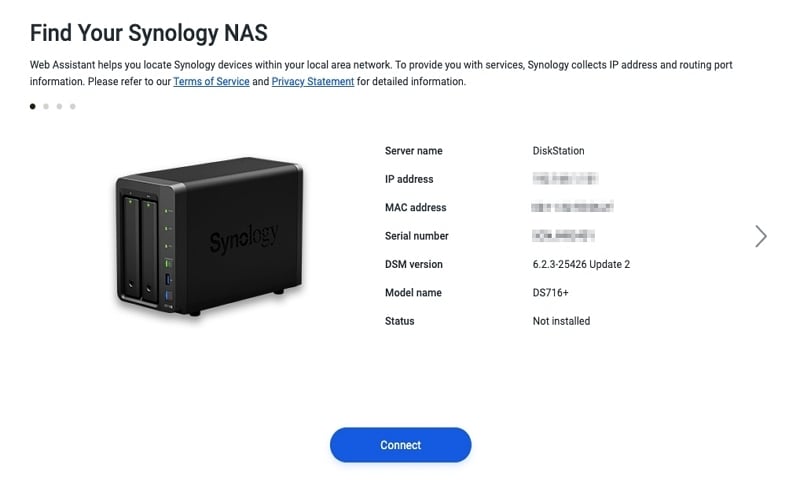
- Visit the http://find.synology.com web page via a web browser on your computer.
- Go to synologynas:5000 and allow the launch of the Web Assistant in your web browser. The Assistant will look for any Synology devices on the local network; at this point, it will display the Not installed message regarding your device’s status.
- Click Connect.
- Accept the End User License Agreement.
- Select Install.
Step 2: Set Up Your DSM
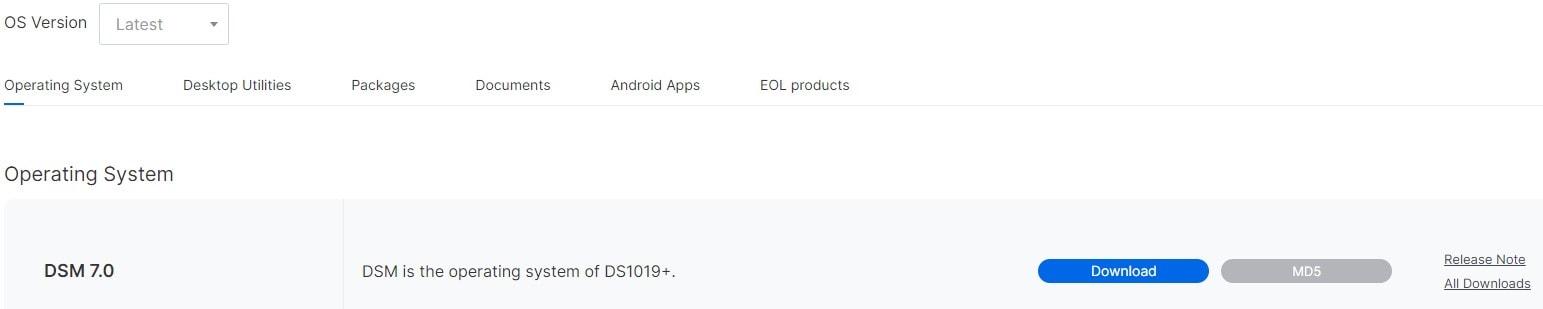
The next step is to set up your DSM. If you’re using DSM 7, you need to download the latest version of DSM from Synology’s Download Center.
- Select the NAS model you’re using.
- Select your series in the OS Version section.
- Download the corresponding DSM Operating System.
- Tick the box next to the I understand that all data on these drives will be deleted text.
- Click Continue.
- Wait for DSM to install and reboot.
- Visit http://find.synology.com and connect to your DiskStation.
- Choose a Server Name, Username, and Password for your DiskStation.
Step 3: Install the Synology NAS Media Server
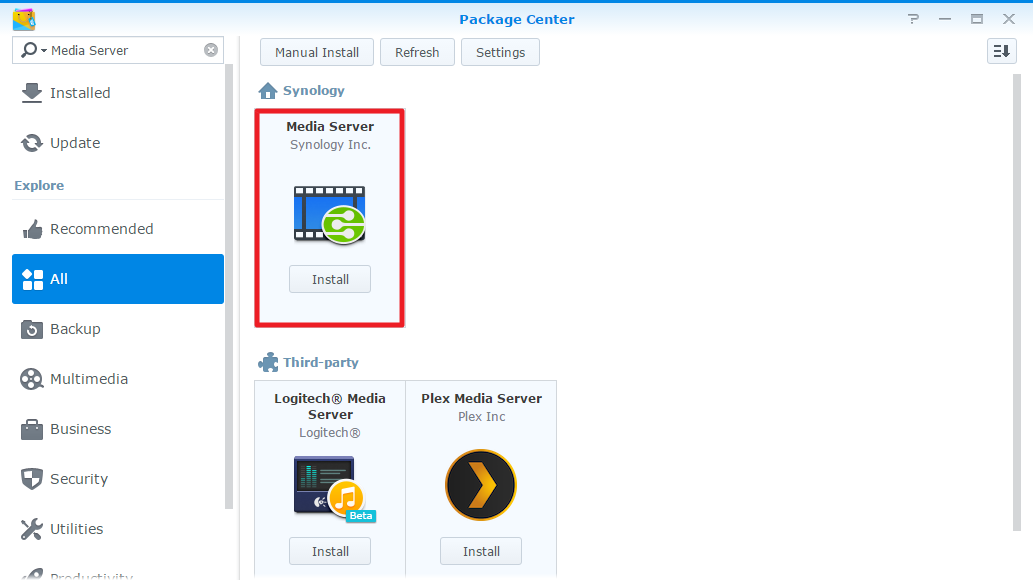
After installing and setting up the Synology NAS and DSM, it’s time to install Synology NAS Media Server. You can do so in three quick and easy steps:
- Go to the Package Center.
- Find Media Server.
- Click Install.
Step 4: Configure the Synology NAS Media Server
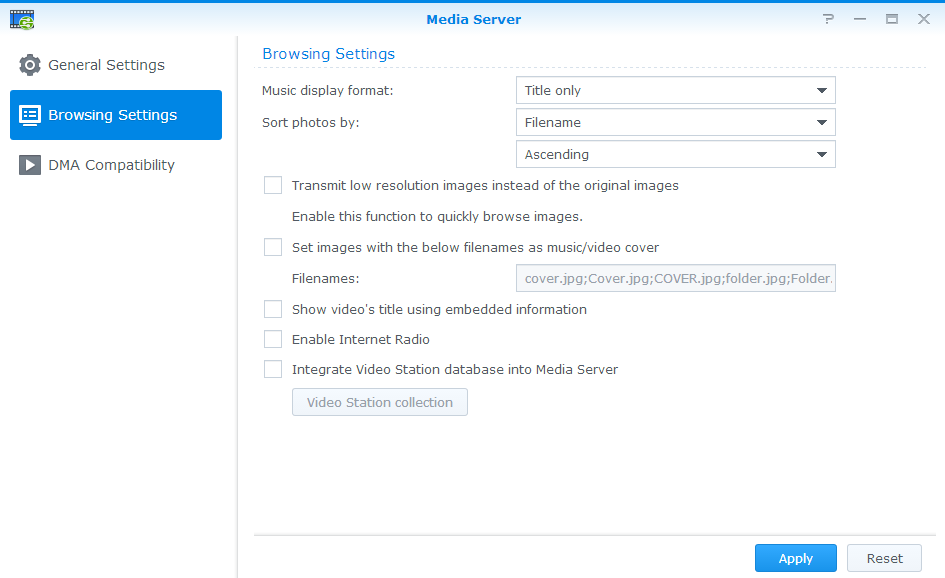
You can configure how different DMA devices browse the media files on your Synology NAS. You can complete the configuration in three steps:
- Go to the Main Menu.
- Click Media Server.
- Choose Browsing Settings in the left panel.
Expert Tip: Enabling Video Transcoding for 4K Playback If your DLNA device (like an older Smart TV) cannot play specific video formats, you can enable Video Transcoding. In the Media Server settings, navigate to DMA Compatibility. Check the box for "Enable video transcoding" and "Enable audio transcoding". This allows your Synology NAS to convert files into a compatible format in real-time. For high-resolution 4K/HDR content, ensure your NAS has a hardware encryption engine to prevent CPU lag during playback.
Users can always receive additional assistance by clicking the Help button at the top-right corner of the Media Server’s window.
Step 5: Access Media Using DLNA/UPnP
As previously mentioned, DLNA/UPnP allows your devices to connect to your home network seamlessly. When you secure the home network connections of the Synology DLNA devices, you can browse the folders that contain multimedia files in them. Whether you want to watch videos or listen to music from your Synology NAS, you can do so on a big screen.
It’s important to note every DLNA-compliant device has a unique setting process, so accessing the media files can vary depending on the device you’re using. The safest way is to follow the instructions from client devices, and you’ll succeed.
Bonus Advice: How To Restore Lost Media Files From a Synology NAS
If you’re using Synology NAS to access multimedia content, there might come a time when you lose your media and want to recover it. That’s why it’s helpful to know how to restore lost media from a Synology NAS and avoid causing yourself unnecessary trouble.
While there are several ways to recover deleted files from a Synology NAS, one of the best methods is to use Recoverit NAS Recovery.
Recoverit is a data recovery software that allows users to recover lost, deleted, or corrupted files from various types of storage media, including Synology NAS. The tool supports many file formats, such as photos, videos, audio files, documents, and emails.
Some of the essential features of Wondershare Recoverit that might help you in NAS recovery are:
- Real-time recovery: Recoverit retrieves data in real time and doesn’t interrupt other operations in the NAS server.
- Diverse storage: Thanks to numerous supported NAS brands and RAID levels, Recoverit offers diverse and vast storage to all its users.
- All file type support: By recovering more than 1,000 file formats, Recoverit helps you retrieve documents, emails, photos, videos, music files, and other file types from NAS drives.
- No disk pull-out: It recovers NAS data through the remote connection. You don’t need to dismantle your NAS device and take out the hard drives.
For Windows Vista/7/8/10/11
For macOS X 10.10 or later
If you choose to recover files from Synology NAS using Recoverit, this step-by-step guide will equip you with everything you need to know about the process.
Step 1. Select NAS Recovery
Download and install Wondershare Recoverit on your device by following the on-screen instructions. Open the installed program and navigate to the NAS and Linux > NAS Recovery.

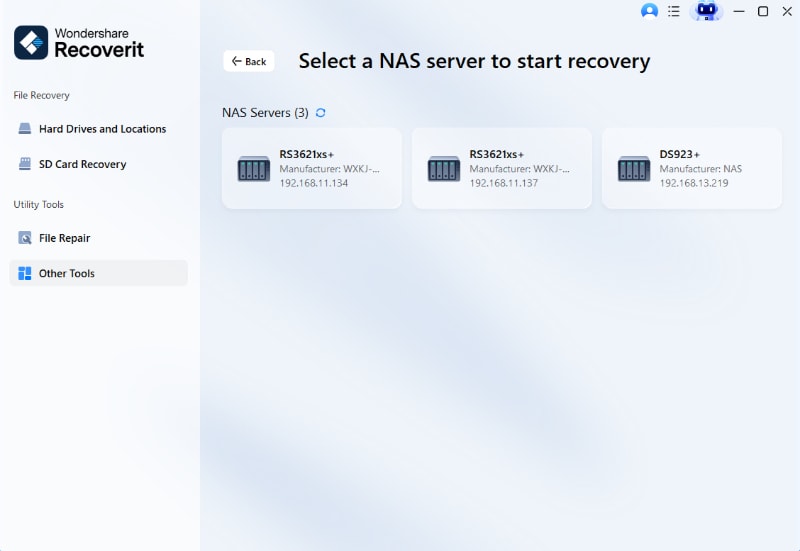
Step 2. Select Synology NAS
After Recoverit finds your NAS device, you can select the NAS you want to recover the lost files from.
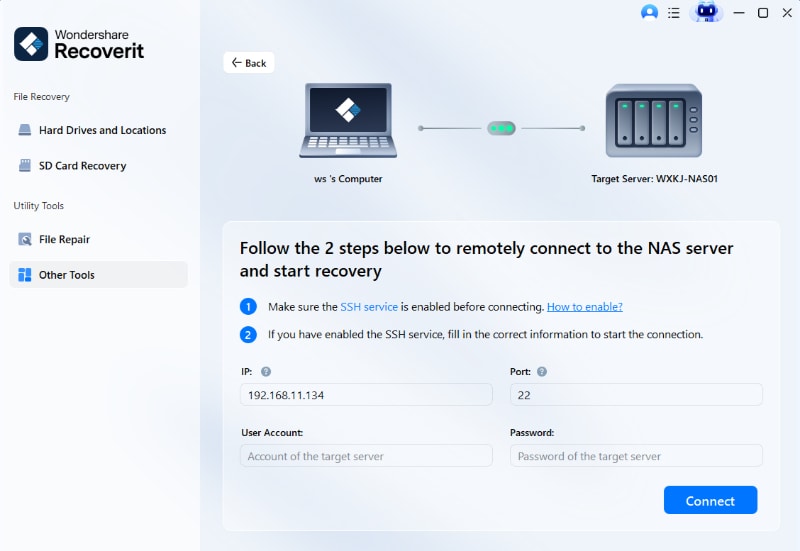
Step 3. Connect to Synology NAS
Insert your IP, Port, User Account, and Password. Once you do that, click Connect and Recoverit will establish a connection as soon as possible.
Step 4. Scan Synology NAS
The NAS data recovery software scans the Synology NAS and searches for deleted or lost files. Sit back and relax while the program finishes scanning your device.

Step 5. Recover Lost Data
Finally, find and choose the lost files you want to retrieve. Click the Recover button to save the files to a desired folder.

For Windows Vista/7/8/10/11
For macOS X 10.10 or later
Conclusion
You can use Synology NAS for various purposes, and accessing multimedia content is one of the most popular use cases. If you’re unsure how to access your multimedia files from Synology NAS via DLNA/UPnP, this guide is for you.
It provides all the steps for accessing multimedia content and even some handy tips for recovering lost data using Wondershare Recoverit.
1. Why is my Synology NAS not showing up on my TV's DLNA list?
First, ensure the Media Server package is running in DSM. Second, check if your TV and NAS are on the same Subnet/VLAN. Finally, go to Media Server > DMA Compatibility and click Device List to see if your TV has been restricted by the firewall.
2. Does DLNA support 4K HDR streaming from Synology?
Yes, DLNA can stream 4K HDR, but it requires a high-speed connection. We recommend a wired Gigabit Ethernet connection for both the NAS and the TV to avoid buffering, as 4K bitrates often exceed the capabilities of older 2.4GHz Wi-Fi.
3. Is UPnP safe to leave enabled on my Synology NAS?
Internal LAN UPnP for media sharing is generally safe. However, avoid enabling UPnP Port Forwarding on your router, as this can open your NAS to the public internet, increasing the risk of ransomware attacks. Keep your sharing local for maximum security.


