
 TL;DR:
You can list disk partitions in Linux using built-in terminal commands like lsblk for a tree-like block device overview, or by executing the fdisk command to view detailed partition tables.
● Viewing complete partition details with utilities like fdisk, sfdisk, parted, or cfdisk strictly requires root or sudo privileges to avoid encountering a command not found error.
● Use the blkid command specifically to display universally unique identifiers (UUIDs) and mount points, or run cat /proc/partitions to probe the virtual file system directly without installing external software.
● Graphical alternatives like GParted and GNOME Disks allow visual management, but when modifying drives, remember that MBR partition tables are limited to 4 primary partitions and a maximum size of 2TB per partition unlike the GPT standard.
Ask AI for a summary
 ChatGPT
 Perplexity
 Gemini
 Claude
 Grok
Grok
Your computer's hard drive usually comes with one or more logical disks. They are known as partitions. The partition table carries the division of these partitions. A number of people across the globe struggle when it comes to Linux list partitions or Linux show partitions. Do you have the same concern? If yes, don’t miss reading this article, as it presents the 11 best methods for Linux see partitions.
Part 1. What Should I Know Before Listing/Showing Partitions in Linux?
Before going into the details of showing or listing partitions in Linux, you must be aware of the fact that Linux operating systems do not have C or E drives. Instead, you will find something like /dev/sdc, /dev/sdb, /dev/sda, etc., as shown below.

The other factors you should be aware of before listing/showing partitions in Linux are listed below.
1. Understand Disk and Partition Naming in Linux
MBR consists of 3 different kinds of partitions, including primary, extended, and logical partitions. Primary partitions carry OS files, and you can create not more than 4 primary partitions. Whereas you can create more than 4 primary partitions in the extended partition. At the same time, a partition created inside the extended partition is called a logical partition.
2. Understand Disk Partition Tables
The partitions of storage devices, including hard drives, are shown by a disk partition table. GUID Partition Table (GPT) and Master Boot Record (MBR) are the two standards for the partition table. MBR is a frequently used partition table but has two limitations. It can create a maximum of 4 partitions, and each partition size must not exceed 2TB. GPT was introduced after MBR, and it efficiently overcomes the MBR’s limitations.
3. Understand Disk Partitions and Partition Numbering
Having an understanding of this factor is also important before you view partitions in Linux. If the disk name is not associated with any trailing digit, it means it is referring to a whole disk. SCSI disks consist of 16 minor numbers by default. One of these minor numbers is used to describe the whole disk, whereas the remaining 15 are associated with the disk partitions.
Part 2. The Best 11 Ways to List/Show Partitions in Linux
Tutorial Details |
|
| Difficulty Level | Easy |
| Root Privileges | Yes |
| Requirements | Linux Terminal |
| Category | Commands |
| OS Compatibility | WSL, SUSE, Rocky, Pop!_OS, Mint, Debian, Alpine, Ubuntu, Stream, RHEL, openSUSE, Fedora, Arch, Alma |
If you don’t know how to open the Terminal window, press “CTRL + Alt + T.” Doing this will open the Terminal for you. Now, you can enter different commands in this Terminal for Linux list partitions. Here, we have presented 11 top-rated ways to view partitions in Linux. Let’s look at how they can help you.
Method 1. Show Disk Partitions in Linux Using Fdisk Command
Fdisk is a dialogue-driven and command-line-based software designed to manage partitions and partition tables on Linux hard drives. To benefit from this program, you should be a root user. Otherwise, you will get an error, “command not found.” If you want to show disk partitions in Linux, you will have to run the Fdisk command with “-1” (as given below) as a sudo or root user.
$ sudo fdisk -1
The output you will see right after entering this command is shown below.
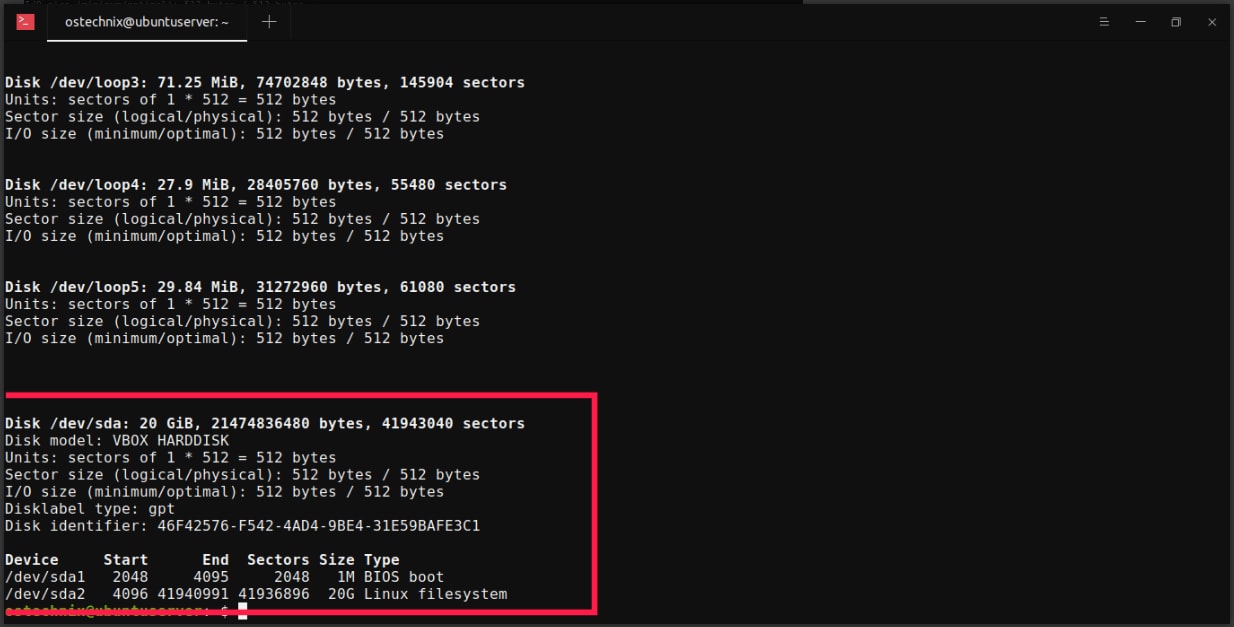
The output shown above displays all the disk partitions available. If you intend to view or show the partition table in a particular drive, don’t forget to mention its name, as shown below.
$ sudo fdisk -1 /dev/sda
Method 2. Display Disk Partitions in Linux Using Lsblk Command
This command can display detailed information about all block devices available. In addition, you can also use the lsblk command to get the information associated with a specific block device with its partitioning in Linux. To get the information about the disks and partitions, this command reads the “sysfs” filesystem and “udev db.” The output is then displayed in a tree-like format. Use the below command to list the partition and disk.
$ lsblk or $ sudo lsblk
The output of this command is as follows.
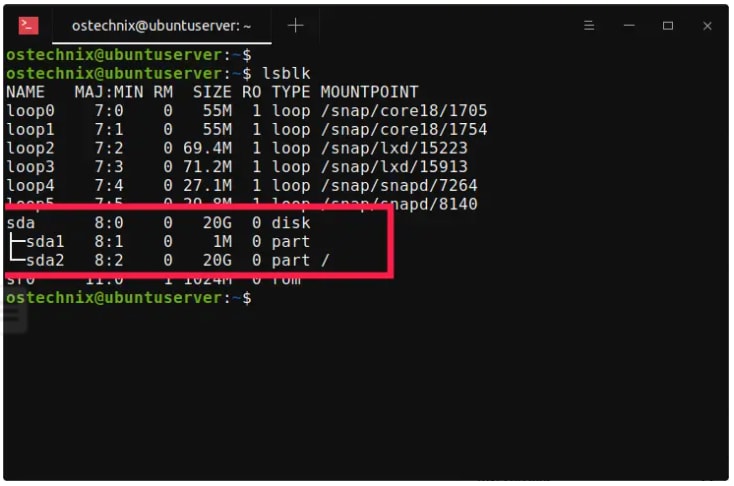
The above image shows “sda” as a 20GB drive with two partitions, “sda1” and “sda2.” Look in front of the disk, and under the Type column, you will see the device type, i.e., part or disk, which means partition. In case you have multiple devices in your Linux OS, you will have to mention the device name, as shown below.
$ lsblk /dev/sda
Using the above command will display the partition details in the first disk. You have the option to show more details, including but not limited to Mountpoints, UUID, and filesystem type. Let’s look at the command for this.
$ lsblk -io KNAME, TYPE, SIZE, MODEL, FSTYPE, UUID, MOUNTPOINT
Method 3. Check Hard Disk Partitions Using Sfdisk in Linux
With the Sfdisk program; you can do partitioning of all block devices. It is a script-based software that comes with the same usage as fdisk. You can use the below Sfdisk command to view the hard drive partitions in Linux.
$ sudo sfdisk -1
You are also free to see partitions in a particular device using the below command.
$ sudo sfdisk -1 /dev/sda
Method 4. View Linux Disk Partitions Using Cfdisk
It is another command-line-based tool designed for partitioning all block devices in Linux OS. If you want to display all hard drive partitions in Linux, use the below cfdisk command.
$ sudo cfdisk
The output of the above command is shown below.
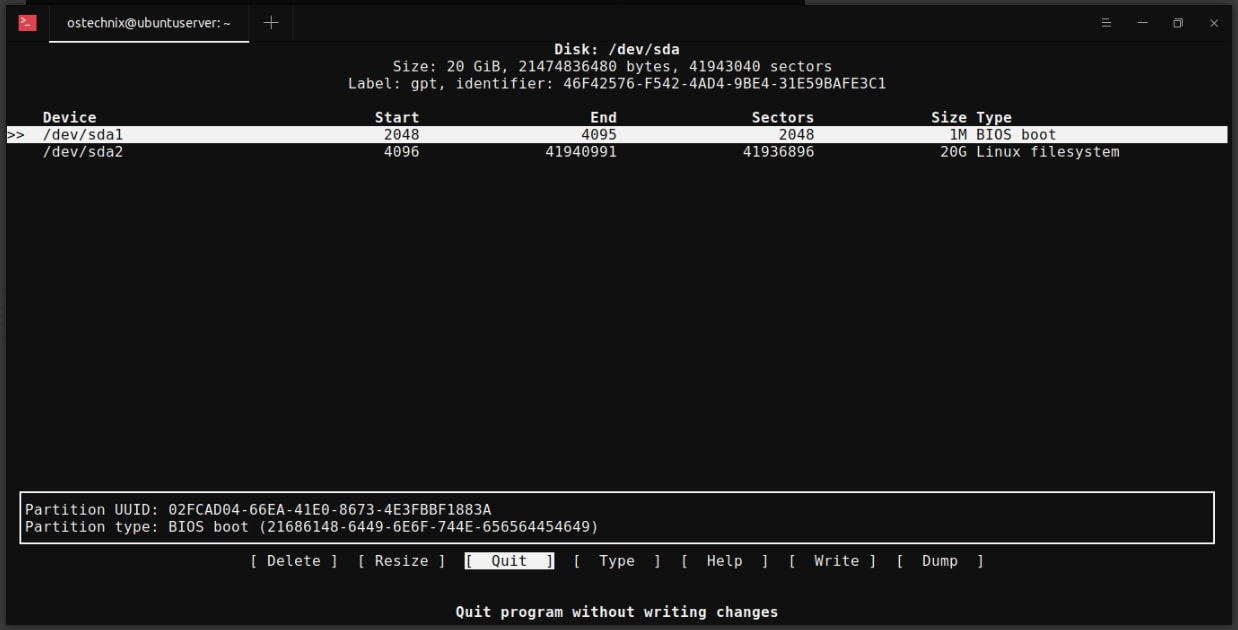
Select Quick or tap on “q” to exit from the screen.
Method 5. Find Disk Partitions in Linux Using Blkid
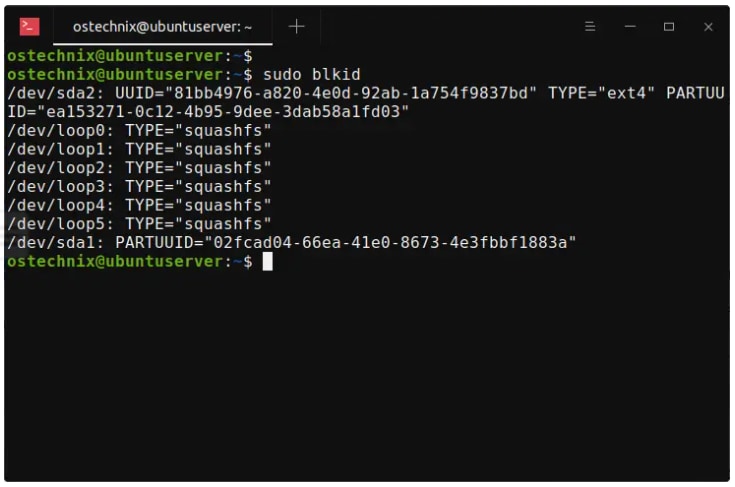
This is another command line tool used for Linux list partitions and their universally unique identifier. Don't forget to run blkid as a sudo or root user if you want to show all Linux partitions. The command is given below.
$ sudo blkid
Below is the output of the above command.
Listing all the partitions in a table with current mountpoints is also possible. For this, use the below command.
$ sudo blkid -o list
Method 6. Get Disk Partition Details Using Hwinfo Tool
This command line utility is free to use. You can use Hwinfo to get information about Linux OS hardware. The best thing about Hwinfo is that it is an open-source program. This tool is designed to extract your system’s hardware info and list all the details. Many Linux distributions don’t come with a pre-installed Hwinfo. So, make sure you check it first. As soon as you install this tool on your system, run the below command to view all partitions in Linux.
$ hwinfo - - block - - short
The output you will get by entering the above command is given below.

The use of “- - short” refers to displaying the CD ROM, partition names, and disk names excluding any other information. You can remove this part of the command to get all the details.
Method 7. List Linux Partition Details with Inxi
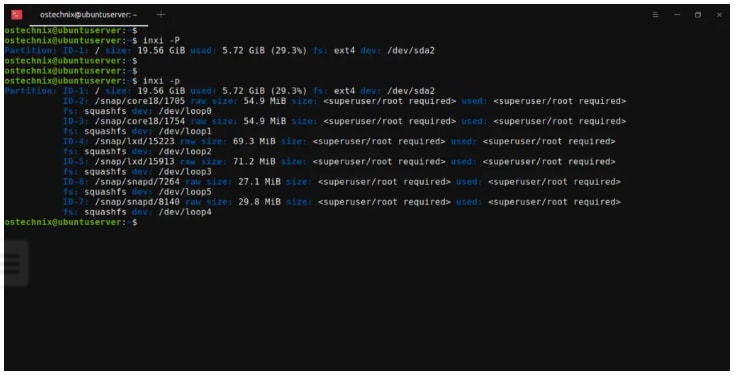
This command line tool is particularly built for IRC and console. You can also use this information tool as a debugging partner for ascertaining your system’s hardware and configurations. Your system does not come with a pre-installed inxi, instead, you have to install it. Once you install this utility, run the command given below.
$ inxi -P
Enter “-p” to get the details about the full partition. Make sure the “p” is small this time.
$ inxi -p
The outputs for both of these commands are presented in the image below.
Method 8. See All Disk Partitions by Probing Proc File System
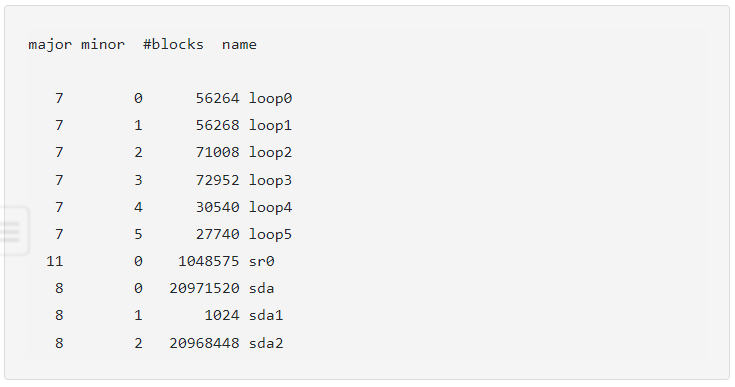
The shorter version of the proc filesystem is “procfs.” Linux kernel maintains this virtual file system. It does not carry real files; rather, it consists of system information, like hardware configuration, mounted devices, and system memory. A special directory - /proc - holds this information. To list all disk partitions, you can use the below command.
$ cat /proc/partitions
The output you will get after entering the above command is presented below.
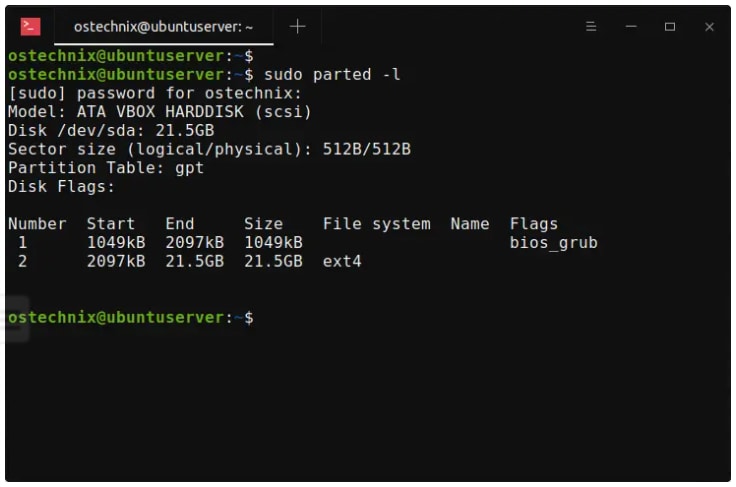
Method 9. View Disk Partitions in Linux with Parted
This is another leading program that efficiently lists partitions in Linux. Parted is known for supporting different partition table formats, like GPT and MS-DOS. This tool is widely used for creating and managing bigger partitions (greater than 2TB). Use this command for Linux list partitions.
$ sudo parted -1
Entering the above command will give you the output presented below.
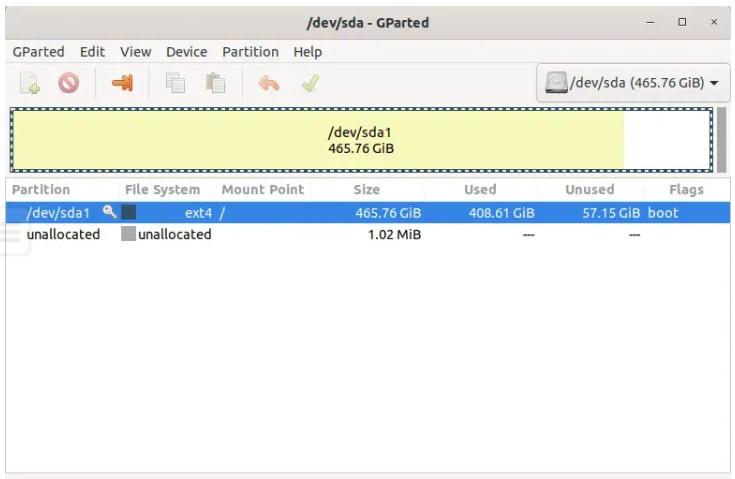
Method 10. View Disk Partition Details Using GParted in Linux
GParted is a short form of GNOME Partition Editor. You can create and manage partitions in Linux with this program. An appealing and easy-to-use graphical user interface makes it super easy to see Linux partitions. Linux OS does not come with a pre-installed GParted. However, many Linux distributions carry this editor by default. You can use the below command to install GParted.
$ sudo apt install gparted
Open the Gparted tool from Dash or the menu to see disk partition tables.
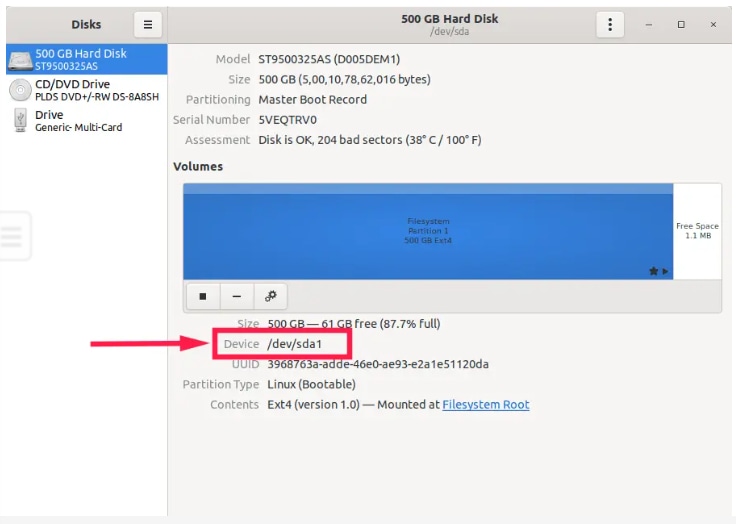
Method 11. Show Disk Partitions with GNOME Disks
GNOME Disks is also known as gnome disk utility. This is an efficient graphical tool designed to configure, modify, and view media and disks in Linux OS. Linux distributions with GNOME Desktop environment come with pre-installed GNOME Disks. Open the program to see all disk partitions available.
Part 3. Bonus Tips: How to Manage Partitions in Linux?
When it comes to managing a partition, you should be aware of how to delete, create a new one, and format a partition. Let’s have a look at how you can perform all these functions.
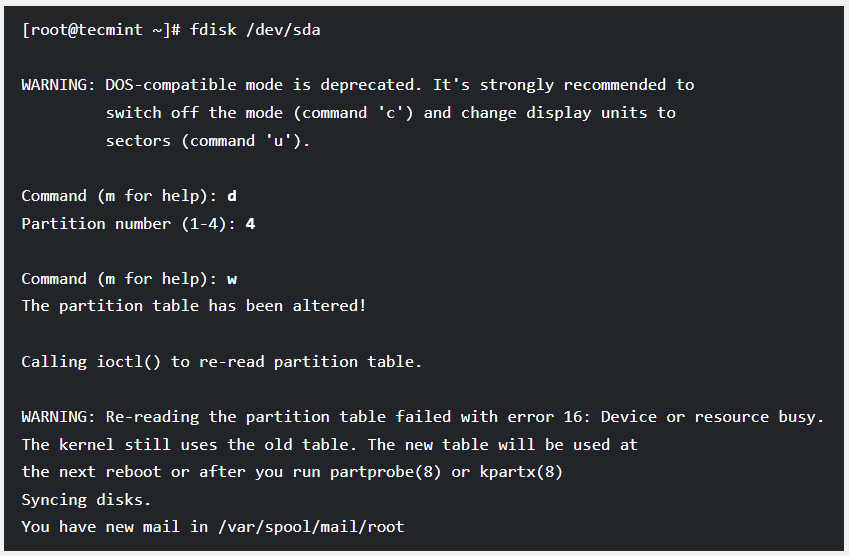
1. Delete a Partition in Linux
You should be in the fdisk command mode if you want to delete a particular partition from a specific disk. For this, use the below command.
[root@techmint ~]# fdisk /dev/sda
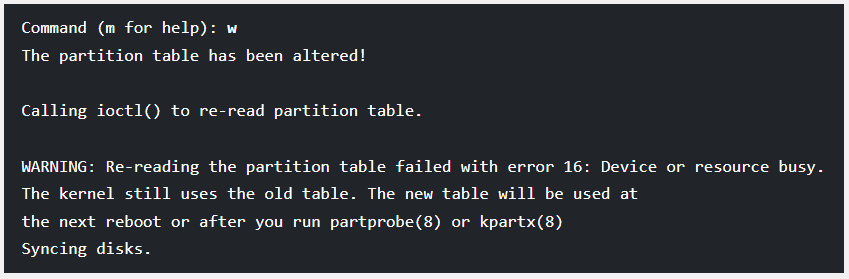
Now, let’s move toward deleting a partition. It requires you to type “d.” As soon as you enter “d,” you will be asked to put the partition. Suppose we want to delete partition number 4. The commands are displayed in the image below. Type “w” to write the partition table to the hard disk. Then, exit once you make changes to the table. New changes will not be applied until you reboot your system.
2. Create a New Partition in Linux
You should be in the fdisk command mode if you have some free space on the disk and you wish to create a new partition in Linux. Type the below command to proceed.
[root@techmint ~]# fdisk /dev/sda
Now, type “n” to create a new partition. This partition will be created under the disk “/dev/sda.” The output for this activity is as follows.
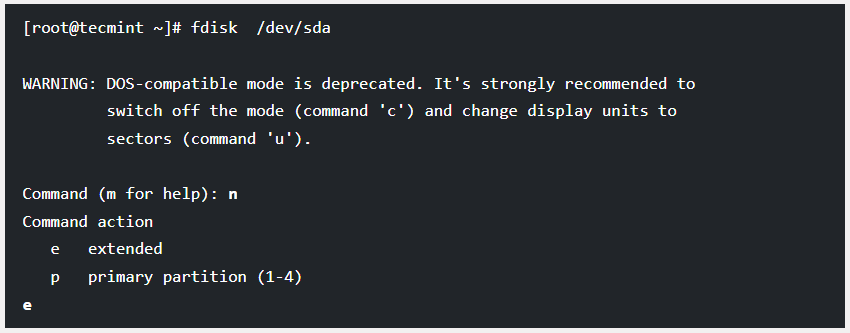
When you try to create a new partition, you will be asked to choose from two options: “primary” or “extended” partitions. If you want to create a primary partition, enter “p,”; otherwise, type “e.” Now, you will be asked for two more inputs, i.e., the first and last cylinder numbers of the partitions you want to create.
In the last cylinder, you can add “+5000M” to the size of the cylinder. The use of the “+” sign refers to the addition, whereas 5000M means that the new partition is of the size 5000MB. Once you create a new partition in Linux, enter “w” to make changes to the table and exit. Don’t forget to reboot your system to apply the changes.
3. Format a Partition in Linux
Have you created a new partition? Great! It is time to format it. You can do it with the “mkfs” command, as shown below.
[root@techmint ~]# mkfs.ext4 /dev/sda4
Here, ext4 is the file system, and /dev/sda4 is the new partition you have just created. This is how you can quickly format the new partition.
Part 4. Frequently Asked Questions (FAQs)
What is the difference between a partition and a filesystem?
A physical subset of the hard disk is commonly called a partition, whereas a filesystem refers to how the folders and files are arranged.
What is the difference between primary and extended partitions?
A primary partition consists of the operating systems of your computer, and it is bootable at the same time. In contrast, an extended partition is not bootable. You can use the extended partition to install different operating systems, create 1 to 4 primary partitions, and boot your operating system.
Is it possible to recover data in Linux?
If your data is softly deleted, you can recover it from Recycle/Trash Bin. But if you have deleted the data with “Shift + D,” you should use a reliable Linux data recovery tool, like Recoverit, to get your lost data back.
What size does the partition table have?
Every partition table’s entry is of the size of 128 bytes. According to the specification of UEFI, the size of the partition entry array is 16,384 bytes.
Is partitioning worth it?
Well, partitioning can be more dangerous at times. If you create incorrect partitions, it may result in reducing the total storage space on the disk. This is why it is very important to set up your disk partitions effectively.
Part 5. How to Recover Lost and Deleted Data in Linux?
Recovering deleted or lost data often becomes a severe challenge for people from around the globe. Are you experiencing the same problem? Looking for an efficient way to get out of this issue? Try finding trustworthy, third-party Linux data recovery software.
Recoverit Data Recovery is an amazing tool to recover lost or deleted data files in Linux with an over 95% data recovery rate. This program comes with an eye-catching and user-friendly interface.
You can use this software easily even if you don’t have enough knowledge of using data restoration tools. Wondershare Recoverit has got an overall rating of 4.2 out of 5.0 on the G2 forum. If you go into the details, you will be happy to see that most users have given this program 5 stars.
How to Use Recoverit to Get Your Lost/Deleted Data Back?
Video Tutorial on How to Recover Files on Linux?
To recover your data, all you need is to follow the below-listed steps.
For Windows Vista/7/8/10/11
For macOS X 10.10 or later
Step 1: Download Recoverit and install it on your system. Open the program, go to the “NAS and Linux” option, and click on “Linux Recovery.”

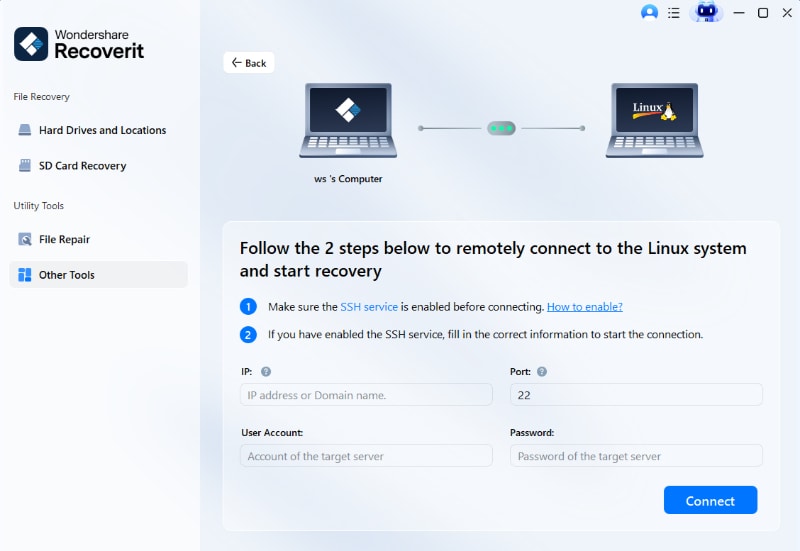
Step 2: Now, connect your Linux computer by creating a remote connection. For this, provide the requested information and click on “Connect.”
Step 3: After the remote connection is established, Recoverit will start an auto scanning to search for the lost or deleted Linux data files.

Once you find the right file, you can stop scanning and preview it to confirm if this is something you wish to get back. Then, you can save it to the computer. This time, ensure to choose a different path.

This is how, with 3 simple steps, you can recover accidentally deleted or lost data from Linux systems.
Final Words
It often becomes challenging for millions of people to view partitions in Linux. But reading through the above discussion will surely reduce your headache greatly, as it has presented the 11 best ways for Linux show partitions. If you want to recover deleted or deleted Linux files from your system, there is nothing better than using Wondershare Recoverit. It is a spectacular Linux data recovery tool equipped with advanced features and an excellent rate of data recovery.
For Windows Vista/7/8/10/11
For macOS X 10.10 or later


