How to Restore Photo Library on Mac [2026]

Jun 29, 2026 • Filed to: Photo/Video/Audio Solutions • Proven solutions
Photo library corrupting and losing photos on Mac can be frustrating for Mac users. But, do not be disheartened! There are several ways to restore your photo library on Mac and get all your precious memories back. Recoverit data recovery for Mac is one of the most effective ways to restore your photo library within a few minutes.
So if you are wondering how to restore my Photo library on Mac, continue reading this post. Here, we will discuss everything you need to know about restoring your Photo Library.
Part 1. What's Photo Library on Mac
Before diving into how you can restore your treasured photo library on Mac, let us understand and learn more about Photo Library on Mac.
1. What is Photo Library on Mac
Photos library on Mac holds all your albums, photos, print projects, and slideshows. So with the help of a photo library, you can store and organize your photos and view them whenever you feel like reliving your memories.
The videos and photos that you import into Photos on Mac are by default stored in the Photos library, which is located in the Pictures folder on your Mac. So when you first use photos, you can choose the library that you want to use or you can create a new library. This library will automatically become your system's Photo Library, where you can view and access the content.
2. Photo Library vs iPhoto Library
iPhoto Library - The iPhoto was recently replaced by the Photos app, which was released in OS X 10.10.3 version. However, if you already have iPhoto installed on your Mac, it will work perfectly, and you will still be able to run it.
The Photos app is a giant next step in photo management, and it also incorporates new features like iCloud photo sharing and iCloud Photo Library. Although similar, the major difference between Photos and iPhoto is the performance of both applications.
iPhoto tends to choke up or slow down when dealing with larger libraries. Also, it has certain limitations when it comes to collection or album sizes. On the other hand, the Photos app has no such restrictions and can accommodate much larger libraries than its forerunner. While Photos and iPhoto may look the same, the Photos app is more powerful and faster.
3. Why Can't You Find the Photo Library?
When you open the Photos application and try finding your Photo library on Mac, there might be a message that it cannot find your Photo library file. This tells that the Photos application is having trouble locating your entire photo collection. This situation may occur due to several reasons. A few of them are listed below:
- Most of the Photo library issues arise when you are using an older version of macOS. Therefore, updating your macOS may eradicate this issue.
- Your Photo library is highly corrupted, which is why you cannot find or open your Photo library.
Many people encounter these issues from time to time. By using proper and effective methods, you can easily solve the problem of not being able to find the Photo library on Mac.
Part 2. 5 Ways to Locate and Restore Photo Library on Mac
Most Mac users get worried when they cannot locate or restore their disappeared Photo library on their Mac. However, by following some effective solutions, you can retrieve and access your lost Photo library immediately. Here are some step-by-step solutions that can help you restore your Photo library on Mac.
| Scenario (The Problem) | Likely Reason | Best Recovery Method |
| Library File Missing | Accidental move or path error | Time Machine / iCloud Sync |
| Photos "Grayed Out" | Database/Index corruption | Apple Photo Repair Tool |
| Emptied Trash Bin | Permanent user deletion | Wondershare Recoverit |
| Sync Failures | Account/macOS Mismatch | iCloud Preferences Re-sync |
Solution 1. Restore Photo Library from "Recently Deleted" on Mac
If you have used the Photos app, then you might be aware of the "Recently Deleted" option available in the application. Using this option is the easiest way to restore your lost or deleted Photo library. By following the steps below, you can get back your lost or deleted photos from the "Recently Deleted" option.
- Launch the Photos app on Mac and then click on "Albums."
- You will now see the "Recently Deleted" option, click on it to open it.
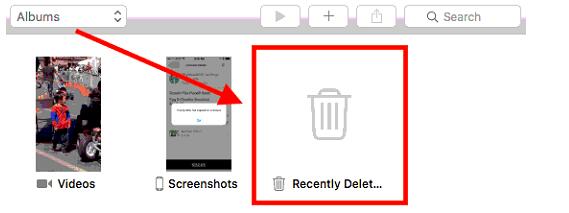
- Select the Photo library you want to recover.
Note: Always keep in mind that the "Recently Deleted" folder will keep your photos only for 40 days, after that, they will be deleted automatically.
Solution 2. Restore Photo Library from Time Machine
If you have recently created a backup of your Photo library with Time Machine, you can easily restore your lost or deleted photo library within a few minutes. If not, you might have to use a photo repair solution, which can fix all the issues related to locating and restoring the Photo library. Here are a few steps to recover the Photo library through Time Machine:
- Connect the Time Machine backup drive to your computer.
- The next step is to click the Time Machine icon in the menu bar and then select Enter. You can also go to the Apple menu, choose system preference, and then click on Time Machine.
- Time Machine will now open up and show you available backups. You can click on the date of your last backup and go to the backup of your Photo library. Once you find it, click and select it.
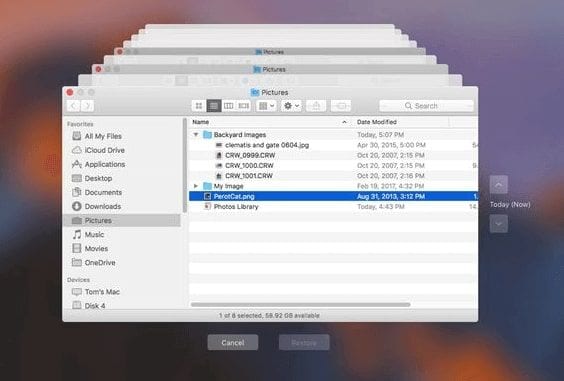
- The last step is to click on "Restore" to recover your Photo library.
Note: It may take some time to recover your Photo Library, depending on its size.
Solution 3. Restore Photo Library on Mac Using iCloud
At times, the absence of photos may result from iCloud settings. Disabling iCloud Photos sync settings can render the photos inaccessible. To rectify this issue and restore the Photo Library via iCloud, follow these steps:
- Navigate to System Preferences->Apple ID.
- Within the Apple ID settings, verify that the Photos option is chosen and activated.
- Proceed to restart your Mac to check if the problem has been resolved.

Solution 4. Restore Photo Library with Apple's Photo Repair Tool
If your Photo Library is corrupt or your photos behave unexpectedly, you can use the photo repair tool on your Mac to get back your Photo Library. This process may take some time, depending on the network speed, and size and number of your library photos. Even though it is a long shot, the photo repair tool is worth a try. You just have to be a little patient with it.
Before repairing the Photos library with the repair tool, you should make sure that you are using the latest version of macOS, and that your Mac is updated. This will make the process smooth, and you can easily access your photos in the Photo Library. Follow these steps to recover photos with the Photo Repair Tool.
- If your Photos app is already open, quit the app first and then go to the "Applications" and look for the Photos app icon.
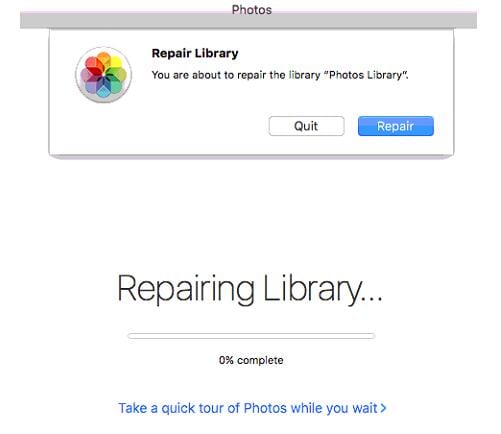
- Once you find it, press the Command + Option keys and double-click the Photos app icon.
- A "Repair Library" dialogue box will appear. Click on "Repair" to restore your library.
You might be prompted to enter your admin account and password to continue with the process. Apple suggests backing up your photo library before proceeding further with the repair process.
If you are using an Apple Silicon (M1, M2, M3, or M4) Mac, Apple's built-in Repair Tool is optimized to use the chip's Neural Engine for database indexing, making it significantly faster than on older Intel Macs. Ensure your Mac is plugged into power during the repair process to maintain peak performance.
Solution 5. Recover Photo Library on Mac Using Recoverit
So even after trying the methods mentioned above, you are still not able to recover your Photo library, you can use an advanced data recovery software that will help you to find and recover your Photo library on Mac.
There are many photo recovery software available in the market, but the one that stands out is Recoverit Data Recovery software. With its all-around scanning ability, photo recovery technology, simple recovery process, and user-friendly interface, you can restore your lost or accidentally deleted Photo library within minutes.
Recoverit Data Recovery - The Best Photo Recovery Software
- Recover corrupted/deleted files from the computer, USB hard drive, and memory card effectively, safely, and completely.
- Supports restoring corrupted files and loss due to virus attacks, the program crashes, or the computer loses power.
- Recover any data and file types with a high success rate and without any quality loss.
- Supported OS: Windows 11/10/8/7/Vista and Mac OS X 10.10 or later.
 Security Verified. 3,591,664 people have downloaded it.
No matter how and when your Photos library disappears, Recoverit enables you to get back your photos on Mac in just four simple steps:
Step 1: Launch Recoverit on Mac
Before you recover your Photo library on Mac, you first need to launch and install Recoverit. All you need to do is double-click on the "Recoverit" icon to start the software. If you have kept a password for the tool, you type the password and press "Enter." If not, you can click "Return" to launch Recoverit. After that, it will only take a few minutes to begin the Mac Photo library recovery process.
The Fix: Go to System Settings > Privacy & Security > Full Disk Access. Find Recoverit in the list and toggle the switch to On. You may need to restart the application for the scan to detect your deep-level Photo Library files.
Step 2: Choose the Photo Library Location
Now that you have installed Recoverit on your Mac, it is time to choose the Photo library location from where you lost your data. After you have selected the location, click on the "Start" button to proceed further.

If you know the exact file path of your lost Photo library, You can also choose the "Select Folder" option under the "Select Location" tab.
Step 3: Conduct an All-Around Photo Library Location Scan
Once you have selected the Photo library location, Recoverit will automatically begin an all-around scan. With advanced scanning and searching, you can get back all your disappeared photos from the Photo library. If you think that you have found all the lost photos, you can stop or pause the scanning process in between.

Step 4: Preview and Recover Photo Library Data
After the scan is complete, you can filter the Photo library pictures that you want and preview them one by one by clicking on the "Preview" button on the right panel. Once you are done reviewing all the photos, you can click on the "Recover" option to restore your Photo library.

Note: Select a different location to save your recovered Photo library. Do not keep it in the same location where you deleted or lost the Photo library. This will prevent the overwriting of data.
Part 3. Extended Tips for Using Photo Library on Mac
It is always better to keep in mind the following tips to increase the chance of Photo library recovery.
1. Designate System Photo Library
If you have more than one photo library on your Mac, you might need to designate a System Photo Library so that other applications like Shared Albums, iCloud Photos, and My Photo Stream can easily access the videos and photos you want them to use. Follow the points below to designate a System Photo Library:
- Quit Photos if it is already open.
- Now again, choose "Photos" and then click on the "Preferences" option from the menu bar.
- After that, select the "General Tab."
- The final step is to click the "Use as System Photo Library" button.
2. Move Your Photo Library
Your system Photo library is by default stored in the Pictures folder on your computer. If you like to take a lot of pictures, your solid-state drive or hard drive may get full quickly. Therefore, it is recommended to move your Photo library to external storage so that you can save some space on your Mac and prevent data loss.
3. Prevent Mac Photo Loss
Photos are invaluable as they create memories for a lifetime. And there might come those awful moments when your precious photos disappear or accidentally get deleted from your Mac. This may cause a lot of stress and anxiety. However, you can prevent Mac Photo Loss by following the points below:
- Keep your macOS updated.
- Repair corrupted Photos library by using Apple's inbuilt Repair tool.
- Create regular backups of your photos.
Factors Affecting Recovery
| Variable | Impact on Recovery | Pro Advice |
| Storage Medium | High success on External HDDs/SDDs. | Use **USB4/Thunderbolt** for faster scanning. |
| Data Overwriting | Critical. New data destroys old files. | Stop using the Mac immediately after loss. |
| File System | APFS handles snapshots better. | Check for local snapshots via Terminal. |
Closing Words
In this digital age, we cannot afford to lose our photos as they mean the world to us. Losing photos from your Photo library due to technical reasons or human errors can be devastating. However, if you follow and apply the above measures, you can retrieve your lost items in no time. Remember, creating a regular backup of your Photo library can help you avoid all the hassle and prevent photo loss on your Mac.
Related Questions Searched Frequently
-
1. Why did my photos disappear on my Mac?
There can be multiple reasons why your photos disappeared on Mac. Some of the most common ones include hardware issues, random software glitches, or low storage on your Mac. -
2. How do I recover my iPhoto library?
To recover your Photo library on Mac, you can try using Apple's inbuilt repair tool, check the Recently Deleted folder, or use Time Machine Backup. If none of this works, you can use reliable Photo recovery software. -
3. Why is my photo library not available?
The error message "Photo Library not available" shows that the Photo Library is in use by another process, or it may appear due to a permission error. -
4. Do I need both the iPhoto and Photos library?
Although it may appear that both the Photos library and iPhoto are taking up a lot of space, in reality, each picture file is physically stored only once. So if you want, you can delete the iPhoto, but it will hardly make any difference and will not save any space. -
5. How long does it take to repair the Photos library?
Repairing the Photos library may take some time, depending on the network speed, and size and number of your library photos. -
6. How do I restore my photo library?
If you are thinking "How do I restore my Photo library on Mac, you can do that in several ways, like:
- Using Time Machine Backup on Mac
- Looking up and restoring the Photo library from the "Recently Deleted" folder.
- Making use of Apple's "Photo Repair Tool."
-
7. How can I use Recoverit to restore Mac photos?
Recoverit can help you restore your Mac photos by following just a few steps. All you need to do is launch the software and click on the "Start" button to begin the process. After that, Recoverit will automatically perform an overall scan of the deleted or lost photos on your Mac. Once the scanning is complete, you can preview and restore the photos you want back.
Fix Media File Issues
- Recover & Repair Photos
- Recover deleted photos.
- Recover photo booth.
- How to repair JPEG images?
- What is JPG File?
- What is GIF File?
- Guide for PNG File
- Recover Videos
- Best video recovery software for Windows
- Best video recovery software for Mac
- Recover DVR recordings
- Recover CCTV footage
- Recover deleted Vivint videos
- Recover deleted MKV files
- Recover deleted Youtube videos
- Recover deleted CapCut videos
- Recover After Effects Project
- Recover Premiere Pro Project
- Recover iMovie Project
- Recover videos from GoPro
- Repair Videos
- Fix error code 0xc00d36c4.
- Repair corrupted MP4 video.
- Fix 0xc10100be video error.
- Solve blurry videos.
- Fix MOV can't play on QuickTime.
- Free video repair software.
- Fix frozen video files.
- Recover & Repair Audio
- Moov Atom Not Found ?
- Repair your MP4 file online.
- Can't play recorded video?
- AVI/MP4/MKV cannot render?
- Fix 0xc00d5212 error of AVI.
- Recover & Repair Cameras


Eleanor Reed
staff Editor