
![USB Health Check | 4 Effective Tips [Video Tutorial]](https://images.wondershare.com/recoverit/article/usb-health-check-000.jpg)

 TL;DR:
Regularly inspecting your USB drive for physical damage and utilizing built-in diagnostic tools like Windows Chkdsk or macOS Disk Utility is essential to identify early hardware deterioration and prevent permanent data loss.
● Stop using a corrupted drive and extract valuable files using software like Wondershare Recoverit before running repair commands such as "chkdsk driveletter: /r" or formatting, as these system fixes can permanently destroy existing data.
● Windows users can diagnose issues by typing "chkdsk driveletter:" in Command Prompt to remap bad sectors or by running Disk Scan via drive properties, while macOS users should use the First Aid feature within Disk Utility to repair disk errors.
● Always perform a visual check of the storage casing and delicate connection points prior to running software diagnostics, because physical bents can short-circuit the drive and completely fry the memory.
Ask AI for a summary
 ChatGPT
 Perplexity
 Gemini
 Claude
 Grok
Grok
People use USB thumb drives to store important data. However, these storage solutions are not 100% fail-safe. It can fail for many reasons, and you can easily lose your precious data when it does.
Is there anything you can do?
Of course, there is. You can adopt preventive practices and make sure your USB is not failing. Below, you can find how to do a USB health check and learn why you should do it regularly.
Why You Should Test USB Health Regularly
Why test USB drive health? Well, it's a piece of hardware and is susceptible to damage, deterioration, and electronic malfunction. You should do a regular USB stick health check every once in a while. Here are the most important reasons to do so:
- ⛔Data loss can occur – your USB stick's health deteriorates over time. If the health margin drops below minimal, you may lose your data. In this scenario, your USB stick simply stops working;
- 🚧Malfunctions can happen – as we've previously mentioned, a USB drive is a piece of hardware that can malfunction for many reasons. If you regularly check USB flash drive health, you can spot errors early on;
- 🚨OS warnings can pop up – every OS has a built-in warning system that alerts you when something is wrong with your USB drive. For instance, Windows will always ask you to repair your USB because it detects errors.
Staying proactive can help you detect problems before they develop into issues. The same applies to your hard drives. Here are answers if you are wondering: "How can I check and increase hard drive health."
Now that you understand the basics, let's work our way from how to do a USB health check visually to a more detailed and advanced USB health check.
Quick Physical Check on USB Drive Health
You should try to make a USB health check a habit, especially the visual check. Do it with the USB drives you most frequently use. Performing a visual USB stick health check is straightforward and it can help you check if the USB drive is physically damaged. Here is what to do:
- ✅Inspect storage casing – compromised USB storage casing is the leading cause of USB drive failure because it no longer performs its function – to protect the drive from dust and elements. Make sure that it's intact;
- ✅Closely look at the connection point – the connection point of the USB drive should not have any bents or signs of physical damage. These connection points are delicate, and if they stop functioning, they can cause significant damage. For instance, they can short-circuit your USB drive, make it inoperable, and fry the memory;
- ✅Check the indicator lights – indicator lights often turn on when you connect the USB drive to the computer. Make sure they light up every time you use your drive.
Once your USB drive passes the visual health check, you can subject it to a more thorough examination. Here is how to test USB drive health in a more professional manner.
How to Check USB Drive Health: 4 Free Methods
| Solution | Platform | Best For... | Key Action |
| 01. Chkdsk (Command Line) | Windows | Remapping bad sectors & deep repairs. | CMD > Type chkdsk [Drive Letter]: /f /r |
| 02. Disk Scan (GUI) | Windows | User-friendly, visual health checks. | Drive Properties > Tools > Error Checking |
| 03. Microsoft Defender | Windows | Detecting health issues caused by malware. | Right-click USB > Scan with Microsoft Defender |
| 04. Disk Utility (First Aid) | macOS | Diagnosing & repairing disk errors on Mac. | Disk Utility > Select Drive > Run First Aid |
Method 1: Check USB Health with Chkdsk on Windows
Chkdsk, or CheckDisk, is a built-in Windows tool that enables you to quickly scan and fix problems in your USB drive. It's so powerful that it can help you remap the bad sectors on your USB drive to sectors that work. To use it, you will need to access Command Prompt or PowerShell.
- Start Command Prompt. Click start, navigate to the search bar, and type Command prompt. Click the Open option and wait for the command prompt window to open.

- Run Chkdsk. Once the command prompt opens, type in the following command in the command line and hit enter:
chkdsk driveletter:
Video Tutorial on How to Quickly Check your USB Drive
Method 2: Check USB Health using Disk Scan on Windows
The next method involves using a Disk Scan, another reliable tool built into Windows operating systems. It's a more user-friendly option than Chkdsk as it has a graphical user interface. Disk Scan has two capabilities. First, it can help you check the health of your USB drive. And if it discovers any file system-related anomalies, it can fix them for you. Let's see how to use Disk Scan.
- Connect your USB to your computer. Make sure you've inserted your USB thumb drive into the USB port.
- Navigate to Explorer. Press the Windows key + E to open File Explorer.
- Access USB drive properties. Right-click your USB drive and select the properties

- Run Disk Scan. Select the Tools tab and click the Check button to run Disk Scan on your USB thumb drive.

Method 3: Use Microsoft Defender Antivirus to Check USB Health
Finally, you can run an antivirus scan to ensure your USB drive is not infected with a virus. The easiest way to do it is to use a Windows built-in antivirus protection software called Microsoft Defender Antivirus.
- Access Microsoft Defender. Navigate to This PC in Windows Explorer and right-click your USB drive. Select the Scan with Microsoft Defender Option.

- Do an even more advanced scan. To do a more in-depth scan, you can simply select the Microsoft Defender Antivirus offline scan option and click the Scan Now button.

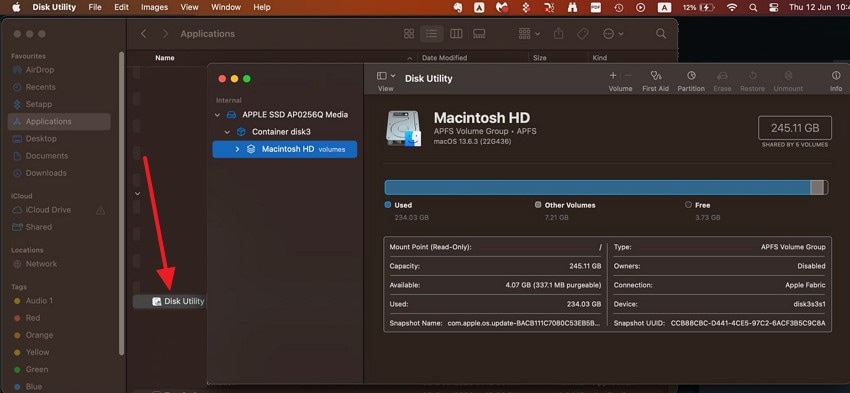
Method 4: Use Disk Utility to Check USB Health on Mac
If you suspect your USB drive is failing or corrupted, macOS provides a built-in tool called Disk Utility to diagnose and repair disk errors.
- Launch Disk Utility: Navigate to Applications > Utilities, or simply press Command + Space and type "Disk Utility" into Spotlight.
- Select Your Drive: Locate your USB flash drive in the left-hand sidebar. (If you don't see it, click View > Show All Devices).
- Run First Aid: Click the First Aid button at the top of the window and select Run. Disk Utility will scan the drive for errors and attempt to repair them, providing a summary of the drive's health status once complete.
Now you know how to check USB health, but more important is the data stored on the drive. Below we will show you how to protect and backup the data stored on your USB drive.
Tips to Protect your USB Drive Data
If your USB drive is corrupted, the safest course of action in terms of preventing data loss is to simply stop using it. However, if there is valuable data on your USB drive, you should give it your best shot to recover your data before doing anything with your USB drive.
Trying to fix your drive can result in permanent data loss. To get your data back, you need to use reliable specialized data recovery software such as Wondershare Recoverit.
- Manages over 500 data loss situations, such as deletion, formatting, and disk corruption.
- The user-friendly interface allows you to recover data in just a few clicks.

Wondershare Recoverit is an easy-to-use tool built from the ground up to facilitate data recovery in a wide range of scenarios and from numerous data storage solutions, including a USB drive. Here is how you can get your data back from a corrupted USB drive.
- Visit the official Wondershare Recoverit website to download the app and install it on your computer.
- Connect your USB drive to your computer. Wait for the computer to recognize your USB drive and start Wondershare Recoverit.
- Once the Wondershare Recoverit is up and running, navigate to Hard Drives and Locations in the left side-bar and select your USB thumb drive.

- Select your USB drive and click on the Start button to initiate the USB drive scan. This process will help you recover the lost data on your USB due to corruption or format. You can monitor the scan progress in the lower left corner of the window.

- Once Wondershare Recoverit is done scanning your USB drive, select the files you want to recover by checking the box in front of the Image name and click Recover. Wondershare Recoverit also enables you to preview the files before recovering them.

After you successfully recover your data, if you want to keep using a corrupted USB drive, you must fix it first. Here are a couple of fixes that you can apply (make sure to recover your data as these fixes can potentially result in data loss:
- Let the OS automatically fix it once you plug it in;
- Run chkdsk again, but this time enter the following command
chkdsk driveletter: /r; - Format your USB drive;
- Run Scan and repair drive with Disk Scan utility.
Any of these methods should do the work and solve issues with your USB drive.
Conclusion
As you can see, the USB stick health check is not overly complicated. You should regularly do it to prevent unforeseen events that may lead to data loss. If you lose some important data on your USB drive, wait before trying to fix it. Use reliable data recovery software such as Wondershare Recoverit to get your data back.
Remember to visually inspect your USB drive before running tests with tools and software. Any signs of physical damage to the casing or connection port can indicate a potential problem down the line with the USB drive.
If everything on the USB drive casing and port appears to be in order, you should proceed to the more advanced USB health check methods. Chkdsk and Disk Scan can help you identify problems and restore your USB drive health, while Microsoft Defender Antivirus can help you clean your USB drive from viruses and restore its functionality.
FAQ
-
Can a USB be infected with a virus?
Yes, your USB can get infected with a virus, especially if you use it with public computers. A virus may slow down your drive and make it appear like it has bad sectors. Use Microsoft Defender Antivirus to clean it. -
Can a corrupted USB be repaired?
In most cases, a corrupted USB can be repaired. However, if you have important data on it, use specialized software such as Wondershare Recoverit to restore your data before trying to fix it with Chkdsk, Disk Scan, or an Antivirus app. -
How does a USB drive become corrupted?
There are many factors that can cause your USB drive to become corrupted. For instance, your OS, some apps, or outdated drives can prevent files from being stored correctly or cause errors in the USB drive's file system.


