

 TL;DR:
The "BitLocker could not be enabled" error stems from a Trusted Platform Module (TPM) communication failure, disabled BIOS settings, or an incompatible MBR disk format, and can be fixed by adjusting system services, enabling TPM, or converting the drive.
● To resolve TPM communication failures without data loss, change the BitLocker Drive Encryption Service Startup Type to Automatic via Windows Services, or uninstall the Trusted Platform Module in Device Manager to force an automatic driver reinstall upon reboot.
● Before enabling the service, ensure your system meets BitLocker's strict prerequisites: the target drive must have a minimum partition size of 350MB, be partitioned into at least two sections, and utilize an inactive partition.
● If the drive uses the older MBR scheme, it must be converted to a GPT disk via Disk Management; however, this process acts as a deep format that wipes all files, making a prior backup or a recovery tool like Wondershare Recoverit necessary to prevent permanent data loss.
Ask AI for a summary
 ChatGPT
 Perplexity
 Gemini
 Claude
 Grok
Grok
BitLocker has safeguarded our sensitive data and vital files for over a decade and a half since Windows Vista. While it has significantly evolved since 2006, this drive encryption service isn't perfect. Users often encounter errors with the tool, and BitLocker doesn't always work as it should.
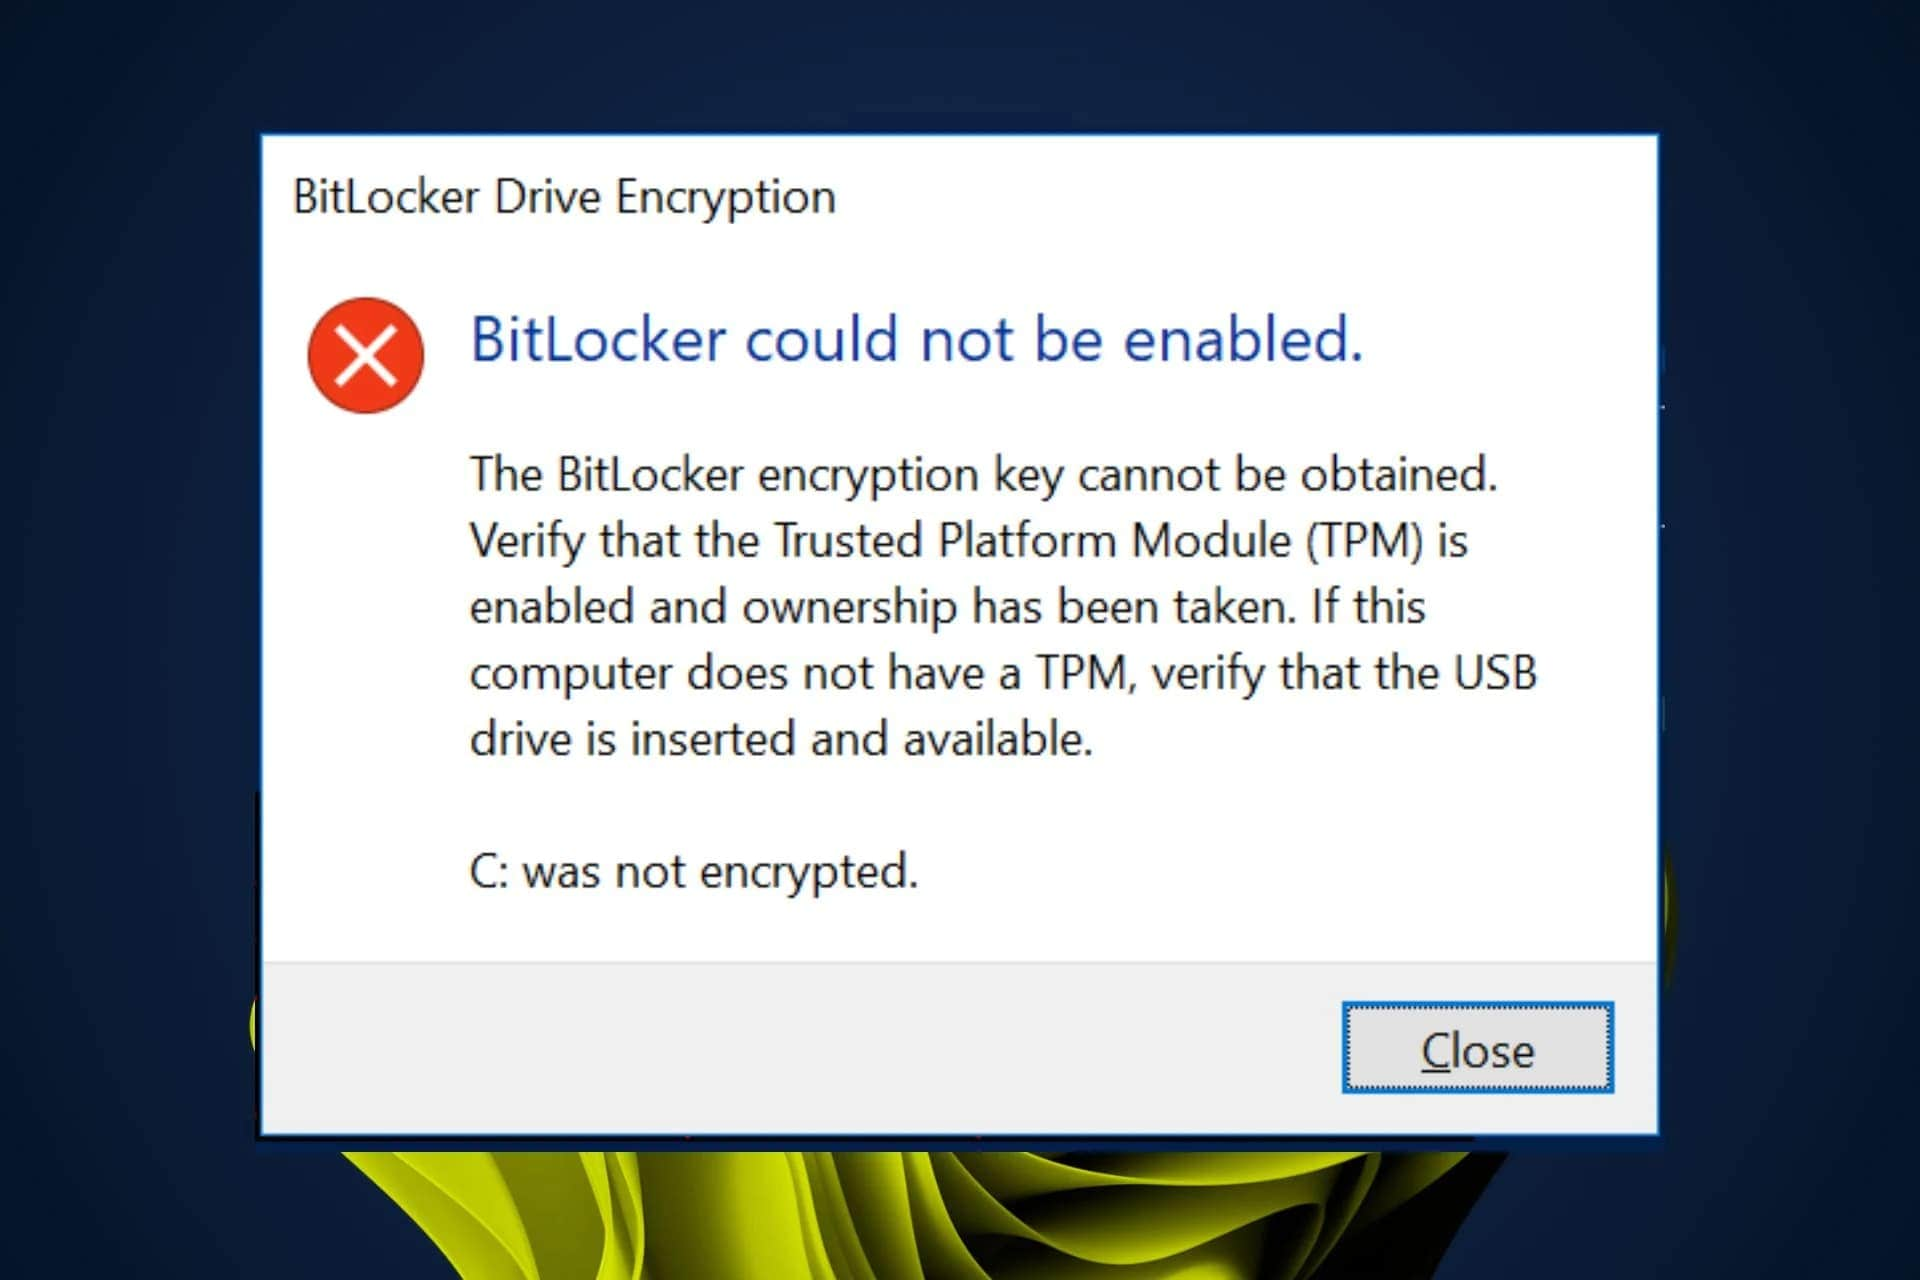
One of those pesky errors states that "BitLocker could not be enabled. C was not encrypted." So, what is the error about, what's causing it, and how can it be fixed? Keep reading, and we'll answer these questions in a bit.
What Is the "BitLocker Could Not Be Enabled" Error?
While enabling BitLocker is relatively straightforward, and the encryption feature usually works well, some users also encounter issues during the process. If you're one of the unlucky users who've seen the "BitLocker could not be enabled. C was not encrypted." error, we understand your frustration. But what does the error mean, and what's causing it?
Causes of the "BitLocker Could Not Be Enabled" Error
With Microsoft's strict enforcement of TPM 2.0 for Windows 11, the "BitLocker could not be enabled" error has become increasingly common. If you recently upgraded your OS or swapped motherboards, your system might temporarily lose communication with the TPM chip, or it might be disabled by default in your new UEFI/BIOS settings.
The BitLocker could not be enabled error typically manifests through two error messages, which also point you to the cause of the issue. There are two distinct problems:
Case 1
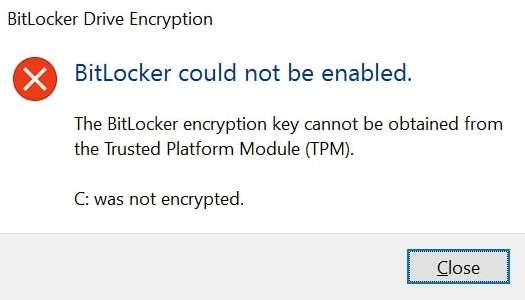
One of the BitLocker errors recognizes the existence of TPM, indicating a communication failure between the BitLocker and the TPM chip.
Case 2
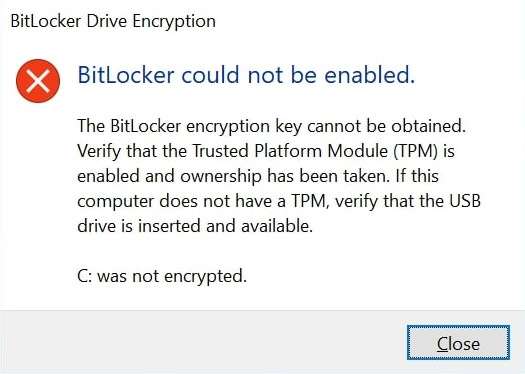
The other BitLocker could not be enabled error states that you should check whether TPM is enabled in your BIOS, and this often occurs when you enable BitLocker with TPM.
How to Fix the "BitLocker Could Not Be Enabled" Error
Most BitLocker errors can be smoothly handled when you know what solution to apply to what problem. We've included an easy-to-use table to match the error with the corresponding solution. Below are also the step-by-step guides for each solution.
📊 BitLocker Error Diagnostic & Fix Matrix
Match your specific error trigger to the correct solution below. Be aware that some fixes carry a risk of data loss.
| Error Trigger | Root Cause | Recommended Solution | Data Loss Risk |
| TPM Communication Failure (Case 1) | Windows services delayed or TPM driver corruption. | Method 1 & 2: Set BitLocker service to Automatic & Restart. Method 3: Reinstall TPM Drivers via Device Manager. |
None |
| Incompatible Drive Format (Case 1) | The disk is using the older MBR partition scheme instead of GPT. | Method 4: Convert disk to GPT via Disk Management. | High (Wipes Drive) |
| TPM Disabled / Not Found (Case 2) | BIOS settings are outdated or TPM is turned off. | Fix 1 & 3: Check PC configuration and Update/Enable TPM in BIOS. | Low to Moderate |
| USB Not Recognized (Case 2) | BitLocker To Go fails due to dead ports or disabled USB boot settings. | Fix 2: Test USB ports and enable USB devices in BIOS boot settings. | None |
Method 1: Turn on the Automatic BitLocker Drive Encryption Service
BitLocker runs as a background service in Windows. However, the operating system may sometimes delay starting this service, which can cause one of the abovementioned errors. To fix it, you must ensure that the BitLocker Drive Encryption Service initiates automatically. Here's how:
- Press the Windows + R keys to open the Run command and type in services.msc to launch Windows Services.
- Locate the BitLocker Drive Encryption Service, right-click it, and select Properties.

- Change the service's startup type to Automatic, hit Apply, then OK.

You may be prompted to restart the PC, but even if you aren't, a restart is highly recommended, after which you can check whether the service is running.
Method 2: Disable and Enable BitLocker
We often forget the power of a simple restart when fixing various software bugs, yet disabling and reenabling BitLocker works wonders. You can follow these steps to complete the action:
- Navigate to Control Panel > System and Security > BitLocker Drive Encryption.
- Locate the drive with the BitLocker encryption on, and click Turn off BitLocker.

- Follow the instructions, input the password, and turn the encryption off.
Once BitLocker finishes, restart the PC and follow the same steps to turn the encryption back on, this time clicking Turn on BitLocker. The error should be gone.
Method 3: Reinstall TPM Drivers
There's a chance that your computer's TPM drivers are outdated, which can also cause the BitLocker error. Fortunately, updating them is effortless, and you can follow these steps:
- Tap the Windows key and search for Device Manager.
- Open the tool and navigate to Security Devices.
- Select the nested Trusted Platform Module, right-click it, and click Uninstall device.

Once you restart the PC, Windows should automatically reinstall the TPM driver, but running Windows Update afterward is also highly advisable.
Method 4: Convert Disk to GPT
While the chances of your disk using the older MBR partition scheme are relatively low, especially if you're using Windows 10 or 11, it's always possible. In that case, you'll need to convert your disk drive to GPT, the newer partition scheme, which will let you use TPM and enable BitLocker without an issue. Here's how:
- Right-click on This PC and navigate to Manage > Disk Management.
- Find the disk drive you want to convert and delete all its partitions by right-clicking and selecting Delete Volume.
- Once the entire drive becomes Unallocated, right-click it and select Convert to GPT Disk.

You'll see the option if the drive has an MBR partition scheme. However, if it's already a GPT disk, you'll see "Convert to MBR disk," so there's no need to proceed.
Remember that converting the disk to a different partition scheme is similar to formatting. The process will wipe everything off the drive, and you'll lose files. However, it's worth noting that your data is still recoverable even if you've already gone ahead with this action without a backup. All you need is the right tool.
Converting a disk from MBR to GPT acts similarly to a deep format—it wipes the partition table and erases all files on the drive. If you perform this fix to enable BitLocker without backing up your C: drive first, your operating system and personal files will be lost.
Why Wondershare Recoverit is Essential Here:
If you accidentally converted your disk to GPT and lost your files, Wondershare Recoverit can bypass the new partition table, scan the raw disk sectors, and retrieve your lost data safely before it gets permanently overwritten.
Wondershare Recoverit is one such tool, and it'll effortlessly recover your lost files after converting the disk to GPT. This superb data recovery tool can handle hundreds of situations like accidental deletion, formatting, viruses, malware, disk conversion, system crashes, errors, etc.
- Manages over 500 data loss situations, such as deletion, formatting, and disk corruption.
- The user-friendly interface allows you to recover data in just a few clicks.

Using the software is incredibly straightforward, but we've also included the steps. You'll need to do this:
- Launch Wondershare Recoverit, choose Hard Drives and Locations, and click on the drive you've just converted.

- The app will automatically scan the location.

- You can add keywords and filters like file size and type.

- You can also preview the found files.

- When ready, hit Recover to save the found data.

With a tool like Wondershare Recoverit, disk conversion is not a problem, and you have nothing to fear if you've hastily done it without a backup.
These are four methods for Case 1. If they don't work for you, let's have a look at Case 2 and its fixes.
Fix 1: Check Your PC's Configuration
While not particularly resource-heavy, BitLocker has some minimum system requirements for enabling the service. Before turning the BitLocker encryption on, you should check if your PC meets these requirements:
- a minimum partition size of 350MB
- a disk drive partitioned into at least two partitions
- an inactive partition
Here's how to check that:
- Navigate to File Explorer > This PC.
- Find the partition you want to turn BitLocker on and check its size.
- Follow the steps from Method 4 to go into Disk Management and check whether your disk drive is partitioned into two or more partitions.
Finally, the partition you're enabling BitLocker on must be inactive. That means enabling BitLocker on any partition other than the C drive, which houses the Windows operating system, is possible. In the case of C drive, you'll likely need to reinstall Windows and reallocate partitions to enable the BitLocker service.
Fix 2: Check The USB
Users often encounter the pesky "BitLocker could not be enabled" error when enabling BitLocker To Go for a USB drive. Fortunately, troubleshooting the culprit here is incredibly straightforward. To resolve it, you'll need to check the USB drive and ensure it's working as it should, as a faulty USB drive, shorted USB port, or disabled USB at boot can cause the error.
- Plug your USB flash drive into a different port and check whether it's showing up inside File Explorer.
- Use a secondary USB flash drive to check whether your USB port works as it should.
- Restart your PC and press the adequate keyboard key to go into BIOS. (You can find information about which key it is by searching for your motherboard brand's BIOS key.)
- Locate USB settings and ensure that USB devices are loaded during boot.
It's worth noting that USB settings for each motherboard manufacturer require different steps. Thus, searching for model-specific instructions on enabling USB devices during boot for your specific motherboard brand and model would be your best option.
Fix 3: Update Your BIOS
BIOS updates are essential to the computer's health, and running the latest version is recommended, as it can also clear the BitLocker error. Let's dive straight into updating it:
- Prepare an empty USB stick and go to your motherboard's website.
- Navigate to the support page, input your motherboard model, and download the latest BIOS version from the Drivers Download page.
- Unzip the file and place it on an empty USB stick.
- When ready, restart your computer and press the BIOS key. It's often the ESC, F2, F8, F10, F12, or DEL key.
- Navigate to your BIOS update settings and add the USB stick as the update source.
- Start the update, carefully follow the instructions, and let the PC handle everything while it reboots a few times to apply the update.

Since BIOS updates vary from manufacturer to manufacturer, following the detailed instructions from your motherboard maker is highly advisable. Otherwise, you may end up bricking your computer. There's also a chance that a BIOS update wipes your storage devices.
However, there's nothing to worry about, even if updating the BIOS wipes your data. With the right tool at your side: Wondershare Recoverit, that data can quickly be recovered.
Conclusion
As a terrific disk encryption tool, BitLocker has evolved since its inception. However, it still suffers from issues. Users often see errors like "BitLocker could not be enabled. C was not encrypted" and similar messages, for which there are two cases.
In case 1, the BitLocker error can be solved by adjusting the BitLocker service, turning it off and back on, or reinstalling TPM drivers. Converting the disk to GPT also works, but it's a solution that can result in data loss.
In case 2, the error can be solved by checking your computer's configuration and ensuring your USB flash drive works correctly. There's also the method of updating the BIOS, a solution that can lead to data loss.
Whether due to BIOS updates or disk conversion, files can be recovered with the help of a reliable data recovery tool like Wondershare Recoverit.
🏁 Final Checklist: Resolving BitLocker Errors
BitLocker is a highly secure encryption tool, but it relies heavily on your hardware's TPM chip and partition scheme. If you encounter the "BitLocker could not be enabled" error, follow this verification checklist:
- Service Check: Is the BitLocker Drive Encryption Service set to "Automatic" in Windows Services?
- Driver Check: Have you uninstalled and reinstalled the Trusted Platform Module (TPM) in Device Manager?
- BIOS Check: Is TPM enabled in your BIOS, and are you running the latest BIOS firmware?
- Disk Check: Is your hard drive formatted to GPT rather than MBR?
Remember: Methods like updating BIOS or converting MBR to GPT can wipe your storage. Always keep a reliable data recovery tool like Wondershare Recoverit installed to instantly rescue your files in the event of an accidental drive wipe or system crash.
FAQ
-
Can I Reinstall BitLocker?
No, you can't. BitLocker is a built-in Windows tool; the operating system manages it entirely, including its updates and versions. However, although you can't reinstall BitLocker, you can update it and sometimes fix the issue by running Windows Updates. -
How Can I Check if BitLocker Is Working Normally?
While most drives encrypted with BitLocker have a small lock icon next to them, you can also check BitLocker's status inside the Control Panel. Navigate to System and Security and select BitLocker Drive Encryption. Here, you'll see BitLocker's status for the operating system drive, fixed data drives, and removable data drives that use BitLocker To Go. -
What Does It Mean to Enable BitLocker?
Enabling BitLocker refers to encrypting your disk drives, which may or may not contain sensitive data. The Trusted Platform Module, or TPM for short, works with BitLocker to provide additional security for your system. This collaboration also makes the encryption more complicated, and it's why you sometimes see the error saying, "Bitlocker could not be enabled."


