

 TL;DR:
To safely rebuild a RAID array, you must first back up or image the current structure to a separate drive, replace the failed disk with a fully compatible drive of equal or greater capacity, and initiate the reconstruction through your controller interface.
● Never run volume repair tools like CHKDSK or FSCK to fix a disordered array, as they can incorrectly update parity with a zeroed disk and cause unrecoverable logical volume corruption.
● RAID 5 rebuilds require significantly more time (often 12 to 24 hours) due to complex parity recalculations; you must use a UPS during this process, as any power failure will corrupt the array and destroy your data.
● If the hardware rebuild fails, the controller malfunctions, or multiple drives crash simultaneously, utilize specialized recovery software like Recoverit to virtually reconstruct the RAID 0, RAID 1, RAID 5, or RAID 10 structure before making further physical changes.
Ask AI for a summary
 ChatGPT
 Perplexity
 Gemini
 Claude
 Grok
Grok
RAID arrays store data across multiple drives for better performance and protection. When one drive fails, you need to know how to rebuild RAID array to keep your data safe. This guide shows you exactly how to rebuild RAID without losing data.
Learning how to rebuild RAID array is crucial for any system administrator or home user with multiple drives. Whether you need to rebuild RAID 1, rebuild RAID 5, or rebuild RAID 10, the basic steps remain similar. The key is acting fast when a drive fails. You must rebuild RAID array without losing data to protect your important files.
This comprehensive guide covers all major RAID types. Learn effective techniques for reconstructing RAID 0 and RAID 1 arrays without risking data loss, and safely restoring RAID 5 configurations. This guide also covers when it's appropriate to turn to RAID disk data recovery software if the RAID rebuild doesn't go as planned. Use these reliable strategies to ensure your data stays secure throughout the rebuilding process.
In this article
Part 1: Understanding RAID Array and Rebuild Process
RAID stands for Redundant Array of Independent Disks. It combines multiple drives to work as one unit. When you rebuild RAID array, you replace a failed drive and restore the array to full functionality. The process varies depending on whether you need to rebuild RAID 1, rebuild RAID 5, or other configurations.
Different RAID levels handle rebuilds differently.
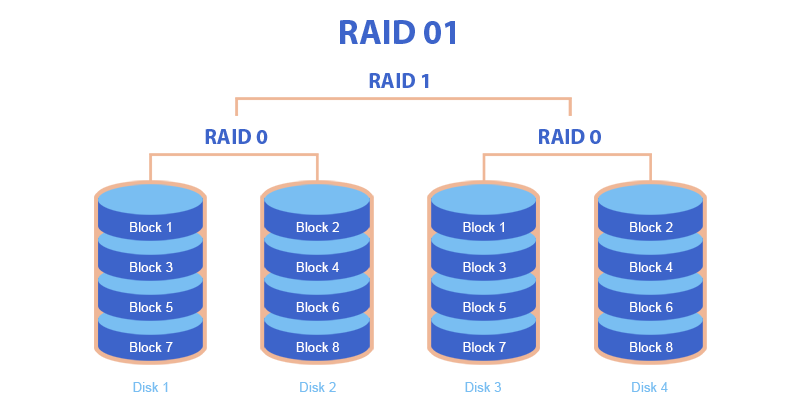
RAID 1 mirrors data across drives, making it easier to rebuild RAID 1 without losing data.
RAID 5 uses parity data spread across all drives. When you rebuild RAID 5, the system recalculates this parity information.
RAID 10 combines mirroring and striping, so you can rebuild RAID 10 by replacing the failed drive in the mirror pair.
Part 2: Why RAID Array Data Gets Lost?
RAID arrays can fail for various reasons. Understanding these causes helps you prevent failures and know when to rebuild RAID array without losing data. Here are the most common reasons:
- Drive mechanical failure - Mechanical breakdowns in hard drives are common, as their internal components experience wear and tear over time due to continuous motion.
- Power supply issues - Unstable power can damage drives and corrupt data
- Controller card problems - RAID controllers can malfunction and cause array failures
- Firmware bugs - Firmware glitches—especially those stemming from outdated versions—can lead to system compatibility problems.
- Multiple drive failures - When two or more drives fail simultaneously
- Environmental factors - Heat, humidity, and vibration damage drive
- Age-related degradation - Older drives are more likely to fail unexpectedly
Part 3: How to Rebuild RAID Array: A Step-by-Step Guide.
Step 1: Identify the Failed Drive
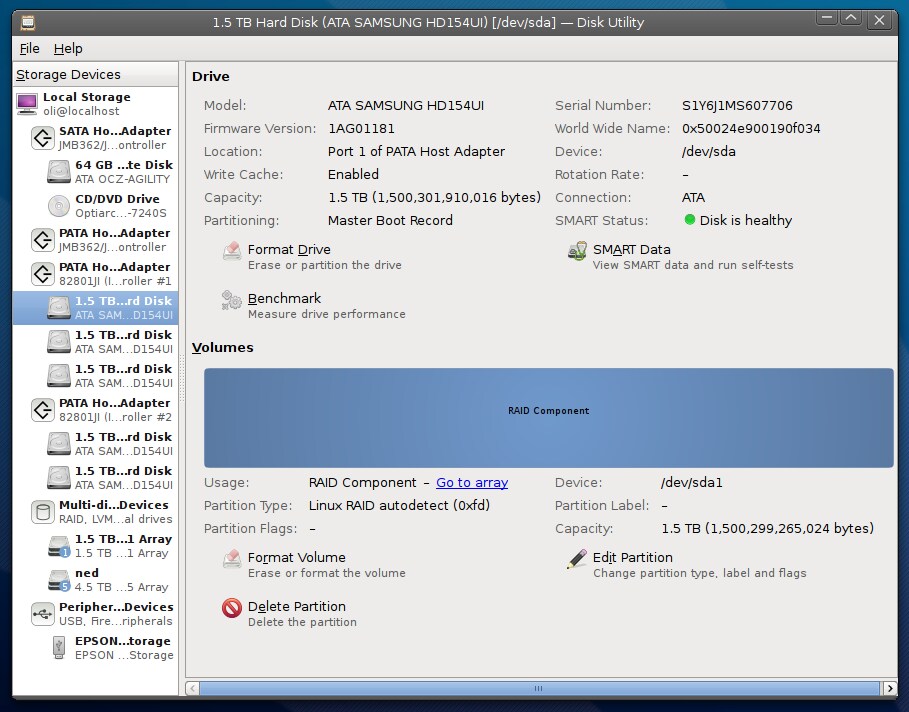
First, you must identify which drive has failed in your array. Check your RAID management software or hardware controller interface. Look for error messages or drive status indicators. Most systems show failed drives in red or with warning symbols. Document your current RAID configuration before you begin to rebuild RAID without losing data.
Next, determine your RAID level and array structure. This information is crucial whether you need to rebuild RAID 1, rebuild RAID 5, or rebuild RAID 10. Check how many drives are in the array and their current status. Write down drive serial numbers and positions. This preparation helps ensure you rebuild RAID array without losing data successfully.
Step 2: Backup or Image the RAID Structure Before Rebuild

Always create a backup before you attempt to rebuild RAID array. If possible, copy critical data to another storage device. This step is essential when you rebuild RAID without losing data. Even if the backup takes time, it protects against total data loss if something goes wrong during the rebuild process.
Create an image of your RAID structure using specialized software. This image captures the current state of your array before you rebuild RAID 1, rebuild RAID 5, or other configurations. Store this image on a separate drive. Having this backup ensures you can recover if the rebuild RAID process encounters problems.
Step 3: Replace the Failed Drive
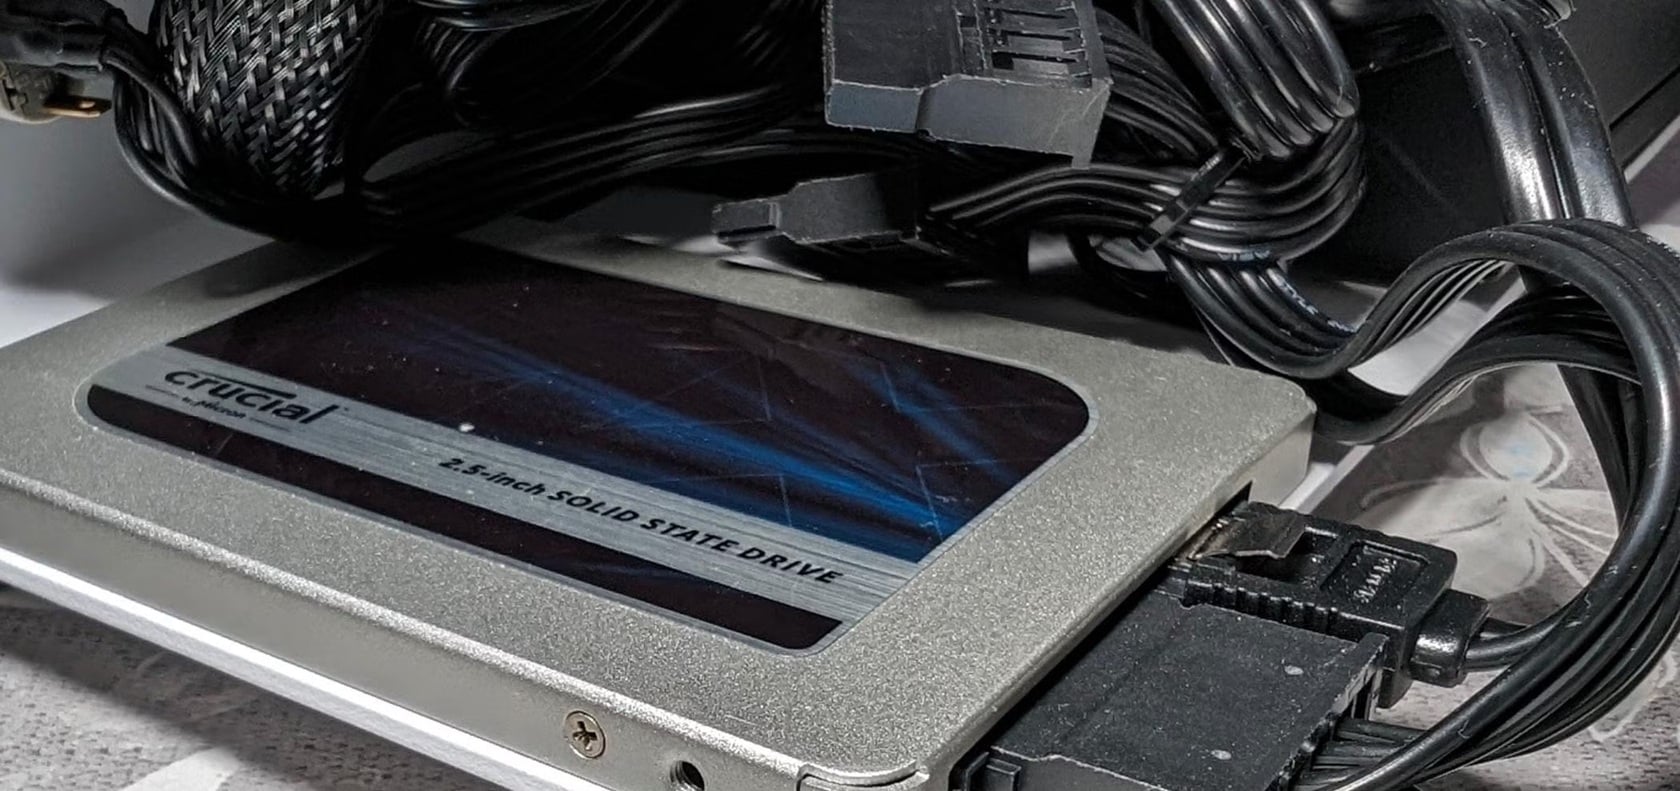
Power down your system completely before replacing any drives. Remove the failed drive carefully and note its position in the array. Replace the malfunctioning drive with one of equal or greater storage capacity. Before initiating the RAID array rebuild, ensure the new drive is fully compatible with your RAID controller to prevent data loss and maintain system stability.
Connect the replacement drive properly and secure all cables. Power on the system and verify the RAID controller detects the new drive. The drive should appear as "uninitialized" or "ready" in your RAID management interface. Do not start the rebuild process yet - first ensure the new drive is functioning correctly.
Step 4: Use RAID Controller or Software to Initiate Rebuild
Access your RAID management software or hardware controller interface. Locate the rebuild or restore function for your array type. The process differs slightly when you rebuild RAID 1, rebuild RAID 5, or rebuild RAID 10. Select the failed drive position and the replacement drive to begin the rebuild RAID process.
Configure rebuild settings carefully before starting. Choose appropriate priority levels - higher priority rebuilds faster, but may slow system performance. Some controllers allow you to schedule rebuilds during off-peak hours. Start the rebuild process and immediately begin monitoring its progress to rebuild RAID without losing data.
Step 5: Monitor the Rebuild Process Carefully
Watch the rebuild progress constantly through your management interface. The time to rebuild RAID array depends on drive size, RAID level, and system load. Rebuilding RAID 5 arrays typically takes longer than rebuild RAID 1 operations. Keep the system running and avoid unnecessary operations during this critical time.
Check for error messages or warnings during the rebuild process. If errors occur, stop immediately and investigate the cause. Monitor system temperature and ensure adequate cooling. Never power off the system while rebuilding unless absolutely necessary. Patient monitoring helps you rebuild RAID array without losing data successfully.
Part 4: RAID Rebuild Failed or Data Lost? Use Recoverit
Sometimes, RAID rebuilds don’t work even if everything seems right—this can happen due to broken drives, hardware issues, or messed-up system data. When that happens and you can't get your files back the usual way, special recovery software can help save your data, even from badly damaged RAID setups.
Recoverit is a powerful data recovery solution designed specifically for RAID array recovery. This professional software can recover data from failed RAID 0, RAID 1, RAID 5, and RAID 10 configurations. Unlike basic recovery tools, Recoverit understands RAID structures and can reconstruct arrays virtually. The software works even when you cannot rebuild RAID without losing data through conventional methods.
The advanced algorithms in Recoverit can handle scenarios where traditional rebuild RAID processes fail completely.
Try Recoverit to Retrieve Lost Data
![]() Security Verified. Over 7,302,189 people have downloaded it.
Security Verified. Over 7,302,189 people have downloaded it.
Whether your RAID controller died, multiple drives failed simultaneously, or the array became corrupted, Recoverit provides hope for data recovery. The software supports all major file systems and can recover documents, photos, videos, and databases from failed RAID arrays.
4 Steps to Recover Data with Recoverit:
Step 1. Download and install Recoverit on a separate computer, then connect your RAID drives.

Step 2. Now, let the software scan and identify your drive configuration.

Step 3. Preview recoverable files from the scan results and select the data you need to recover. Recover data to a safe location on a different drive to avoid overwriting original data.

Video Tutorial: What is RAID 1?
Bonus Part: Overview on rebuilding RAID 5
Your RAID array is failing even after continuous patching and monitoring. And, this is why you’re here to rebuild RAID 5 without losing your data. However, you should also note that rebuilding a RAID array is an extensive and pretty complex task to do, which we’ve tried our best to explain to you in the simplest terms possible. You have to rebuild RAID 5 even if your hard disk has stopped working temporarily. But, the worst-case scenario happens when more than one disk is involved in the failure issue. Thus, it will be only a matter of second to the failure if other disks perform and replace tasks instead of the defective disks. In such worst scenarios, you have to avoid the RAID 5 death at any cost.
You could find solutions if you already have a data backup. On the other hand, you have to go for RAID 5 Recovery Software to recover damaged RAID disk data.
But, the major problem with knowing how to rebuild RAID 5 without losing your data is the negative impact of latency performance. And, in the cases that RAID is not built perfectly, even undertaking its entire rebuilding process. The waiting period is directly proportional to the configuration of capacity drives.
Given below are the causes needed to know to avoid rebuilding incorrect RAID array.
- RAID 5 Disordered Array
- Rebuild Error that leads to Data Loss
- RAID 5 New Configuration
- RAID 5 NFTS Volume
Now, let’s discuss these causes in a bit of detail as follows!
- RAID 5 Disordered Array
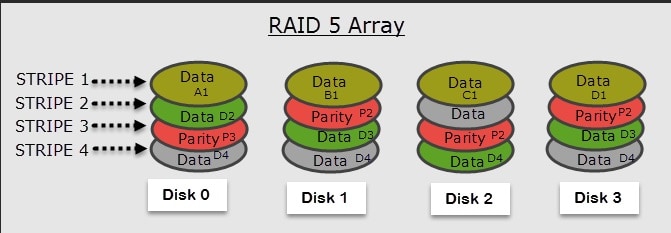
Let’s understand the RAID 5 disordered array with an example. Say, the data was initially present on C1 of Stripe 1 of Disk 2. This data gets rewritten with new parity during the RAID rebuild. And, it will lead to the treatment of Parity on Disk 3 as a data disk and not parity. This whole scenario creates ‘Logical Volume’ corruption. Ultimately, all the disks mentioned are damaged.
It is also imperative to run volume repair tools like FSCK, CHKDSK, and similar on the system due to logical volume corruption and parity build. Sometimes, these utilities also cause severe damage than repairing.
- Rebuild Error that leads to Data Loss
Rebuilding rests upon two factors, i.e., Parity and Array configurations. The fault in either of these configurations will lead to the misappropriate functioning of Array. What happens in the rebuild RAID configuration is that the Parity gets updated with a zeroed disk instead of an HDD rebuild. Here, the original Parity is destroyed by rebuild RAID, and then the zeroed disk prevents the drive rebuild. Consequently, it will be challenging to recreate missing or damaged HDD.
- RAID 5 New Configuration
In this case, the data will become unusable due to a fault in the Operating System. Here, the Operating System of a rebuild cannot correctly read the metadata sections, which causes logical corruption and data being made unusable. This logical volume corruption will trigger the admin to run the volume repair tool and repair logical drives, which is the main reason for further damages.
- RAID 5 NFTS Volume
If the user tries to rebuild the lost RAID array configuration using an incorrect format, it will lead to data damage. For instance, the damage is apparent when the 32K stripe size composition is forced upon the 64K stripe size configuration.
Part 6: Solutions to rebuild RAID 5 without losing your data
Before we directly dive into the solutions of how to rebuild RAID 5 without losing your data, it’s crucial to consider few essential factors as given below. It’s because the RAID 5 rebuilding process doesn’t always flow smoothly.
Vital Considerations to rebuild RAID 5 without losing your data
- Know when to rebuild
As earlier mentioned, even a single hard drive failure can lead to a complete RAID failure if your RAID system is not fault-tolerant. And, you should rebuild RAID 5 after five disk fails if your system has a fault-tolerance of 5. As the RAID rebuilding task is risky, you can hire a RAID recovery specialist if you’re not confident enough to do it independently.
- Understand RAID level
Understand your RAID level before you start the RAID data recovery. You need to know all the aspects of an array’s configuration. In this case of RAID 5, the level of data storage and redundancy is 5. Now, you know the class, you can start labeling the cables, wires, drives, ports, or controller configuration, etc., leading to the disconnection of each disk in the Array. These disks should then connect to a controller before running the RAID recovery software. So, understand all these array parameters as profoundly as possible for successful rebuild execution.
- Check new RAID controllers and disks
Now, you need to ensure the proper working of newly replaced disks. Check that your controllers are in good condition before starting the rebuild process to avoid any future problems. You could corrupt or lose data if you try to rebuild RAID 5 with a faulty controller.
- Clone the disks before rebuild
Be well prepared by cloning all the disks in the RAID array to ensure your absolute data security. Imaging your drive means you will put in the backed-up Array. Remember to label every backup clearly while mirroring the drives to maintain proper order if you ever need to reconstruct volume from these reserves.
- Avoid running CHKDSK or deleting any file
Do not delete any files ever before the whole process of rebuilding gets done. Often, users delete specific files to have some extra space during the rebuild process. Also, don't utilize file system tools like CHKDSK to try recovery. It can seriously worsen the whole issue!
- Do not create a new file on disarrayed disk
As a significant precaution, you shouldn't create any new file or run any important application during the data recovery. It is because the new files can overwrite data available on the corrupted disk.
- Take a backup
You need to take a backup on a separate volume. Also, you shouldn't overwrite data inactive volume as it can lead to an unrecoverable damage.
Solutions to rebuild RAID 5 without losing your data
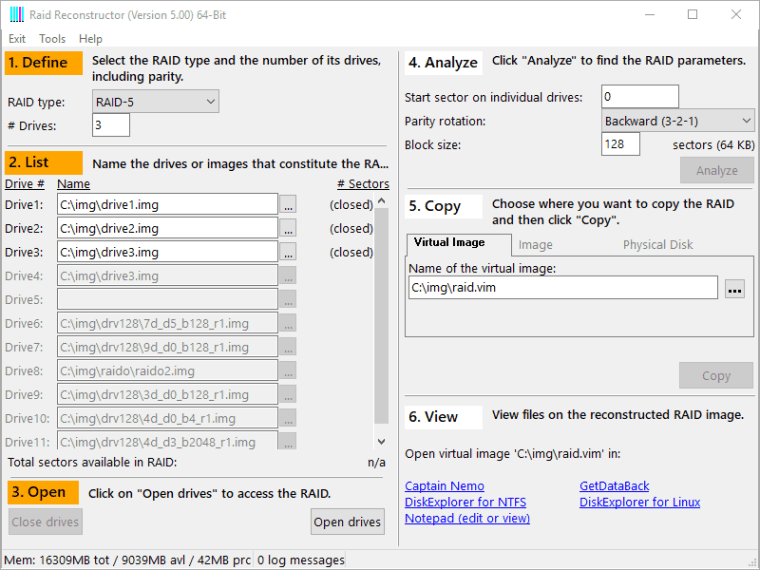
A powerful RAID Recovery software can do wonders even if you don't keep a regular backup. However, it's a good practice to maintain a backup. With the RAID Recovery software, you can detect disk configuration and technical parameters either automatically or manually.
Part 7: Pro Tips to Safely Rebuild RAID Arrays
Successful RAID rebuilds require careful planning and execution. These professional tips help ensure you rebuild RAID array without losing data every time. Follow these best practices whether you need to rebuild RAID 1, rebuild RAID 5, or any other configuration.
- Test replacement drives first - Verify new drives work properly before installing in RAID arrays
- Use identical drive models - Same manufacturer and model reduces compatibility issues during rebuilds
- Monitor drive health regularly - Use SMART monitoring to predict failures before they happen
- Keep spare drives ready - Having replacement drives available reduces downtime during failures
- Document array configurations - Maintain records of RAID settings, drive positions, and serial numbers
- Update firmware regularly - Keep RAID controller and drive firmware current for best reliability
- Schedule regular backups - Always have current backups before attempting to rebuild RAID without losing data
- Use UPS power protection - Uninterruptible power supplies prevent corruption during rebuilds
Conclusion
Learning how to rebuild RAID array is essential for anyone managing multiple drive systems. This guide covered the complete process to rebuild RAID without losing data, from identifying failed drives to verifying data integrity. Whether you need to rebuild RAID 1, rebuild RAID 5, or rebuild RAID 10, the fundamental steps remain the same: identify, backup, replace, rebuild, monitor, and verify.
Remember that prevention is always better than recovery. Regular monitoring, proper maintenance, and current backups reduce the need for emergency rebuilds. When standard methods to rebuild RAID array without losing data fail, professional recovery tools like Recoverit provide additional options.
Following these guidelines helps ensure your RAID arrays remain reliable and your data stays protected.
FAQs
-
Q: How long does it take to rebuild RAID array?
The time to rebuild RAID array depends on several factors including drive size, RAID level, and system performance. Simple RAID 1 arrays may rebuild in a few hours, while large RAID 5 arrays can take 12-24 hours or more. The process to rebuild RAID 5 typically takes longer than rebuild RAID 1 because of parity calculations. Always allow sufficient time and avoid interrupting the rebuild process. -
Q: Can I use the computer while rebuilding RAID?
Yes, you can usually use the computer during RAID rebuilds, but performance will be slower. The rebuild process consumes system resources and drive bandwidth. Light tasks are generally acceptable, but avoid heavy operations that stress the drives. When you rebuild RAID array without losing data, limiting system usage reduces the risk of errors and speeds up completion. -
Q: What happens if power fails during RAID rebuild?
Power failure during RAID rebuild can corrupt the array and cause complete data loss. This is why using an uninterruptible power supply (UPS) is crucial when you rebuild RAID without losing data. If power fails without UPS protection, the rebuild must restart from the beginning. In worst cases, you may need professional data recovery services to rebuild RAID array without losing data.


