Contrary to what you might have heard, the ReFS file system is not resistant to data loss. If you’re in the middle of a ReFS partition fiasco, you’ve learned that the hard way. While this situation is difficult to manage, it is not beyond recovery. Don’t worry. We’re here to help you.
Here’s everything you need to know about the ReFS file system and the common causes of data loss of ReFS partitions. Below, you’ll also find the three most effective ReFS partition recovery methods, one for each Windows skill level – beginner, intermediary, and professional.
In this article
What Is a ReFS File System?

Resilient File System, or ReFS for short, is a relatively new version of the file system that Windows introduced back in 2012 to offset the growing number of issues related to its predecessor – NTFS. ReFS was initially intended for Windows servers, but it wasn’t long since it debuted on desktops with Windows 8.1. By the time Windows 11 was out, it was already discontinued.
Be that as it may, the ReFS file system is characterized by a sophisticated build that makes data more resilient to corruption. It includes internal mechanisms like metadata mirroring and data scrubbing, both of which help battle storage issues that have become common in NTFS.
Causes of Data Loss of ReFS Partition
Despite all these enhancements, ReFS remains vulnerable to data loss, which means that every once in a blue moon, a ReFS partition will get lost. Some of the common causes are:
- 🚨Accidental deletion/formatting – ReFS uses sophisticated mechanisms to defend data against corruption and data loss, but it’s not immune to human error. Accidental deletion and ReFS partition formatting are the number one reason for this.
- 👾Malware attacks and viruses – Any computer and partition can get involved in a malware attack, regardless of the file system used. ReFS can’t save a partition from getting infected with a virus, making this the second most common cause of data loss.
- 💻ReFS file system corruption – Data and partition corruption can happen for many reasons. It can be due to physical or logical damage, exposure to sudden power outages, data transfer interruptions, and so on. All of this happens frequently.
How to Recover a ReFS Partition and Its Data
Obviously, it is possible to recover from ReFS partition data loss, or you wouldn’t be reading any of this. Depending on your computer prowess and technical skills, you can approach this issue in several ways. Refer to the table below for the most suitable ReFS recovery method:
| 👀If you are… | 🔧You can pick… |
| New to data loss and recovery. | Method 1: Using a Professional Partition Recovery Tool |
| Comfortable with running commands. | Method 2: Using Diskpart |
| An advanced computer user. | Method 3: Using the ReFSUtil Tool |
Method 1: Using a Professional Partition Recovery Tool
Because ReFS partition loss happens more often than you’d think. every respectable data recovery software is expected to have an integrated partition recovery tool. One of the most capable tools for this is Wondershare Recoverit, a professional solution everyone can use.
Here’s how to perform ReFS data recovery using Wondershare Recoverit:
- Download, install, and launch Wondershare Recoverit for Windows.
- Select a problematic ReFS partition from Hard Drives and Locations.

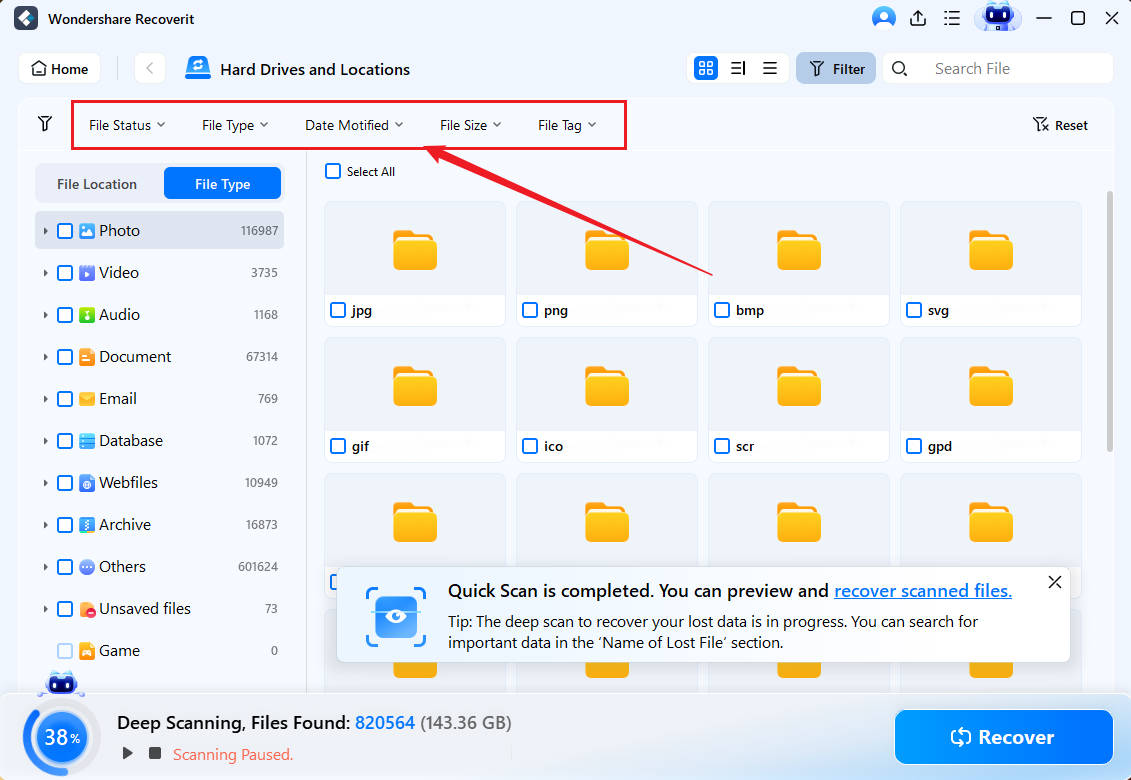
- The app will initiate an all-around scan of your partition. You can follow the progress and pause or stop the scan if necessary.

- When the app is done scanning your partition, you can search for missing files by file type, date stamp, size, or tag. Alternatively, you can browse results based on keywords.

- Double-click any file to preview it before recovery.

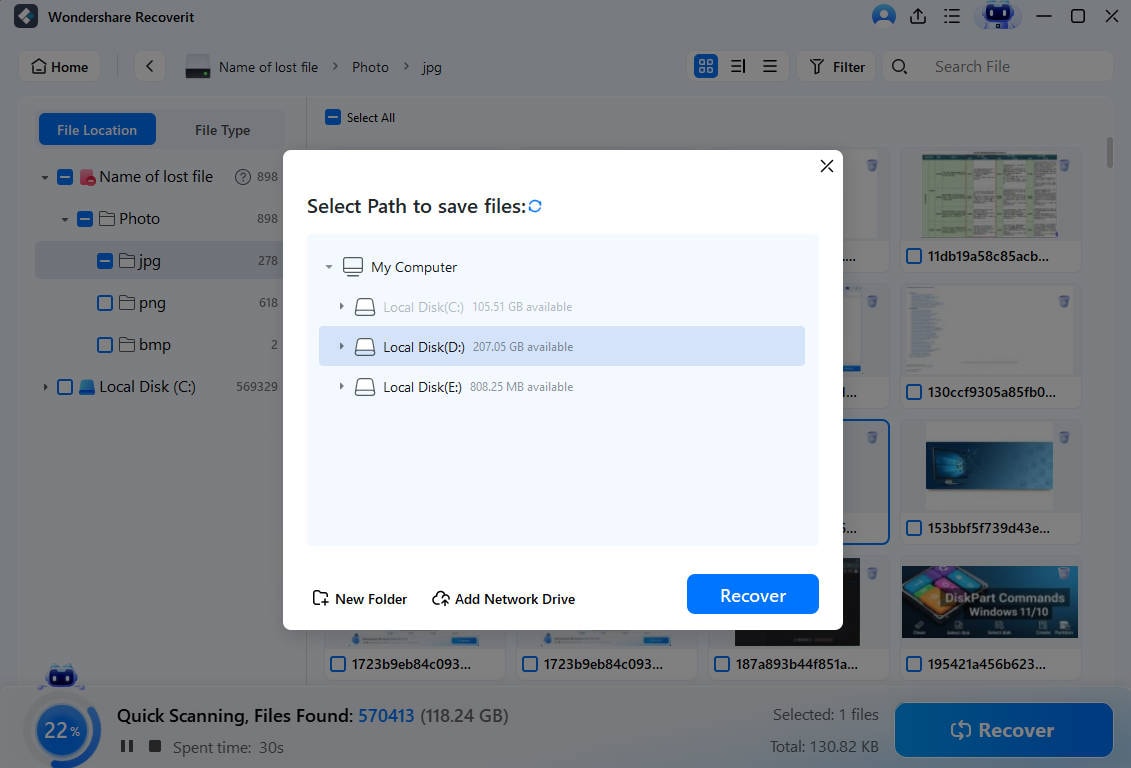
- Select all files and folders you want to rescue from the partition and click Recover.
- Choose a safe location to store data after recovery and click the Save button.

- If you don’t want to recover data right now, you can save scan results for later.

Method 2: Using Diskpart
As its name suggests, Diskpart is a disk partitioning utility in Windows that allows you to take control of disk partitions. You can use it to format, delete, and wipe problematic partitions and create new ones in their place. Diskpart commands are executed in Command Prompt.
Follow these steps to perform ReFS file recovery using the Diskpart utility:
- First, open the Start menu and go to Disk Management to check the size of your ReFS partition. You’ll need this information for Diskpart commands.

- Return to the Start menu and search for Command Prompt. Click Run as administrator.

- Once in Command Prompt, type in diskpart and hit Enter.
- Next, type in
list diskand press Enter. This command will show you the list of all available disks on your computer. Find the disk that contains the ReFS partition and remember its number. - Type in select
disk X, whereXis the number of the disk with your ReFS partition. Hit Enter. - Type in
list volumeand press Enter. You will see a list of all partitions on the selected disk. Find your ReFS partition based on its size and remember its number. - Now, type in
select volume Y, where Y is the number of your ReFS partition. Press Enter. - To recover your partition, type in
assign letter=Z, whereZis any letter you want to name your partition.
Method 3: Using the ReFSUtil Tool
ReFSUtil is a specialized tool in Windows computers that helps you diagnose ReFS partitions after they’ve been heavily damaged or corrupted. It is invaluable in identifying and moving salvageable ReFS data to a healthy volume. ReFSUtil also relies on the Command Prompt.Here’s what you need to do to recover the ReFS partition using ReFSUtil:
- From your Start menu, go to Disk Management and find the ReFS partition needing recovery. Remember its drive letter because you will need this information later to run ReFSUtil.

- ReFSUtil will copy all recoverable files from a lost ReFS partition to a healthy one. Before you run it, you need to choose the recovery destination.
- Next, Search for Command Prompt in the Start menu and click Run as administrator.
- Use Command Prompt to work out your working directory. That’s the directory in which you will be running ReFSUtil. Type in
cdand press Enter. - To run ReFSUtil, type in the following command:
refsutil salvage -FA, followed by the drive letter of the problematic partition, working directory, and recovery destination. For example:refsutil salvage -FA D: C:\Temp C:\Restore. Press Enter to execute the command.
Bonus 1: How to Create a New Partition on the Unallocated Space
After you rescue data from a lost ReFS partition, you might want to create a new healthy partition in its place. The easiest way to do that is using Disk Management:
- In Start, search and open Disk Management.

- Right-click the unallocated space where your ReFS partition used to be and select New Simple Volume.

- Specify volume size and click Next.

- Assign a new drive letter to the partition and click Next.

- Select the ReFS file system format and check Perform a quick format. Click Next.

- Click on Finish to create a new partition in the unallocated space.
Bonus 2: How to Correctly Format a Recovered Drive to ReFS
Disk Management can also help you format a recovered drive and keep the ReFS file system. Just in case, we want to remind you that doing that will wipe your ReFS partition.
- Go to Disk Management from the Start menu.
- Right-click your recovered ReFS partition and select Format…

- Choose the ReFS file system and check Perform a quick format. Click OK.

Conclusion
Unfortunately, using the ReFS file system instead of the textbook NTFS can’t protect you against data loss. When you find yourself in a situation where you must perform ReFS file recovery on your PC, you should use the most suitable method according to your experience and skill level.
The quickest way to recover a ReFS partition and its data is using the ReFSUtil tool, but it takes a lot of technical knowledge. Diskpart is easier, although it also requires you to use the Command Prompt. The easiest way to recover ReFS partition data is using Wondershare Recoverit.
FAQ
Does CHKDSK work on ReFS?
CHKDSK doesn’t work on ReFS. If you try to run CHDSK on a ReFS partition, you will receive the following message: “The type of the file system is REFS. REFS file system does not need to be checked.”Does Windows 11 support ReFS?
Yes, Windows 11 supports the ReFS file system.What is the best ReFS file recovery tool?
One of the best ReFS file recovery tools based on success rate is Wondershare Recoverit. Recoverit’s patented data recovery technology boasts an impressive 98% recovery rate in more than 500 data loss scenarios, including accidental deletion, formatting, malware attacks, and corruption.


 ChatGPT
 Perplexity
 Google AI Mode
 Grok
Grok


