

 TL;DR:
To fix the "Please insert a disk into USB drive" error—which occurs when Windows fails to detect the flash drive and displays 0 bytes of available space—start by resolving drive letter conflicts or updating drivers before attempting partition-level repairs that cause data loss.
● Attempt non-destructive fixes first by opening Disk Management to manually assign a new drive letter to the unrecognized volume, or by using Device Manager to update the specific driver under Universal Serial Bus Controllers.
● If basic repairs fail, you must rebuild the drive by deleting and recreating the partition in Disk Management or by executing a specific Command Prompt sequence using Diskpart (clean, create partition primary active, format fs=fat32), which will completely erase all stored files.
● If inserting the USB drive causes Windows to freeze or hang, the device is likely interfering with system boot priorities and should be inserted before the operating system initiates its startup sequence.
Ask AI for a summary
 ChatGPT
 Perplexity
 Gemini
 Claude
 Grok
Grok
USB flash drives are the most popular storage devices because they are versatile enough to accommodate a lot of different devices and file formats. Depending on the size of the USB drive, you can use it to store all manner of files including documents, audios, photos, and videos. But as useful as a USB flash drive can be, the devices are prone to numerous errors.
One of the most common USB errors is the error message, "Please insert a disk into Removable Disk". In this guide, we offer you numerous ways to fix this problem and get the drive working normally again.
Part 1: What is "Please Insert a Disk into Removable Disk" Error?
The "Please Insert a Disk into Removable Disk" error is a common message that you may see when a USB flash drive is malfunctioning. It usually indicates that the computer has been unable to detect the USB device for some reason and therefore you are unable to access any of the files on the drive.
If you see this error and then check the drive's properties, you will see that both the "Available Space" and the "Used Space" both show "0 bytes".
Part 2: How to Fix "Please Insert a Disk into USB Drive" Error?
The following are some of the most effective solutions for this error. We recommend attempting each solution in turn until you find the right one:
Solution 1: Manually Assign a New Drive Letter to the USB Drive
You can be able to fix this problem by manually changing the drive letter. Here's how to fix it:
- Ensure that you are logged into your computer with administrative privileges and plug in the USB flash drive to the computer.
- Go to "This PC" and then click on Manage > Disk Management.
- Right-click on the problematic drive and then select "Change Drive Letter" and "Paths".

- Right-click on the problematic drive and then select "Change Drive Letter" and "Paths".
Solution 2: Try Inserting the USB drive before Windows starts
If Windows hangs when you insert the USB drive, the drive is likely set as a priority boot device. If this is happening, remove the device and insert it before Windows starts.
Solution 3: Try Cooling or Heating the USB Drive
If the two methods above don't work, try inserting the drive into the computer and heat it using a hairdryer. Wait at least two minutes and then remove and reinsert the drive again. If that doesn't work, let the drive cool for a while and then remove and reinsert it for a while.
Solution 4: Update USB Driver
Updating USB drivers is another great way to fix a USB driver that doesn't work properly. Follow these simple steps to update the USB drivers:
- In the search function, type in "Device Manager" and click on the top result.
- Click on "Universal Serial Bus Controllers" to locate the driver you need to update.
- Right-click on the drive and choose "Update Driver".

Solution 5: Format the USB Drive
Another great way to fix a malfunctioning USB drive is to format it. But it is worth noting that this may cause data loss. Here's how to format the drive:
- Insert the device into the computer and then right-click on "This PC" and select "Manage".
- Select "Disk Management" and right-click on the problematic USB drive. Select "Format" from the options.
- Enter the drive's new name in the "Volume Label" and ensure you are using the correct file system. Click "OK" when you're ready.

Solution 6: Fix Inaccessible USB Drive Using Diskpart
You can use the Diskpart in Command Prompt to fix the USB drive. Follow these simple steps to do it:
- Type in "Command Prompt" in the search function and right-click on the result to choose "Run as Administrator".
- In the Command Prompt window, enter the following commands, hitting "Enter" after each command.
diskpart
list disk
select disk X (x is the drive number assigned to your USB drive)
clean
create partition primary
active
Select partition 1
format fs=fat32
Solution 7: Try Hardware and Devices Troubleshooter
Running the Hardware and Devices troubleshooter in Windows may also fix a malfunctioning USB drive. Here's how to run the troubleshooter:
- On your Windows PC, open "Control Panel" and then click on "Configure a Device" under "Hardware and Sound." Windows 10 users can also access the same process by going to Settings > Update and Security > Troubleshoot and then click on "Hardware and Devices".
- The troubleshooter should begin running immediately. When it is done, you should see a report of the problems found and the steps you can take to fix them. The troubleshooter may also repair some of the problems automatically.

Solution 8: Delete Partition and Create a New One
Deleting the partition and then creating a new one is an advanced solution that may be just what you need. Follow these simple steps to delete the partition from Windows:
- Ensure that you are logged in to your computer with administrator privileges and then click on the File Explorer icon to begin the process.
- Right-click on "This PC" and then select "Manage".
- In the window that opens, select "Disk Management" under "Storage".
- Now, right-click on the partition that you want to delete and then choose "Delete Volume".

- Confirm that you want to delete the partition, by clicking "Yes" in the dialogue box that appears.
To create a new partition, follow these simple steps:
- Follow steps 1-3 as above.
- In the right-pane, right-click anywhere within the "Unallocated" section and select "New Simple Volume".

- Click "Next" in the wizard that appears.
- Type in the amount of space you want to assign the partition you want to create in the available field on the next page and click "Next" to continue.

- In the Assign Letter or Path page, you can leave everything as is, and click "Next" or make changes as you feel necessary.

- In the "Format Partition" page, you can also choose to leave all the settings as is or make changes as needed. Click "Next" to continue.

- Click "Finish" to complete the process and Windows will create the new partition according to your specifications.
Video Tutorial on How to Fix Please Insert a Disk into USB Drive
Part 3: Causes of "Please Insert a Disk into Removable Disk" Error
Before we get to the solutions for this problem, it is important to understand why this error can occur. The following are some of the most common reasons why this error may occur:
- You may see this error if the USB drive you are using attempts to use a drive letter that is already assigned to another partition.
- The USB drive may have some corrupt files or may be infected by viruses or malware which can corrupt the files on the drive and even damage the drive itself.
- Improper use of the drive can also cause these problems.
- The PC's controller may be unable to load the firmware of the drive you are using.
- The USB drive may also not have been recognized by Windows 10.
Part 4: How to Recover Lost Data after Fixing the Error
The solutions above are all ideal for fixing this error or repairing any USB drive that may be problematic. But most of them are likely to cause data loss. If you experience partial or data loss when fixing the USB device, you may want to use a USB data recovery tool to get the data back. But there are so many data recovery tools that can be difficult to choose the best one. Lucky for you we have the best data recovery tool for the job. Recoverit Data Recovery has one of the best recovery rates in the business. It is also fast and very easy to use.
Key Features of Recoverit Data Recovery
- It is useful in the recovery of data on any type of drive including USB drives, computer hard drives, external hard drives, and SD cards.
- It can also recover more than 1000 different types of data including audio, video, documents, photos and so many more.
- Recovery is simple and straightforward. You can recover your data in just three simple steps.
- It will recover the data regardless of how you lost the data in the first place, even from a damaged device.
To use Recoverit to recover the lost data from the USB drive, install the program on to your computer and then follow these simple steps:
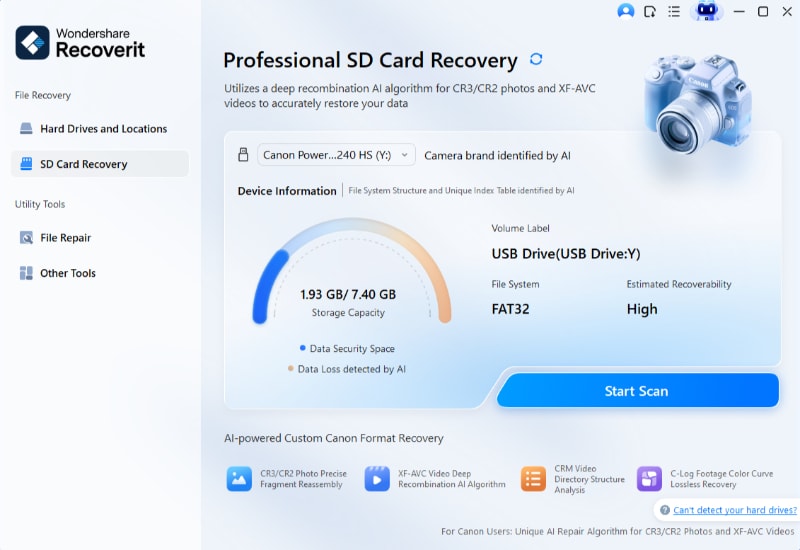
Step 1: Select the Drive Location
Run the program on your computer to begin. You can double-click on the program's icon to open it.
Go to the SD Card section, select the USB drive with the missing data you would like to recover. Then, click "Scan" to begin the process.
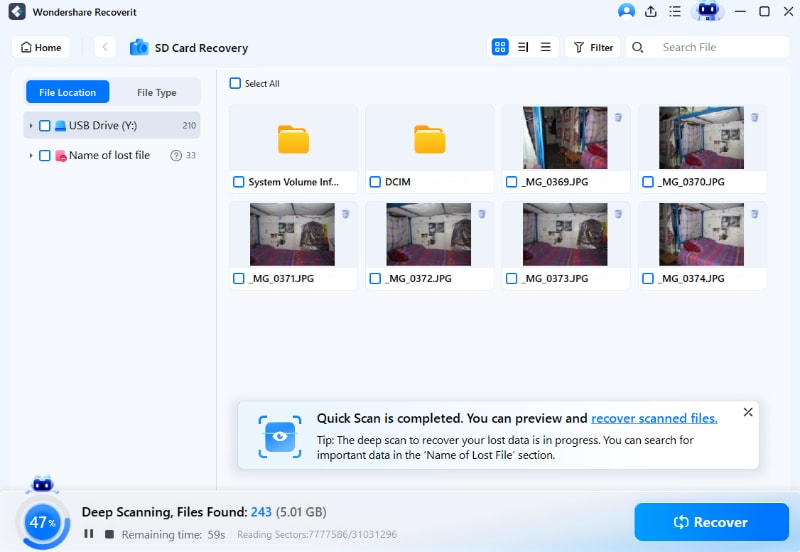
Step 2: Scan the Drive
The program will begin scanning the drive for the missing data. The scanning process can take anywhere from a few minutes to a few hours depending on the size of the files on the drive.
But you can "Pause" or "Stop" the scan any time you want or as soon as you find the files you are looking for. If you click "Pause" you can always resume the scan later to recover more files.
Step 3: Preview and Recover Missing Files
You should see the recoverable files after the scan is complete. Simply click on a particular file to preview it and make sure that it is the file you would like to recover.
Click "Recover" to recover the file and do the same with all other files you want to recover.

This particular USB error is pretty common, and the solutions we've outlined above should be able to help you fix the problem and get the USB device working normally again. Recoverit should be able to help you recover any data that you may have lost when repairing the device.
Try Wondershare Recoverit to Perform Logical Drive Data Recovery
 Security Verified. Over 7,302,189 people have downloaded it.


