

 TL;DR:
You can use the Windows DiskPart command-line utility to format hard drives up to 2TB to the FAT32 file system, effectively bypassing the 32GB capacity limit imposed by the standard Windows formatting tool.
● The FAT32 format provides universal compatibility across Windows, macOS, Linux, and gaming consoles, making it superior to the default NTFS for external sharing, though it strictly limits individual files to a maximum of 4GB.
● Running the formatting process requires Administrator privileges and executing the exact command sequence of list disk, select disk, clean, create partition primary, and format fs=fat32 quick.
● DiskPart permanently erases all existing partitions and files on the selected drive, making it critical to verify the disk number before formatting or use recovery software like Recoverit if data is accidentally wiped.
Ask AI for a summary
 ChatGPT
 Perplexity
 Gemini
 Claude
 Grok
Grok
Windows users often need to format hard drives to FAT32, a file system compatible with many devices. DiskPart is a powerful command-line tool in Windows that can do this—even when other methods fail.
Standard formatting tools in Windows have size limits and may not work with large drives. DiskPart removes those limits and can format drives of any size as FAT32, making it a top choice for larger hard drives.
Learning how to use DiskPart to format a drive to FAT32 is important. This guide walks you through every step of the process so you can do it easily and successfully.
Understanding the FAT32 File System and Its Limitations
File Allocation Table(FAT) is a file support system that is used primarily on small storage devices which can hold up to 32GB of storage. FAT was introduced in 1977, and in, this section, we will learn everything that is to know this specific file support system.
- It is compatible with all operating systems, which include MacOS, Windows PCs, Linux Ubuntu, and mobile devices. FAT system's compatibility makes it one of the best formats for file sharing between two computer systems.
- USB drives and SD cards are formatted in FAT32, which is the advanced form of FAT. This allows those devices to be used on both Windows PC and Mac operating systems.
- The problem is that it does not support storage drives with excessive storage space, and it also cannot handle individual files over 4GB in size.
- It is also compatible with the older versions of Windows such as Windows 98.
- Other than that it is compatible with a variety of devices: smartphones, digital cameras, gaming consoles, and CCTV cameras.
- FAT32 only works with partitions with a maximum capacity of 16 TB.
- FAT32 does not have built-in file compression features.
Windows 10 does not allow you to format drives in FAT32, but there is a way out of it. If you are willing to face the consequences of making such a move, then you have come to the right place. Here, we will show you the way on how to Format a Hard Drive to FAT32 in Windows.
FAT32 stands for File Allocation Table 32-bit. It's an older file system that Windows has supported for decades. FAT32 works with almost every operating system. This includes Windows, Mac, and Linux systems. It also works with gaming consoles and media players. The FAT32 system has important limitations. Single files cannot exceed 4GB in size. The maximum volume size is 2TB when using DiskPart.
Windows' standard format tool limits FAT32 volumes to 32GB. This is why many users turn to DiskPart to format hard drive to FAT32. DiskPart bypasses these artificial limits and can format HDD to FAT32 at full capacity.
Why Format a Drive to FAT32?
Formatting drives to FAT32 serves many purposes. The main reason is universal compatibility across different systems and devices.
- Works across operating systems: FAT32 is compatible with Windows, macOS, and Linux—no extra tools needed
- Supported by game consoles: PlayStation and Xbox can read FAT32 drives out of the box
- Media player compatibility: Most TV media players and streaming devices support FAT32
- USB drive formatting: FAT32 is ideal for USB drives used across multiple computers
- External storage solutions: Portable hard drives work better with FAT32 for device compatibility
- Legacy system support: Older computers and embedded systems often require FAT32
- File sharing purposes: FAT32 eliminates compatibility issues when sharing files between different operating systems
How to Format a Hard Drive to FAT32 Using DiskPart?
DiskPart is a built-in Windows tool used to manage drives through simple commands. It offers more control than regular formatting options and works even when other methods fail. It's useful for cleaning up drives or making them compatible with older devices.
You'll learn how to format a hard drive to FAT32 step by step. We'll show you how to open DiskPart, list drives, select the right one, and format it safely. Each step is clear and easy to follow, even for beginners.
Step 1: Open Command Prompt as Administrator
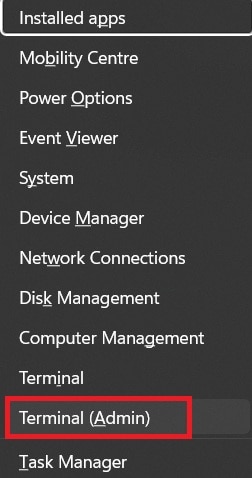
First, you need administrator access to format hard drive to FAT32. Right-click the Start button in Windows. Select "Terminal (Admin)" from the menu. This opens the command line with full system privileges.
Windows will show a User Account Control prompt. Click "Yes" to proceed. The command prompt window opens with administrator rights. You'll see "Administrator" in the window title. This confirms you have the proper permissions to use DiskPart and format HDD to FAT32.
Step 2: Launch DiskPart Utility
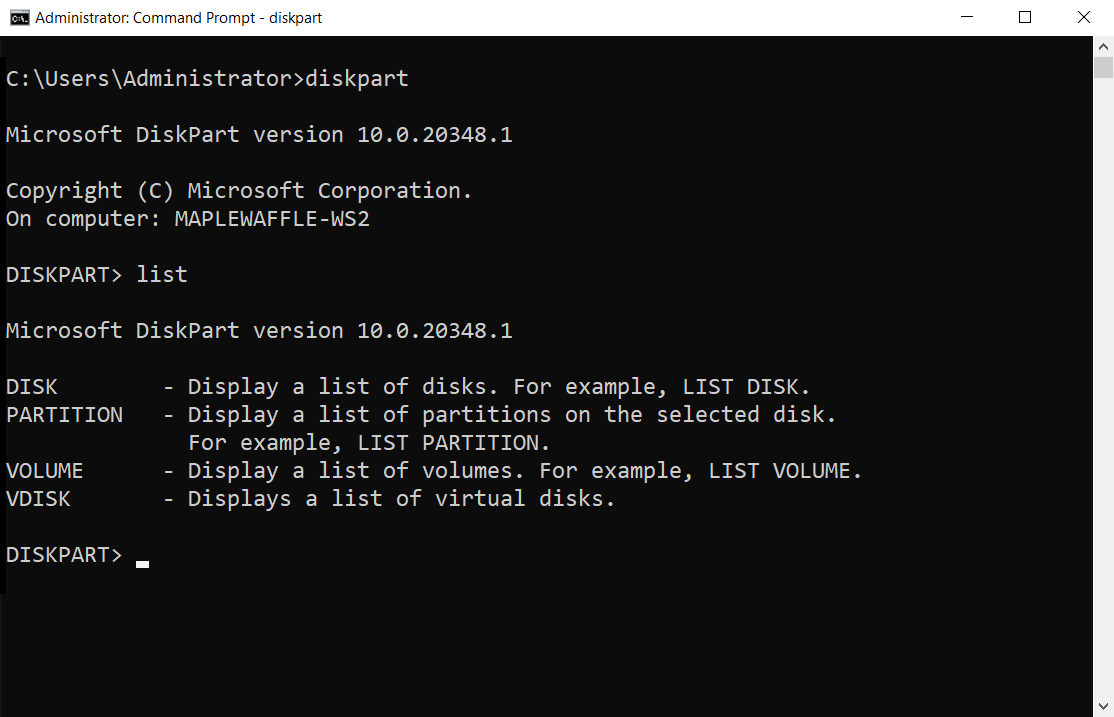
Type "diskpart" in the command prompt window. Press Enter to launch the DiskPart utility. Once the prompt displays "DISKPART>", it confirms the tool is active and ready to begin formatting the hard drive to FAT32.
DiskPart loads all available disk information. This process takes a few seconds on most systems. The utility gains full control over all storage devices. You can now use DiskPart commands to format a hard drive to FAT32 safely and effectively.
Step 3: Use the List Disk Command and then Select the Target Disk
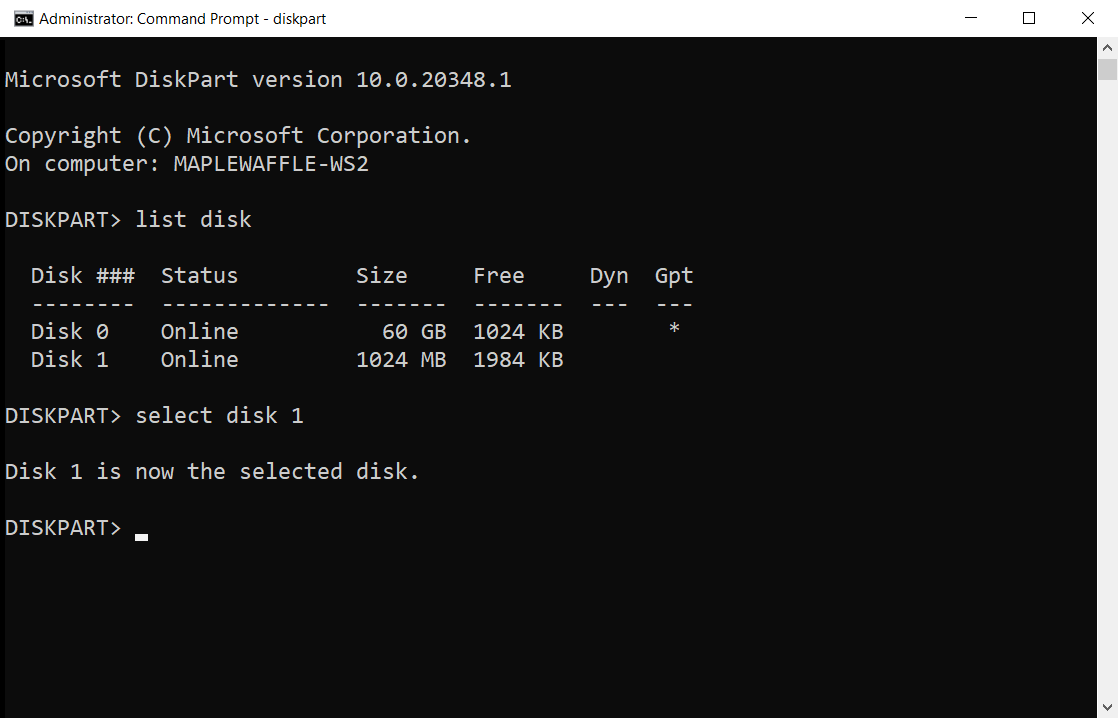
Type "list disk" and press Enter. DiskPart shows all connected storage devices. Each disk has a number (Disk 0, Disk 1, etc.).Make sure to identify the disk number of the drive you plan to format to FAT32.
Type "select disk X". Here X is your target disk number. Press Enter. DiskPart confirms the selection with a message.
Double-check you selected the correct disk before proceeding. Selecting the wrong disk will format HDD to FAT32 on the wrong drive and cause data loss.
Step 4: Clean the Disk (Optional)
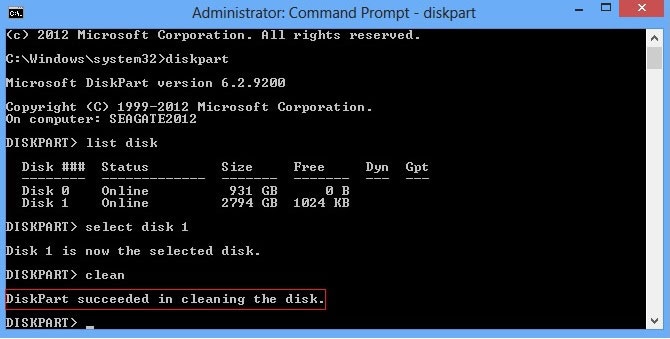
Type "clean". Press Enter to remove all partitions. This step completely erases the selected disk. The clean command removes all data and partition information. Skip this step if you only want to format an existing partition.
The cleaning process usually completes quickly. DiskPart shows a success message when finished. The disk is now empty and ready for new partitions. This ensures a fresh start when you format hard drive as FAT32.
Step 5: Create a Primary Partition
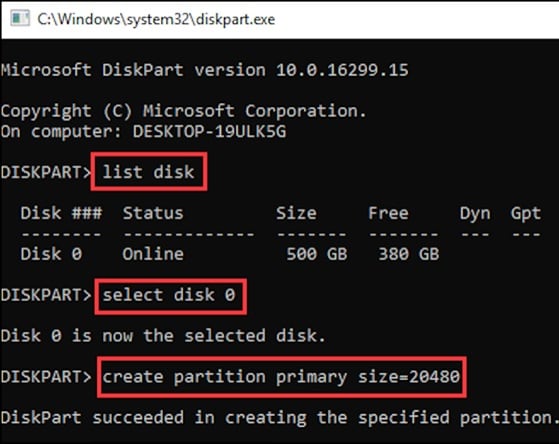
Type "create partition primary" and press Enter. This creates a new primary partition using all available space. DiskPart automatically selects the new partition for further operations. The partition is ready for formatting.
DiskPart confirms successful partition creation. The new partition spans the entire disk by default. You can specify a smaller size by adding "size=XXXX" (in MB) to the command. Most users prefer using the full disk capacity when they format hard drive to FAT32.
Step 6: Format the Partition to FAT32
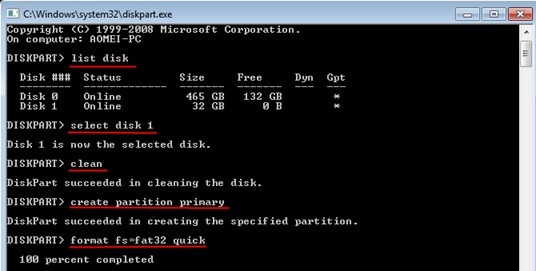
Type "format fs=fat32 quick" and press Enter. This command starts the FAT32 formatting process. The "quick" parameter speeds up formatting by skipping bad sector scanning. DiskPart begins to format HDD to FAT32 immediately.
Formatting time depends on disk size and speed. Large drives take longer to format hard drive as FAT32. DiskPart shows progress during the formatting process. Wait for the "DiskPart successfully formatted the volume" message before proceeding.
Step 7: Assign a Drive Letter
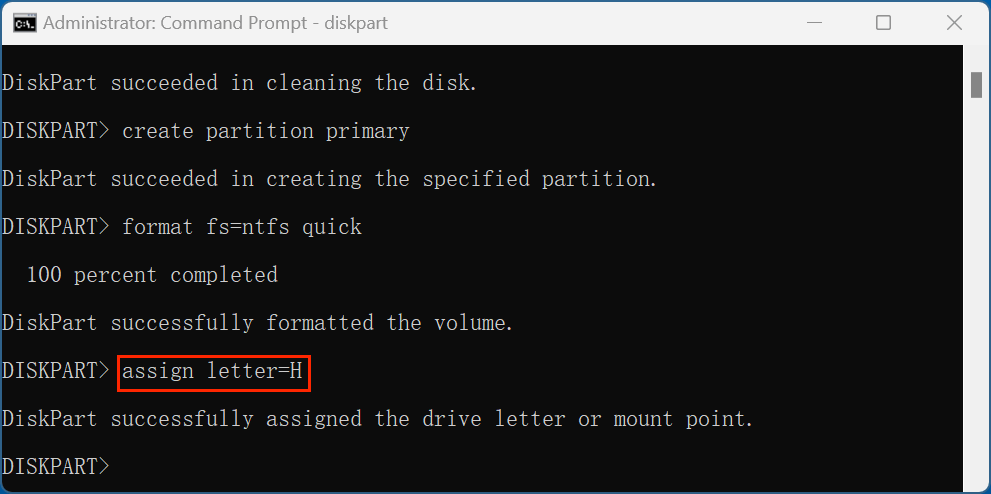
Type "assign" and press Enter to assign a drive letter. DiskPart automatically chooses the next available letter. The formatted drive now appears in Windows Explorer. You have successfully used DiskPart to format hard drive to FAT32.
Windows recognizes the newly formatted FAT32 drive immediately. The drive is ready for use with any compatible device. You can also specify a particular letter using "assign letter=X," where X is your preferred letter. The process to format the hard drive to FAT32 is now complete.
How to Fix DiskPart Conversion Failure?
Disk partition errors in Windows can be annoying if not fixed in time, and it can cause some severe damage. These errors can be caused due to multiple factors, such as bad sectors, sudden power failure, power surge, virus infection, and physical damage. These errors cause the hard drive connected to the Windows PC to become inaccessible, and the data present inside the affected hard can get erased. If your Hard drive is failing to format and change to the FAT32 format, then there might be some issue with your drive. In this section, we will talk about how to fix such errors:
Use the Check Disk Command from Command Prompt:
The check Disk utility helps in fixing the bad sectors that are cause disk errors in the PC. CHKDSK command is used inside the cmd-prompt window. It helps to fix most issues with the hard drive and makes it able to use it again. Here are the steps:
- Enter Run from the Start menu.
- Type cmd and click on OK.
- Type "chkdsk X: /r /f" where X is the external hard drive letter.
- Hit Enter.
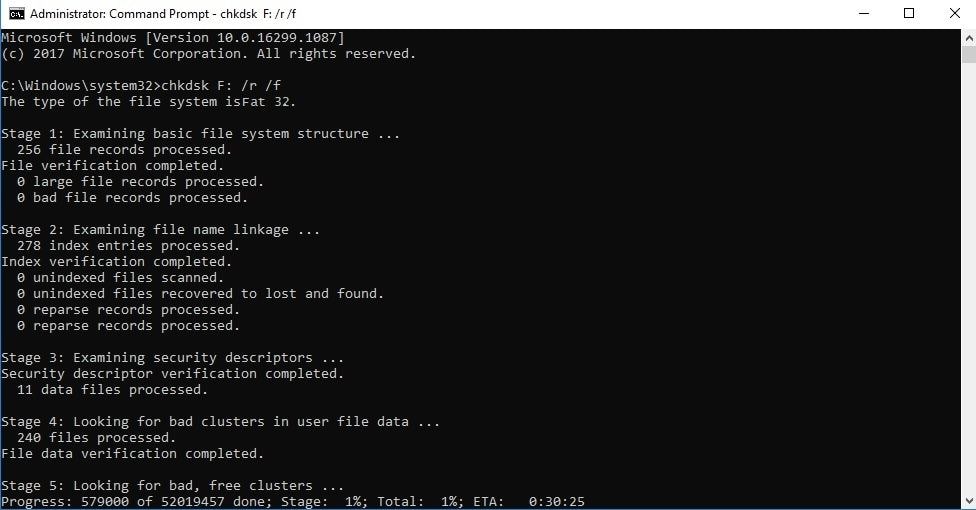
- Restart the system after the process finishes.
Startup Repair
If the solution mentioned above does not work, then you must check the disk using the startup repair technique. Here are the steps to perform startup repair on the computer:
- Hit the F12 key immediately after starting your computer.
- Select the system repair/installation disc option and hit Enter.

- Click on Next'and then click on 'Repair your Computer.'
- Click on Startup Repair.
- Wait until the system is repaired and restart the system again, you will able to format to FAT32 after that.
Bonus Time: Comparison between Fat32 and NTFS
A file support system provides a way of establishing a storage device which also specifies how a data is stored on those drives and their data information amongst other things
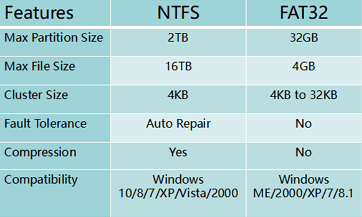
NTFS:
NTFS is the file system that is used on the Windows PC drives by default nowadays. When you install Windows on your computer, it directly formats your disk with the NTFS file system. It can support up to 2TB of storage space. NTFS is not compatible with Mac computers.
FAT32:
FAT 32 is the oldest file support system in the world. It doesn't carry a large amount of storage with its drive, but it is compatible with both Windows PC and macOS. It can support only 32GB of data by default, which you can be changed by following the method mentioned above.
Tips Before formatting HDD to FAT32
Before formatting your disk permanently to FAT32, you should carry out some necessary precautions to ensure the safety of your data.
- Create a backup of your files. You must remove all the important files to a safe location before enabling the formatting procedure. You can save those files on an external memory source or a cloud storage service.
- You must keep a note of all the important drivers of the computer, which might get removed once the formatting is completed.
- Keep a log of your browser data, and sync it with an email client. You can enable the sync function on Google Chrome, that will keep tabs of your browsing data
- Keep a log of all the vital apps/programs that you have installed on your computer, as you might want to reinstall them again.
- If in case, you forget to do all the things mentioned above, and your data gets erased as a result. Then you must perform a data recovery operation on your PC.
- You can perform data recovery by using Recoverit Data Recovery by Wondershare.
Lost Data During Formatting Hard Drive? Use Recoverit Data Recovery Tool Today
Wondershare Recoverit is a powerful data recovery tool. It can restore files lost during formatting operations. The software works with all file systems, including FAT32, NTFS, and exFAT. Recoverit supports over 1000 file formats and can recover data from various storage devices.
Recoverit uses advanced scanning algorithms to find lost data. The software can recover files even after you format hard drive to FAT32. It works on formatted, corrupted, and damaged drives. The tool maintains high success rates for data recovery operations.
The software offers both quick scan and deep scan options. Quick scan finds recently deleted files rapidly. Deep scan performs a thorough analysis to locate all recoverable data. Recoverit provides preview functionality so you can verify files before recovery.
Try Recoverit to Recover Lost Data
![]() Security Verified. Over 7,302,189 people have downloaded it.
Security Verified. Over 7,302,189 people have downloaded it.
Why Choose Recoverit for Data Recovery:
- High success rate: Recoverit recovers over 95% of lost files in most scenarios
- Multiple file format support: Supports recovery of documents, photos, videos, audio files, and more
- User-friendly interface: A Simple wizard-based interface makes recovery easy for beginners
- Preview before recovery: See file contents before deciding which files to recover
- Deep scan technology: Advanced algorithms find files that other tools might miss
- Safe recovery process: Non-destructive scanning preserves existing data during recovery
Recovery Process with Recoverit:
Step 1. Download and install Recoverit on a different drive than the one you're recovering from. Launch the software and select the formatted drive from the location list. Start scanning.

Step 2. Wait for the scanning process.

Step 3. Preview and select the files you want to recover from the scan results, then click Recover.

Tips to Format Drives Safely Without Losing Data
Formatting drives requires careful preparation to avoid data loss. Following safety protocols protects your important files and documents.
- Create complete backups: Copy all important files to another drive before starting the format process
- Verify backup integrity: Check that backup files open correctly and aren't corrupted
- Double-check disk selection: Confirm you're formatting the correct drive in DiskPart
- Use disk management tools: Windows Disk Management provides visual confirmation of drive selection
- Disconnect unnecessary drives: Remove external drives to prevent accidental formatting
- Note drive letters and sizes: Write down current drive configurations before making changes
- Test with small partitions first: Practice on small test partitions before formatting large drives
- Keep recovery software ready: Have data recovery tools available in case of mistakes
Conclusion
DiskPart provides the most reliable method to format hard drive to FAT32 in Windows. This command-line tool bypasses the limitations of standard Windows formatting options. You can format HDD to FAT32 regardless of drive size using DiskPart. The process works consistently across different Windows versions.
Learning to format hard drive as FAT32 with DiskPart opens many possibilities. You can prepare drives for gaming consoles, media players, and cross-platform use. The FAT32 file system ensures maximum compatibility with various devices and operating systems. Remember to backup your data before formatting and keep recovery tools available for emergencies. DiskPart makes it simple to format hard drive to FAT32 when you follow the proper steps.
Frequently Asked Questions:
-
Q: Can I format drives larger than 32GB to FAT32 using DiskPart?
Yes, DiskPart can format a hard drive to FAT32 regardless of its size. The default Windows formatting tool limits FAT32 to 32GB. It won’t let you format larger drives with FAT32. DiskPart doesn’t follow that limit. You can format drives larger than 32GB with it. In fact, you can format up to 2TB in FAT32 using DiskPart. The process only needs the right sequence of commands. It’s a reliable option for creating large FAT32 partitions. -
Q: Will formatting to FAT32 erase all my data?
Yes, formatting deletes all data from the selected drive. You should always back up your files before formatting. FAT32 formatting is no exception—it wipes the drive clean. Important data may be lost if you skip the backup step. If you formatted without backing up, there's still hope. Recovery tools like Recoverit can help restore lost files. Act quickly, as new data can overwrite recoverable content. Being prepared saves time, effort, and important documents. -
Q: Why does Windows show an error when I try to format large drives to FAT32?
Windows’ graphical format tool has a 32GB limit for FAT32. This limit is built into the software—not the file system. FAT32 itself can support volumes much larger than 32GB. The restriction is artificial, and not based on technical need. To bypass it, you need a different formatting method. DiskPart lets you format larger drives using FAT32. It works through command-line instructions, not the GUI. This method unlocks FAT32 formatting for drives up to 2TB.


