
Creating a file system is essential in setting up a new storage device or partition. XFS file system is a high-performance file system commonly used in enterprise environments due to its scalability, reliability, and speed. This article will thoroughly explain the steps of creating an XFS file system on a Linux-based system. So, let's get started!
Creating XFS File System With Internal Log on the Same Device
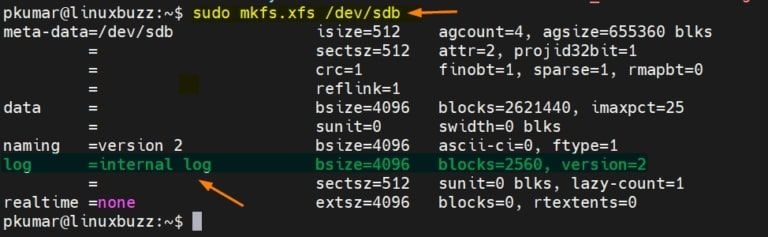
Creating an XFS file system with an internal log on the same disk is a straightforward process that involves using the mkfs.xfs command-line tool. This method is suitable for creating an XFS file system on a new disk or partition without any data.
- To create an xfs file system and an internal log on the same drive, use the mkfs.xfs command, as illustrated below:
$ sudo mkfs.xfs /dev/sdb
Creating XFS File System With Journal on Another Device
Creating an XFS file system with a journal on another device involves more than creating one with an internal log on the same device. This method involves creating two separate partitions, one for the data and one for the journal.
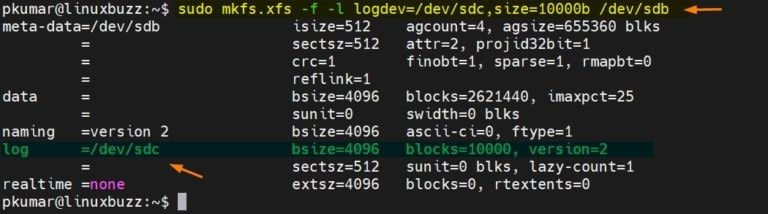
- The following example builds an XFS file system on "/dev/sdb," but the journal is stored on another device, “/dev/sdc.” The size option defines a block journal of 10000.
# mkfs.xfs -l logdev=/dev/sdc,size=10000b /dev/sdb
- Here’s the output:
meta-data=/dev/sdb isize=512 agcount=4, agsize=1310720 blks = sectsz=512 attr=2, projid32bit=1 = crc=1 finobt=0, sparse=0data = bsize=4096 blocks=5242880, imaxpct=25 = sunit=0 swidth=0 blksnaming =version 2 bsize=4096 ascii-ci=0 ftype=1log =/dev/sdc bsize=4096 blocks=10000, version=2 = sectsz=512 sunit=0 blks, lazy-count=1realtime =none extsz=4096 blocks=0, rtextents=0
Overwriting an Existing File System With XFS File System
Overwriting an existing file system with XFS is more complicated than creating a new one from scratch. It involves first backing up the data on the existing file system, creating a new XFS file system on the same device, and then restoring the data from the backup onto the new file system.
- Use the -f option on the mkfs.xfs command to overwrite the existing xfs file system.
$ sudo mkfs.xfs -f -l logdev=/dev/sdc,size=10000b /dev/sdb
- The value after the size option indicates the number of blocks (10000).
Creating XFS File System on LVM
Creating an XFS file system on Logical Volume Manager (LVM) is a useful way to manage disk space across multiple physical disks. LVM allows for dynamic allocation of disk space, meaning you can add or remove disks and adjust the size of volumes without needing to back up and restore data.
Refer to the procedures below to construct an LVM-based file system.
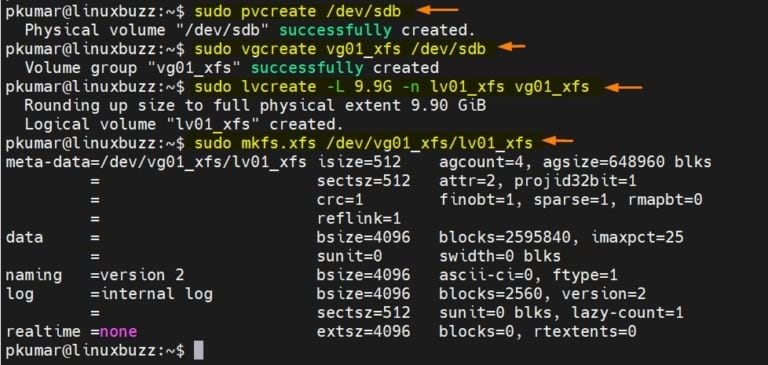
- Run a Physical Volume (PV) command on “disk /dev/sdb.”
$ sudo pvcreate /dev/sdb
- Subsequently, run the vgcreate command to create a Volume Group (VG) on pv /dev/sdb.
$ sudo vgcreate vg01_xfs /dev/sdb
- Convert VG to LV (Logical Volume). To build a logical volume of 10 GB, use the lvcreate command below.
$ sudo lvcreate -L 9.9G -n lv01_xfs vg01_xfs
- Use the XFS file system to format the LV (logical volume). To format lv (/dev/vg01_xfs/lv01_xfs) with an xfs file system, use the mkfs.xfs command below.
$ sudo mkfs.xfs /dev/vg01_xfs/lv01_xfs
The output of the preceding instructions would be as follows:
After creating the XFS file system, it's important to properly mount it to ensure its smooth operation. Mounting a file system makes the files and directories accessible to the operating system and users. Please go to the step-by-step guide on mounting an XFS file system, including the commands and options you need to know to get started.
How To Recover Deleted Files on XFS File System
Accidentally deleting important files is a common mistake, and it can be especially frustrating if those files are stored on an XFS file system. But don’t stress out anymore! There are solutions available to undelete files on XFS. One such solution is using Wondershare Recoverit Linux File Recovery.
Wondershare Recoverit is a powerful data recovery tool that can help recover deleted files on XFS file systems. Its NAS/Linux Recovery feature is designed to recover data from NAS devices and Linux-based file systems like XFS.
Wondershare Recoverit - Your Safe and Reliable Linux Recovery Software
5,481,435 people have downloaded it.
Recovers lost or deleted documents, photos, videos, music, emails, and other 1000+ file types effectively, safely, and completely.
Compatible with all mainstream Linux distros, including Ubuntu, Linux Mint, Debian, Fedora, Solus, Opensuse, Manjaro, etc.
Assists in 500+ data loss scenarios, such as deletion, disk formatting, OS crash, power outage, virus attack, lost partition, and many more.
The simple point-and-click interface allows you to recover data from Linux hard drives in just a few clicks.
Works through a remote connection. You can recover lost data even when your Linux device is crashed.
To recover deleted files on XFS using Recoverit:
Step 1 Select "Linux Recovery" from the menu.
Download, install, and run Wondershare Recoverit on your device. Select NAS and Linux > Linux Recovery.

Step 2 Connect Linux
You need to create a remote connection between your Linux device and the data recovery software. To establish a remote connection, enter the required information. When you're done, click the Connect button.
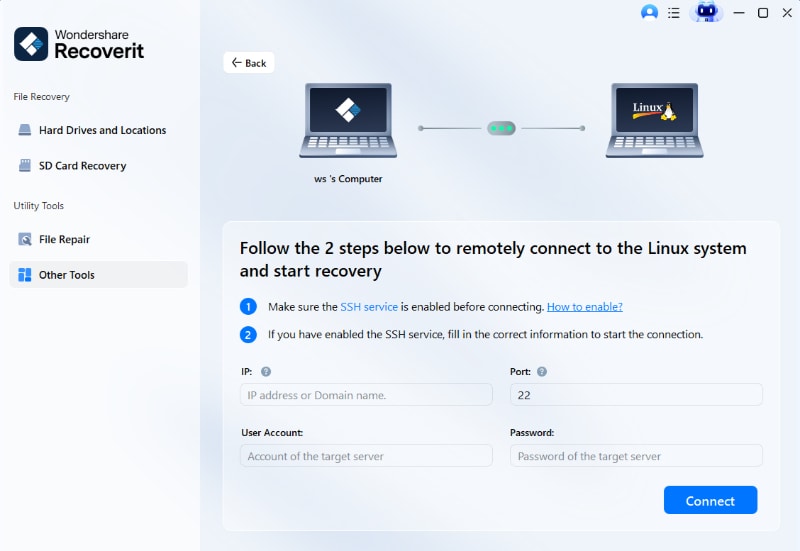
Allow some time for the connection to be formed. Once done, Recoverit will automatically search for missing files on your XFS Linux computer.
Step 3 Preview and Recover Deleted XFS Files
Depending on how much data is scanned, the scanning method can take some time. The scanning progress is shown in the bottom bar. The nicest aspect about using Recoverit is that after you've located the file you want to restore, you may stop scanning whenever you want.

When the scanning process is complete, Recoverit allows you to inspect the files to ensure they are the ones you wish to recover. Press the Recover button to save the file to your Linux device.

The software will ask you to save the restored data to a location on your Windows PC. Click the Recover button to get the restored data. This time, take a different saving route from where you lost your XFS files.

For Windows 7 or later
For macOS 10.10 or later
Conclusion
The article covers topics such as creating an XFS file system with an internal log, creating an XFS file system with a journal on another device, overwriting an existing one with XFS, creating an XFS file system on LVM, and how to mount an XFS file system. Additionally, if you ever lose or delete XFS files, you can easily recover them using Wondershare Recoverit.
 ChatGPT
 Perplexity
 Google AI Mode
 Grok
Grok


