Photo Recovery
- Recovers deleted or lost photos effectively, safely and completely.
- Supports data recovery from 500+ data loss scenarios, including computer crash, partition loss, accidental human error, etc.
- Supports 1000+ file formats recovery with a high success rate and without any quality loss.

How to Find Pictures on Old Hard Drive? 4 Cases&11 Fixes

Jun 03, 2026 • Filed to: Photo/Video/Audio Solutions • Proven solutions
 TL;DR:
You can retrieve misplaced, hidden, or deleted pictures from an old hard drive by applying specific OS search parameters, executing attribute-restoring command-line utilities, or utilizing bootable recovery software for crashed disks.
● Locate scattered image formats across all partitions by typing `kind:=picture` into the Windows File Explorer or Mac Finder search bar, or reveal hidden items by toggling settings in the Control Panel's Appearance and Personalization menu.
● Restore logically deleted files by running `chkdsk [drive letter]: /f` followed by `attrib -h -r -s /s /d *.*` as an administrator in Command Prompt, which extracts the recovered data into a new folder in `.chk` format.
● Access pictures on a crashed or unbootable system by using Wondershare Recoverit Data Recovery on a separate working computer to generate a bootable USB drive, then booting the crashed PC via the BIOS entry key.
Ask AI for a summary
 ChatGPT
 Perplexity
 Gemini
 Claude
 Grok
Grok
Sometimes there arise certain circumstances when you are not able to access pictures from your old hard drive. Then you start applying several online techniques, but at the end of the day, you leave yourself panicked. If this is your situation, you finally hit the right spot where you will be guided step by step on how to find pictures on an old Hard Drive. It doesn't matter whether you want to find all the pictures on Hard Drive for Windows 7 or Windows 10.
Part 1. Cases of Finding Pictures on Old Hard Drive
Several reasons might prompt the question of how to find pictures on old hard drives, even if they're present or accidentally deleted. Let's explore the top 4 cases and fixes to understand this better.
| Cases | Reasons | Fixes |
| Pictures get Deleted on Hard Drive | 1. Damage to the file system. 2. Hard Drive is converted from NTFS to FAT. 3. Corruption in the structure of Metadata. 4. Sudden shutdown during preview 5. You delete pictures accidentally |
1. Use Recoverit Data Recovery 2. Use Recycle Bin 3. Use Command Prompt 4. Use Backup Step-by-step Guide |
| Too Many Pictures of Various Formats on Hard Drive | 1. Pictures are obtained from different sources. 2. The number of images is generally too large. |
1. Use File Manager/Finder 2. Use command prompt/ terminal Step-by-step Guide |
| Pictures are Hidden on Hard Drive | 1. A file system error that prevents entries to pictures 2. An attack from a virus or malware. 3. The option of "show hidden files" has been disabled. |
1. Use File Explorer 2. Use the control panel Step-by-step Guide |
| Old Hard Drives are Crashed | 1. Firmware corruption makes it unreadable 2. Some problems in hardware components. 3. Sudden power failure while the disk is writing. 4. Overheating damages the electronic circuit board. 5. Improper functioning of filters blocks the air intake. |
1. Use Recoverit 2. Running Scan Disk CHKDSK 3. System restore in safe mode Step-by-step Guide |
Part 2. How to Find All Pictures on Old Hard Drive in 4 Cases:
There arise several situations when you lose your pictures from your hard drive or they get deleted. Before we go in further detail it is crucial to mention here that these images are not deleted permanently. Also, if they are misplaced in some folder or some subfolder it is easy to locate. The only thing you need to do is just follow the guideline that we are providing you with images and you will get your task done. These guidelines will help you find all photos on Hard Drive for Windows 7 as well as Windows 10.
Case 1: Recover and Find Photos on Hard Drive
Sometimes your photos are there in the Hard Drive but you can't open them. There also arise some cases when you can't find your photos despite knowing they are in your Hard Drive itself. Some best solutions to overcome this situation are.
Solution 1. Use Recoverit Data Recovery
Recoverit Data Recovery is a hard drive data recovery software that helps you to recover lost data as long as they are not overwritten by other data. This software works both for Windows and MAC.
Recoverit Data Recovery - The Best Photo Recovery Software
- Recover corrupted/deleted files from the computer, USB hard drive, memory card effectively, safely, and completely.
- Supports to restore corrupted files and loss due to virus attack, the program crashes or computer loses power.
- Recover any data and file types with a high success rate and without any quality loss.
- Supported OS: Windows 11/10/8/7/Vista and Mac OS X 10.10 or later.
 Security Verified. 3,591,664 people have downloaded it.
For this just open Wondershare Recoverit as shown below,
Now to use Recoverit you just need to follow 3 simple steps given below:
Step 1: Select the Location
To recover images on a computer, it is necessary to choose a location where you have lost them.
Here, please select a hard disk under the "Hard Disk Drives" tab or Desktop under the "Select location" tab.
Click "Start" to begin the scanning on the selected location as shown below

Step 2: Scan the location
Recoverit will start an all-around scan. Usually, it will take a few minutes to finish the scanning. Sometimes, a few hours are required if many large-sized files are present. During the scanning process, you can also pinpoint files or stop scanning for your convenience. This process is shown in the image below:

Step 3: Preview and Recover Files
This is the last step in the recovery of your photos. Recoverit allows its users to preview the recoverable files before proceeding to the final recovery step. You can select targeted files and then click the "Recover" button to retrieve your files back. Here also there are some points you need to consider.

After getting a preview of the files and confirming they are what you want, you are all set to get them all back using Recoverit.
For this just directly hit on the "Recover" button to retrieve your lost photos back and choose a path to save the recovered files. One thing to consider here is, not to save the files to the hard drive where you have deleted or lost the data.
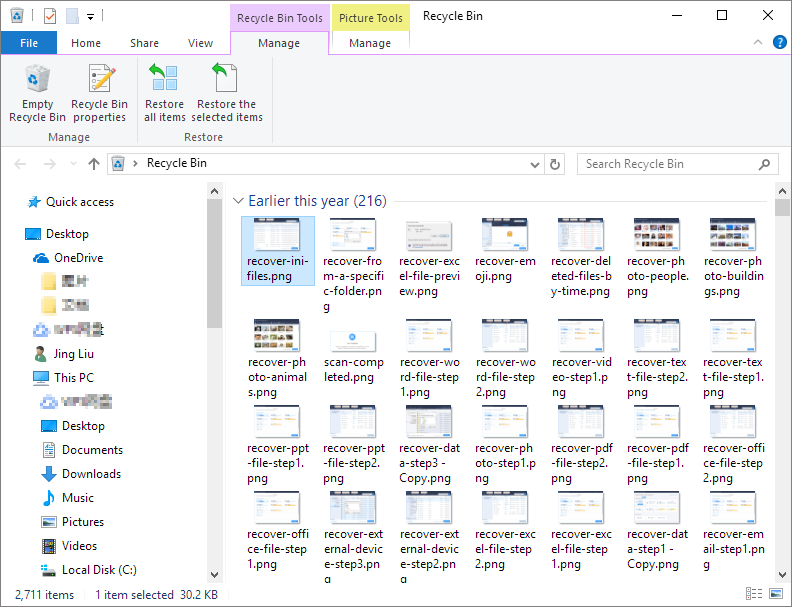
Solution 2. Use Recycle Bin
Recycle Bin stores your deleted files that can be restored easily to the location from where they were deleted. This is one of the easiest techniques to go with for finding all pictures on Hard Drive on Windows 7 and Windows 10.
- For this just go to your desktop and double click the "Recycle Bin" icon.
- Locate and select the picture or the folder containing pictures you want to restore.
- Now just right-click or double click on the selection and choose "Restore".
- This will restore the deleted files to their original locations.
Solution 3. Use Command Prompt
This is also one of the safe techniques to find all pictures on old Hard Drive:
To open a command prompt for Windows 7, you can open the start menu - All programs - open accessories - click command prompt shortcut. For Windows 10 click on the start button at the lower-left corner for opening the menu then choose the command prompt. You can also press Windows + X.
- Now type chkdsk*:/F (where * represents the drive letter of the certain drive that contains deleted filed) and press enter.
- Now, wait for the command to complete processing.
- Type the drive letter again and press "Enter".
- Type attrib -h -r -s /s /d*.* and press "Enter".
- Wait for the processing.
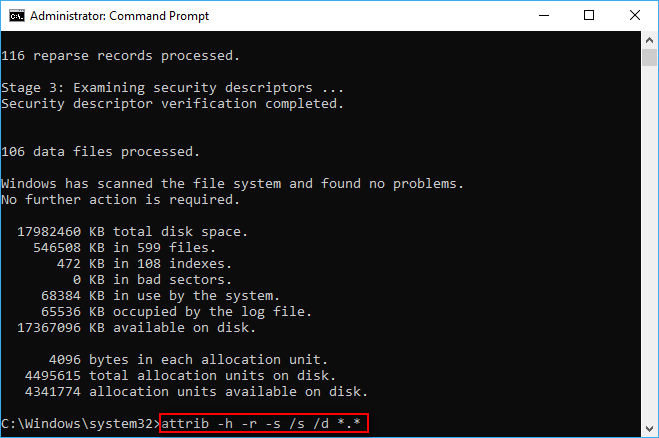
Once the processing of the given command has been finished, a new folder will be generated on the drive to store all the recovered files, which will be in the .chk format. The formats of those files can be changed and you can save them to the location where you want. The CMD attrib command is mainly used to recover even permanently deleted files from CMD.
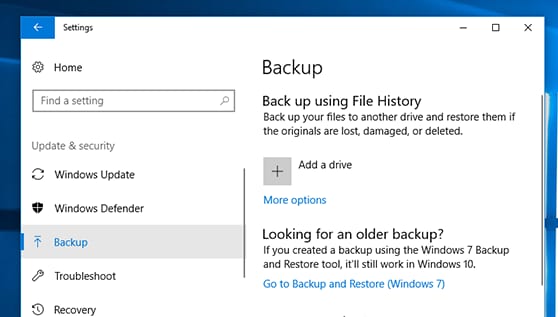
Solution 4. Use Backup
One of the best options to recover or to find all the pictures on the Hard Drive is to go with a backup option. For this just follow simple steps:
- In the search box on the taskbar, just type restore files, and then select Restore your files with File History.
- Now look for the file that you need, then use the arrows to see all its versions.
- When you find the version you need, select Restore to save it in its original location.
- To save it at a different place, right-click Restore, select Restore to, and then finally choose a new location.
Case 2: Too Many Pictures of Various Formats on Hard Drive
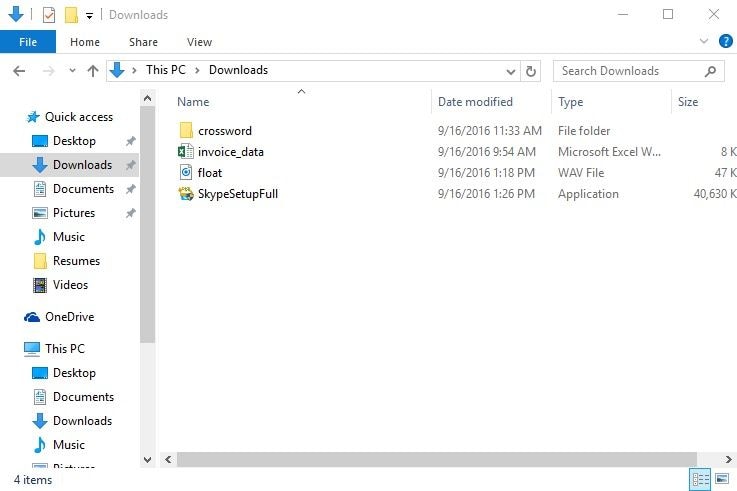
Your Hard Drive may contain many pictures of different formats. When it comes to the storage of pictures. They may be stored at different locations depending upon, where they came from. Windows itself stores images in your "Pictures" folder or the "Downloads" folder. In the case of MAC, these are usually stored in "Pictures".
For Finding Pictures:
Solution 1. Use Finder
Finder is used for quickly locating any file on your Hard Drive. To use it just click My PC in the file explore or Computer in the windows explorer. You can now go to the "downloads" or "pictures" section for your pictures. You can also enter the command kind:=picture in the search box. This will let you search all partitions on your Hard Drive for various image formats.
Solution 2. Command Prompt
- Press Windows key + R and then type CMD in the search box.
- Now in the Command Prompt window, type chkdsk 'drive letter' /f and then hit Enter. Like C: \ USERS\ PROGRAM FILES\ chkdsk D: /f
- Now press Y until the command lines start again
- Now type the drive letter again and hit The enter button.
- Finally type [drive letter: \ >attrib –h –r –s /s /d *.*].
This command will recover all the files in the Hard Drive

Case 3: Pictures are Hidden on Hard Drive
Finding hidden pictures is not an easy task as you don't know where those pictures are placed, to make this task easy for you two solutions will work for you.
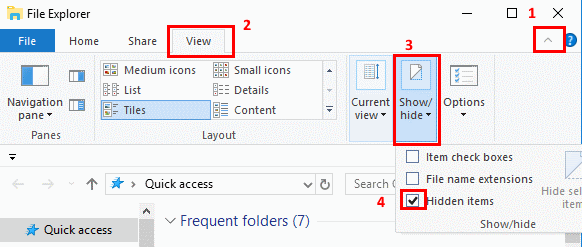
Solution 1. Use File Explorer
- Go to search bar and type file explorer
- Click on the View tab and select hidden items
- To go in detail double click on options and then on view
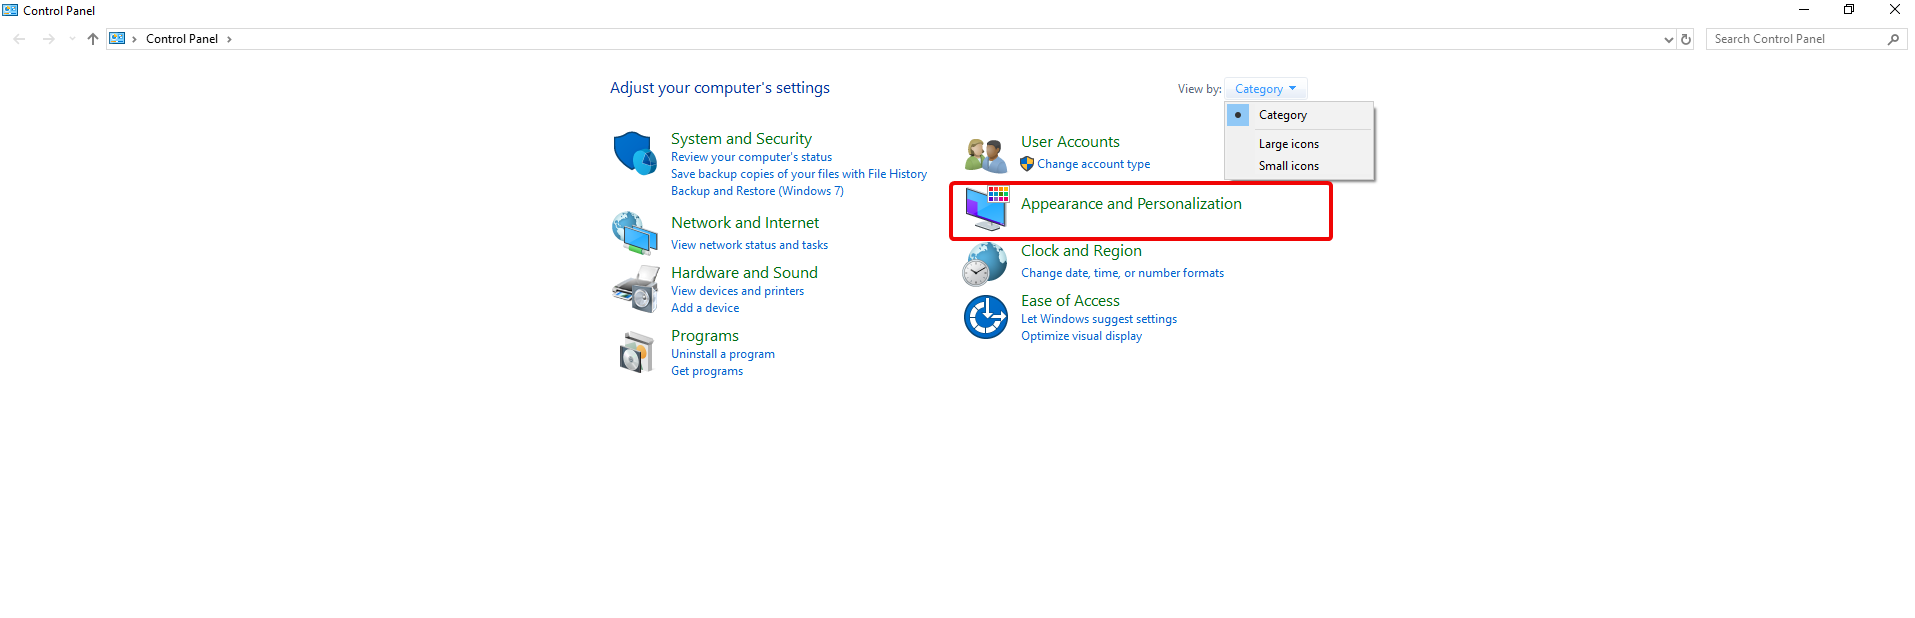
Solution 2. Use Control Panel
- Go to search bar and type control panel
- Click on appearance and personalization
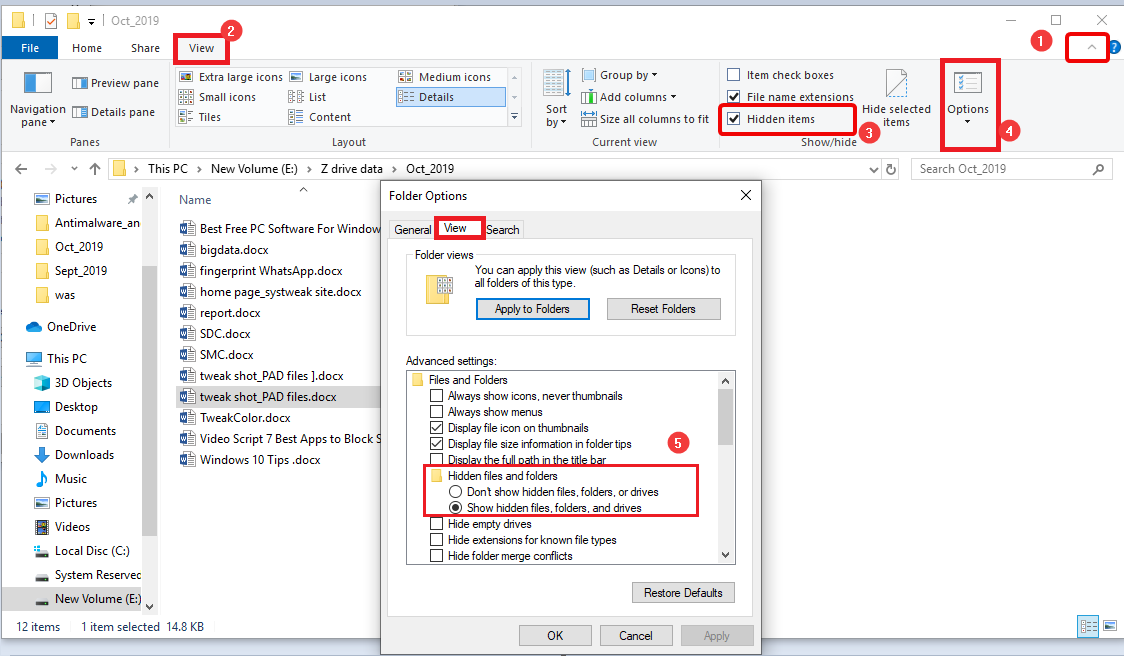
- Click on file explorer options and then view.
- Scroll down to find hidden files, folders, and drive options. Select it and you are done.
Case 4: Old Hard Drives are Crashed
This is the situation where utter care is a demand, to recover your pictures. As once your hard drive is crashed you will not able to operate properly by connecting it to your PC.
We will provide you with simple techniques to do this job for you.
Solution 1. Use Recoverit Software
If you are unable to launch your Windows computer, you can use Recoverit to create bootable media and recover data.
Step 1. Connect a blank USB drive to the working computer. Select the drive to create a bootable media, and then click "Create" to start.

Step 2. After creating a bootable USB flash drive, connect it to your crashed computer and restart it. Press the BIOS entry key when the first screen is displayed
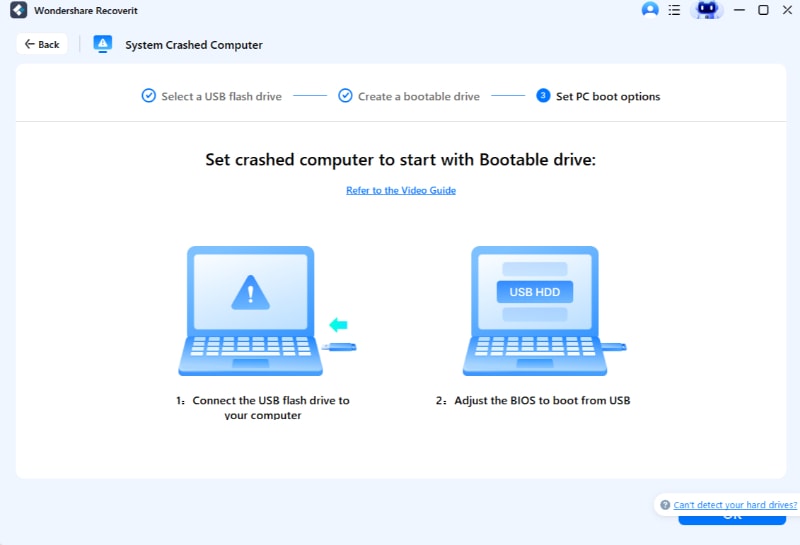
Step 3. Now your crashed computer becomes bootable. You can choose Hard Disk Copy or Data Recovery to find and recover your pictures. (You can also check our detailed guide on how to recover data from a crashed computer.)

Solution 2. System Restore in Safe Mode
Step 1. Start the computer in safe mode
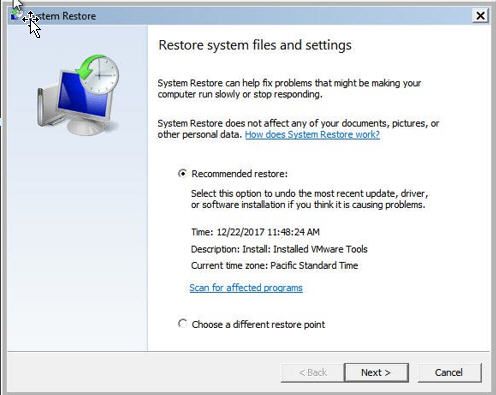
Step 2. Now click Start menu - All programs - Accessories - System tools - System restore
Step 3. Choose your restore point and then click on next.
Step 4. Choose the recommended restore option, if not working choose a different restore point
Step 5. Confirm settings and click next. You are done.
Solution 3. Run ScanDisk CHKDSK
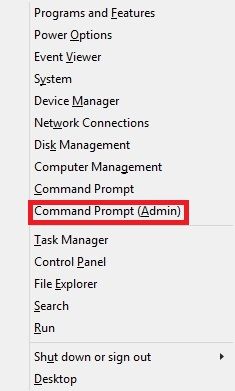
Step 1. Press Windows + X and select Command prompt as an admin
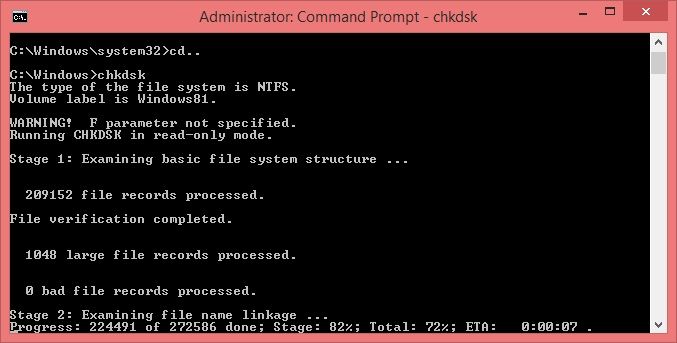
Step 2. Now type chkdsk and click enter.
Step 3. Now suppose your corrupted drive is c you can type chkdsk C:/f/r/x to fix errors and get your photos back.
Part 3. How to Prevent Pictures Not Finding on Hard Drive?
Sometimes you have pictures on your computer that you don't want to be seen by others. In these situations, the best solution is to hide them where it becomes difficult or almost impossible for others to reach
Let us discuss 5 effective strategies.
Strategy 1. Use Hidden Folders
This technique can hide your pictures from others and provide you with an option to see them whenever you want.
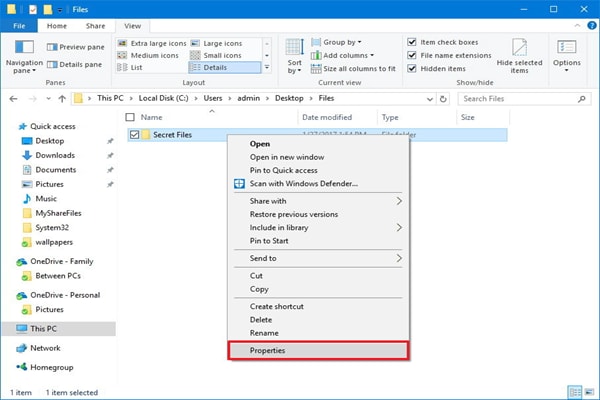
- Select images you want to hide and create a folder
- Select the folder you want to hide then Right-click and choose Properties
- Click on the General tab that appears
- Now click the checkbox next to the Hidden option in the attributes section
- Finally Click Apply.
Strategy 2. Encrypt the Files
This is an easy and secure method to hide your pictures. Just create an encrypted zip file and you can place it anywhere you want. It can't be opened by anyone until they have the right password with them.
Strategy 3. Use Camouflage
In this process, the disguised folder is created that resembles the Recycle Bin, Control panel, and even the fonts folder. The fact with this folder is one can't be able to see the real content of this folder even after opening it. As when you open this folder inside Windows Explorer, that folder will open which corresponds to the real folder in appearance. but if you try to open the same folder through Disguise Folders, it will reveal the actual content in that folder.
Strategy 4. Use the Steganography Technique
This is one of the effective techniques to hide folders containing your pictures. It is embedding images into unsuspecting files like car images. Here when you double click container files, the picture of the car will open but internally it contains your hidden image
Strategy 5. Using File Explorer
This is a simple yet effective technique
- Open File Explorer
- Right-click on the item and click on properties
- Under attributes choose the general tab, check the hidden option, and Hit apply.
- Click on the 2nd option as shown and click OK.
Conclusion:
There arise certain conditions when you are unable to find your pictures on your old Hard Drive. Although it is a difficult process in this resolute dossier a step-by-step explanation is given that helps you to find all pictures on Hard Drive.
Fix Media File Issues
- Recover & Repair Photos
- Recover deleted photos.
- Recover photo booth.
- How to repair JPEG images?
- What is JPG File?
- What is GIF File?
- Guide for PNG File
- Recover Videos
- Best video recovery software for Windows
- Best video recovery software for Mac
- Recover DVR recordings
- Recover CCTV footage
- Recover deleted Vivint videos
- Recover deleted MKV files
- Recover deleted Youtube videos
- Recover deleted CapCut videos
- Recover After Effects Project
- Recover Premiere Pro Project
- Recover iMovie Project
- Recover videos from GoPro
- Repair Videos
- Fix error code 0xc00d36c4.
- Repair corrupted MP4 video.
- Fix 0xc10100be video error.
- Solve blurry videos.
- Fix MOV can't play on QuickTime.
- Free video repair software.
- Fix frozen video files.
- Recover & Repair Audio
- Moov Atom Not Found ?
- Repair your MP4 file online.
- Can't play recorded video?
- AVI/MP4/MKV cannot render?
- Fix 0xc00d5212 error of AVI.
- Recover & Repair Cameras


Eleanor Reed
staff Editor