


 TL;DR:
To boot an MSI laptop from a USB drive, you must create a bootable flash drive containing your OS installation files and manually select it by pressing the F11 key repeatedly when the MSI logo appears during startup.
● Creating the bootable media requires an empty USB drive with a minimum of 4–8 GB of storage, configured via Command Prompt (`diskpart`) and formatted as NTFS for Legacy BIOS or FAT32 for UEFI systems.
● To permanently configure the laptop to prioritize external drives over the internal hard drive, press the Delete key repeatedly during startup to enter the MSI BIOS and modify the Boot priority settings.
● If the MSI device still refuses to boot from the correctly prepared USB, you can reset the BIOS hardware configurations to their defaults by removing the motherboard's CMOS battery for 30 seconds.
Ask AI for a summary
 ChatGPT
 Perplexity
 Gemini
 Claude
 Grok
Grok
Has your MSI (Micro-Star International) laptop crashed and won’t turn on? You can try an MSI boot from a USB. Fortunately, we’ve prepared a thorough guide to running a bootable MSI USB drive.
With our guide, you’ll learn how to prepare an MSI USB boot from scratch. Moreover, we’ll cover the steps for booting from a USB drive. However, if your MSI device still doesn’t boot, we’ve prepared a few tips to help you. Our guide is your go-to source to perform an MSI laptop boot from a USB drive.
Preparing for an MSI USB Boot
If your MSI laptop crashes, you can try booting it from a USB drive. However, you must create a bootable USB flash drive to boot your MSI computer. Preparing for a USB boot is an easy and necessary process. To complete all the MSI USB boot preparations, follow the steps below.
Get a USB Flash Drive
First things first, you’ll need a USB flash drive. Ensure your USB flash drive is empty and back up any data from it, as you’ll erase everything while creating a bootable USB.
Most importantly, find a USB flash drive with a minimum of 4–8 GB of space. Depending on your operating system, you might need more. So, ensure your USB drive has 4–8 GB or more to prepare it for booting successfully.
Video Tutorial: How to Recover Data from Crashed Computer with Bootable USB Drive
Create a Bootable Drive
The best tool to create a bootable USB drive is Command Prompt. It works perfectly on all Windows versions and is relatively easy. This command-line utility will help you make your USB bootable, but it can take some time. Therefore, be patient and follow these steps:
- Open the Start menu and search for cmd.
- Click Run as administrator.

- Connect the USB flash drive you want to make bootable to your computer.
- Type the diskpart command in Command Prompt and press Enter.

- Type the list disk command and press Enter. This command will show you the list of all the storage devices connected to your computer.

- You’ll see the available disks as Disk 0, Disk 1, etc. Find the USB drive you want to make bootable, enter the select disk X command (replace X with the number next to your USB flash drive from the list), and press Enter.

- Format the flash drive to make it bootable. Use the clean command and press Enter.

- To make your USB drive bootable, type the create partition primary command and press Enter.

- Select your primary volume by entering the select partition 1 command and pressing Enter.

- If your computer uses Legacy BIOS, enter the format=fs ntfs quick command and press Enter. If it uses UEFI BIOS, enter the format=fs fat32 quick command and press Enter. That will format your USB flash drive.

- Once you format the volume, enter the active command and press Enter to activate the bootable partition. You can close the Command Prompt now.

- Copy the data from the Windows OS installation disk to your bootable USB drive, and you’re done.
Insert the Drive Into Your Device
Now that you’ve made your USB flash drive bootable, it’s time to use it to boot your MSI laptop. Thus, get your crashed MSI device and insert your bootable USB drive into it. To start booting your MSI from a USB drive, follow the steps from the following section.
How to Boot From a USB in MSI
Once you insert your bootable USB drive into your MSI laptop, you need to boot it. Booting your MSI laptop from a USB drive has five stages. We’ve prepared detailed step-by-step guides for each. Once you complete the steps, you’ll have successfully booted your MSI.
Access the Boot Menu
To access the boot menu, follow these steps:
- Turn your laptop on and wait for the MSI logo to appear.

- Once you see the logo, repeatedly press the F11 key to open the Boot menu.
- Once the Boot menu opens, find your bootable USB flash drive.
Select USB Booting
Follow these steps to choose the USB booting mode:
- Once you find your bootable USB drive in the Boot menu, highlight it.

- Press Enter to start the booting process.
Set Up the MSI for Booting From a USB
Follow these steps to configure the MSI for USB booting:
- Restart your MSI laptop.
- Once the MSI logo appears, press the F11 key repeatedly to open the Boot menu.
- When you enter the Boot menu, select the USB boot mode option.

- Press Enter to start booting from the USB drive.
MSI Laptop Boot From a USB
Now you can start your MSI laptop boot from the USB by following these steps:
- Turn off your MSI laptop.
- Press and hold the Esc key.
- While holding the Esc key, press the Power button to start your MSI laptop.
- Don’t release the Esc key until the BIOS setup utility appears.

- Select your bootable USB drive in the Boot tab.
- Press Enter to start booting the MSI system from the USB drive.
Adjust Boot Priority in MSI BIOS
Now that you’ve booted your MSI laptop from the USB drive, it’s time to select the boot device and adjust boot priority in MSI BIOS. Follow these steps to do so:
- Turn on your MSI laptop.
- Press the Delete key repeatedly to open the BIOS settings menu.
- Select Settings from the menu.
- Choose the Boot option.

- That will open the list of available options for boot priority. Set your desired boot priority for your MSI laptop.
What You Can Do if Your Device Doesn’t Boot
Have you tried booting your MSI device using a bootable USB drive, and it still won’t boot? Maybe there’s another underlying problem. First and foremost, check the cables. Test the wall outlet, power strip, and power supply switch, and ensure you’ve correctly plugged in all the other cables.
If the cables are fine and working, the next step is to check the POST and Beep codes. Even though you’ve ensured your computer is getting power, it may not be doing it correctly. POST codes are visual, and Beep codes are auditory signals that display the code or indicators of an error. To learn how to check and understand them, consult your motherboard documentation or search the manufacturer’s website.
Another thing you can try if your MSI computer won’t boot is to reset the CMOS battery. By resetting the battery, you’ll clear any BIOS settings that weren’t default and possibly allow your MSI to boot.
Follow these steps to reset the CMOS battery:
- Locate the small coin-sized disk on your MSI motherboard. That’s the CMOS battery.

- Unplug your MSI laptop’s power supply cord and remove the motherboard’s battery.
- Use a small screwdriver to take the CMOS battery out of its socket.
- Leave it out for about 30 seconds, then put it back into the socket and plug it back into your MSI laptop.
- Turn on the laptop again.
Lastly, if your MSI laptop still doesn’t boot, you can at least try to save the lost data. You can use data recovery software like Wondershare Recoverit to restore lost data from your crashed MSI laptop.
Follow these steps to recover lost data using Wondershare Recoverit:
- Install and open Wondershare Recoverit on a working computer.
- Go to the System Crashed Computer section and click Start.

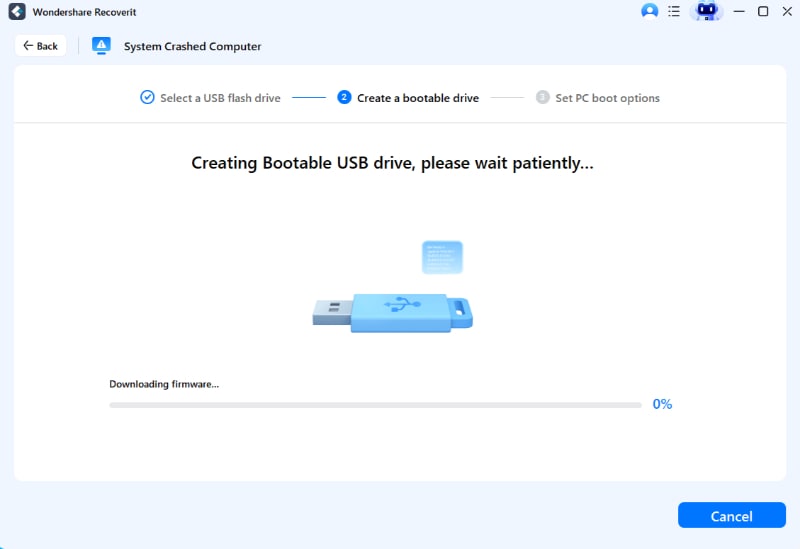
- You’ll need a bootable USB drive. You can make a bootable USB in Wondershare Recoverit in just a few steps. Connect a blank USB drive to the computer with Wondershare Recoverit and click Create to start.

- That will initiate the process of creating a bootable drive, so wait for it to finish.
- Once it completes, you’ve made your USB drive bootable. Connect your bootable USB flash drive to your crashed computer.
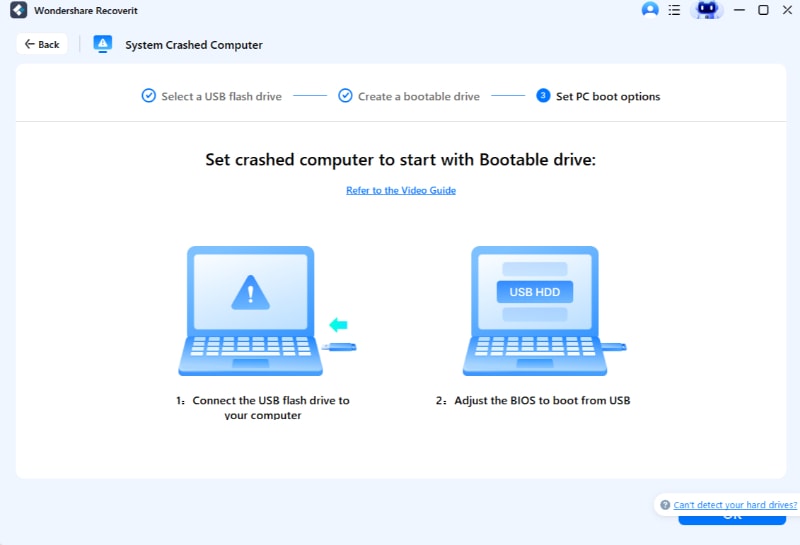
- Set the BIOS to boot from the USB drive.
- Your crashed computer will become bootable again. Select one of the two options: Hard Disk Copy or Data Recovery. Pick whichever option you want and follow the on-screen prompts to finish.
Conclusion
If your MSI laptop won’t start, you can try booting it from a USB flash drive. Fortunately, you can boot your MSI laptop from a USB flash drive by following our detailed guide.
If your laptop won’t boot, test its cables, check POST and Beep codes, or reset the CMOS battery. If it still doesn’t work, you can recover lost data from your crashed MSI laptop using Wondershare Recoverit.
FAQ
-
How do I enter the Boot mode?
Entering the Boot mode isn’t intuitive, and you might need some guidance. When the MSI logo appears upon turning your computer on, press F11 repeatedly to enter the Boot mode. -
Can I use a bootable USB drive that contains data?
You can use a USB with data to boot your MSI. However, you’ll need to format the flash drive, meaning you might lose all your data. Therefore, always back up your USB drive before using it as a bootable USB. -
How can I restart the MSI laptop using the Power button?
You can’t automatically restart your MSI laptop using the Power button. However, you can shut it down manually using the Power button and turn it back on by pressing it again.


