Jan 13, 2026 • Filed to: Photo/Video/Audio Solutions • Proven solutions
Kodi is a good source of entertainment. But it has an issue, and that is Kodi's no sound issue. It is a common issue that arises without any warning. It is very frustrating when Kodi has no audio. Let us begin a journey to fix the Kodi no sound issue with some simple steps.
What Are the 4 Cases Where Kodi Has No Sound?
When we talk about Kodi no sound issue, there are many causes. Let us go through this by taking the top 4 cases for the same.
Case 1. Kodi Audio Settings Problem
Incorrect audio settings are a major reason behind Kodi's no audio issue. It happened when the audio settings of Kodi didn't match your audio output device. In this case, you will not be to hear audio at all or can hear disturbing audio.
Case 2. Kodi Software Crash
In certain cases, the sudden power failure or some bugs causes Kodi software to crash. In this case, you will not be able to listen to audio, or you cannot access Kodi at all. This generally happens in the case of Kodi's old versions.
Case 3. Video Has No Sound
In this case, you will only be able to see videos but cannot listen to the audio. Here you need to check your Bluetooth connectivity in the case of Bluetooth speakers. Sometimes this issue is caused by a problem with sound drivers in case you are using windows.
Case 4. Hardware Problems
A hardware problem is a common problem for Kodi no sound issue. You will not hear any sound or disturbing sound in this case for all videos. It is a problem with the audio cable, connecting ports, or an old Kodi box.
How to Resolve the Kodi Audio Settings Issue
In many cases, incorrect audio settings can cause Kodi no sound issue. In this case, you are required to change some general audio settings. For this, go through some steps.
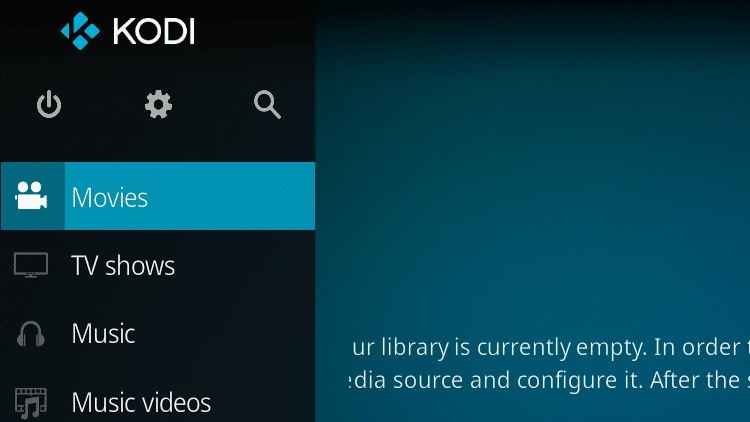
Step 1: Launch Kodi on your device and go to the home screen. Here click on the "Settings" icon from the given options as shown in the image.
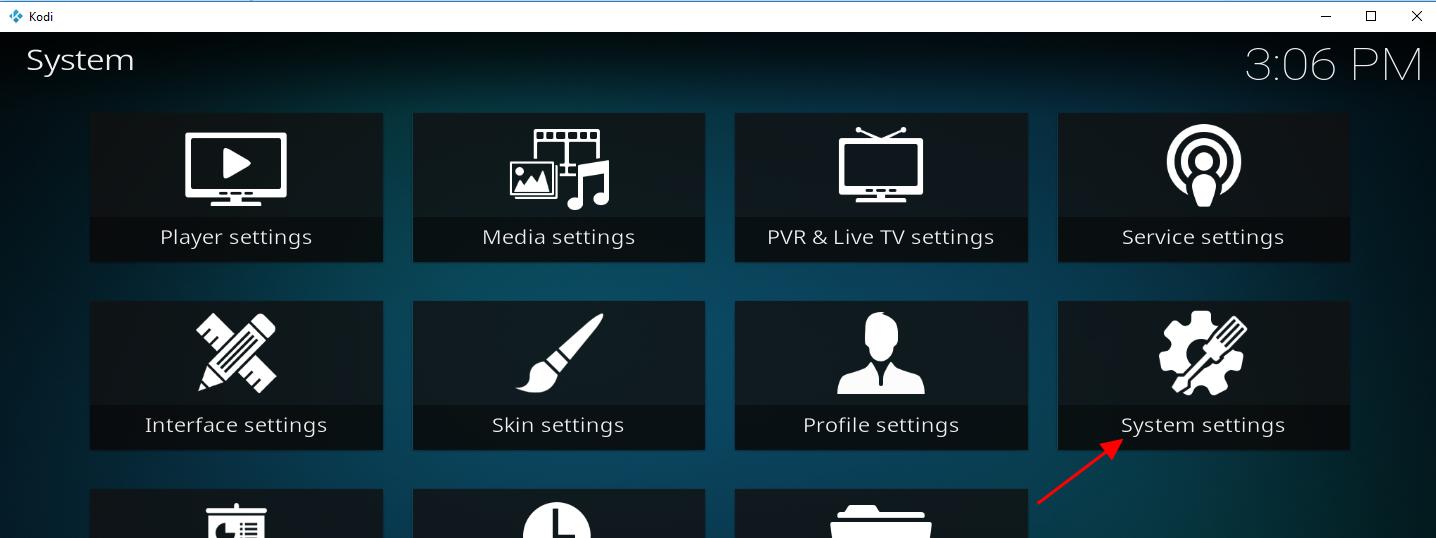
Step 2: Click on "System Settings" as shown below in the image with an arrow.
Step 3: Start clicking on the "Standard" and continue doing it until you saw "Advanced" in the left pane. Once you saw "Advanced," click on this to enter Advanced settings as shown below.

Step 4: On clicking "Advanced," you will see options on the left pane. Choose "Audio" from these options.
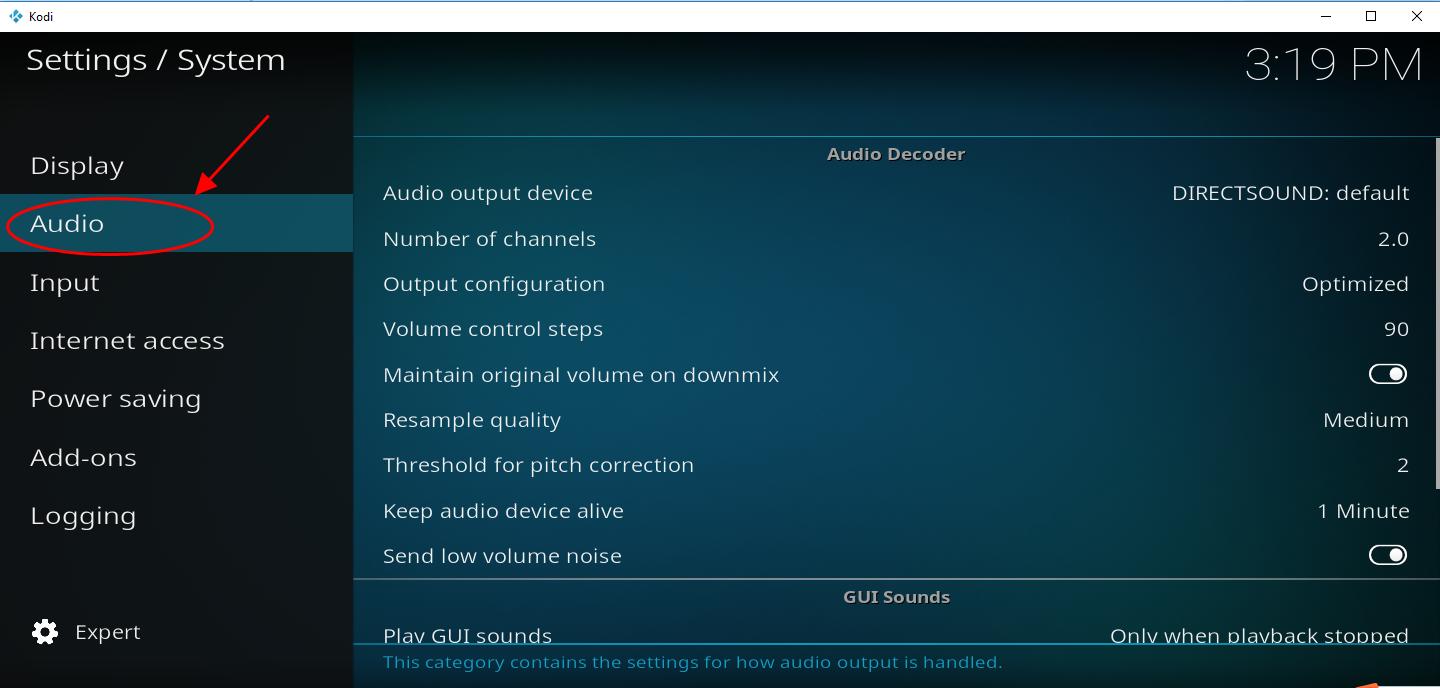
- Audio output device: It provides you the ability to select the right output device. Choose an appropriate device.
- Many channels: It helps you choose the number of channels required for a digital audio connection. In other words, you can change it according to the number of speakers for an analog connection.
- Output configuration: Here, you can configure the properties of the audio output. It provides you with various options,
- Fixed: You can set audio output according to the indicated sampling rate. It also allows you to set the speaker accordingly.
- Best Match: It is highly recommended as this option allows you to set audio output as per the closest match to the source properties.
- Optimized: It provides you an opportunity to set audio output at the start of the playback itself. It will remain the same even if the properties of the source changes afterward.
- Volume control steps: This function allows you to adjust the number of buttons presses. It ranges from mute to full volume.
- Maintain original volume on downmix: It provides you an option to balance the surrounding channels. It will let you restore the original audio source's volume if the sound on your Kodi is low or there isn't any sound at all.
- Resample quality: It allows you to resample the audio at various rates that range from low to high.
- Keep the audio device alive: It allows you to set the time for the audio device to wait in case of non-requirement of sound.
- GUI sounds: It allows you to choose a sound theme.
Note: After resetting the audio settings, Restart your device.
How to Fix the Kodi Software Crash Issue
There are many reasons behind Kodi software crash like,
- You are using an older version. In this case update to the latest version is the quick fix.
- You recently install some addons. In this case, immediately remove the addons.
- Your graphics driver is old. In this case, a simple update to the later version will fix the issue.
But when this problem remains certain for a long time, you need to alter some settings. It would help if you disabled hardware acceleration. Let us discuss it in detail.
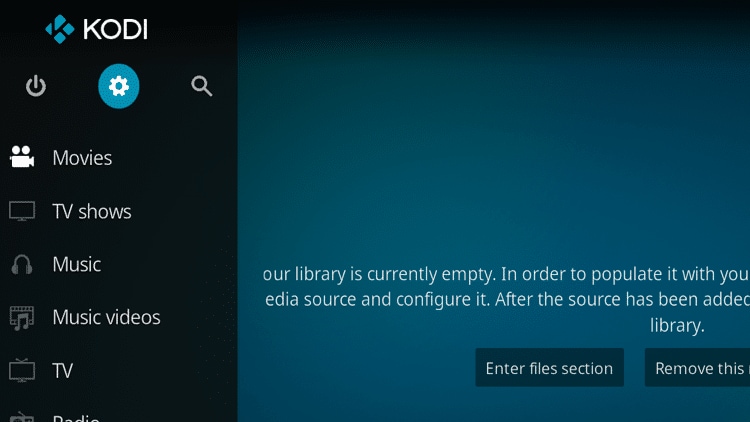
Step 1: Click on the settings icon as shown in the image.
Step 2: Go for the "Player settings" from the given options.

Step 3: Now go to the bottom left corner and start clicking on the gear icon until you reach "Expert."
Note: It generally takes three clicks to change the mode from "Standard" to "Expert."

Step 4: Click on the "Videos" tab from the given options and go to the processing section. Now go to "Allow hardware acceleration - DXVA2". You are required to keep it disabled.
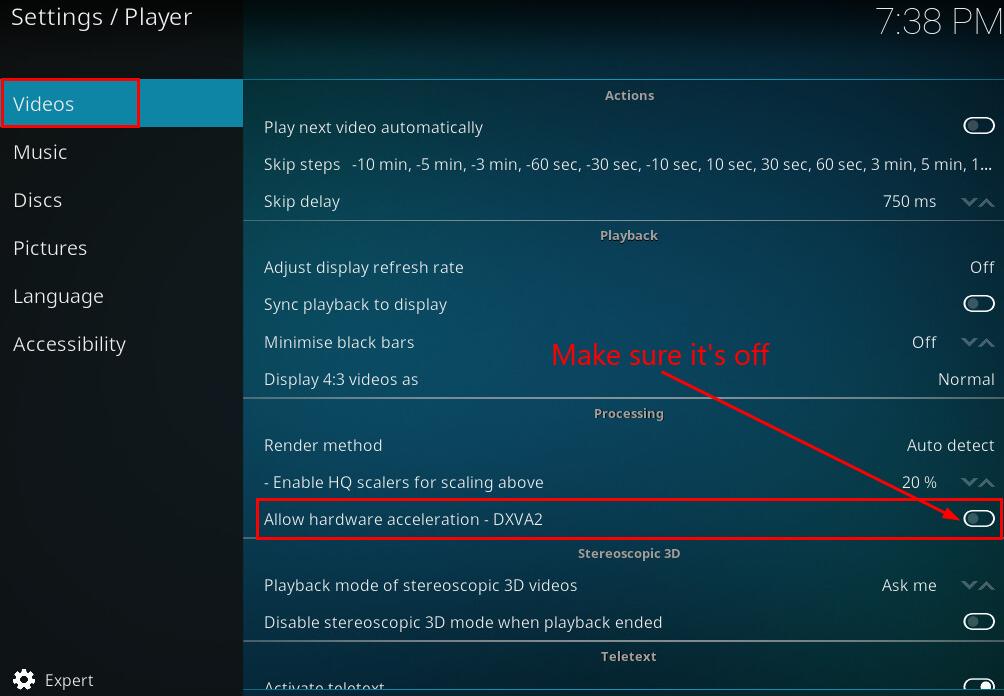
Once you successfully disabled the given option. You are required to restart your Kodi to make the necessary changes, applied effectively. This technique will prevent Kodi from crashing in the future.
How to Repair Corrupted Videos Without Sound
There were several instances when your videos got corrupted due to several reasons. It may happen due to sudden interruption during transfer, changes in the format, virus attack, etc.
You need to know that no matter whatever will be the reason for corruption, you can easily recover your video with the Wondershare Repairit Video Repair software.
Video Tutorial on How to Fix Kodi Won't Play Videos Issues?
This software is available for both Windows OS and Mac OS. The prime advantage of using this software is, it recovers your corrupted videos of almost any kind and without introducing any sound. You just need to follow three simple steps to repair your corrupted video.
Step 1: Add corrupted video
Launch Wondershare Repairit and add a corrupted video. You can add a corrupted video by clicking anywhere in the middlebox with the message" Add video and start repairing" or clicking on the "Add" button.

Once the corrupted video is added successfully, the interface will show the required details as shown in the image.

Step 2: Repair video
Click on the "Repair" button to proceed. It will take some time. Once the repair is completed, a window will appear before you. It will ask your permission to preview and save your repaired video. If you don't want a preview, you can simply click on the "Save" button to proceed. In case you want to preview the repaired video for its quality, you can do this by simply clicking on the little triangle.
If the repaired video doesn't meet your expectations, you can go for "Advanced Repair."

For this, click the folder icon and add a sample video file. A sample video file is a valid file that is created by the same device. It also carries the same format as that of a corrupted video. Actually, the advanced repair will utilize the information from the sample file to provide efficient results.
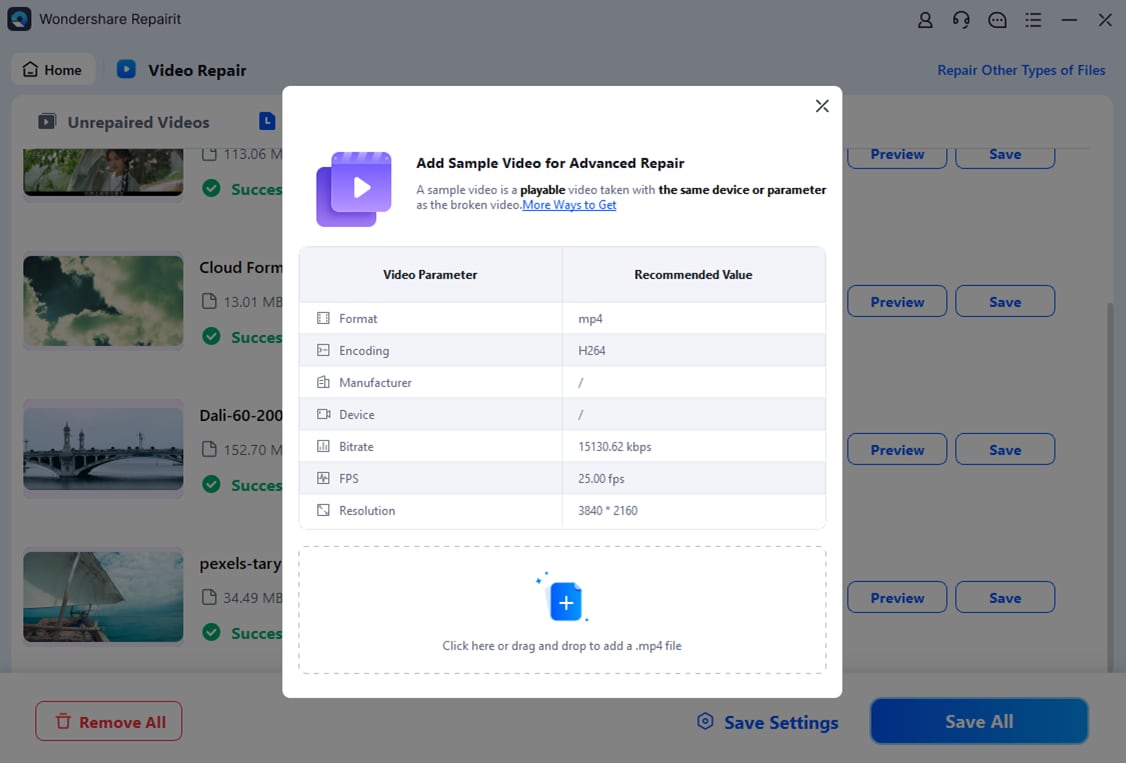
Once the sample file is added, click on the "Repair" button. Once the" Repair" button is pressed, you will be asked to save the video.
Note: Once the advanced repair starts, you can't save it.
Step 3: Save video
Now on clicking "Save," you will be asked to select a path or location for saving the recovered video. You can simply select any location to proceed. You are also provided with an option to create a new folder. You can name a new folder to find it easily later on.
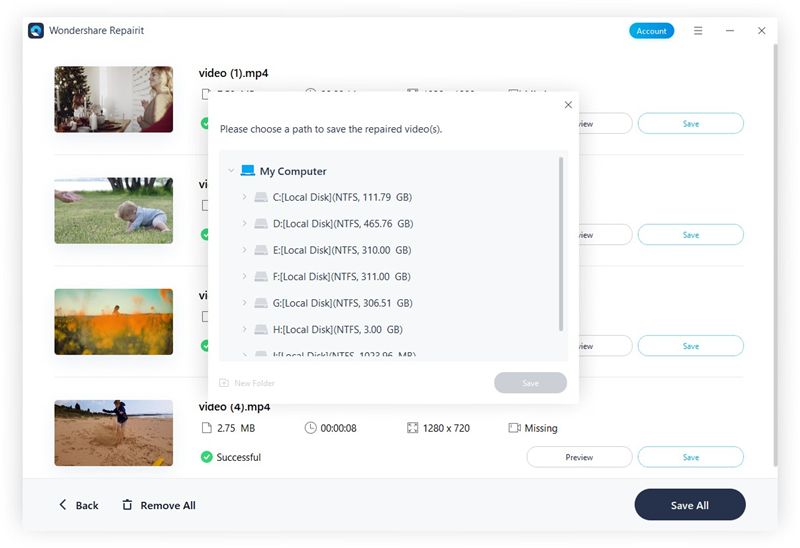
Once you are done with selecting the location, the process of repairing will begin. Once completed, you can access your repaired video.
How to Fix the Hardware Issues
It's not a software issue in all cases. There are many instances when hardware failure causes Kodi no sound issue. Although it is not a common cause, it happens sometimes. In this case, you are required to follow some of the simple tips that are presented below.
- Connecting Ports: With time, connecting ports are often exposed to dirt and other atmospheric conditions. As a result, static noise, choppy audio, etc., start coming. Even in some cases, there is no sound at all. This is just a normal condition that causes Kodi no audio issue.
To get rid of this issue, you can use air to blow out the accumulated lint. It also helps you to blow out other dust contaminants. As far as the remaining contaminants are concerned, you can use a cotton swab to wipe them out.
- Audio cables: It is advised to check the audio cables of your sound system for any defects. With time the wires lose their ability to stand wear and tear. As a result, they got cracks. In another case, the wires may have frayed ends, or they are wrapped around each other. To fix this issue, you can swap another cable or simply fix the damaged wire by soldering.
In another case, there is a possibility that you have plugged-in the wrong cable. For this, you can take the help of the device's manual for establishing the right connections.
In another case, you are advised to keep your audio cable away from sources that generate electromagnetic radiation. The sources responsible for electromagnetic radiation include computer monitors, power supplies, etc. if you face low space issues, you can arrange cables in parallel or cross them at 90-degree angles.
- Bluetooth connection: It is advised to keep your Bluetooth speakers within range. In most cases, this range is about 30 feet or 10 meters. Also, make sure that there is enough distance from other equipment like microwave ovens, external monitors, etc. Metal desks and brick balls also interrupt the Bluetooth signal.
If the above mention tips don't work for you. You are required to switch off all Bluetooth devices except for Kodi. In most cases, this technique works as there doesn't remain Bluetooth disturbance anymore.
- Kodi box: Most people ignore Kodi box. They think that they can stream video, which means there is nothing wrong with the Kodi box. But, in many cases, Kodi no audio issue has a lot to do with the Kodi box. In most cases, you are required to upgrade your Kodi box.
There is a hardware fault in the electronic components present on the circuit board used inside the Kodi box. In this scenario, a simple hardware repair will do a job for you, and you will experience good sound.
Remember the Tips on Playing Videos with Kodi
- Enable unknown sources: By default, Kodi has disabled the option of adding add-ons. In many cases, Kodi requires add-ons to work properly. You can enable this from Settings > System > Add-ons > Unknown sources to experience interruption-free entertainment.
- Reinstall Kodi: Sometimes, you start facing no sound issue or video buffering issue and even Kodi crash issues in some cases. Here you are required to reinstall Kodi, and most of the issues will be resolved.
- Update Kodi to the latest version: Simply updating Kodi to the latest available version can fix many issues. As most of the bugs are removed in a new version. You can also update the sound driver of your computer to fix the Kodi no audio issue.
- YouTube sound settings: One of the best techniques is to configure Kodi audio settings by going through Settings > System > Audio. You can also enable debugging by going through Settings > System Settings > Logging.
- Enable audio passthrough: Play any movie. Once it starts, click on "Settings" and go to "Audio Settings." Now enable "Audio passthrough" To resolve Kodi's no sound issue.
Closing Words:
There are many reasons behind Kodi's no sound issue. These reasons are common reasons and often accompanied by almost everyone. It just requires some tips and easy solutions to fix these issues. Some trusted and tested techniques are presented in this resolute dossier to help you out on the same.
Related Questions Searched for Frequently
-
1. Why is my Kodi muted?
You accidentally did it, or you have enabled "Audio Passthrough." In another case, you have pressed "F8". -
2. How do I adjust the volume on Kodi?
Press "+" or "-" from the keyboard to increase or decrease the volume. You can also press "F8" to toggle muting. You can also take the help of the "F9" and" F10" keys to adjust the volume level as per your choice. -
3. How to fix the Kodi no sound problem?
- You can reinstall Kodi to fix this issue.
- You can update your Kodi to the latest available version.
- You can uninstall any latest add-on.
- You can update sound drivers.
- Check for loose connections.
Fix Media File Issues
- Recover & Repair Photos
- Recover deleted photos.
- Recover photo booth.
- How to repair JPEG images?
- What is JPG File?
- What is GIF File?
- Guide for PNG File
- Recover Videos
- Best video recovery software for Windows
- Best video recovery software for Mac
- Recover DVR recordings
- Recover CCTV footage
- Recover deleted Vivint videos
- Recover deleted MKV files
- Recover deleted Youtube videos
- Recover deleted CapCut videos
- Recover After Effects Project
- Recover Premiere Pro Project
- Recover iMovie Project
- Recover videos from GoPro
- Repair Videos
- Fix error code 0xc00d36c4.
- Repair corrupted MP4 video.
- Fix 0xc10100be video error.
- Solve blurry videos.
- Fix MOV can't play on QuickTime.
- Free video repair software.
- Fix frozen video files.
- Recover & Repair Audio
- Moov Atom Not Found ?
- Repair your MP4 file online.
- Can't play recorded video?
- AVI/MP4/MKV cannot render?
- Fix 0xc00d5212 error of AVI.
- Recover & Repair Cameras

 ChatGPT
 Perplexity
 Google AI Mode
 Grok
Grok


Eleanor Reed
staff Editor