Having your plans derailed by a RAW partition can ruin your day. If you're looking at one right now, you know what we mean. Your computer won't let you access it, but that's only the beginning. On top of it all, there's a good chance all your data is lost.
You're right to be researching TestDisk RAW partition recovery. It's undoubtedly one of the most effective ways out of a tricky situation involving a RAW partition. Unfortunately, TestDisk is not a tool for everyone. Here's what you need to know.
In this article
What Is a Raw Partition?

When your computer reports a RAW partition, that can mean several different things. Typically, a partition becomes RAW due to accidental or improper formatting. In addition, having a RAW partition can imply some kind of file or disk corruption.
In one way or another, a RAW partition is unrecognizable or unreadable to the operating system. For example, if you format a drive on a Mac computer and connect it to a PC, the partition will appear as RAW. Windows OS won't be able to access and read it.
What Is TestDisk?

TestDisk is an open-source data recovery tool specializing in these situations. If you need to troubleshoot, recover, or fix a lost or bootable disk, TestDisk can help you. One of the advantages of this tool, in addition to its freeware model, is its incredible versatility. You can use TestDisk for disk recovery on Windows, Mac, Unix, and Linux distributions.
Features
- Data recovery – TestDisk allows you to rescue files from a RAW or corrupt partition after accidental formatting, malware attacks, and other scenarios.
- Wide support – On top of its multiple OS support, this tool lets you recover NTFS, FAT32, exFAT, ext2, ext3, ext4, HFS, JFS, and many other file systems.
- Command line interface – TestDisk sports a command line interface, so it may not be suitable for computer users without any technical knowledge.
Pros & Cons
User Comments
TestDisk bodes extremely well across different online review platforms, with most users praising its effectiveness. It's hailed as a powerful tool that is capable of recovering heavily corrupt disks and is compatible with different types of memory drives. While professionals claim it's easy to use, most average users say they've experienced difficulties with TestDisk's interface.
How to Recover Data From a Raw Partition With TestDisk
One thing is for sure – TestDisk looks great on paper. It's a free solution with powerful features and rave reviews, so what could go wrong? More experienced users are now thinking, Where's the catch? Well, we've already mentioned it. It's TestDisks' interface.
If you don't know what the command line interface is, you've probably never used a utility like this one before. That also means you'll have difficulty getting used to it. Don't worry. We'll show you the steps for TestDisk's RAW partition recovery below.
- First, download TestDisk for your OS from the official website.
- Next, unzip and run the testdisk_win.exe file on your computer.

- Under Use arrow keys to select, then press Enter key:, choose the No Log mode.

- Navigate to your RAW drive and then select the Proceed option.

- Select the partition table type and press Enter when done. For an MBR partition, select Intel. If you have a GPT table, select EFI GPT.

- If you don't know the partition table type of your RAW drive, go to Disk Management and right-click the disk with the RAW partition. Select Properties.

- Look under the Volumes tab. The information you're looking for is in the Partition style field.

- Next, select Analyze and then Quick Search. Now, wait for the results.

- Shortly, you'll see a list of partitions that TestDisk was able to dig up.
- Look for your RAW partition. If it's highlighted green, it is recoverable.

- If your RAW partition isn't highlighted in green and has a D label instead, it has been labeled for deletion. Don't worry; you can change this label. Use the right and left arrow keys to change the D label to the P label.
- If you want to see the contents of your RAW partition, press the P key.
- To initiate the TestDisk RAW partition recovery, select your RAW partition and press Enter. Then, choose the Write option.

- You may need to restart your computer to apply changes. After you do that, your partition will no longer be RAW, and you will be able to access it.
Wondershare Recoverit VS TestDisk
If you find TestDisk confusing or difficult to use, you'll be happy to hear that there are alternatives. One of the best ones is Wondershare Recoverit, a professional data recovery tool with a success rate of blazing 98% and a simple step-by-step user interface.
It's a reputable software from the data recovery space that anyone can use in any situation involving data loss. Its robust algorithm can recover over 1000 file types and formats from 2000+ devices, including RAW disks and partitions.
In addition to popular filesystems, Wondershare Recoverit also supports media files, so you can use it to rescue your photos, videos, and music. It can also recover Word documents, PDFs, EPUB books, Outlook emails, etc. You can also preview your files before recovery.
| TestDisk | Wondershare Recoverit | |
| Supported systems | OS: Windows, Mac, Linux, Unix Filesystems: NTFS, FAT32, exFAT, ext2, ext3, ext4, HFS, JFS and others. | OS: Windows and Mac Filesystems: NTFS, FAT32, FAT16, exFAT, ReFS, APFS, encrypted APFS, HFS+, encrypted HFS, HFSX, RAW, RAID, EXT2, EXT3, EXT4, BTRFS, JFS, and others. |
| Pricing plans | Free forever | From $69.99 per year |
| User reviews | TestDisk has generally positive reviews (4.3 out of 5 stars on G2). According to many satisfied users, TestDisk's most praise-worthy qualities are its success rate and versatility. Most reviewers agree that TestDisk's command line interface isn't very user-friendly. | Wondershare Recoverit isn't far behind, with an average score of 3.7 out of 5 stars on Trustpilot. Over 65% of users recommend Recoverit for its powerful data recovery algorithm and ease of use. Less satisfied users mostly complain about slow customer service response. |
Final Verdict
Both TestDisk and Wondershare Recoverit are data recovery giants. If you ask which one is better at saving your files from unreadable partitions, the answer is – it's a tie. However, there are two critical differences between these tools that you must consider.
First and foremost, TestDisk will throw you a nerve-wracking user experience if you're accustomed to writing commands. The data recovery process is more visual, intuitive, and easier to understand when using Wondershare Recoverit's user-friendly software.
On the other hand, you don't pay anything for TestDisk. Wondershare Recoverit does offer a free trial, but that's only a taste of what the premium version can do. If you don't want to subscribe, then TestDisk is a sensible choice.
Other than price and ease of use, TestDisk and Wondershare Recoverit are not that far from each other. They offer the same powerful capabilities but a very different degree of accessibility. You'll be more comfortable using the latter unless you're fluent in the command line.
How to Recover Raw Partition Data With Wondershare Recoverit
Is using Wondershare Recoverit really that easy? Here, see it for yourself.
- First, you need to download Wondershare Recoverit from the official website.
- Click on the recoverit_setup_full4134.exe file to install the app on your computer.
- The setup is fully automatic. Click on Install and relax until the setup is completed.

- Click on Start Now, and Wondershare Recoverit will launch automatically.

- Under Hard Drives and Locations, choose the drive with the RAW partition.

- It will initiate an all-around scan of your drive. Again, relax and wait for results.

- Wondershare Recoverit allows you to pause or stop the scan if you notice a file you want to keep.
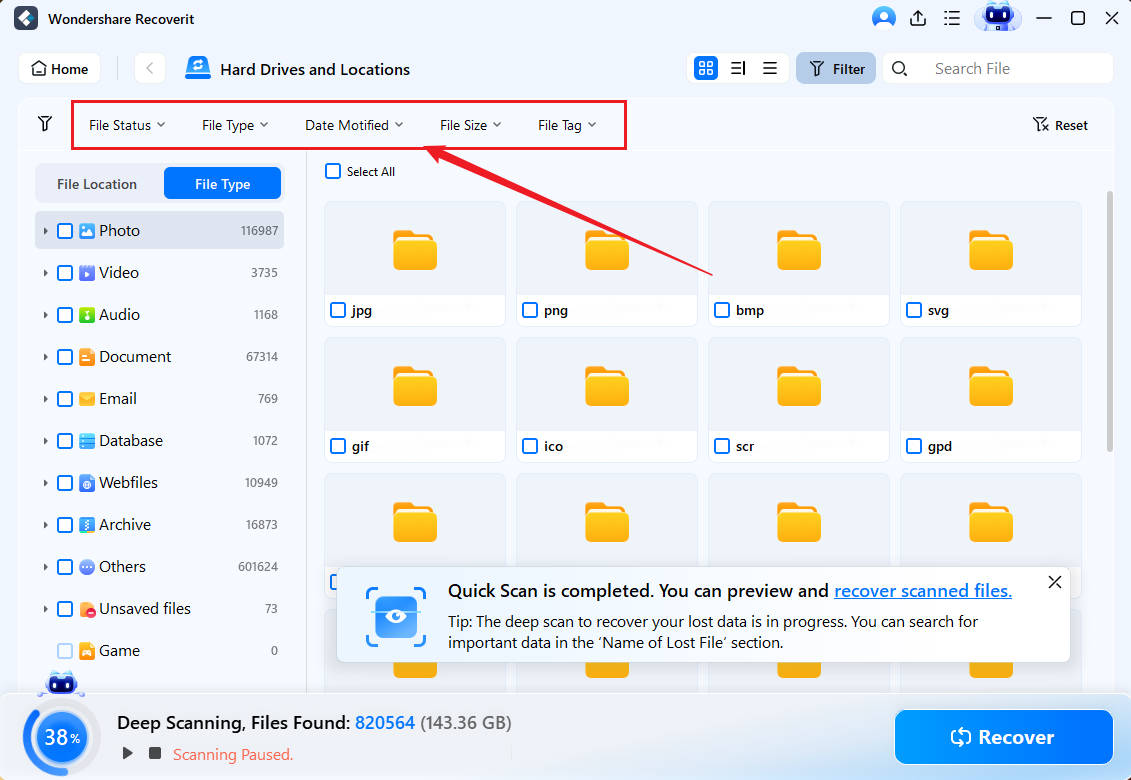
- When all results are in, you can browse recoverable files using filters or keywords.

- If you want, you can preview the files you want to rescue before you recover them.

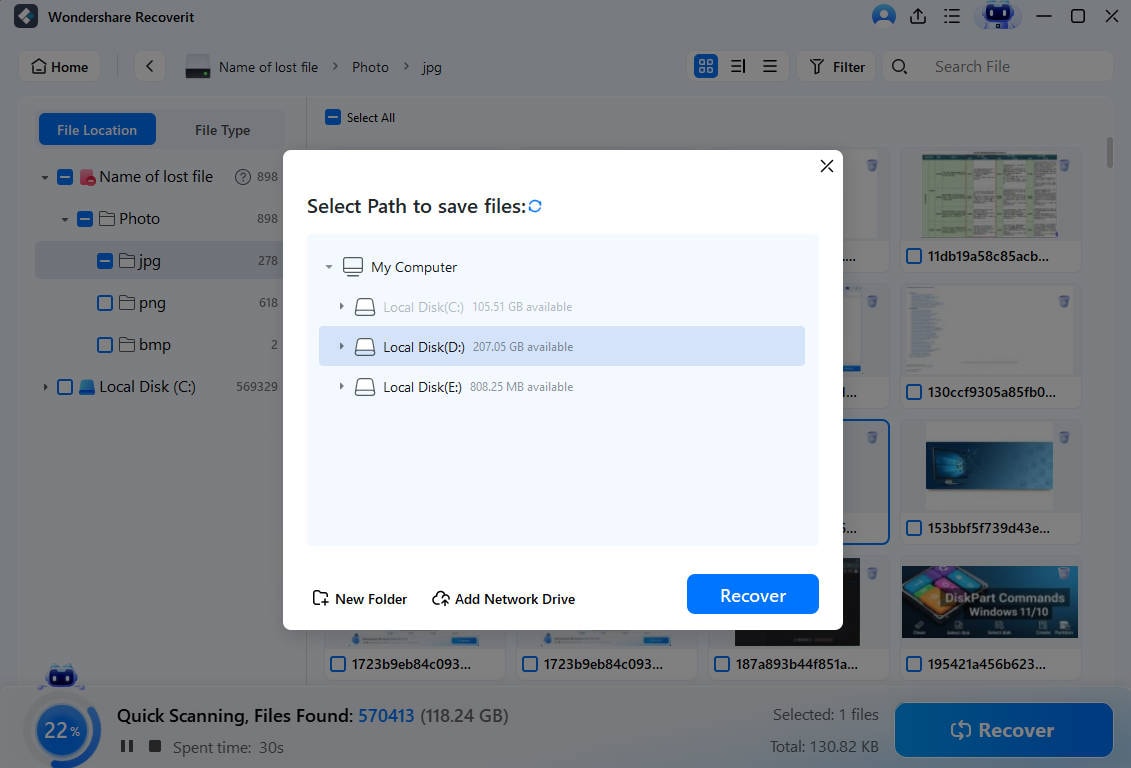
- Select all files you want to restore from the RAW partition and click on Recover.
- Choose a safe place to store them and click the Save button to complete recovery.

Conclusion
Is TestDisk RAW partition recovery a good option when you can't access a partition but have files on it that you don't want to delete? The answer is yes. TestDisk is a reliable partition recovery tool with a proverbial cherry on top – it is completely free to use.
However, TestDisk is also a tool designed primarily for professionals. Instead of a classic interface, it has a command prompt that you might find intimidating. TestDisk's best alternative, Wondershare Recoverit, is a much simpler-to-use but equally powerful tool.
FAQ
Should I format my RAW partition?
When you have a RAW partition, the easiest way to return it to a normal state is to format it. However, this will erase all the files you've stored there. If you decide to do this, you can access your partition after you format it, but it will be completely empty.Should I use TestDisk or PhotoRec?
TestDisk comes with satellite software called PhotoRec, which specializes in media files like photos, audio, and video files. If there are files of this type on your RAW partition that TestDisk cannot recover, you can try using PhotoRec instead.Is TestDisk supposed to be slow?
Sometimes, TestDisk might take several days to scan the drive and recover files. It depends on factors like the type of drive that's being used, as well as PC specifications. If you're using TestDisk to recover files from a RAW partition on an external drive, the process could be slow due to a slow USB port.


