I was trying to factory reset my macbook pro, and when I thought I deleted Macintosh HD - Data in Disk Utility, it was actually Macintosh HD itself. How do I restore Macintosh HD?- Reddit
Accidentally erased your hard drive on a Mac? That sinking feeling is real, but your data may not be permanently gone. Recovering an erased hard drive on Mac is often possible, whether it's your main Macintosh HD or an external disk. This guide provides clear, step-by-step methods designed for all users to restore critical files. We will walk you through everything from macOS's built-in utilities to dedicated recovery software to help you safely retrieve your valuable data.
Table of Content
I Erased the Hard Drive on My Mac by Accident. What Now?
Disk Utility is a program responsible for handling data on your Mac hard drive. It organizes and deletes your files, partitions, and disks accordingly. Although it is an excellent tool, things may go sideways regarding data deletion.
Before you start the recovery process, you should know whether it is possible to recover your data or disks. This depends on the deletion option you've chosen in Disk Utility.
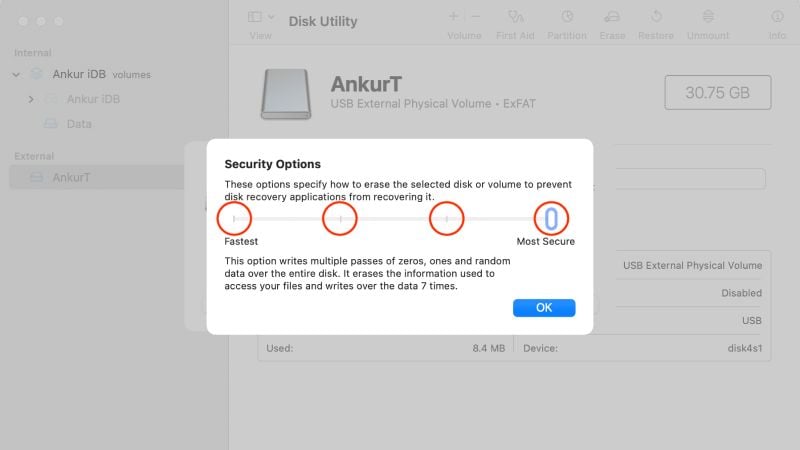
There are 4 deletion options: Fastest, Fast, Secure, and Most Secure. The chances of data recovery decrease as the deletion level increases.
| Erasing Options | Recovery Chances |
| Fastest | This level simply deletes the file directory and marks the space as free. It does not overwrite the actual data, making it the quickest method but also the least secure. Data recovery chances are high, as the actual data remains on the disk and can be retrieved using data recovery software. |
| Fast 3-pass secure erase (DoD 5220.22-M standard) |
This level of deletion writes over the data three times with different patterns. It is considered secure by the U.S. Department of Defense (DoD) standard. Recovery chances at this level are low, as the overwritten data is difficult to retrieve. However, with advanced forensic tools and techniques, it might still be possible to recover some data. |
| Secure 7-pass secure erase (DoD 5220.22-M ECE standard) |
This level overwrites the data seven times with different patterns, making it even more secure than the 3-pass erase. It is considered secure enough for most sensitive data and is compliant with the DoD's Enhanced Standard. Data recovery chances at this level are minimal, as it would require highly specialized equipment and expertise to recover any data fragments. |
| Most Secure Gutmann method (35-pass secure erase) |
This is the most secure deletion level, overwriting the data 35 times with different patterns. It was developed by Peter Gutmann in 1996 and is considered one of the most secure methods for erasing data. However, it is also the slowest and may not be necessary for most users. The chances of data recovery at this level are extremely low, as it would require highly sophisticated technology and expertise to recover any remnants of the data. |
Most macOS devices use the Fastest option as the default setting. So, if you haven't set the deletion level above Fastest, there's a high chance of recovering your erased hard drive and data. Additionally, it is crucial to stop using your drive to avoid overwriting and improve your recovery success.
How To Recover Accidentally Deleted Files/Volumes From Macintosh HD or External Hard Drive
Method 1. Restore an Erased Hard Drive Using Disk Utility
If you have accidentally erased files or a volume from your Macintosh HD using Disk Utility and the Mac still works properly, you can reverse the process with the same program.
- Open Disk Utility on your device.

- Click View and select Show All Devices.
- Select the device from which you wish to recover data.
- Click Restore to initiate the process.

After the program scans for lost data, you will receive the detected files back on your Macintosh device. You can also recover accidentally erased external hard drive in Disk Utility. However, this method may only partially restore your hard drive in some cases. This method is suitable if you have used the Fastest deletion option.
Method 2. Recover an Erased Hard Drive With Data Recovery Software for Mac
Sometimes, you may need a helping hand to reach your recovery goals and get high-quality data back on your Mac device. Since numerous solutions are available on the market, choosing a program with high success rates and reliable algorithms is essential.
One such software is Wondershare Recoverit for Mac. It is one of the most advanced yet easy-to-use hard drive recovery tools on the market that can recover your data from Mac HDD or SSD, even with T2 and M1 chip encryption. Discover which one is the best data recovery software for Mac.
It covers various loss scenarios, including accidental deletion and drive damage, so you won't have to worry about unsuccessful file retrieval, no matter the case. Moreover, it will successfully restore hundreds of file types while guaranteeing discretion and safety. Thus, you can be worry-free if you have stored sensitive data on your hard drive.
Recoverit is perfect for retrieving data deleted with the Fastest and Fast methods. In some cases, it can even retrieve data from the Secure option.
Here's how you can recover an erased hard drive on Mac using this hard drive recovery tool:
- Download Recoverit to your PC and start the program.
- Choose the Hard Drives and Location option and select your accidentally deleted hard drive.

- Start scanning your drive. You can also pinpoint the files you want to recover or search for your files using the keyword option.

- If the program finds all the files you want to recover, you can pause the scanning process and recover your data.
- Preview your files and select the ones you want to recover.
- Press the Recover button to finish the process.

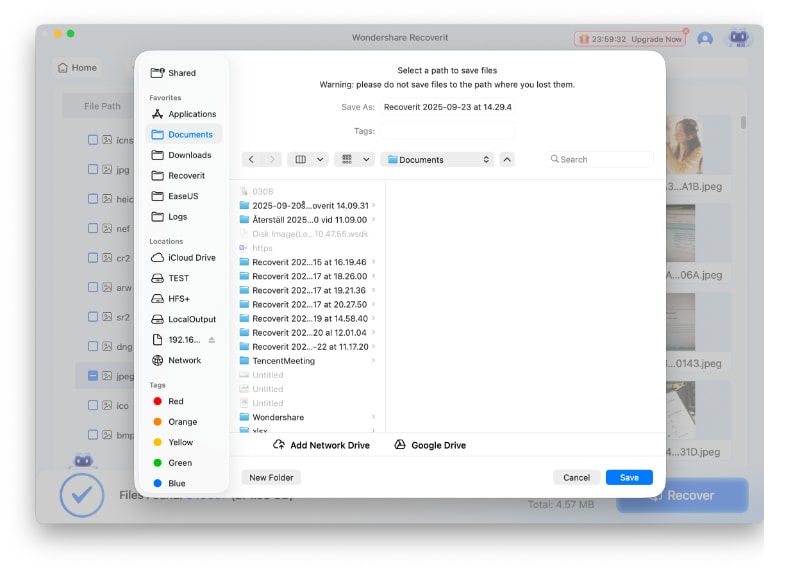
- Choose a destination where you want to save your recovered files.
Method 3. Recover Data From Deleted Hard Drive Using Mac Time Machine
Time Machine is another integrated program on Mac devices that enables you to back up and store your valuable data. Everything you saved on your device will be in the Time Machine section. If you have configured the Time Machine backup and want to get your data back, you can use this program for the best results.
Here's how to use Mac's Time Machine to get your deleted data back from your erased hard drive:
- Connect the external drive containing your Time Machine backup to your Mac. If your Time Machine backup is on a network drive, ensure that your Mac is connected to the same network.
- Go to Apple menu > System Preferences > Time Machine and click Select Disk....
- Choose the external drive or network drive containing your Time Machine backup. Click Use Disk to set it as the backup source.
- Close System Preferences. Then, open Finder and navigate to the location where you want to restore the deleted files.
- Click the Time Machine icon in the menu bar and select Enter Time Machine.
- Time Machine will now display a timeline of your backups on the right side of the screen. Use the arrows or the timeline to navigate to a backup that contains the deleted files.
- Select the files to restore and click Restore to recover them to the original or specified location.

Time Machine is ideal if you have deleted your files using Fast, Secure, and Most Secure options since it doesn't rely on Disk Utility. Instead, you will recover backup files from the Time Machine program.
What To Do if You've Accidentally Erased the Startup Disk on Mac
The startup disk refers to the disk where your operating system is stored. If your MacBook only has one internal hard drive, the Macintosh HD could be the default boot disk. When you accidentally deleted this disk, there will be no startup disk on your Mac, and you will not be able to boot your device. You will surely lose the data stored on your computer.
If this scenario occurs, you will need to reinstall your operating system to make your Mac bootable and work again.
Here are several methods you can try to fix this issue.
Method 1. Use Recovery Mode
Recovery Mode can help you retrieve your Macintosh HD startup disk if you have used the Fastest Deletion option. You can restore your operating system through the Recovery Mode option, but you will need to repartition your disk afterward.
We have prepared two step-by-step guides on recovering accidentally deleted Macintosh HD startup disk using the Recovery Mode, depending on your processor.
Here's a guide on recovering erased hard drive from M1-based processors:
- Press the Power button to turn on your Mac.

- Immediately after seeing the Apple logo, press and hold the Power button until you see the startup options window.
- Release the power button when the Startup Options appear.

- Select Options and hit Continue.
- Choose Disk Utility from the available options.
- Select the drive you want to recover from the sidebar and select the Partition option.

- Choose 1 Partition and select Apply.
- From the menu, choose Reinstall macOS and follow the onscreen instructions.

This method should get your system back to your Mac device. Your device will automatically restart after this process.
Here's how to use this method to recover data from your Intel-based Mac device:
- Press the Power button to turn on your Mac.
- Press and hold the Command (⌘) + R keys. Release the keys when the Apple logo appears on the screen.
- Choose your account and input the password. Click on the Continue button.

- Find the Recovery Mode menu and select Disk Utility from it. Click Continue.

- Choose the drive you want to recover files from and select Partition.
- Choose 1 Partition and press Apply.
- From the top menu, choose Disk Utility > Quit Disk Utility.

- Choose Reinstall macOS and follow the onscreen instructions.
Method 2. Use a Time Machine Backup
Time Machine is an excellent, integrated tool that allows you to back up and recover data from your Mac device. If this program stores your operating system, you can follow the guide below to retrieve the deleted startup disk and reinstall it on your device:
- Restart your Mac device.
- Boot your Mac into Recovery Mode.
- Choose your user account and enter the password.
- In the next window, select Restore from Time Machine Backup and press Continue.

- Choose the disk you want to recover the data from and press Continue.

- Select the correct backup version and hit the Continue button.
- Choose the startup disk as your destination and press Restore.
In this case, your device should automatically restart and turn back on with the desired operating system version.
Method 3. Use Wondershare Recoverit to Create a Bootable USB for Mac
If the above two methods failed, you can use third-party software like Wondershare Recoverit to create a bootable USB and copy files from the unbootable Mac computer to a safe external storage device. Here's how to do it:
- Download, install, and launch Wondershare Recoverit on a working Mac computer.
- Select System Crashed Computer.
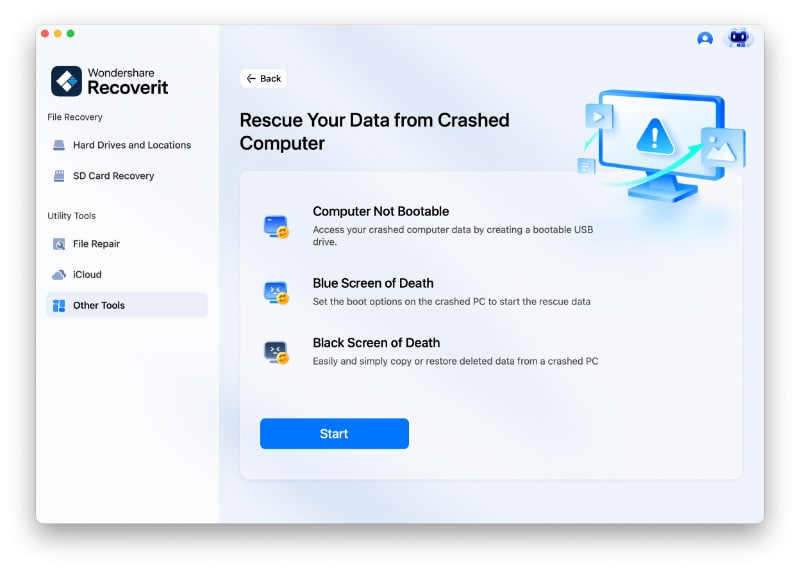
- Insert a blank USB drive and select it in the next window.
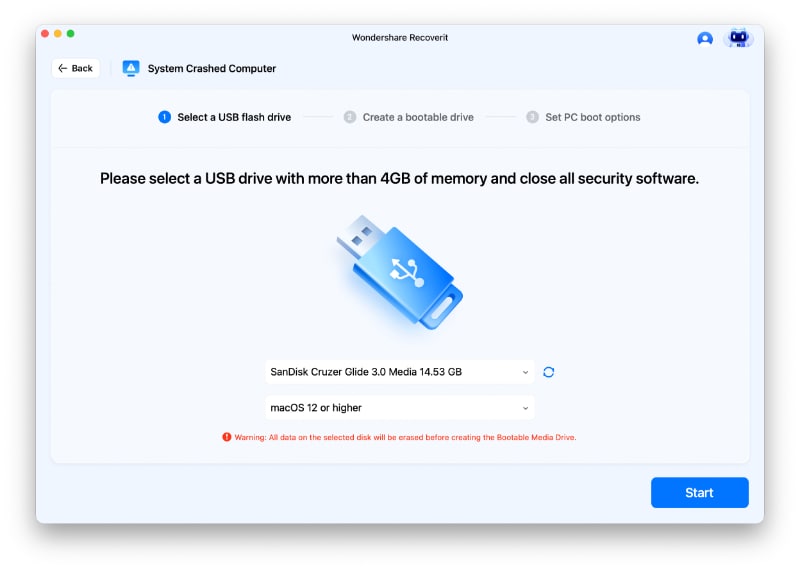
- Wondershare Recoverit will format your USB at this step, so ensure it is empty and hit Format.
- The program will automatically start creating bootable media, so keep the USB plugged in.
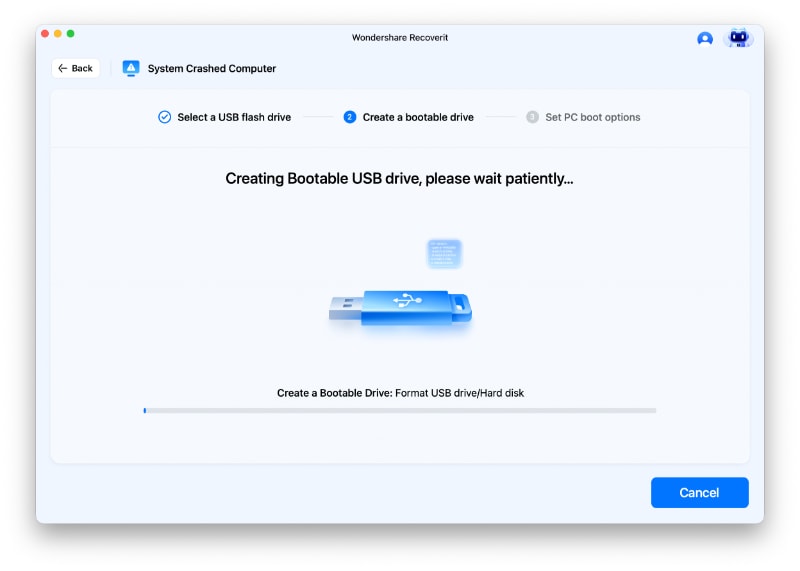
- After creating a bootable usb drive, connect it to the Mac that you have deleted the Macintosh HD by accident.
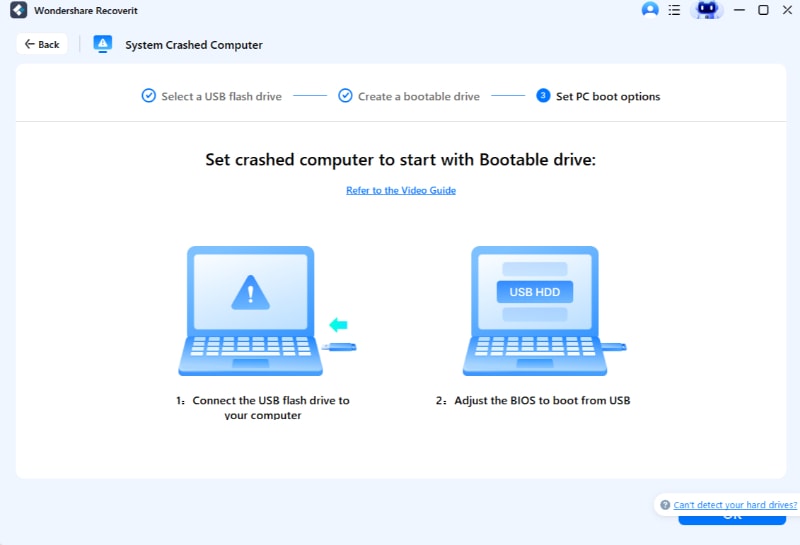
- Adjust the BIOS to boot from your bootable USB. To do this, restart your unbootable device and press the BIOS entry key when the first screen is displayed.
- Choose between Hard Disk Copy and Data Recovery in the next window.
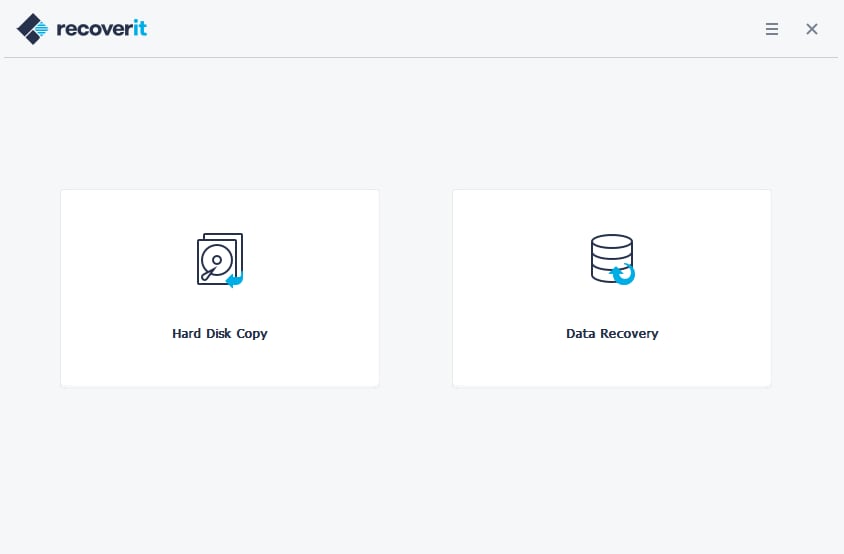
- Connect an external drive to the Mac computer and start transferring files or copying the deleted hard drive to the external one.
Method 4. Use a Bootable macOS Drive
If you have accidentally deleted the startup disk on your Mac, it is possible to reinstall macOS using a bootable macOS drive. However, keep in mind that reinstalling macOS will result in the loss of all data on your Mac computer. As a result, you should only resort to this option as a last resort. Before proceeding, make sure to recover and back up all your important data using Method 3 to prevent any permanent loss.
Here's how to do it:
- Connect the bootable macOS drive to your Mac device. If you haven't prepared one, you can follow the guide in this article to "create a bootable USB for Mac".
- Power on your Mac and press and hold the Option (or Alt) key immediately after hearing the startup chime or upon seeing the Apple logo.
- Release the Option key when you see the Startup Manager, which displays available boot drives.
- Select the bootable macOS drive using the arrow keys and press Return.
- Choose the Install macOS option and click Continue.

- Follow the on-screen instructions to reinstall macOS on the Mac with the deleted startup drive.
- Once the installation is complete, your Mac will restart, and you should be able to set it up as usual.
This method will automatically recover your system on your Mac device. However, if you don't have a bootable macOS drive, you may need to boot it beforehand, which may be a complex, time-consuming process.
Conclusion
Accidentally deleting hard drives or Macintosh HD can be overwhelming and stressful. However, you can quickly recover your data with the help of the right tools. We have covered several deletion cases and presented step-by-step guides to help you eliminate this issue and get your Mac up and running again.
Whatever the scenario, Wondershare Recoverit will be your best friend regarding data recovery. You will get all your valuable data back in only a few moments and be ready to use your computer as usual. Try it now, and thank us later!
People Also Ask
- What should I do immediately after I accidentally erased my Mac's hard drive?
Stop using the Mac immediately to prevent overwriting data. Do not install new software or save any files, as this maximizes the chances of a successful mac hard drive recovery. The best first step is to use a separate computer or device to research a reliable recovery solution.
- Can files truly be recovered after a complete Mac hard drive data erase?
Yes, recovery is often possible. A standard erase procedure removes the file directory but leaves the actual data on the disk until it's overwritten by new information. This makes recovering from Mac hard drive data loss feasible with data recovery software or a previous backup.
- Can I use Mac's built-in Disk Utility to recover an erased hard drive?
No. Disk Utility's "First Aid" feature is designed to repair disk errors, not to perform file recovery. For mac hard drive data recovery after an erase, you must restore from a backup (like Time Machine) or use specialized third-party data recovery software.
- Is it possible to recover an erased hard drive on Mac without a Time Machine backup?
Absolutely. If you don't have a backup, your primary option for recovering an erased hard drive on Mac is professional data recovery software. These applications are designed to scan the drive for leftover file data and can often restore it successfully.
- How can I prevent accidental mac hard drive data loss in the future?
The most effective prevention is maintaining regular backups. Enable Time Machine to create automatic, incremental backups on an external drive. Additionally, always double-check warning prompts in Disk Utility before confirming an erase operation to avoid future data loss scares.


 ChatGPT
 Perplexity
 Google AI Mode
 Grok
Grok


