
Want to know what is RAID 5? We attach storage devices like SSDs and M2 Drives to our computers to secure our precious data. But in case of failure, we lose our data for good. In this article, we are going to discuss a technique for keeping data safe even in case of storage drive failure.
Part 1. What is RAID 5?
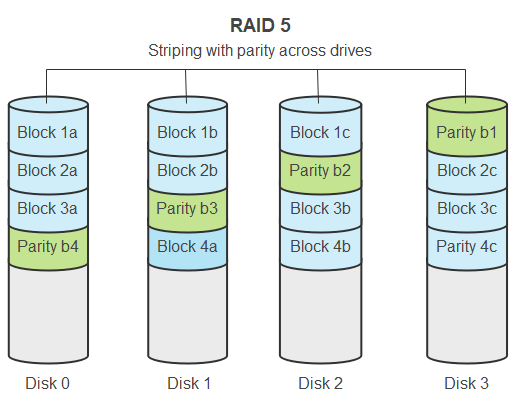
RAID stands for Redundant Array of Independent Disks", which is a method of storing the same data on multiple disk drives or SSDs so it can be retrieved safely if one of the storage devices fails permanently. There are many different RAID levels, and each handles the data and storage array differently. RAID 3 and RAID 4 used a single disk for saving parities. In the case of failure, it was impossible to recover the RAID data. RAID 5 solved this problem as the parity is distributed in multiple storage devices in this configuration.
| Metric | RAID 5 Specification | User Impact |
| Minimum Drives | 3 Disks | Entry-level redundancy. |
| Fault Tolerance | 1 Disk Failure | Array stays online if 1 drive dies. |
| Storage Efficiency | (n-1) * Smallest Drive Capacity | High efficiency (66% to 90%+). |
| Best Use Case | File Storage / Media Servers | Good balance of speed and cost. |
How Does RAID 5 Work?
RAID 5 combines two techniques for storing data on multiple discs: “Parity” and “Disk Striping”. Let's understand these two as RAID 5 works on these principles.
- Parity: Parity is a value used for retrieving data from the other drives in which it was kept as a copy of the original data in case of storage media failure. Parity is done by performing XOR (Exclusive OR) operation on the data to be stored. For a RAID protection with 3 Disks, only 2 disks will store parity.
- Data Striping: Data Striping is a method of storing data in RAID 5 configuration. In this technique, the data is broken down into consecutive logical segments, and these parts (that may be of a single file) are stored on different storage devices such as SSDs or HDDs. In simpler words, each data segment is called a strip, while a stripe is a collection of various strips.
Performance of RAID 5
Performance-wise, RAID 5 turned out to be a suitable choice, as the data write speed of this protected storage system was more or less 230 MBps, while the read speed was slightly slower at around 195 MBps.
What Is RAID 5 Used for?
RAID 5 is frequently utilized for storage since it provides a suitable compromise of capacity and performance. It's also popular among applications that require high availability, such as database servers and customer information storage in customer services. RAID 5 may also be used for backup and recovery purposes.
Advantages and Disadvantages of RAID 5
Pros
No bottleneck occurs in the RAID Level 5 data protection method.
Write time of RAID 5 is speedy.
The same data is copied on different disks so that you can recover data from RAID 5 in case of a disk failure.
The writing speed of RAID 5 is very fast, approximately 230 MBps.
RAID 5 is an affordable storage system.
This storage mechanism is safer and faster than the older mechanisms.
Cons
The data may never recover if two or more discs with parity are out of order.
Reading speed is slower around 195 MBps.
Critical Safety Tip: The RAID 5 "Write Hole" Because RAID 5 calculates parity in real-time, a sudden power failure during a write operation can cause the data and its parity to become out of sync. This is known as the "Write Hole." To prevent silent data corruption, it is strongly recommended to use a UPS (Uninterruptible Power Supply) with your RAID 5 server. Modern hardware RAID controllers often include a BBU (Battery Backup Unit) to mitigate this, but for software RAID (like Windows Server), a UPS is your primary line of defense.
Part 2. How to Set Up RAID 5?
For configuring a RAID Level 5 storage system you need at least 3 SSDs or Disk Drives on Windows 10. However, RAID 5 made up of 4 storage devices is considered better as it has high performance and more data safety. You can easily set up this storage system using Windows Server.
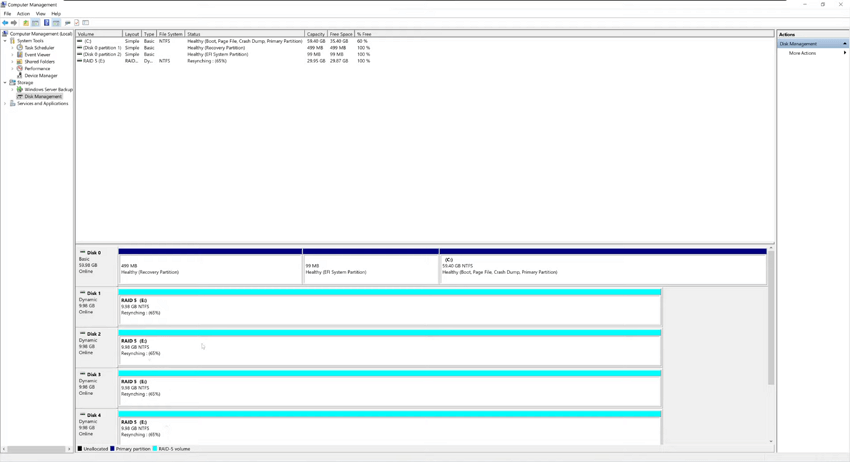
RAID 5 Configuration using Windows Server 2019
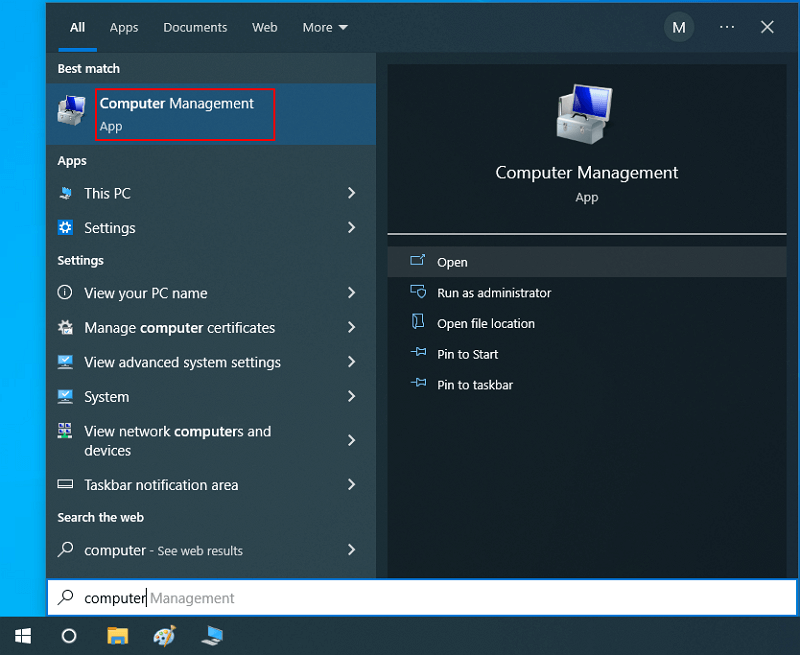
- Press the Windows Key (Winkey) on your keyboard (or manually open the Start Menu) and type “Computer Management”. Open this app as you find it.
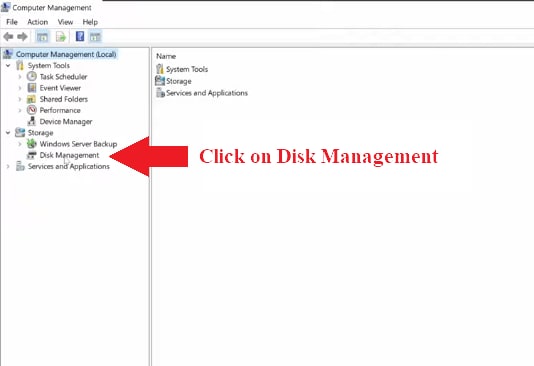
- Inside the left panel list of the Computer Management App will be an option called “Disk Management”, right under the “Storage”. Click it to have it in the right panel of the app.
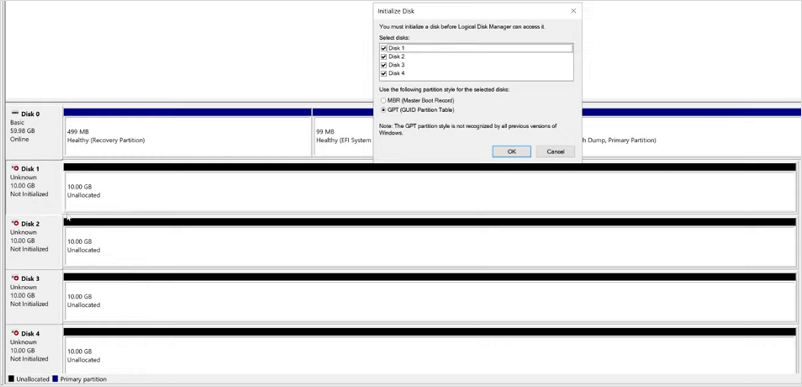
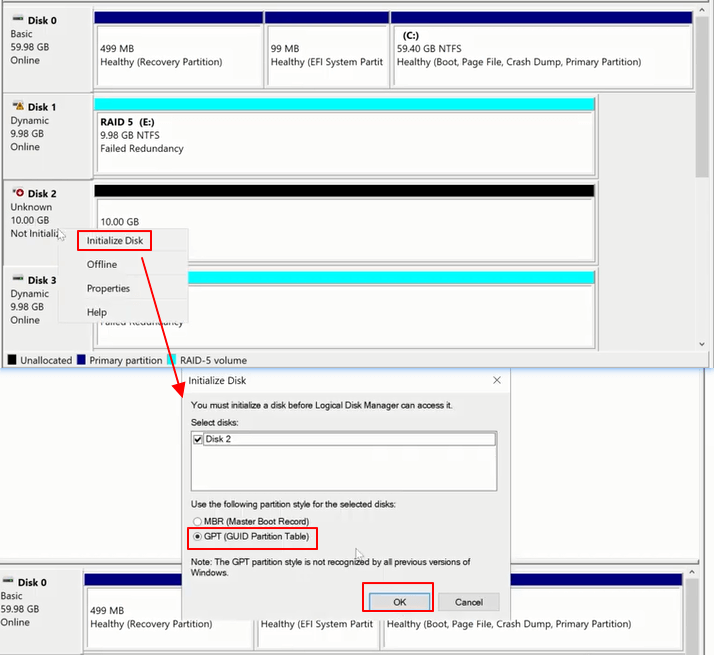
- A form will appear saying “Initialize Disk” with two options, MBR and GPT. Select the GPT option and press the “OK” button because GPT is newer than MBR.
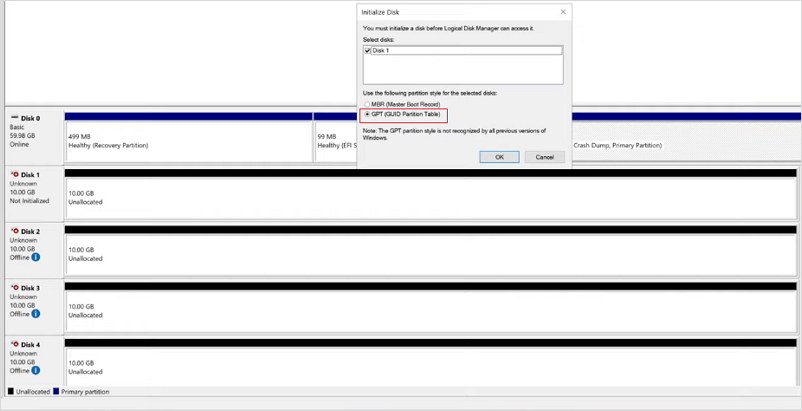
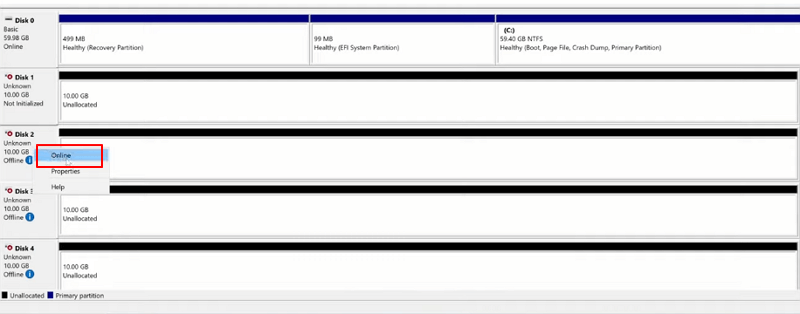
- If the disks are offline, right-click on the disk's names one by one to open a small menu and select “Online”.
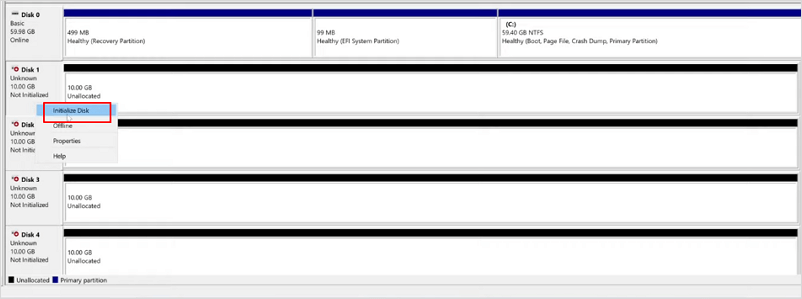
- After the offline disks are online, you will also have to initialize them. Again, just right-click on any disk to open a small menu and select the disks to be initialized.
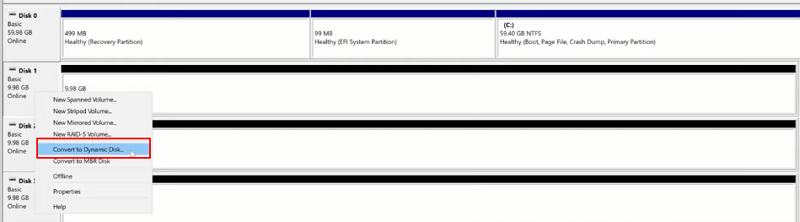
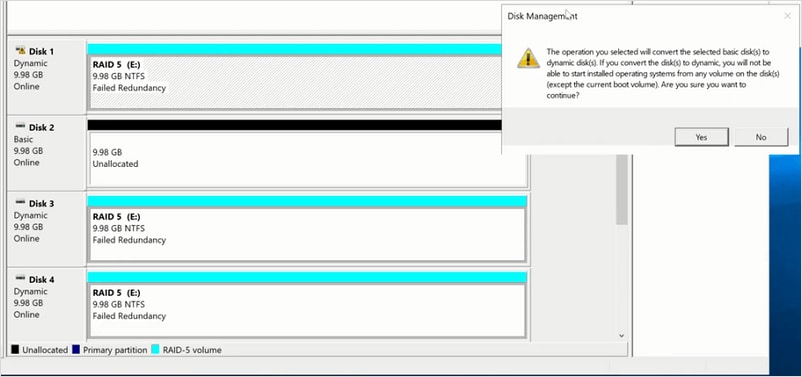
- Exclude the “Disk 0” as it has a server installed and perform the following operations on the other disks or SSDs.
- Right-click on any disk but “Disk 0” and choose the “Convert to Dynamic Disk” option. A small form will appear where you must select the disks you want to use for setting up RAID 5. Check those disks, leave the “Disk 0”, and press the “OK” button.
- Right-click on either Dynamic Disks and select the “New RAID 5 Volume” option.
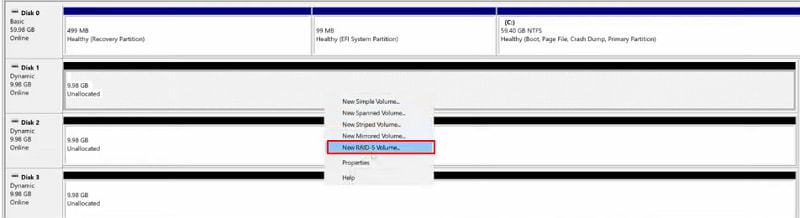
- A setup will appear to create your RAID 5 storage system. Click Next and “Add” at least 3 SSDs or Disks. Try to use the max space as it will allow your server to protect more data.
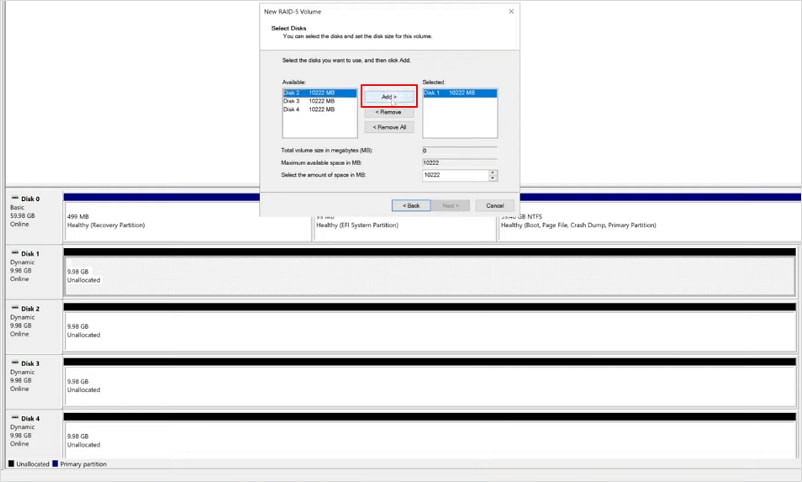
- You do not need to change the size or space of any disks because more capacity will allow more data. Hence, press the “Next” button.
- Assign the drive letter to the new RAID 5 volume and press the “Next” button. If you want to mount in the empty NTFS folder, select that option and choose a folder.
- Format the new RAID 5 volume using NTFS, where you can also give the volume label (name of the RAID 5 Array) such as RAID 5.
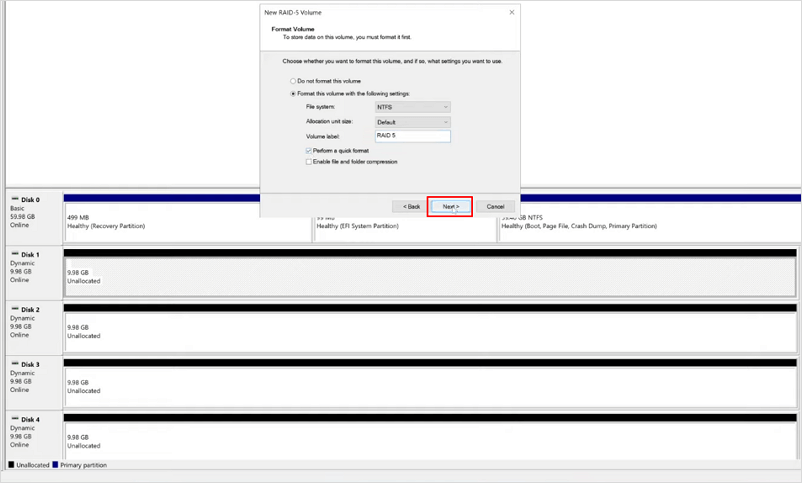
- Check the “Perform a quick format” option but selecting “Enable file and folder compression” is entirely up to you as it requires time to compress and decompress files and folders, making the storage system a bit slower.
- Press the “Next” button and print or note down the information about RAID 5 before pressing the “Finish” button.
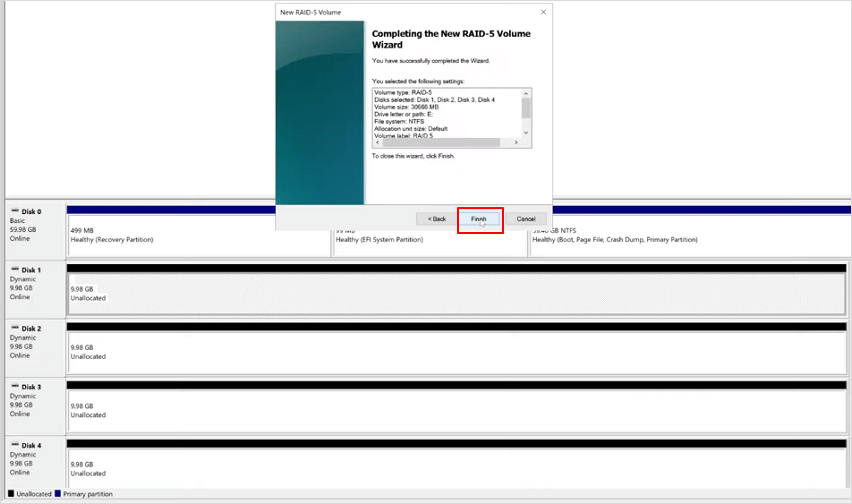
- After pressing the “Finish” button, RAID 5 will set up in some time when you can enjoy your snacks. The time for setting up RAID 5 depends on the capacity and the number of disks. The status of the disks will be “Resynching”.
- After some time, your RAID 5 array will be ready to store your essential data. The “Healthy” disk status instead of “Unallocated” means that the RAID 5 has been set up successfully.
Part 3. How to Rebuild a Failed Raid 5 Array [Without Data Loss]?
There is a very slim chance that your RAID 5 storage system will fail because it is created to store precious data without failing. And if it fails, luckily, there is an option to recover the lost data (also known as Regeneration).
We are going to teach you to rebuild your RAID 5 in the case of disk failure. You need to understand that you haven't lost your data as your SSD or HDD became out of order. You can still retrieve it as the RAID 5 array duplicates it (also known as Redundancy) in several drives.
Warning: The Rebuild Stress Factor
When rebuilding a RAID 5 array, every bit of data on the remaining drives must be read to recalculate the missing data. For modern high-capacity drives (e.g., 18TB HDDs), this process can take days and puts immense stress on the "healthy" drives. If a second drive develops an Unrecoverable Read Error (URE) during this window, the entire array will fail. This is why many experts now recommend RAID 6 (2-drive parity) for arrays using drives larger than 8TB.
Tips before Rebuilding the RAID 5 Array
If you want to rebuild the RAID 5, such as adding new drives to replace the faulty ones, then you must perform the following steps:
- If you are a large company, organization, or institute, then at least make two backups on a separate or external SSD or HDD to prevent any data loss. Even when the disk has failed, your data is still there. So don't worry about making two backups because you can make one backup as well.
- Check if the backup can be restored using more than one method or not. If it does, then you are good to go.
Steps to Rebuild the RAID 5
- Go to the “Disk Management Utility” by right-clicking on the taskbar icon and selecting Disk Management. Here you should be able to see the storage media that has failed.

- Make a backup of all of your data on RAID 5 volume.
- Shut down your device, detach the corrupt SSD or HDD from your computer or device, and replace it with a new one.
- Switch on your computer and go to the “Device Manager” utility.
- Now using the Disk Management Utility, you need to initialize the disk drive or SSD only by right-clicking on it and selecting the “Initialize” option.
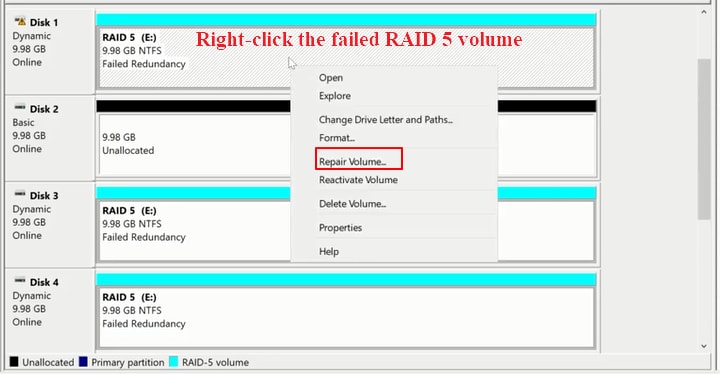
- If the disk is offline, you need to make its status online by right-clicking it and selecting the “Online” option.
- Now, right-click on the failed disk and select the “Repair Volume” option from the menu. A form named “Repair” will appear where you can choose the disk and press the “OK” button to repair it.
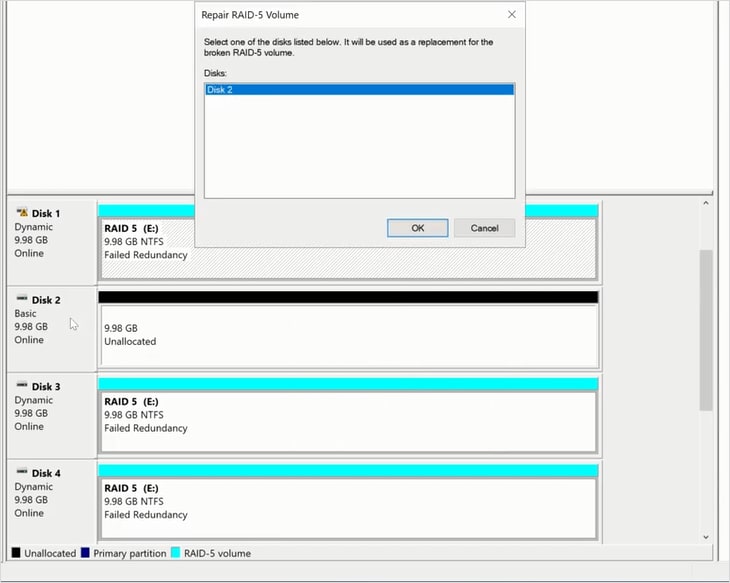
- A warning about the operating system will appear where you can press the “Yes” button as the operating system is always in “Disk 0”.
- After you perform the steps above, the status of all drives will change to “Resyncing” for some time. So wait until it becomes “Healthy”.
- Congratulations! Your RAID 5 is back online and reconstructed.
What to Do If You Lose Data after Rebuilding?
You will not lose your data after rebuilding, but if you want to perform the rebuilding task ideally, you should make one or two backups of your data before reconstructing the RAID 5. On the other hand, if more disks have failed and you have suffered a severe data loss, then consider using the RAID data recovery software, such as Wondershare Recoverit, to recover your data. Before this, please read an article on "Raid 5 Data Recovery" as you might recover your data more easily, saving your precious time.
Part 4. How to Upgrade RAID 5 Drives?
In most of cases the four storage disks are not enough to store the data, especially when you are a big company or institute. We often need to replace our slow Hard Disk Drives (HDDs) with fast and efficient Solid State Disks (SSDs) as they have more fault tolerance than the old storage media. Sometimes we need to upgrade the partitioning to 64-bit or increase the overall storage size. This is where upgrading plays an important role in improving your RAID 5 storage system.
Method 1: Upgrade RAID 5 Drive with Existing Free Space
For changing the partition sizes of your RAID 5 disks, you can use partition management tool like AOMEI Partition Assistant and follow the steps below:
- First, download and install AOMEI Partition Assistant for free and install it on your computer or laptop.
- Then open the app, and there will be an option on the disk(s) saying "Dynamic Disk." Select it and let the disks be dynamic.

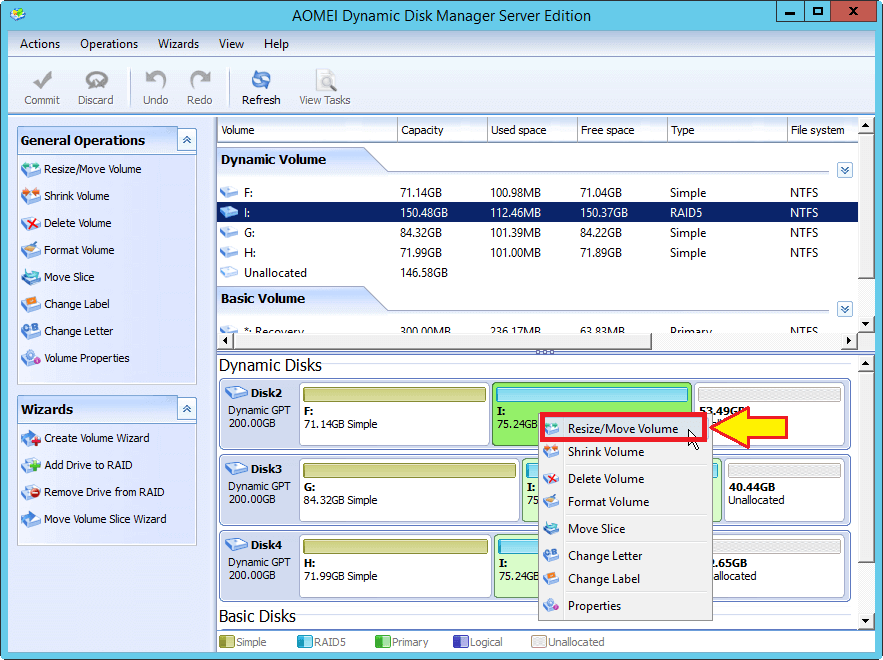
- Right-click on the disk and select the “Resize/Move Volume” option from the menu.
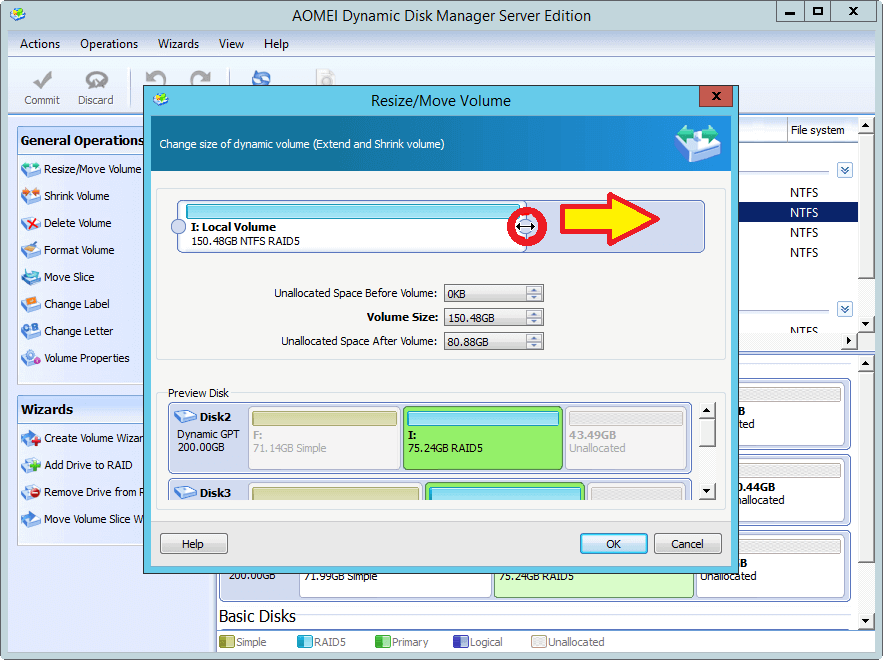
- After this, a form will pop up where you can either slide up to expand the partition size or enter a calculated value in GBs and press the “OK” button.
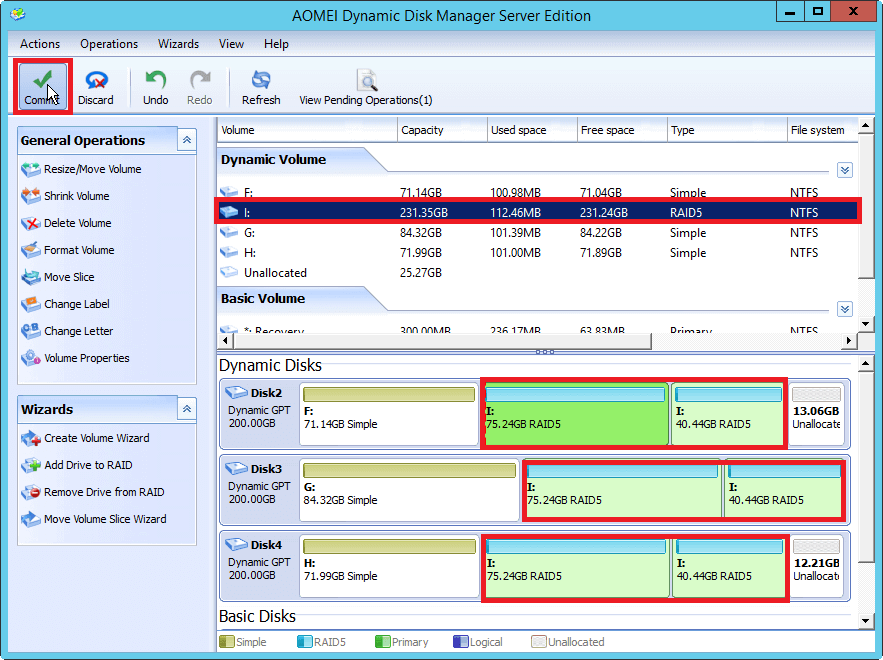
- To complete the operation, click the “Commit” button on the toolbar above.
- A form will appear with all the partitioning information where you need to click on the “Proceed” button.
Method 2: Upgrade RAID 5 with a Large Hard Disk
If your RAID 5 array is running out of storage and you want to upgrade it by adding a new large hard disk, then stick to this guideline:
- Turn off your computer or device and attach the large hard disk or SSD.
- Then switch it back on and open the AOMEI application, and there will be an option on the disk(s) saying "Dynamic Disk". Select it and let the new disk be dynamic.

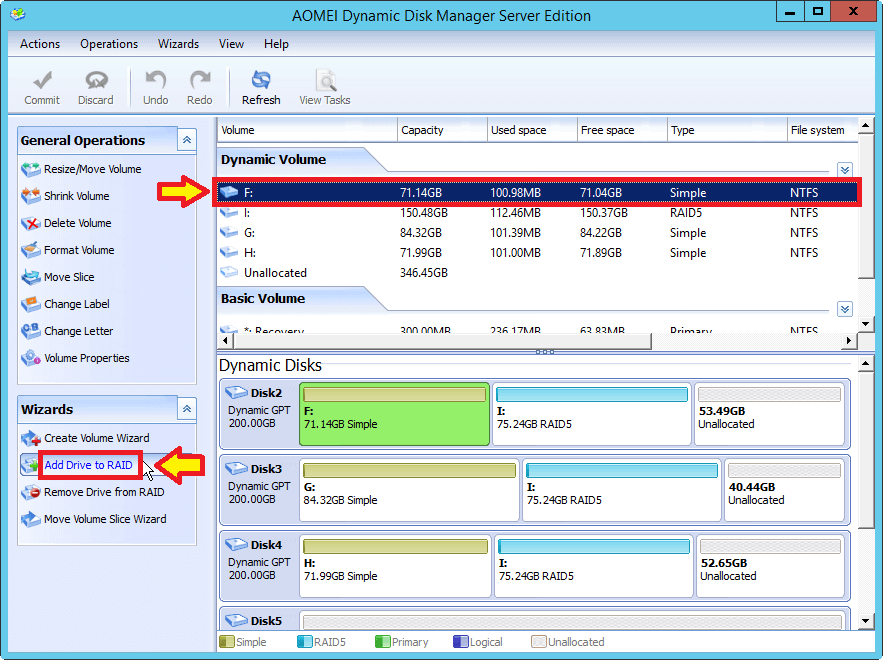
- Select your large disk and at the bottom left panel, named Wizard, click the “Add Drive to RAID” option.
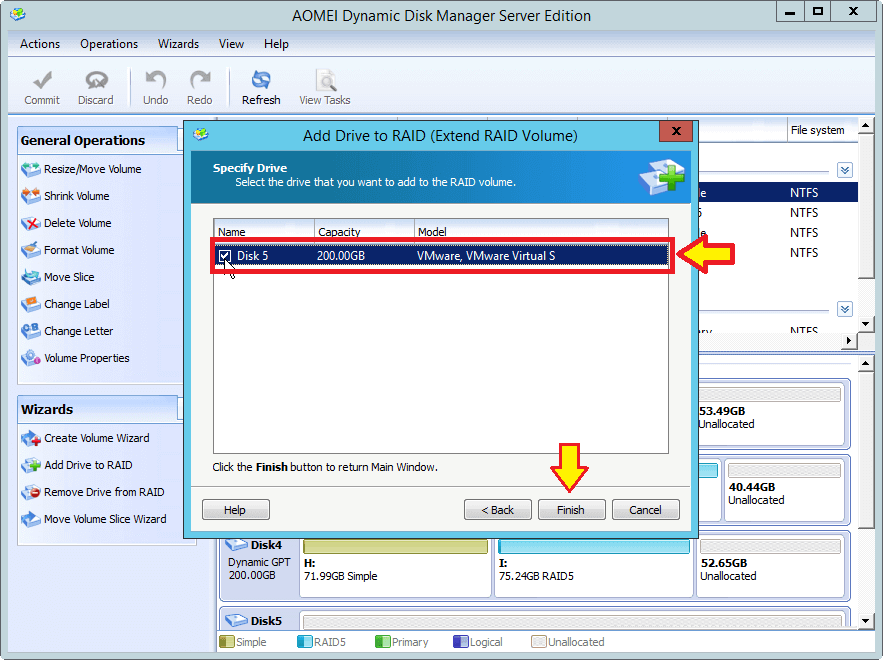
- A window will appear with your RAID 5 volume. Select it and click the “Next” button here.

- After that, check on the name of your new large disk and press the “Finish” button.
- In the end, click the “Commit” button and your RAID 5 will be expanded and upgraded.

Part 5. RAID 5 vs SHR: What’s the Difference?
SHR stands for Synology Hybrid Raid, an automated Raid Management System developed by Synology. It is similar to RAID 5. RAID 5 allows you to have one hard drive fail to maintain its integrity. SHR also maintains data integrity by using the same principle.
RAID 5 is straightforward and easy to manage. SHR is a Linux RAID Management System, and storage deployment is fast and easy. In addition, this storage system has an optimized capacity and performance, and it is claimed that SHR outperforms the traditional RAID arrays.
RAID 5 vs. Modern Alternatives
| Feature | Standard RAID 5 | Synology SHR | RAID 10 |
| Disk Flexibility | Same size drives required. | Mix and match drive sizes. | Matched pairs required. |
| Expansion | Complex / Full rebuild. | Easy (Add one drive). | Moderate (Add pairs). |
| Read Speed | Excellent (Striping). | Good. | Best (Fastest). |
| Rebuild Risk | High on large drives. | Moderate. | Low (Fastest rebuild). |
You may also be interested in:
Conclusion
This article is a super and easy guideline on RAID 5. It will not only clear your concepts but also teach you to create your own RAID 5 storage array using your computer system. For you, we have included the methods of rebuilding your RAID 5 in case of a disk failure. You are also provided with how to upgrade the existing RAID 5 as well.


