In the world of data storage, RAID 10 is a game-changer. Many ask, what is RAID 10 and how can it help? Understanding what is RAID 10 configuration is key for data protection.
RAID 10 is a combination of RAID 1 and RAID 0, making it a hybrid RAID level. It is frequently implemented in enterprise systems due to its ability to provide both high performance and robust data redundancy.
Knowing what is a RAID configuration is crucial for managing data storage systems. RAID is the short form for Redundant Array of Independent Disks. It uses several disks to boost performance and ensure data safety. RAID 10 is among the most dependable and effective RAID levels. Knowing its features can greatly improve your data storage.
When you ask, what is RAID 10, you are looking at a setup that ensures both speed and safety for your data. RAID 10 mirrors data across pairs of disks and then stripes it across multiple disks. This combination provides high-speed data access and strong data protection. It is especially useful for systems that require high availability and fast recovery times.
Understanding what is a RAID configuration helps in making informed decisions about data storage. RAID 10 stands out due to its balance of speed and safety, making it a preferred choice for many enterprise systems.
In this article
Part 1: What is RAID 10?
So, what is RAID 10? RAID 10 requires a minimum of four disks. It mirrors and stripes data across these disks, providing both high performance and data safety.
When you ask, what is a RAID configuration, RAID 10 is an important part. Data is mirrored for redundancy. It's also striped for speed.
RAID 10 is used in systems needing high availability and speed. It’s popular in databases, email servers, and transactional systems. It provides excellent performance and reliability.
Part 2: Overview: What is a RAID Configuration?
A RAID configuration stands for Redundant Array of Independent Disks. It combines multiple disks into one system. This improves performance and/or data redundancy.
RAID configurations can be simple or complex. They offer various levels of speed and redundancy. Knowing what is a RAID configuration helps in choosing the right setup.
RAID levels like RAID 0, RAID 1, RAID 5, and RAID 10 each offer unique features and benefits. Understanding these differences can greatly improve your data storage strategy.
RAID 10 stands out as one of the most dependable RAID levels. It's crucial for systems that require both high availability and speed. Understanding what is a RAID configuration is essential for choosing the right setup to meet your specific data storage needs.
Performance of RAID 10
RAID 10 performance is quite impressive for a simplistic array that doesn’t require a lot of hardware.
Features |
Performance |
| Fault Tolerance: | With RAID 10, you can withstand a single disk failure without interrupting the service. |
| Reading Speed: | The striped data blocks make it easier for the system to locate the desired information. Thus, with RAID 10, you get reading speeds that multiply per the array’s total number of drives. |
| Writing Speed: | Considering the fault tolerance, RAID 10 has an excellent writing performance. While the mirrored data might slow it down a bit, it still presents remarkable speeds that scale with the number of drives in the system. |
| Redundancy: | Since there is no parity, the mirrored data is readily accessible from another drive. The location is random, although all disks in the array share the same data structure. Even the block size remains the same. |
| Space Efficiency: | RAID 10 only renders 50% of the total storage space usable because it requires the same area for the data as its mirror image. So, it would be best to have at least 100% overhead when establishing a server with RAID 10 configuration. |
Applications of RAID 10
Due to its high I/O performance and uninterrupted access in most faults, the RAID 10 configuration is ideal for the below-mentioned applications.
- Web hosting
- Multiplayer gaming servers
- Email services
- Analytics
- Media streaming
Benefits of RAID 10
If you know how does RAID 10 work, you can observe the advantages it brings to any deployment. Some of the most notable ones include:
- RAID 10 has exceptional read/write performance with some fault tolerance. The speed multiplies with each active drive on the system.
- The mirror image of the data blocks is readily available on another drive, so you can instantly switch to it if the first drive fails. Many IT professionals program the array, so the switch happens automatically without user input.
- RAID 10 doesn’t require a high-end rig to operate and maintain. You can easily set up a server without spending much on RAM chips and processors.
- For what it offers, RAID 10 is easier to configure than other RAID configurations. You can easily apply it to a new server within a few minutes, as you’ll learn later in this guide.
Disadvantages of RAID 10
The high I/O performance alongside the fault tolerance for RAID 10 doesn’t come without its tradeoffs. Before applying a RAID 10 array to your server, you should consider its disadvantages, too.
- RAID 10 limits the effective storage efficiency to 50% since you need equal space for a striped data block and its mirror image. The configuration is not suitable for a large-scale persistent server.
- It is hard to detect any faults in the drive since the drive failure makes it difficult to isolate specific blocks. In most cases, you have to go with either complete formatting or drive replacement.
- RAID 10 possesses limited storage redundancy. Extensive drive failure may force the administrators to shut down the servers for repairs.
Part 3. How Does RAID 10 Work?
While people often denote it as RAID 1+0, the order of data storage takes place in reverse. First, the data is striped into blocks (RAID 0) and assigned an address for easier access in the future. Before the system stores it in a drive, it first creates a mirror image with a separate address (RAID 1) and stores it in another.
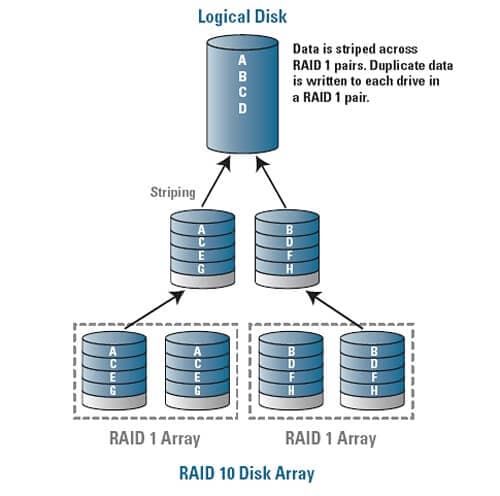
In regular usage, the system calls the original data block when an information query is generated. The read/write speed is relatively high as all drives remain active. If the array experiences a failure, you can switch to any of the mirror data sets without requiring a system shutdown. The data block is identical, which doesn’t let the end user know the difference.
Part 4. How to Configure RAID 10?
Due to its combination of two of the most straightforward RAID setups, you can configure RAID 10 for your server with a few simple steps. In terms of hardware, you need at least four disks or partitions. Furthermore, the RAM and processor requirements aren’t too sophisticated, either.
Since most servers use Linux, we’ll focus on how to configure a RAID 10 array for the same.
- Verify that all the disks are ready using the following command.
# ls -l /dev | grep sd
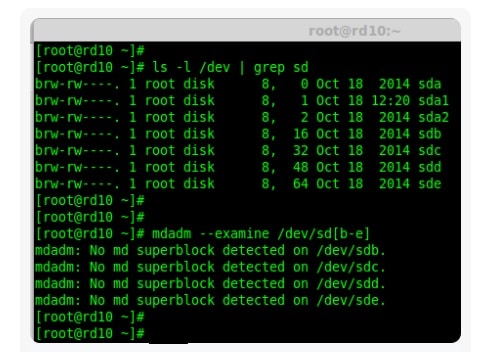
- Check whether all the drives are free of any previous RAID configurations using the command below.
# mdadm --examine /dev/sd[b-e]
You can change ‘sd[b-e]’ with appropriate drive names as per your server.
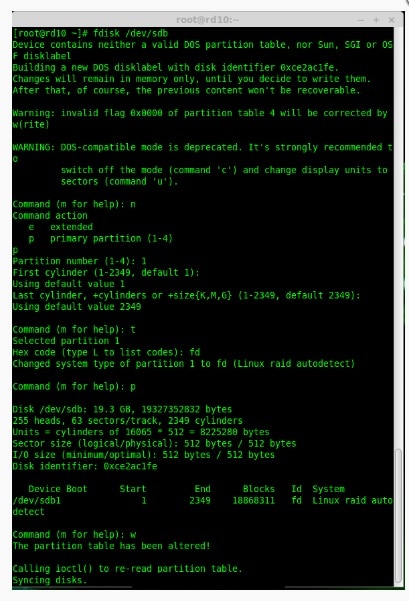
- Next, you need a partition for each drive. Use the ‘fdisk’ command as follows.
# fdisk /dev/sdb
# fdisk /dev/sdc
# fdisk /dev/sdd
# fdisk /dev/sde
The process of creating a new partition is the same for each disk. Press the N key and assign it a number. Once you’re done, press ‘p’ to print the partition and ‘w’ to write any changes.
- After you’ve created the partitions, it’s time to make a RAID device. It requires the mdadm RAID management tool, which you can install using the following command.
# yum install mdadm
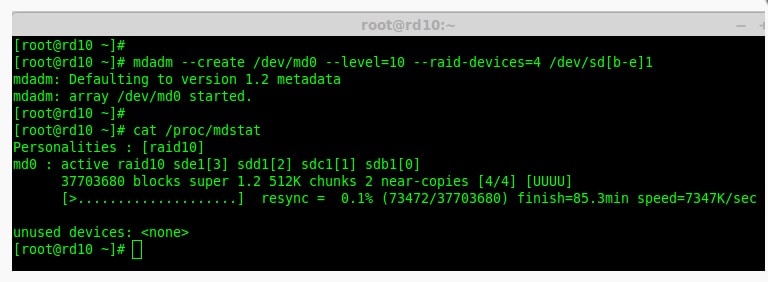
- With the RAID management tool installed, you can now create a RAID device and assign it the RAID 10 configuration.
# mdadm --create /dev/md0 --level=10 --raid devices=4 /dev/sd[b-e]1
You can verify the RAID device using the ‘cat’ command.
# cat /proc/mdstat
- Now, you need to verify the status of the active RAID 10 array. Use the following command for the same.
# mdadm --detail /dev/md0
It should show the array as active and re-syncing.
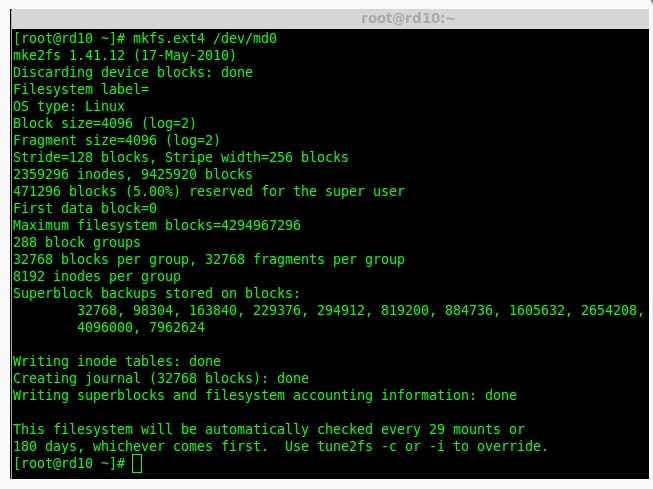
- You can now create a file system for the array. Here, we’re using ext4, but you can also use ntfs or fat32, as per your requirements.
# mkfs.ext4 /dev/md0
- Mount the file system on the array using the following command.
# mkdir /mnt/raid10
# mount /dev/md0 /mnt/raid10
# ls -l /mnt/raid10
- Next, you need to add some text files and edit them to see if the drive is working properly.
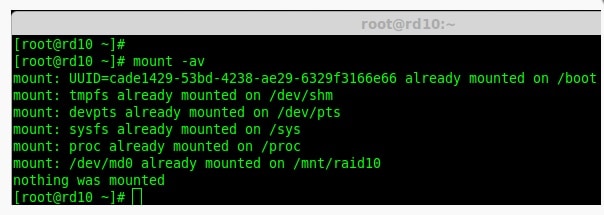
- Upon confirmation, you can use automounting through the ‘/etc/fstab’ file.
# vim /etc/fstab
It shall mount the files automatically without you designating the appropriate drive. You can verify it by utilizing the command mentioned below.
# mount -av
- RAID doesn’t have a default config file. You need to save the configuration manually using the following command.
# mdadm --detail --scan --verbose >> /etc/mdadm.conf
And that’s it! You can now add and edit files to your server with a RAID 10 configuration. You can edit the settings of the RAID controller using the ‘/dev/md0’ identifier.
Part 5: Difference Between RAID 10 and RAID 5
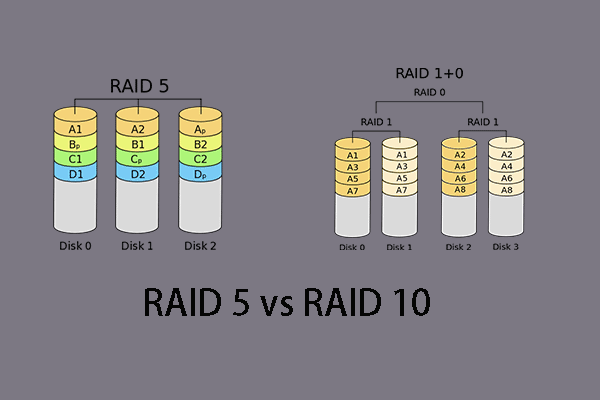
RAID 10 and RAID 5 are two widely-used RAID configurations, each offering distinct advantages. Understanding the differences between RAID 10 and RAID 5 is essential for choosing the right setup for your storage needs.
While both provide data redundancy, they do so in different ways, impacting performance, cost, and recovery time.
Here’s a detailed comparison of RAID 10 and RAID 5.
| Feature | RAID 10 | RAID 5 |
| Minimum Disks | 4 | 3 |
| Data Redundancy | Yes (Mirroring) | Yes (Parity) |
| Performance | High | Moderate |
| Rebuild Time | Fast | Slow |
Part 6: Pros and Cons: RAID 10 Configuration
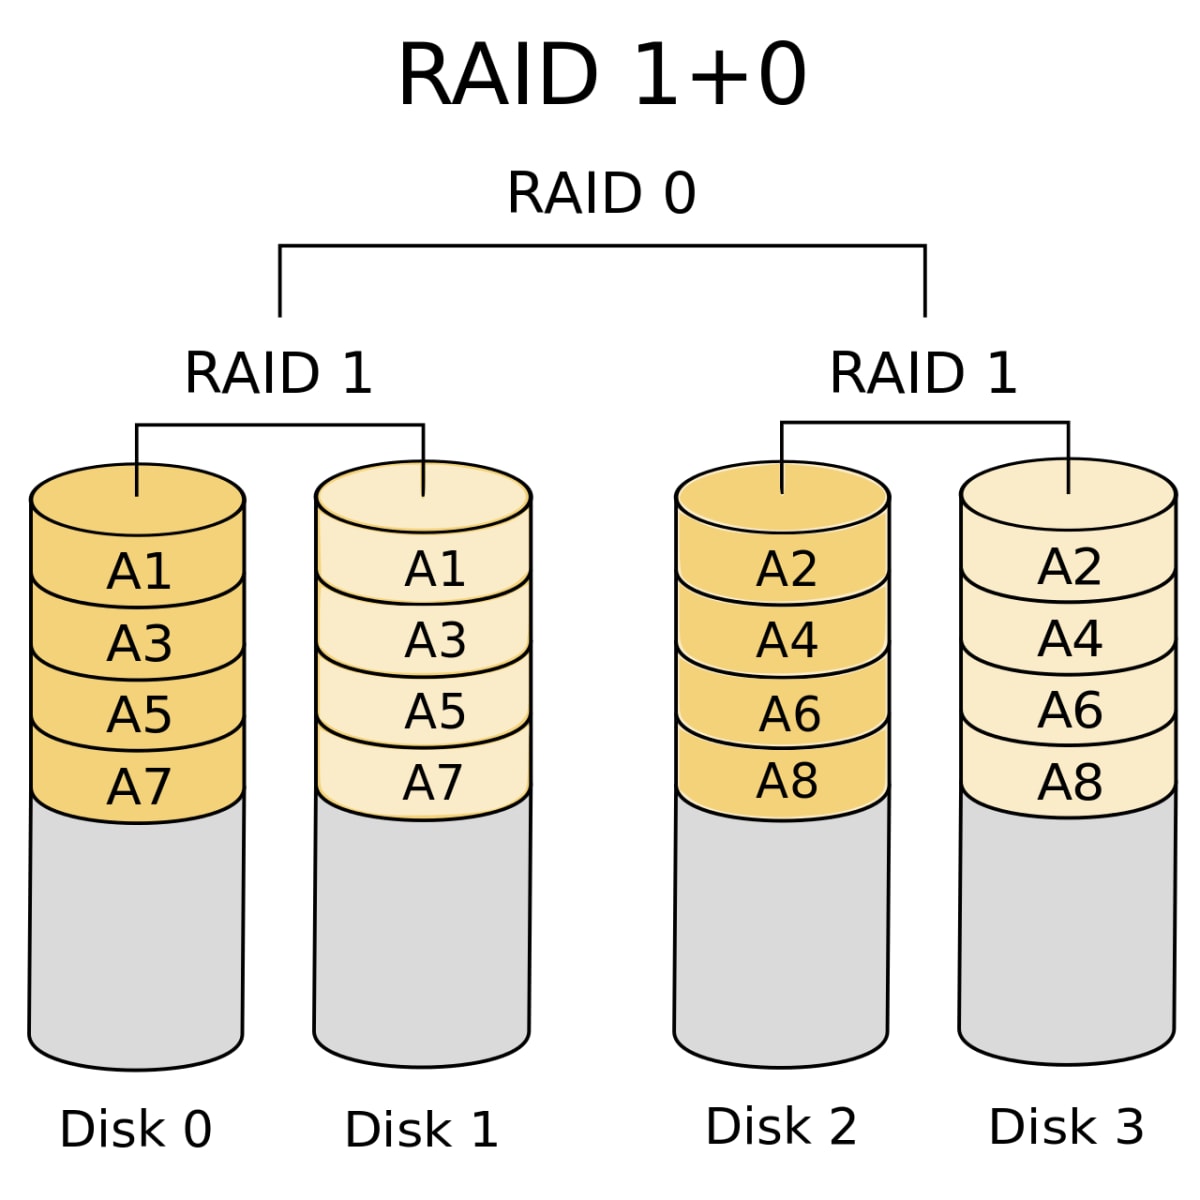
Understanding the pros and cons of RAID 10 is crucial for making an informed decision about your data storage. While RAID 10 offers high performance and excellent data redundancy, it also comes with certain drawbacks such as higher costs and less storage efficiency.
Here's a detailed breakdown:
Part 7: Lost File Due to RAID 10 Fails?
RAID 10 data recovery is essential. When data loss occurs, you need a reliable solution. That’s where Recoverit comes in. Recoverit helps in RAID 10 data recovery efficiently.
Recoverit offers an easy-to-use interface. Anyone can navigate it without much technical know-how. It can recover RAID 10 data with a few clicks. The tool is designed to handle complex data recovery tasks smoothly. It guarantees the safety and recoverability of your data.
Additionally, Recoverit is capable of managing various file types. This makes it suitable for diverse data recovery needs. It can retrieve documents, photos, videos, and emails. Recoverit conducts deep scans to locate lost data, increasing the likelihood of successful recovery.
Using Recoverit saves time and eases stress. Its reliability makes it a favorite among users. Recoverit is a valuable tool for both businesses and individuals to safeguard important data.
Here are the steps:
- Download and install Recoverit. Launch the program. Select the RAID 10 array. Click Start.

- Wait for the scan to complete.
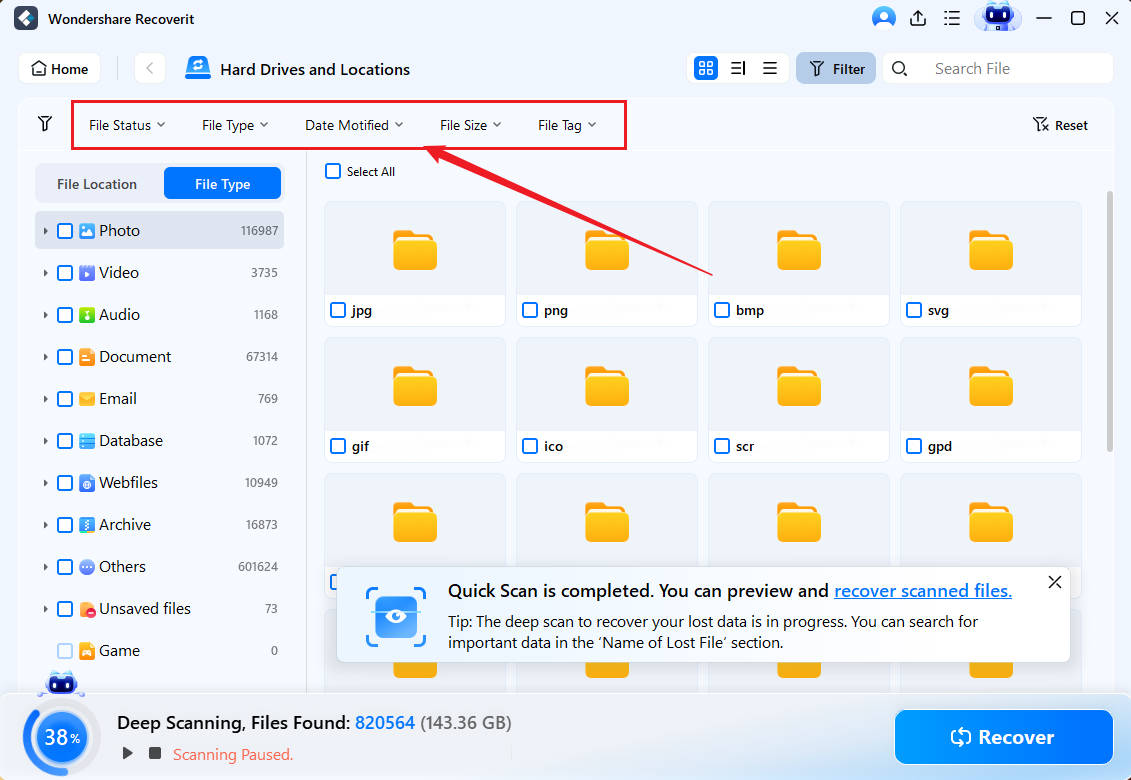
- Preview the recovered files. Click Recover to save your data. Check the recovered files.

Part 8: Pro Tips to Recover RAID 10
When dealing with RAID 10 data recovery, having a strategy in place is crucial. These pro tips will guide you through the process, ensuring you can recover your data efficiently and effectively. Follow these steps to maximize your chances of successful recovery and minimize data loss.
- Do Regular Backups: Always keep a recent backup of your data. This can save you from a lot of trouble in case of failure.
- Monitor Disk Health: Regularly check the health of your disks. This can help in identifying potential issues before they become serious.
- Use Reliable Recovery Tools: Invest in reputable data recovery software like Recoverit. It can make the recovery process easier.
- Avoid Overwriting Data: Do not write new data on the RAID array until you recover the lost data. This ensures the lost data is not overwritten.
- Keep Firmware Updated: Ensure that your RAID controller firmware is up-to-date. This can prevent compatibility issues and improve performance.
- Use UPS for Power Backup: An uninterrupted power supply (UPS) can protect your system from power surges and outages.
- Hire Professionals if Needed: If the situation is critical, consider hiring professional data recovery services. They have the expertise and tools to handle complex recovery tasks.
- Test Recovery Tools Regularly: Regularly test your recovery tools to ensure they work properly. This ensures you are prepared in case of a failure.
These tips can significantly improve your chances of successful RAID 10 data recovery. Following them can help protect your valuable data and keep your RAID system running smoothly.
Related Video >>: What is RAID 1 and How to Set Up?
Comparing RAID 10 to Other RAID Levels
Now that you know what is RAID 10, it is time to compare it with some other RAID configurations. You can check out the links below for the same.
Conclusion
RAID 10 is a powerful RAID configuration. It combines speed and safety. Knowing what is RAID 10 helps in protecting valuable data. RAID 10 uses both mirroring and striping. This ensures data redundancy and high performance.
When issues arise, RAID 10 data recovery is crucial. Having a reliable data recovery plan in place is vital. This helps in retrieving lost data quickly and efficiently.
RAID configurations like RAID 10 and RAID 5 have their pros and cons. RAID 10 provides high performance and redundancy. RAID 5 offers good storage efficiency but slower rebuild times. Choosing the right RAID configuration depends on your specific needs. Always assess the requirements before deciding.
Always be prepared with data recovery solutions. Tools like Recoverit can be a lifesaver. They make the recovery process easier and more efficient. Regular backups and monitoring can prevent data loss.
Understanding what is a RAID configuration is essential. It helps in making informed decisions about data storage. RAID stands for Redundant Array of Independent Disks. It improves performance and provides data redundancy. Knowing this helps in selecting the right RAID level for your needs.
FAQ
-
Q1: What is RAID 10?
RAID 10 is a combination of RAID 1 and RAID 0, also known as RAID 1+0. It offers the benefits of both mirroring and striping. This means data is duplicated across multiple disks for redundancy (mirroring) and split into smaller segments to be written across multiple disks for faster access (striping). This RAID level provides high performance and excellent data protection, making it ideal for systems requiring high availability and speed. -
Q2: How to recover RAID 10 data?
To recover RAID 10 data, use reliable recovery tools like Recoverit. This software makes the process straightforward and efficient. Start by downloading and installing Recoverit. Then, launch the program and select the RAID 10 array. Click 'Start' to initiate the scan. Once the scan completes, preview the recoverable files and click 'Recover' to save them to a safe location. Ensure that you do not write new data to the RAID array to avoid overwriting the lost data. -
Q3: What is the difference between RAID 10 and RAID 5?
The main difference between RAID 10 and RAID 5 lies in their data redundancy methods and performance. RAID 10 combines mirroring and striping, providing high performance and fast rebuild times, but it requires more disks and has lower storage efficiency. RAID 5, on the other hand, uses parity for data redundancy, allowing for greater storage efficiency as it requires fewer disks for redundancy. However, RAID 5 has slower write speeds and longer rebuild times compared to RAID 10. The choice between the two depends on your specific needs for performance, redundancy, and storage efficiency.


 ChatGPT
 Perplexity
 Google AI Mode
 Grok
Grok


