
 TL;DR:
RAID 6 is a dual-parity storage configuration requiring between 4 and 32 drives that keeps data accessible and allows for drive repairs during two consecutive disk failures without a system shutdown.
● While reading speeds multiply based on the number of active drives, writing speeds drop significantly, and space efficiency is only 50% for the four-drive minimum but scales to 93.75% at maximum capacity.
● Linux configuration requires using the fdisk command to partition drives, the mdadm tool to build and verify the level 6 array on /dev/md0, and mounting an EXT4, NTFS, or FAT32 file system before saving to /etc/mdadm.conf.
● RAID 6 is recommended over RAID 5 for preserving massive datasets in mission-critical applications, as the two dedicated backup stripes allow administrators to isolate faults and rebuild data without losing access.
Ask AI for a summary
 ChatGPT
 Perplexity
 Gemini
 Claude
 Grok
Grok

Thousands of gigabytes of data are produced every second. Thus, we need efficient data storage to keep up with the pace. Sure, we have SSDs replacing magnetic hard drives, but we’re lacking in the process if we don’t update the recovery protocols alongside them. A redundant array of independent disks (RAID) has emerged as a popular reading/writing scheme that can reduce the chances of data loss for multiple drives. RAID 6 is the latest iteration of the configuration. Throughout this guide, you’ll learn what RAID 6 is, why it's crucial for data storage management, and how to configure RAID 6 for your system.
🛠️ RAID 6 Technical Architecture & Configuration Index
Section Focus |
Target System Layer |
Technical Element Addressed |
Array Failure Boundary |
| Part 1: RAID 6 Essentials | Storage Virtualization | Dual Distributed Parity Mechanics | Sustains up to 2 dead disks |
| Part 2: Operational Logic | File Block Striping | Galois Field Mathematical Matrices | Active reconstruction during degradation |
| Part 3: Linux Configuration | Kernel Software Raid (mdadm) | Command-Line Initialization & Mount Paths | Zero risk if partitions are blank |
| Part 4: FAQ & Crash Scenarios | Logical File System Maps | Unrecoverable Read Errors (URE) & Data Recovery | Requires expert raw sector extraction |
Part 1. What is RAID 6?
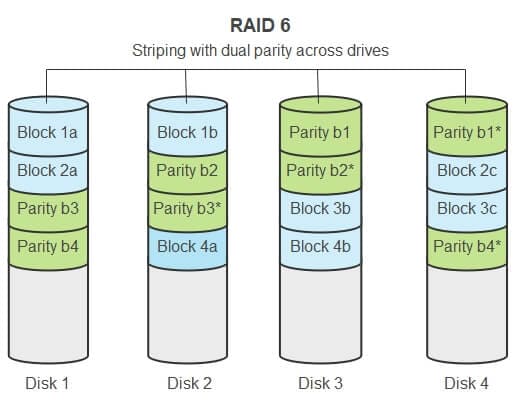
As the name suggests, RAID 6 (Striping with Dual Distributed Parity) is the sixth iteration in a set of storage protocols designed for a multi-disk arrangement. It is a data-striping process that utilizes two disks as a backup. The data is striped in the form of blocks and is stored across multiple partitions, including the backup disks. That way, it remains accessible even after two consecutive failures.
RAID 6 involves a dual-parity system that adds two backup octets to each data block. These pertain to the location of either backup disk. Thus, it is helpful for integrated drives containing storage units just millimeters apart.
📊 Hardware Trade-Off Matrix: RAID 6 Performance Metrics
RAID 6 performance is a step up in data integrity and fault analysis, although some areas, such as space and writing speeds, suffer a few drawbacks.
Performance Attribute |
Technical Capability Profile |
Underlying Mechanical Architecture |
Impact on Enterprise Environments |
| 🛡️ Fault Tolerance | Maximum Data Integrity | Bypasses up to 2 completely dead disks simultaneously using independent parity loops. | High availability; arrays stay online during a dual disk mechanical failure. |
| 🔍 Fault Isolation | Hot-Swappable Rebuilds | Identifies broken disk sectors via drive firmware flags and real-time checksum checks. | Drives can be replaced on-the-fly without shutting down production servers. |
| 🚀 Reading Speed | Linear Scalability | Scaled by the active data drive count: Read Speed = (n - 2) x Single Disk Speed. | Excellent for high-read application servers, streaming media arrays, and file archives. |
| 🐢 Writing Speed | Heavy I/O Penalty | Requires a 6-step operation (Read-Modify-Write) to update both parity blocks per stripe. | Slows random write operations significantly; requires heavy caching or SSD arrays. |
| 💾 Space Efficiency | Variable Scaling | Efficiency formula is (n-2) / n. Scale ranges from 50% (4 drives) up to 93.75% (32 drives). | Highly efficient in large-scale server racks, but costly for smaller desktop NAS setups. |
📐 Scaling Analysis: Usable Space & Capacity Efficiency Profiles
Total Physical Drives (n) |
Array Type |
Raw Array Capacity |
Parity Overhead |
Net Usable Capacity |
Array Space Efficiency |
| 4 Drives | Minimum Array | 40 TB | 20 TB (2 Drives) | 20 TB | 50.00% |
| 6 Drives | Mid-Tier NAS | 60 TB | 20 TB (2 Drives) | 40 TB | 66.66% |
| 8 Drives | Enterprise Node | 80 TB | 20 TB (2 Drives) | 60 TB | 75.00% |
| 12 Drives | High-Density Rack | 120 TB | 20 TB (2 Drives) | 100 TB | 83.33% |
| 32 Drives | Maximum Array | 320 TB | 20 TB (2 Drives) | 300 TB | 93.75% |
Applications of RAID 6
Because RAID 6 requires several drive slots and can retain data after consecutive failures, it is the ideal configuration for the following applications.
- Defense systems
- Banks and other financial institutions
- Healthcare
- Social security
- Law enforcement
- Scientific research
Advantages and Disadvantages of RAID 6
RAID 6 configuration has the following advantages and disadvantages compared to its predecessors.
Pros
RAID 6 drastically reduces the risk of data loss and denial of service. No one likes it when the server goes down just because of a fault in a single drive.
It is easy to configure for any server and operating system. Whether you use Linux or Windows Exchange, you can apply RAID 6 for all the drives without needing a large crew.
RAID 6 supports double-parity, which isolates the backup drives unless called into action. Thus, any faults in the system are easy to spot and repair. You can still access the data during the repair process.
For a large number of drives, the reading speed is significantly increased.
Cons
RAID 6 has a slower writing speed as compared to other configurations.
For fewer drives, the space efficiency is very low. For example, in the case of just 4 drives (minimum for RAID 6), the space efficiency is only 50%.
It is more expensive to implement since it requires two backup drives and only works efficiently for several partitions within the same system.
Part 2. How Does RAID 6 Work?
A server with a RAID 6 storage configuration strips the data down in blocks. Each block has a minimum data allocation and an address. Once a block fills up, it goes to a designated location with the required address. In addition, it is assigned two parity stripes stored in two separate backup disks. It increases the aggregate mean time between failures (MTBF), enabling the administrator to analyze and minimize the data loss within a reasonable time frame.
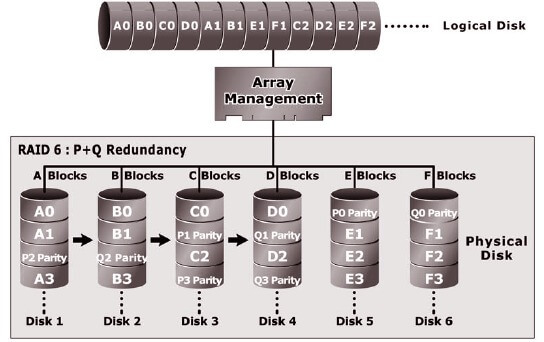
It is easy to locate a file using its data block address in regular functions. Although, in case of a disk failure, the same data can be recovered from the backup disks using the parity stripes.
As the backup disks remain isolated from the primary database, there is no need to shut down the system. The recovery and repair process can occur with the backup drives still mounted. Since there are two backup drives, the system can still withstand another failure. It is also why you can use RAID 6 configuration in an SSD-HDD hybrid system.
Part 3. How to Configure RAID 6?
The process of configuring RAID 6 differs for various systems. However, since most servers today utilize Linux OS, this guide will discuss the process for Linux in detail.
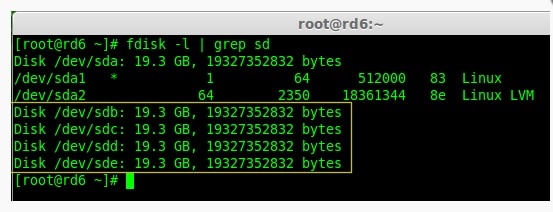
- Install the ‘mdadm’ tool onto your system and use the ‘fdisk’ command to verify all attached drives.
- Create a new partition for the RAID 6 drives through the following command:
# fdisk /dev/sdb
You can interchange ‘sdb’ for ‘sdc’, ‘sdd’, and so on for different partitions. Remember, RAID 6 supports up to 32 drives at a time, with two of them always reserved as backups.
- Press 'N' to create a new partition. You can make it the primary partition by choosing ‘P’ and assigning it the number 1. Once done, press ‘P’ to print the section.
- You can repeat the process for all the other partitions. However, you don't need to assign a number each time. Instead, just press the Enter key twice, and Linux gives it the default value.
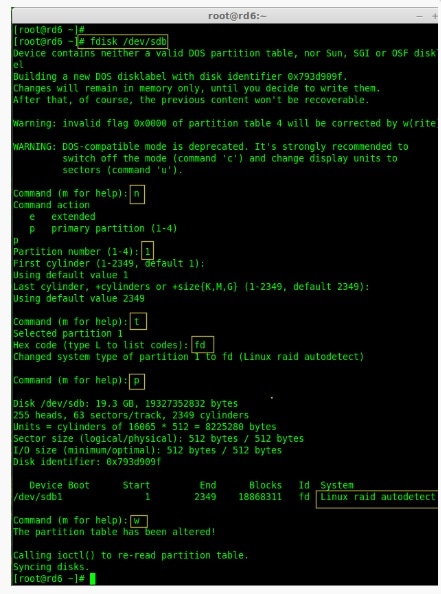
Use the L key to browse the list of all the available partitions. You can type ‘t’ to choose the partition and ‘w’ to write any changes.
- Once you have created the partitions, you can use the following command to check for the formation of super-blocks. They consume a lot of space and can make it even slower to write data to the disk.
# mdadm -E /dev/sd[b-e]1
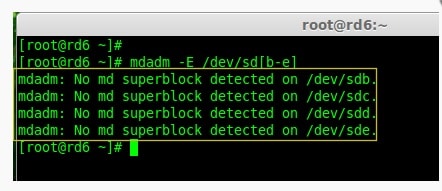
You can replace ‘b-e’ with the naming scheme you used.
- Now, you can create a new RAID device and apply the appropriate level to all the partitions. Use the following command for the same.
# mdadm --create /dev/md0 --level=6 --raid devices=4 /dev/sdb1 /dev/sdc1 /dev/sdd1 /dev/sde1
#cat /proc/mdstat
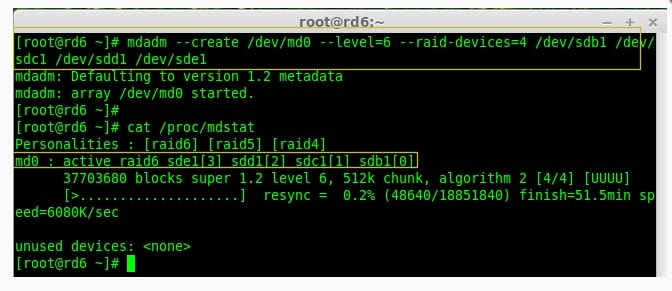
If you know how RAID 6 works, you can verify the RAID devices using the command # mdadm -E /dev/sd[b-e]1
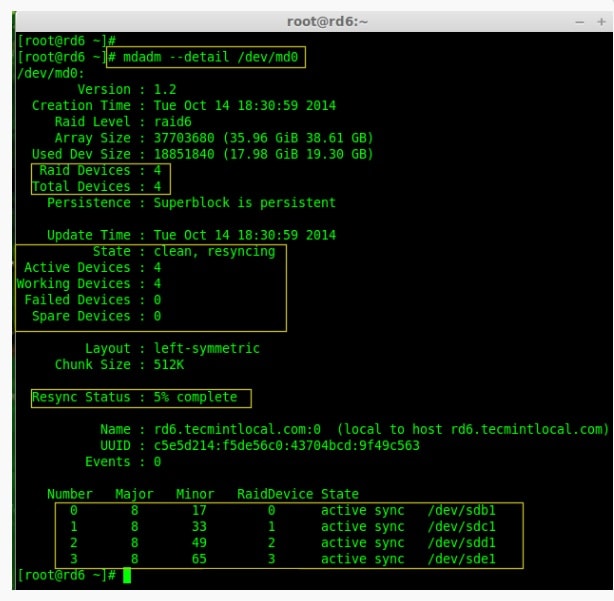
- Next, you must verify that the RAID array is active and re-syncing has started on your system. Type in the following command to check the same.
# mdadm --detail /dev/md0
- Now, you can use the ext4 attachment to create a file system and mount it under /mnt/raid6. You can switch the EXT4 file system for NTFS or FAT32 per your needs. Type in the following command to establish the file system.
# mkfs.ext4 /dev/mod0
# mkdir /mnt/raid6
# mount /dev/mod0 /mnt/raid6
- Create a few test files and edit them to ensure the partitions are working correctly.
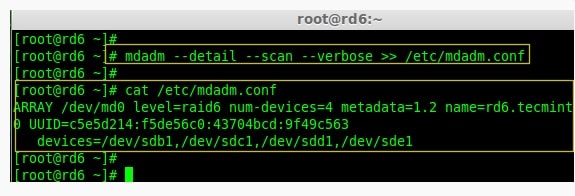
- Save the RAID 6 configuration and verify the virtual device ‘/dev/md0’ status using the following command.
# mdadm --detail --scan --verbose >> /etc/mdadm.conf
# mdadm --detail /dev/md0
Upon conclusion of the process, you can choose to add a few spare drives to save some time in the future using the fdisk command.
What Happens When RAID 6 Configuration Fails
There might be times when a RAID 6 configuration faces several disk failures and lose important files. You can read our article RAID 6 Data Recovery to find solutions.
People Also Ask
How many disks are needed for RAID 6?
There should be four RAID 6 minimum drives on a system. The usable capacity is always 2 less than the number of available drives. That increases fault tolerance since the backup drives can always engage if the primary drive fails.
How many disks can fail in RAID 6?
RAID 6 can withstand the failure of disk drives twice before requiring a backup. The fault can occur either simultaneously or consecutively. The key concept is to isolate and repair the damaged drives without losing access to the data.
Is RAID 5 or RAID 6 better?
If you want to run a system without an archive but still desire an extensive database, then RAID 5 is sufficient. However, if you need proper preservation for a massive data set, you should choose RAID 6.
Does RAID 6 increase speed?
Regarding reading speed, RAID 6 performance is up to par with the rest of the independent disk arrays. However, in the case of data writing, it offers only one-sixth of the actual speed when operated with a single drive.
Conclusion
In a world where rampant malware and cyberattacks, safeguards are more valuable than ever. If you need to preserve a database that remains accessible even after disk failures, knowing what RAID 6 is can make your life much easier.
🏁 Post-Deployment Maintenance Checklist: Maintain RAID 6 Array Health
To verify that your storage virtualization layer stays stable, runs clean parity scrubs, and is completely protected against double-fault scenarios, complete this system validation checklist regularly:
- Schedule Automated Parity Scrubbing: Configure a monthly cron-job to run a low-level data check (`echo scrub > /sys/block/md0/md/sync_action`) to scan and repair silent data corruption.
- Configure Real-Time Email Alerts: Link your `mdadm.conf` daemon configuration to an active SMTP mail server relay to receive immediate alerts if a disk encounters an input/output error.
- Maintain a Dedicated Global Hot-Spare: Keep an extra physical drive plugged into the system frame and pre-staged as a spare disk (`mdadm /dev/md0 --add /dev/sdf1`) so it can rebuild data automatically if a live drive fails.
- Monitor S.M.A.R.T Drive Wear Lifespans: Track drive wear levels across your array to prevent multiple factory-batch drives from reaching their hardware wear limits at the exact same time.
- Deploy a Redundant Backup Plan: Even a dual-parity RAID system cannot protect against accidental file deletions, ransomware attacks, or major site power drops. Keep an external backup of your data away from your primary array, and use a specialized tool like Wondershare Recoverit to restore raw sector files if multiple drives fail and break your volume maps.


