


 TL;DR:
To fix a WD Elements hard drive not showing up on your Mac, bypass basic cable or port issues and use macOS built-in tools to manually mount, repair, or reformat the unrecognized drive.
● Force macOS to display the drive by checking the "External Disks" option in Finder Preferences, or manually activate it by clicking the "Mount" button for your WD Elements within Applications > Utilities > Disk Utility.
● Run a "First Aid" scan in Disk Utility to instantly repair minor drive errors, or reset your Mac's NVRAM by holding the Option + Command + P + R keys during startup to clear hardware-related memory glitches.
● If the drive uses an incompatible file system, you must reformat it to APFS or exFAT via Disk Utility; because this process erases everything, salvage your files beforehand using a data recovery tool like Wondershare Recoverit.
Ask AI for a summary
 ChatGPT
 Perplexity
 Gemini
 Claude
 Grok
Grok
When it comes to your personal files, who's to say what's important and what's not? Whether it's your wedding pictures, cat videos, or work docs, you should be able to access them on your WD Elements whenever needed.
Right now, however, your WD Elements hard drive is not showing up on Mac, and you have no idea why. The last time you checked, it worked ok.
The only important thing is to get into your WD Elements without losing your data. Luckily, you're in the right place. Below, you'll find everything you need to troubleshoot, diagnose, and repair your WD elements not working on Mac.
Table of Content
Basic Troubleshooting WD Elements Not Showing Up on Mac
Here's the thing – the WD Elements drive not showing up on Mac is nothing out of the ordinary. Even though this is a reliable solution from a reliable brand, it often pairs poorly with Mac and causes connectivity issues that can be fixed.
Because of this, it's always wiser to troubleshoot your WD Elements first. Perhaps the only thing you need to do is change your USB cable:
1. Check USB Ports
Mac has notoriously fragile USB ports that are terribly allergic to dust and dirt. The first thing we advise you to do is safely unplug your WD Elements from its current port and connect it to your Mac via a USB port that you don't use as much.
2. Check Your USB Hub
Are you using a USB hub? Many Mac users do. If this is the case, your hub might be broken. First, try each port within the hub. If there's no sign of WD Elements on your Mac, discard the hub altogether and plug the drive into a native port.
3. Check USB Cable
Here's a question that's as old as time – is it the port or the cable? If the Mac has no problem recognizing other USB devices, it's time to check the cable. Just like ports, they are very prone to wear and tear, even if they don't show damage.
4. Plug the Device Into Another Mac
If both the ports and the cable work fine, but the WD Elements external hard drive is still not working on your Mac, maybe it's not a bad idea to try a different Mac. That will help you determine where the core issue is – in Mac or WD Elements.
5. Check if the Device Is Password-Locked
Are you sure you didn't lock your WD Elements after the last backup and forgot about it? Check if the device is locked, and try to remember the password you used. If you can't, you can unlock it with different WD tools, such as WD SmartWare.
Reasons for WD Elements Not Showing Up on Mac
It's time for answers. Why is your WD Elements external hard drive not showing up on Mac? As far as we know, there are a few possible reasons:
| Cause | Solution |
| WD Elements is not mounted | Way 1: Mount WD Elements manually |
| Mac's Finder settings are off | Way 2: Reset NVRAM Way 3: Adjust Finder settings |
| Faulty USB port, hub, or cable | Way 4: Reboot your device or replace your USB gear |
| WD Elements is outdated | Way 5: Update WD Elements |
| WD Elements is outdated | Way 6: Repair with First Aid |
| WD Elements is outdated | Way 7: Reformat WD Elements |
Before we continue, please ensure that your WD Elements problem isn't caused by faulty USB equipment. While effective, some of the following repair methods could take time and put you at risk of unnecessary data loss.
Recover Files From Your Unrecognized WD Drive Before Trying the Fixes
Before we introduce the steps for fixing your WD Elements Mac not recognized problem, we must remind you to recover data from the WD Elements and perform a backup. This is an important step because some of the following solutions will require you to reformat WD, erasing all data.
A professional recovery tool such as Wondershare Recoverit can safely recover your files and help you avoid potential data loss before you reformat WD.
In case it's late for backup because you've already reformatted your WD Elements, Wondershare Recoverit might be able to help you recover files from a formatted hard drive. It's a one-stop solution for over 500 data loss scenarios and 2000+ devices, including reformatting.
Here's what you need to do:
- Download, install, and launch Wondershare Recoverit for Mac.
- Connect the WD Elements using a healthy USB port and cable.
- Find WD Elements under External Devices and click to scan it.
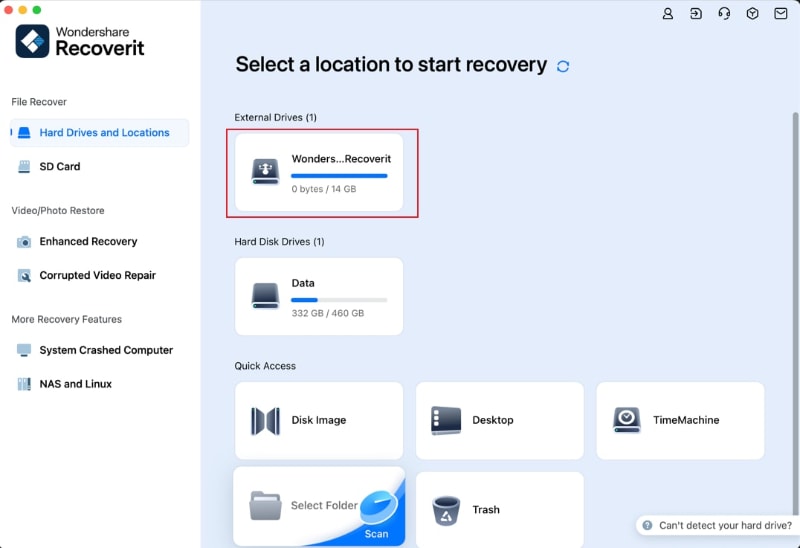
- Wait a bit and track the progress until the scanning is finished.

- Preview recoverable files and click on Restore to save them.

Even though Wondershare Recoverit can successfully restore lost files in 95% of cases, it's always better to be safe than sorry. Back up your WD Elements drive data right now, and we can jump straight to your WD Elements not detected on Mac
How To Fix WD Elements Not Showing Up on Mac
Without any further ado, here's how to access locked data when your WD Elements drive is not showing up on Mac. If you cannot troubleshoot the issue, you'll have to go about it method by method until you find the right fix.
Way 1: Mount Your WD Elements on Mac Manually
After you connect WD Elements to your Mac via USB, your operating system should automatically mount the external drive. Mounting renders WD Elements accessible from Mac by making it a part of the computer's native file system.
Sometimes, however, Mac fails to automatically mount WD Elements. If you can't see WD Elements on your Mac and are unable to access it, it's likely that automatic mounting has failed. This means that you need to mount WD manually.
Don't worry if you've never done that before. We'll walk you through it:
- Go to your Mac's Applications folder and open Utilities > Disk Utility.

- In the sidebar on the left, click under External to mark Show All Devices.

- If you can see WD Elements there, select it and click on the Eject symbol.
- Now, click on the Mount button at the top of the Disk Utility window.

If mounting was successful, you'll be able to see WD Elements on your desktop.
Way 2: Reset Your NVRAM to Reveal the WD Elements Hard Drive
Certain Mac computers, such as MacBook Pro, MacBook Air, and Intel-based Macs, have a chip called NVRAM. Here's what that is:
NVRAM is short for non-volatile random-access memory, which is a type of computer memory that retains stored information even when your Mac is turned off. NVRAM works similarly to short-term memory in humans - It holds a small amount of OS and hardware-related settings that help your Mac start up and perform quickly.
If you have one of the Mac models we've mentioned, resetting NVRAM might be the key to helping your computer notice WD Elements.
Resetting NVRAM is quick and easy:
- First, shut down your computer by choosing the Apple menu > Shut Down.

- Now, turn it back on and hold the Option + Command + P + R keys simultaneously.

- Give your Mac 20 seconds to reboot, and keep holding the keys until the logo shows up.
You should now be able to access your WD Elements drive from the Mac desktop.
Way 3: Adjust Finder Settings
When your Mac recognizes an external device, this device immediately shows up on your desktop. This is due to the "visibility setting," which is turned on by default on every Mac computer. That's how MacOS ensures accessibility and ease of use.
If you can't see WD Elements on your screen when you connect it to your Mac, that could mean that the default visibility settings are off for some reason. These settings control how you see external devices on your desktop – including WD Elements.
Let's reset external devices back to default settings:
- Navigate to Finder and select Preferences.

- Click on General at the top of the window.
- Ensure the External Disks option is checked.

- Return to the top of the window and click Sidebar.
- Check External Disks under Locations.

Hopefully, these settings will set things right, and WD Elements will show up on your Mac.
Way 4: Reboot Your Device
Have you tried turning it off and on is a long-running gag among computer enthusiasts, but it's not entirely without meaning. Rebooting a device closes all running programs and services, completely resetting and refreshing the system.
If your Mac is heading towards system overload because there are too many applications running at the same time, rebooting it can help eliminate potential problems arising from this. It also refreshes the memory and boosts performance.
Finally, a reboot can help your Mac solve connectivity issues and reconnect with the network and external hard drives, including WD.
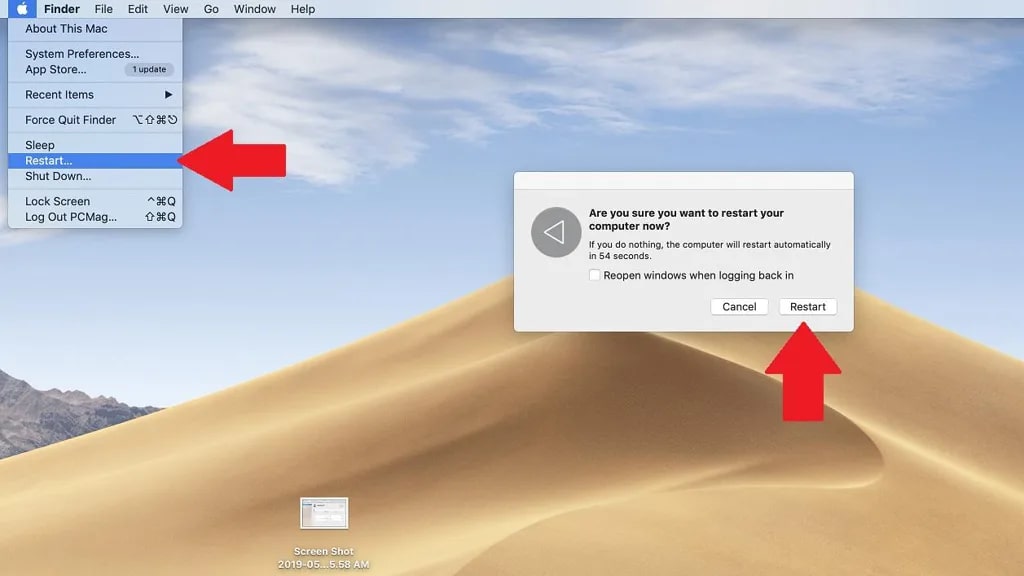
On the off chance that you don't know this, the only right way to reboot a Mac is by clicking on the Restart button in the Apple menu.
Way 5: Update Your WD Elements Drive
"When my WD Elements is not recognized on Mac, that's almost always because I forget to update the drive." Many WD Elements users have confirmed this to be true. When you don't update your device in a while, it begins to underperform.
You can update your WD Elements drive with one of the WD tools – WD Discovery, WD Security, or WD Drive Utilities – depending on which one you use for drive management. It's a simple process; just follow the steps provided by the tool.
Also, don't forget that the OS version that your Mac is currently running must be compatible with your latest WD Elements update. If it isn't, that, too, might render the WD drive invisible. In this case, it might be useful to downgrade your WD.
Way 6: Repair Unrecognized WD Elements Drive With First Aid
First Aid is Mac's native diagnostics and repair tool that can help you troubleshoot and fix minor problems regarding external hard drives.
Below, we will show you how to run a First Aid scan on WD Elements when it's not showing up on your Mac. If the scan detects an issue, it will repair it instantly. But if First Aid can't help you fix this problem, the only thing left is a reformat.
Here's how to use First Aid:
- Open Applications > Utilities > Disk Utility.
- Find WD Elements in the sidebar on the left.
- First Aid is at the top bar of the Disk Utility window.

- Click First Aid and then press the Run button.
It will initiate Mac's internal troubleshooting mechanism to pinpoint and repair any potential issue that might be affecting WD Elements's visibility. If this didn't do anything, you still have one more option to try – reformatting.
Way 7: Reformat WD Elements Hard Drive Not Showing Up
Reformatting does more for a drive than just wiping it clean, thus eliminating all potential problems. During a disk reformat, you also have the option to change the format of your external drive's file system and make it visible on your Mac.
MacOS can't read and access all file systems. The preferred file systems for MacOS are APFS and exFAT. If your WD Elements have a different file system format, like EXT4, your Mac won't be able to recognize it, and you won't be able to use it.
Reformatting will help you solve this incompatibility issue, but it will also erase all data from your WD Elements. So before you reformat your WD Elements, don't forget to save important files to a different location using the Wondershare Recoverit tool.
Easily recover deleted or lost files from 2000+ storage devices like HDDs, SSDs, external drivs, USB drives, memory cards, and more. The software confidently retrieves all data types, regardless of how they went missing.
- To reformat WD Elements, go to Applications > Utilities > Disk Utility.
- Select WD Elements in the sidebar on the left.
- Find the Erase button on the top of the window and click on it.

- Finally, choose a new name and format for your WD Elements.

Did that do the trick? If you still can't see WD Elements on your Mac, we recommend taking both devices to professional repair.
Conclusion
When the WD Elements external hard drive is not working on Mac, there are several things you can try – after you troubleshoot the issue. The solutions from this list work in most cases, and one of them should work for you, too.
The most important thing in these situations is to protect the data trapped inside the unresponsive WD Elements Drive. For this, we recommend Wondershare Recoverit. You can always buy a new WD, but your personal files are irreplaceable. If you are using other WD hard drives, you can check the general fixes for WD hard drive not showing up on Mac.


