

 TL;DR:
To fix a WD external hard drive not showing up on a Mac, first verify Finder visibility settings, use Disk Utility to mount or repair the device, and proceed to system hardware resets or drive reformatting if system bugs or corruption prevent access.
● Enable the "External Disks" option in Finder Preferences if the drive is physically connected but invisible, or manually select the drive and click Mount or First Aid in Disk Utility to resolve minor mounting failures.
● Reset your Mac's PRAM/NVRAM using the Command+Option+P+R keys or reset the SMC to clear hardware-state bugs, noting that SMC manual resets are strictly limited to Intel-based Macs and unavailable on M1 or M2 models.
● Reformat the WD drive to a macOS-compatible file system such as APFS, HFS+, FAT32, or exFAT to fix severe corruption or format incompatibility, ensuring you recover essential data beforehand since formatting completely erases the disk.
Ask AI for a summary
 ChatGPT
 Perplexity
 Gemini
 Claude
 Grok
Grok
Western digital hard drives are among the best external hard drives for Mac. They have numerous features and advanced options to take your experience to the next level. However, as with any other hard drive, you may experience issues with your WD unit. You are probably here because your hard drive is not detected on your Mac device, and we are here to help.
We will cover the nine most reliable ways to fix the WD hard drive not showing up on Mac issues. First, let's dive into why your WD external hard drive is not showing up on a Mac.
Quick Fixes Overview
| Why is my WD hard drive not showing up on Mac? |
Explanations | Possible solutions |
| Connection issues | If the cable is not properly connected to the PC, your drive may not show up on your Mac device. | Reset USB Ports |
| Permissions | The Finder app may not have the permission to search for external devices, leading to your WD external hard drive not showing up on Mac. | Turn on the "Show" option in Preferences |
| Incorrect format | Mac only supports four formats for reading and writing data (APFS, HFS+, FAT32, and exFAT). The Mac won't recognize if the hard drive isn't formatted to some of these file systems. | Reformat Your WD External Hard Drive |
| Drive not mounted | The WD external hard drive might not be mounted on your Mac, which can prevent it from showing up in Finder. | Mount Your WD External Hard Drive in Disk Utility |
| A corrupted drive | If any of the sectors of your hard drive become corrupted, they will become unknown to your Mac device. | 1. Repair the Corrupted WD Drive With First Aid 2. Reformat Your WD External Hard Drive 3. Run WD Drive Firmware Updates |
| OS bugs | Your operating system may randomly lag, leading to the hard drive not showing up on the Mac issue. | 1. Reboot Your Mac 2. Reset Your Mac's SMC 3. Reset PRAM or NVRAM on Mac |
Can I Fix the "WD External Hard Drive Not Showing Up" Issue?
Seeing that your Mac doesn't recognize your WD external hard drive may be frustrating, but there is a solution to your problem. We will present nine ways to fix this issue below, depending on the type of error.
However, if none of these solutions work, and you still can't connect the drive to your Mac device, it might be a sign that the WD external hard drive isn't compatible with Mac computers. Companies like Western Digital often create HDDs compatible only with one type of device or OS. Thus, the problem might be in the hard drive itself.
Why Is the WD Hard Drive Not Showing Up Mac?
Before diving into fixing the issue of your Western Digital hard drive not showing up on a Mac, it's essential to first understand how a Mac recognizes a WD external hard drive. By grasping this process, you'll be better equipped to identify potential causes and troubleshoot the problem more efficiently.
When a WD external hard drive is connected to a Mac, the operating system goes through several steps to recognize and mount the drive:
- Physical connection: First, the Mac establishes a physical connection with the WD external hard drive through a USB, Thunderbolt, or FireWire cable. Ensure that the cable is properly connected and not damaged.
- Detection by the operating system: Once connected, the Mac's operating system detects the presence of the WD external drive. If the drive is not detected, try connecting it to a different USB port or using a different cable.
- Compatibility check: The Mac checks if the WD external hard drive's file system is compatible with macOS. Macs support HFS+, APFS, FAT32, and exFAT file systems. If the drive is formatted with an incompatible file system like EXT4, you'll need to reformat it using Disk Utility on your Mac.
- Mounting the drive: If the file system is compatible, Mac's operating system will attempt to mount the WD external hard drive, making it accessible for data storage and retrieval. This process involves reading the drive's partition table and locating a valid partition.
- Displaying the drive: Once mounted, the WD external hard drive will appear on your Mac's desktop as an icon, as well as in the Finder sidebar and the Disk Utility application. You can now access the drive's contents and use it for storage.
If any part of this process experiences an issue, you may encounter the problem of the WD hard disk not detected by your Mac. Here is an overview of the most common scenarios and solutions.
Secure Your WD External Hard Drive Data Before Applying the Fixes
Since you will use your WD external hard drive to store valuable data, backing up the data before fixing the HDD is essential. This step is especially important if you decide to reformat your external hard drive; the reformatting process will wipe off your disk and all the stored data.
Thus, always have a backup plan to retrieve data from the WD external hard drive and store it in a safe place. One such solution is Wondershare Recoverit – Hard Drive Data Recovery. It has among the highest success rates on the market (over 99%) and can extract all sorts of files from the desired storage device. It also covers numerous data loss scenarios, so you will undoubtedly recover your data.
Try Recoverit to Recover Data from a WD external hard drive
![]() Security Verified. Over 7,302,189 people have downloaded it.
Security Verified. Over 7,302,189 people have downloaded it.
Here's a step-by-step guide to recovering data from a Western Digital external hard drive:
- Download Wondershare Recoverit and run the program.
- Head to Hard Drives and Locations.
- Choose your WD external hard drive from the list of available options.
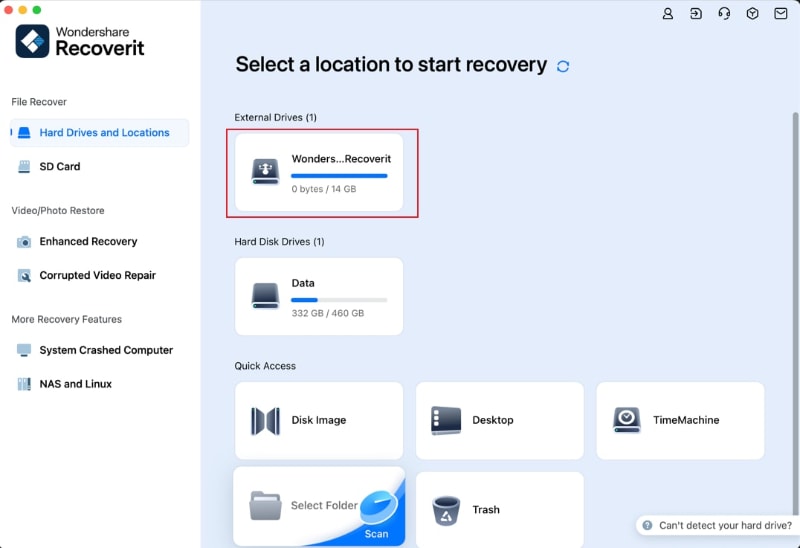
- The software will automatically start scanning the drive. You can pause this process if you detect all the files you want to recover.

- After the scanning process, you can preview your files. Select those you wish to retrieve and click Recover.

- Choose where to save the recovered files.
Extracting and backing up your files will take only a few minutes. Trust us, your future self will be thankful.
Top 9 Ways to Fix a WD Hard Drive Not Showing Up on Mac
We will jump into possible solutions for fixing the Western Digital external hard drive not showing up on the Mac issue. Whether you are using WD My Passport, WD Elements, WD My Book, or WD Easystore, you can try all of them to detect and fix the problem. If none of these work, check the model of your HDD or consult professionals for help.
Way 1. Reset USB Ports
Sometimes, the issue might be with your USB ports; they may not work correctly, and you might need to reset them to make them as good as new. The best way to reset your ports is through the Terminal app:
- Open Terminal.
- Type the following command:
sudo kextunload IOUSBMassStorageClass.kextand press Enter. - Provide the administrative password and hit Enter.

This method will reset your USB ports without restarting your computer and solve the WD hard drive not connecting to your Mac issue.
Way 2. Turn on the "Show" Option in Preferences
Another reason your Mac may not display your external WD hard drive is that the WD external hard drive may be hidden or have a hidden partition, making it not visible in Finder. In that case, you can use Disk Utility to check for hidden drives or partitions and make them visible. Here's how to show hard drive on Mac:
- Go to the Finder menu and click Preferences.

- Tick External Disks in the General tab.

Now, your Mac should recognize your WD external hard drive and display it in Finder or on Desktop.
Way 3. Reformat Your WD External Hard Drive
Your WD external hard drive may have an incompatible file system format, causing it not to be detected by the Mac operating system. Therefore, reformat the HDD, set a suitable file system, and watch the magic happen. Choose a file system type compatible with Apple devices, such as APFS, HSF+, or exFAT. In addition, formatting can also help fix a corrupted external hard drive.
Here's a step-by-step guide to reformatting your WD external HDD on Mac:
- Open Disk Utility by going through Finder > Go > Utilities > Disk Utility.
- Select your WD drive from the list of available external devices.

- Click Erase in the action pane.

- Select the desired format from the available options and set the GUID Partition Map as the scheme.

- Click Erase to complete the process.

This method should resolve the issue of the WD hard drive not being recognized by a Mac if file system corruption is the problem. However, formatting an external hard drive will erase all data stored on it. If you found you have lost some important files, don't worry, it's easy to recover data from a formatted hard drive on Mac using Wondershare Recoverit.
Way 4. Mount Your WD External Hard Drive in Disk Utility
If you have purchased a new WD external hard drive and it doesn't show up on your Mac, it might be time to mount it and make it usable. Mounting is essential to make your external device and operating system compatible. It's among the most prevalent reasons your WD hard disk is not detected on Mac.
To mount your WD external HDD, you will need the help of the powerful Disk Utility tool. Follow the guide below to complete the process:
- Open Disk Utility.

- Click the View icon in the action pane's top left corner and click Show All Devices.

- Select your WD external hard drive from the available options and click Mount.

The program will quickly mount your drive and prepare it for further use.
Way 5. Repair the Corrupted WD Drive With First Aid
Mac devices have built-in tools to help you detect and fix minor issues with your WD external hard drives. First Aid can uncover why your western digital hard drive isn't working on Mac within a few minutes. Here's how to run diagnostics on your Mac and fix minor issues:
- Open Disk Utility.
- Select your WD external hard drive from the list of available options.
- Go to the First Aid tab and click Run to start the diagnostics.

The program will automatically identify and fix all potential issues causing the WD hard disk not to work on a Mac. However, First Aid can only address minor hard drive failures. You may need to reformat your WD drive if the problem is more significant.
Way 6. Run WD Drive Firmware Updates
Every WD hard drive has designated software to control it, keep track of the capacity, and update the device. Regularly updating the HDD will protect it from potential issues, such as your WD external hard drive not recognized by your Mac. Here's how to perform the update:
- Open WD Dashboard.
- Head to the Tools tab.

- Select the Firmware Updates section.
- Download the available update.

This update will protect your device and give it a fresh start.
Way 7. Reboot Your Mac
Rebooting or restarting your Mac can help eliminate unnecessary cramming, leading to better performance. Sometimes, random bugs and lags may lead to your Mac not detecting your WD hard drive, and you should try restarting your Mac to fix the issue. There are several ways to restart your Mac: from the Apple menu and keyboard.
Restart from the Apple menu:
- Click the Apple menu in the top left corner.

- Select Restart and click the Restart button in the dialog box.
Restart your Mac through your keyboard:
- Press and hold the Control + Command + Power buttons.

- Release the keys when the computer turns off.
Way 8. Reset Your Mac's SMC
As mentioned above, you may experience issues with hardware. One of the ways to fix this issue is to reset the Mac's System Management Controller (SMC). This program controls internal and external operations, which may lead to your WD drive not showing up on Mac. The Mac may also slow down if the issue lies in the SMC.
However, you won't have the SMC program on an M1 or M2 Mac. It's only available on Intel-based computers, so you won't find the software since M1 and M2 chips are responsible for management.
To reset the SMC, follow the steps below:
- Power off your Mac.
- Press and hold the Power button for ten seconds.
- After a few moments, restart your Mac.
- If that doesn't work, power off your Mac again.
- Press the Shift, Option, and Control keys and hold them for seven seconds.
- Press and hold the Power button again.

- Hold all four keys for another seven seconds.
- Restart your Mac afterward.
This method should help you fix management issues and make your Mac detecting the WD external hard drive.
Way 9. Reset PRAM or NVRAM on Mac
PRAM and NVRAM hold information about your system. For instance, these segments store all the data about your startup disk, speaker volume, and external devices. The only difference is that NVRAM is non-volatile, meaning the settings don't change when you power off your computer.
The issue of your WD hard drive not showing up on Mac may be due to incorrect settings or PRAM/NVRAM malfunction. Here's how to restart these segments:
- Power off your Mac.
- Press and hold the Power button, Command, Option, P, and R keys. Hold them until your Mac restarts.

You can also use Terminal to restart your PRAM/NVRAM:
- Open the Terminal app.
- Type the sudo nvram -c command and press Enter.

- Enter the administrator password and press Enter.
- Input the sudo shutdown -r now command and press Enter.

The computer will automatically restart PRAM and NVRAM and you can check if your WD hard disk is detected by your Mac now.
Video Tutorial on How to Fix External Hard Drive Not Showing Up on Mac?
WD Drive Not Showing Up on Mac FAQs
-
Why is my WD drive not being detected?
Several reasons may lead to the recognition problem. For instance, incorrect formats, operating system errors, physical damage, file system errors, connectors, and permissions might make your WD external hard drive unrecognizable by your Mac. -
How do I get my WD hard drive to work on my Mac?
You can fix the issue of your WD hard drive not showing up on Mac by trying the methods in the guide:- Turn on the Show Option
- Restart your Mac
- Verify macOS compatibility
- Reset USB Ports
- Reset NVRAM/PRAM
- Reset Your Mac's SMC
- Mount the drive in Disk Utility
- Format the drive with a Mac-compatible file system
- Repair the drive using Disk Utility
-
Can I fix the WD drive not showing up on Mac without losing data?
Yes, you can use Wondershare Recoverit to restore the data before trying to fix this issue:- Download, install, and launch Wondershare Recoverit on your Mac.
- In the interface, select the WD external drive to begin scanning for files stored on it.
- After the scan, choose the files you wish to keep
- Click Recover to save them to a secure location.
Conclusion
WD external hard drives are among the best you can find, but your Mac not recognizing your WD drive can be stressful. However, many solutions can help if you experience this issue.
The nine effective ways above can help fix the WD hard drive not showing up on Mac, so try them all for the best results. If you fail to resolve the issue, consult professionals and check for physical damage.
Backing up your data before trying any of the solutions above is crucial. We recommend Wondershare Recoverit as it can save your data and extract data from a WD external hard drive after fixing it.


