
 TL;DR:
PhotoRec is a robust command-line utility for extracting deleted files directly from Linux XFS file system data blocks, while Wondershare Recoverit provides a graphical alternative for remote, point-and-click data restoration.
● Executing PhotoRec requires terminal access and strictly necessitates saving the retrieved data to a separate partition or storage device to avoid permanently overwriting the lost files.
● Files recovered through PhotoRec will not retain their original filenames or directory structures, though users can utilize advanced parameters like a brute force mode for fragmented JPEGs and a low memory toggle to prevent system crashes.
● Wondershare Recoverit is optimal for users who want to avoid the risks of a command-line interface lacking an undo function, operating via a remote connection to the Linux device to safely preview and restore data.
Ask AI for a summary
 ChatGPT
 Perplexity
 Gemini
 Claude
 Grok
Grok
Accidental file deletion or data loss on Linux can be a frustrating experience. However, reliable tools, such as PhotoRec for Linux, can help you recover deleted files from various file systems, including XFS file system. XFS, a high-performance file system commonly used in Linux distributions, offers excellent scalability and robustness. This guide will explore how to use PhotoRec to retrieve deleted files from an XFS file system.
About PhotoRec
PhotoRec is a robust and trusted file recovery tool developed by CGSecurity. It is designed to recover lost files by scanning the underlying data on a storage device and identifying file signatures or headers. It can handle various file formats, including documents, images, videos, and archives, and works effectively even when file system metadata is unavailable or damaged.
Here are some notable features of PhotoRec that make it an excellent choice for XFS file system recovery:
- PhotoRec supports many file formats, including documents, images, videos, archives, etc.
- It is a cross-platform tool compatible with Linux, macOS, and Windows operating systems.
- This tool can recover files from various storage devices, including hard drives, SSDs, USB drives, and memory cards. Whether your deleted files were stored on a hard disk or a portable storage device, PhotoRec can assist in their recovery.
Steps to Recover Deleted Files on XFS File System Using Photorec
How can PhotoRec recover deleted files on the XFS file system? Here’s the step-by-step process.
Step 1. Run PhotoRec executable
Begin by downloading and installing PhotoRec on your system. Open a terminal window and launch PhotoRec by typing "photorec," followed by the device path you want to recover files. For example, if your XFS file system is on /dev/sdb1, the command would be "photorec /dev/sdb1".
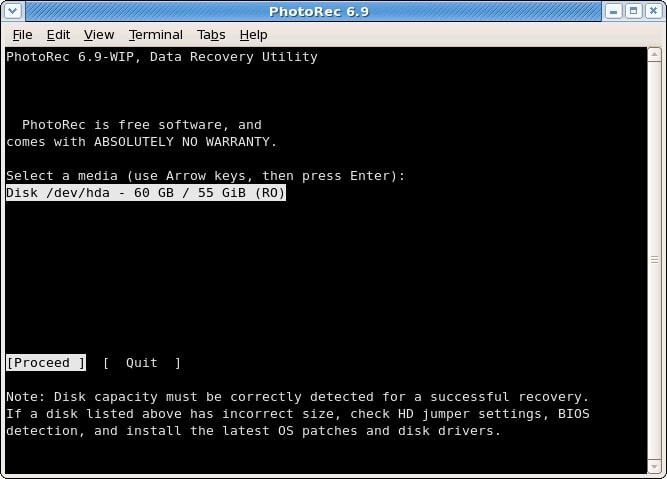
Step 2. Select disk
PhotoRec will display a list of available media. To choose the disk that corresponds to your XFS file system, use the up or down arrow keys. Press Enter to proceed.
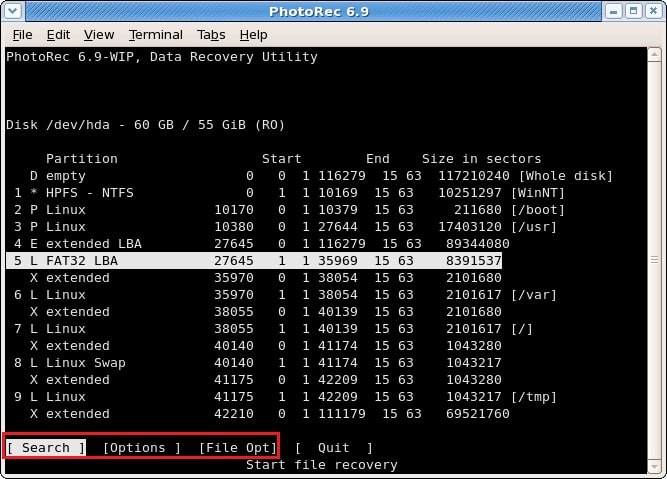
Step 3. Select source partition
There are three options you can click on at the bottom part. Select:
- Search: After selecting the partition containing the deleted files to begin the recovery process.
- Options: To change the selections.
- File Opt: to change the file types recovered by PhotoRec.
Step 4. PhotoRec options
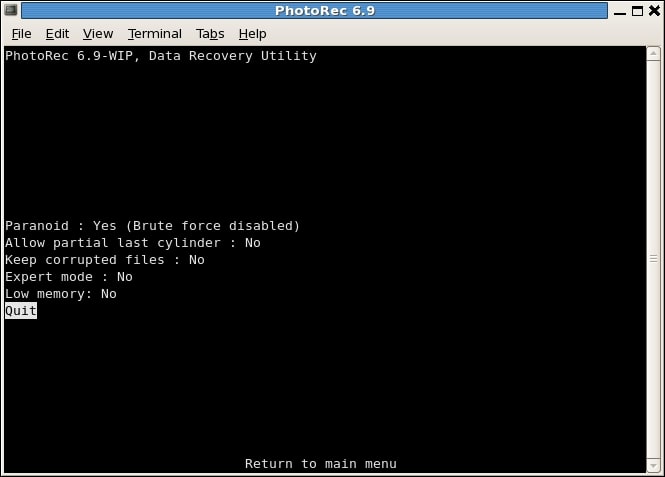
Next, you will be presented with recovery options. You can enable or disable these options, such as searching for deleted files or recovering files from unallocated space. Review the options and make your desired selections.
These are the available PhotoRec options you can modify when recovering files:
- Paranoid is a default option where recovered files are validated while invalid files are rejected. If you wish to recover more fragmented JPEG files, enable brute force, but remember that it is a very CPU-intensive procedure.
- Allow partial last cylinder: This option changes how the disk shape is determined.
- Expert mode allows users to force the file system block size and offset. Each filesystem has its block size and offsets set when created or formatted. If PhotoRec has detected very few files when working on the entire drive or a reformatted partition, try the smallest value that PhotoRec allows you to select for the block size.
- Keep corrupted files: This option keeps files even if they are invalid.
- Low memory: If your device system doesn’t have enough memory and crashes during recovery, enable this option. It may be required for big and extensive fragmented file systems. Use this option only when necessary.
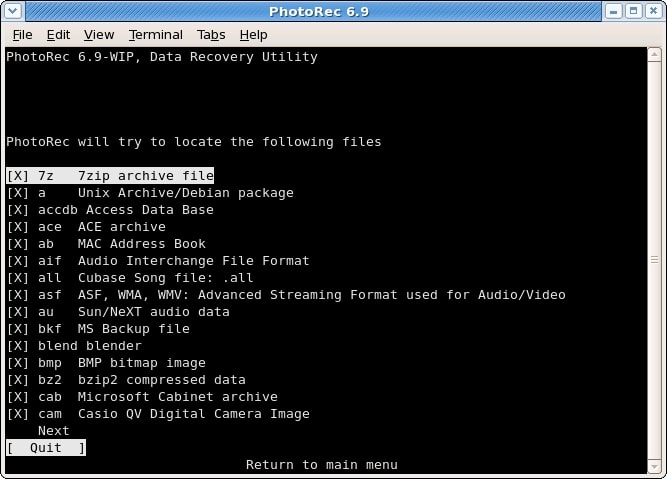
Step 5. Select files to recover
PhotoRec will prompt you to select the file types you want to recover. You can choose specific file formats or choose File Opt to select all file types. Use the arrow keys to select options and press the Spacebar to toggle it. Once you have made your selections, press Next to continue.
Step 6. File system type
PhotoRec requires knowing how the data blocks are distributed after a partition has been identified and verified with the Search option. In this situation, choose Other.

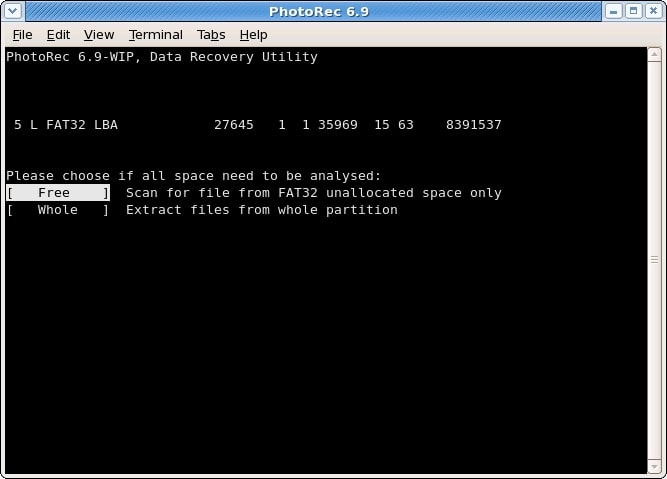
Step 7. Carve only the partition or unallocated space only
PhotoRec can search for files with the following selections.
- Free: Only unallocated space is supported, and only deleted files are retrieved with this option.
- Whole: Extract files from the whole partition. This option is helpful if the file system is faulty or from a specific partition.
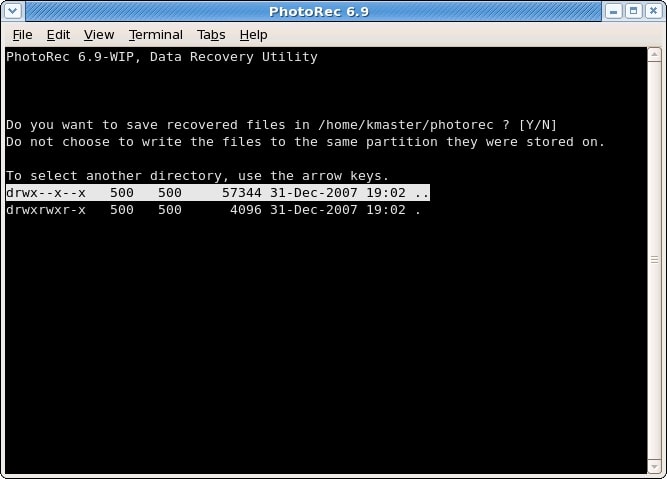
Step 8. Choose recovery destination
PhotoRec will ask you to specify where the recovered files should be saved. Select a destination different from the XFS file system you are recovering from to avoid overwriting the deleted files. It is recommended to choose a separate storage device or a different partition. Click Enter and confirm it by Y or Yes.
Step 9. Recovery in progress
Once you have selected the recovery destination, PhotoRec will begin the scanning process. It will analyze the disk or partition, searching for file signatures and recovering the identified files. The recovery progress will be seen on the screen.
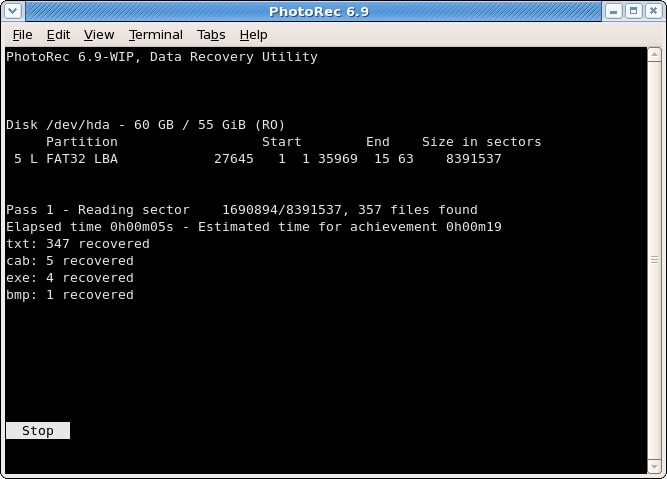
Depending on the partition's size and the number of deleted files on your XFS drive, it may take some time. PhotoRec will display the recovered files in real time during the scanning process.
Step 10. Finished recovering files
A summary is displayed once the recovery is complete. If you pause the recovery, you will be prompted to resume it the next time PhotoRec is used.
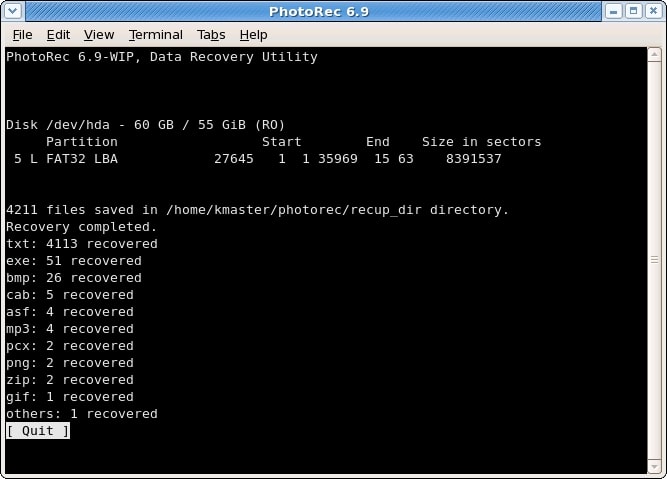
You can browse the recovered files and verify their integrity. Note that the recovered files may not retain their original filenames of the directory structure.
A Simpler Alternative to Photorec for Linux XFS File Recovery – Wondershare Recoverit
While PhotoRec is primarily a great tool to recover deleted files on the XFS file system, it still has some drawbacks. PhotoRec is a command-line tool that is quite complex for some users. Also, you must be extra cautious using command line tools as it has no undo button.
With this limitation, there is one tool that can help you recover deleted files on the XFS file system more conveniently. Recoverit Linux File Recovery, trusted by billions of people, can recover lost or deleted files. It smoothly searches your system and ensures that data files are properly recovered, with sound support for the EXT4, BTRFS, XFS, and BFS file systems.

Wondershare Recoverit - Your Safe and Reliable Linux Recovery Software
5,481,435 people have downloaded it.
Recovers lost or deleted documents, photos, videos, music, emails, and other 1000+ file types effectively, safely, and completely.
Compatible with all mainstream Linux distros, including Ubuntu, Linux Mint, Debian, Fedora, Solus, Opensuse, Manjaro, etc.
Assists in 500+ data loss scenarios, such as deletion, disk formatting, OS crash, power outage, virus attack, lost partition, and many more.
The simple point-and-click interface allows you to recover data from Linux hard drives in just a few clicks.
Works through a remote connection. You can recover lost data even when your Linux device is crashed.
Wondershare Recoverit makes data recovery hassle-free. You can retrieve your data in three simple steps.
Step 1: Click Linux Recovery
Install Wondershare Recoverit on your computer. Start the application and select the NAS and Linux options. To proceed, click the Linux Recovery button.

Step 2: Connect the Linux computer
Enter the required information on the window to establish a remote connection. When finished, click the blue Connect button.
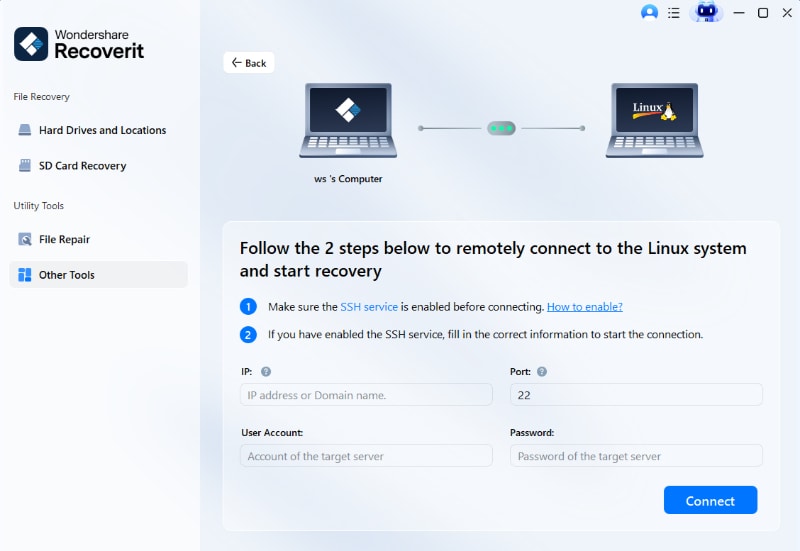
Wait for the connection; once established, Recoverit will run an automatic scan to look for your missing files on your Linux XFS drive.
Step 3: Scan and Recover Files
The scanning process takes time, based on the data being scanned. The scanning status is displayed on the bottom bar. The best part about Recoverit is that you can stop scanning whenever you find the file you want to restore.

When the scanning is finished, Recoverit allows you to examine the files to check they are the ones you want to recover. Now, select Recover to save the file.

Recoverit will ask you to select a location on your Windows PC to save the restored files. To obtain the restored data, click the Recover button.

For Windows 7 or later
For macOS 10.10 or later
Conclusion
PhotoRec is a powerful and reliable tool for recovering deleted files on the XFS file system. Following the process outlined, you can effectively use PhotoRec to retrieve your files. If you want a more easy way of recovering files, use Wondershare Recoverit.


