File Recovery
- Recovers deleted or lost files from hard drive effectively, safely and completely.
- Supports data recovery from 500+ data loss scenarios, including computer crash, partition loss, accidental human error, etc.
- Supports 1000+ file formats recovery with a high success rate and without any quality loss.

How to Fix Powerpoint QuickTime Not Available

Jun 03, 2026 • Filed to: Photo/Video/Audio Solutions • Proven solutions
 TL;DR:
To resolve the QuickTime not available error in PowerPoint 2010, install the QuickTime player on your Windows PC or convert the media to a natively supported format like MP4.
● QuickTime lacks a 64-bit version, meaning MOV files will not play if you are running a 64-bit Windows operating system alongside a 64-bit version of PowerPoint.
● If installing the player is not an option, use an online conversion tool like CloudConvert.com to change incompatible Mac or MOV files into common formats like MPEG 2, MPEG 4, or AVI.
● Video files that are corrupted or damaged must be fixed using a repair application like Wondershare Repairit before they can be successfully embedded into a presentation slide.
Ask AI for a summary
 ChatGPT
 Perplexity
 Gemini
 Claude
 Grok
Grok
If you are using PowerPoint 2010, then surely you are going to see a pop-up message on the screen while using the PowerPoint that says PowerPoint QuickTime not available. It for a reason because PowerPoint 2010 only supports the file sin format i.e. MP4 or MOV. Furthermore, files working on QuickTime need an installation of a QuickTime player on the PC. Another issue that may cause this error is the operating system. If you are using the 64-bit Windows operating system along with a 64-bit PowerPoint, then QuickTime MOV files cannot play on PowerPoint. The reason is, QuickTime doesn’t have any 64-bit version to serve the operating system.
In this article, you are going to know about all other potential reasons to cause the error of QuickTime not available PowerPoint along with some software solutions to fix them in the first place and to keep things going.
Part 1. What Causes PowerPoint QuickTime Not Available
Before heading to the solution to fix the error i.e. PowerPoint QuickTime not available. Here are two of the possible reasons that work in the background for the error to occur i.e. QuickTime not available PowerPoint.
- QuickTime is not installed or downloaded to the windows based computer, and you want to play a MOV file.
- When the working movie format is not compatible with the device or QuickTime.
Part 2. How to Fix PowerPoint QuickTime Not Available
Once you target the reason occurring the error in your device, next you need an appropriate solution to fix the error. Here are some of the viable methods with stepwise procedures for fixing QuickTime not available PowerPoint 2010.
Method 1. Add the QuickTime Player to the Windows-based Computer:
As unavailability of QuickTime on window based computer may cause the error. So adding a QuickTime player to the window-based computer is the first method to fix PowerPoint QuickTime Not Available.
Step 1: Visit the official site to download the QuickTime player to the device.
Step 2: Once the download is complete, open quicktimeinstaller.exe.
Step 3: Run the installer by clicking Next.
Step 4: Continue the process of installation in the wizard by selecting the option of Yes.
Step 5: Once Installation is complete, Click Finish. The QuickTime player is ready to use.
Method 2. Use A Common Movie Format
For a QuickTime media player to work on your device, select the appropriate media (movie) format. For instance, if the files choose to play in PowerPoint are from Mac, documents, worksheets, presentations, or MOV files. The common format for this particular instance is MPEG 2, MPEG 4, and AVI.
Method 3. Convert Video/Audio Inserted Into Powerpoint to the Compatible Format
If the video/audio file that is targeted to be played in PowerPoint via a QuickTime media player, is not in a compatible format, the only solution is to convert it into the device's recommended format. The conversion to a compatible format is possible with online software solutions. Using CloudConvert.com in this regard is a good deal. Here are the steps to follow:
Step 1: Visit CloudConvert.com and select the files from the device that needs to be converted.

Step 2: From the device, select the media (audio/video). Click Open to continue. The file with the name and its format will appear on the screen.

Step 3: Select the desired format for conversion. Let’s say MP4 for the media file from the drop-down menu of formats.

Step 4: Choose Video Codec, and/or Audio Codec. A dialogue box will appear. Chose the right options and click Okay to continue.

Step 5: Start the conversion by clicking on Start conversion.
Step 6: Once the conversion is completed, download the media file to your device. It is ready to use. Add the file to the PowerPoint and you are all done.

Method 4. Repair Video Added in Powerpoint with Wondershare Repairit Video Repair
In the case of corrupted media files, a one-stop solution is a third-party application software i.e. Wondershare Repairit. For repairing a corrupted video file with this software, we can fix all the video files that have been corrupted, unreachable, broken, or damaged in MOV, MP4, M4V, M2TS, MKV, MTS, 3GP, AVI, FLV, and more file formats. It can be worked on all kinds of brands of camera, whether you are using Nikon, Fuji, Samsung, Panasonic, DJI, Parrot, Skydio, and Olympus, it does not make any difference to this fixing tool. This tool has been specially made for the video files that are creating problems while playing them, audio-video sync issues, video playback disrupted, stuck videos, videos with blurry images, etc. Here are some easy steps to follow:
Step 1: Add your corrupted videos
The first and foremost step is to run the application on your computer or laptop, whatever you are working on. You have to add the video file which has to be fixed and this can be done by clicking the Add button or "Add video and start repairing" area.

Step 2: Repair your videos
After adding the corrupted video files here comes the second step, now you have to press the "Repair" option, the process of repairing the corrupted video file will be initiated.

Step 3: Preview the videos
The process of repairing is not too long once it is done a message will pop up at your screen. After this, you can have a preview of the video which has been fixed with the help of the preview button.

Step 4: Advanced mode for immensely corrupted video (optional)
This advanced process is for those videos that are a bit complicated and can't be easily fixed, for repairing these types you need to press the "Advanced Repair" button.
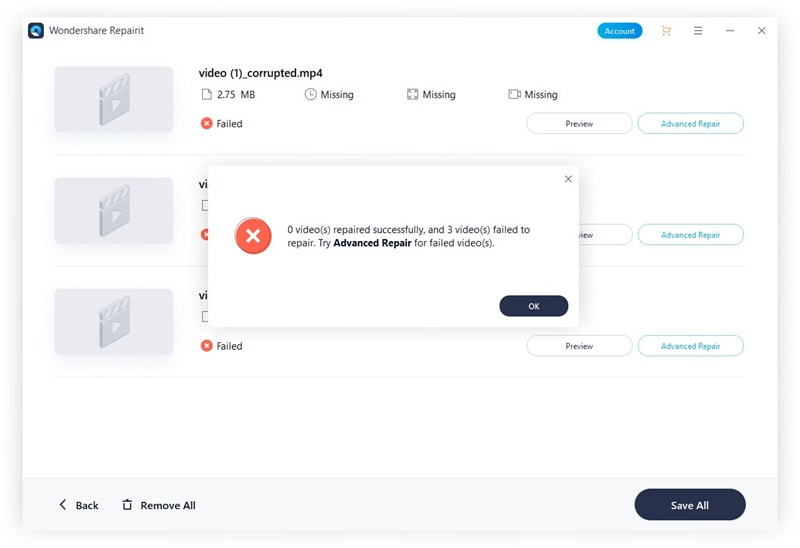
Then add a video file that you want to fix.

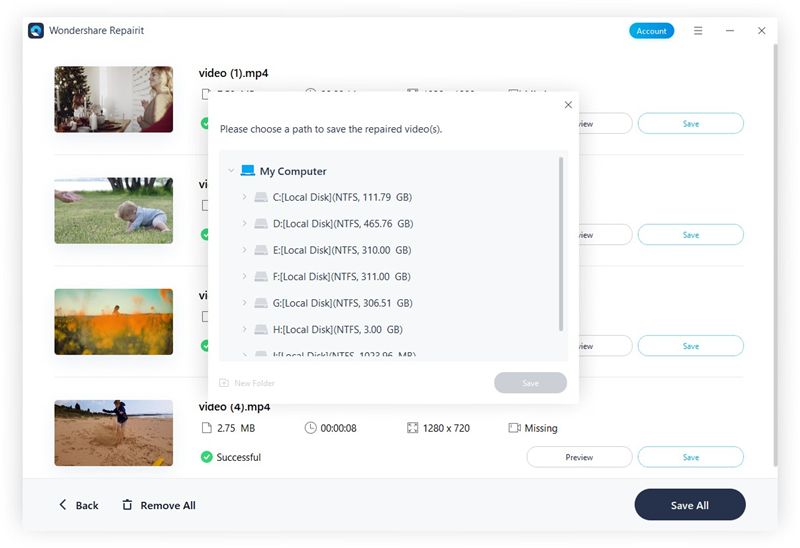
Step 5: Save repaired video
This last step is very significant and can't be neglected, in this step you will have to click on the "Save" button, so that the new file can be saved anywhere inside your computer.
You may be also interested in: PPT Recovery Methods: Effortlessly Recover Lost PPT Files
Bonus Tip. How to Insert/Embed QuickTime Movie to Powerpoint for Presentation
Once your video is in the compatible format with PowerPoint and QuickTime, the next step is to insert or imbed the QuickTime movie to PowerPoint for presentation.
Step 1: Initiate with launching the PowerPoint on the device and select the slide in which you want to imbed the movie/video. From the Insert tab select the Video icon.
Step 2: Choose the video file from the next drop menu and click Open. Your media will be embedded in the PowerPoint slide.
Step 3: Once embedded, now save the changes in the PowerPoint presentation in the Save as an option from the File menu. Save the work on the device, and you are ready to go.
Fix Media File Issues
- Recover & Repair Photos
- Recover deleted photos.
- Recover photo booth.
- How to repair JPEG images?
- What is JPG File?
- What is GIF File?
- Guide for PNG File
- Recover Videos
- Best video recovery software for Windows
- Best video recovery software for Mac
- Recover DVR recordings
- Recover CCTV footage
- Recover deleted Vivint videos
- Recover deleted MKV files
- Recover deleted Youtube videos
- Recover deleted CapCut videos
- Recover After Effects Project
- Recover Premiere Pro Project
- Recover iMovie Project
- Recover videos from GoPro
- Repair Videos
- Fix error code 0xc00d36c4.
- Repair corrupted MP4 video.
- Fix 0xc10100be video error.
- Solve blurry videos.
- Fix MOV can't play on QuickTime.
- Free video repair software.
- Fix frozen video files.
- Recover & Repair Audio
- Moov Atom Not Found ?
- Repair your MP4 file online.
- Can't play recorded video?
- AVI/MP4/MKV cannot render?
- Fix 0xc00d5212 error of AVI.
- Recover & Repair Cameras


Eleanor Reed
staff Editor